
Choosing the Right Baofeng Scanner Model
When it comes to choosing the right Baofeng scanner model, there are several factors you should consider. Baofeng offers a wide range of scanner models, each with its own features and capabilities. Here are some key points to keep in mind:
- Frequency Range: Baofeng scanners come in various frequency ranges, such as VHF (Very High Frequency) and UHF (Ultra High Frequency). You need to determine the frequency range that best suits your needs, depending on the type of communication you want to monitor.
- Power Output: Consider the power output of the scanner model you’re interested in. Higher power output allows for better reception over longer distances.
- Channels and Memory: Look for a scanner that offers a sufficient number of channels and memory capacity. This will allow you to program and store a wide range of frequencies for easy access.
- Display and User Interface: Check the display size, clarity, and ease of use. A clear and intuitive user interface will make it easier for you to navigate through settings and frequencies.
- Antenna Connector: Ensure that the scanner model comes with a standard antenna connector so that you can easily connect external antennas for improved reception.
Additionally, take into account any specific features you may require. Baofeng scanners may offer features like dual reception, weather alerts, FM radio reception, and more. Consider whether these features align with your scanning needs.
Finally, it’s always a good idea to read reviews and gather feedback from other scanner enthusiasts. Their experiences can provide valuable insights into the performance and reliability of different Baofeng scanner models.
By carefully considering these factors and doing thorough research, you can choose a Baofeng scanner model that suits your scanning requirements and budget. Whether you’re a hobbyist or a professional, selecting the right scanner will enhance your scanning experience and ensure you can monitor relevant frequencies effectively.
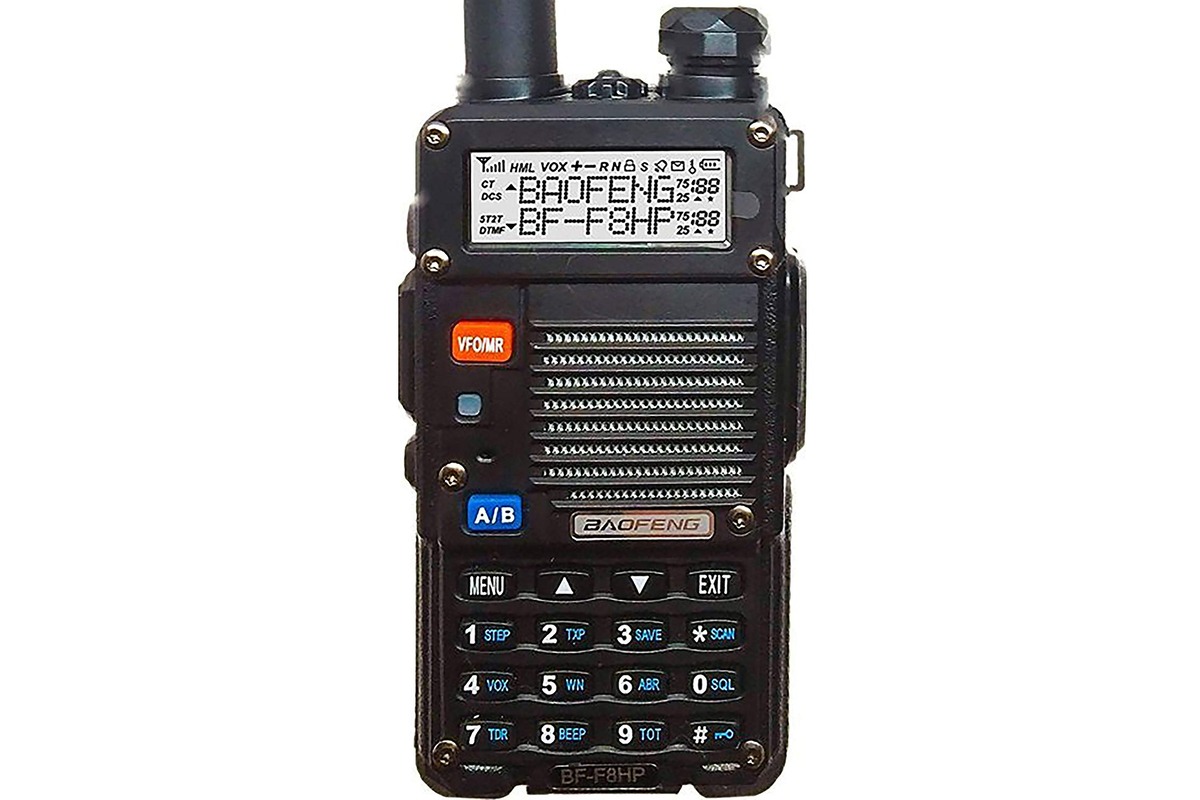
Getting Familiar with the Baofeng Scanner Functions and Buttons
Before diving into programming your Baofeng scanner, it’s important to get familiar with the various functions and buttons on the device. Understanding the purpose and location of each button will make navigation and operation much easier. Here’s a rundown of the key functions:
- Power Button: This button powers the scanner on and off. It is typically located on the top or side of the device.
- Menu Button: The menu button allows you to access the scanner’s menu options and settings. It is usually located near the keypad or on the front panel.
- Up/Down Buttons: These buttons are used to navigate through menu options, adjust settings, and scroll through frequencies.
- Keypad: The keypad consists of alphanumeric buttons that are used for programming frequencies and selecting menu options.
- Function Buttons: These buttons usually have dual functions depending on whether they are pressed individually or in combination with the Shift or Menu button. They provide shortcuts to commonly used functions such as scanning, setting squelch levels, and enabling dual reception.
- Scan Button: The scan button enables the scanner to search and scan through programmed frequencies.
- PTT Button: The Push-to-Talk (PTT) button is used to transmit on a selected frequency when the scanner is in two-way radio mode.
- Display Screen: The display screen shows important information such as the active frequency, channel name, signal strength, and battery level.
- Speaker: Located on the front or side of the scanner, the speaker produces audio output for received transmissions.
- Antenna Connector: The antenna connector allows you to attach an external antenna for improved reception.
Take some time to familiarize yourself with the placement and function of these buttons on your specific Baofeng scanner model. Reading the scanner’s user manual can provide detailed information about each button and its associated features.
By understanding the functions and buttons on your Baofeng scanner, you’ll be able to navigate through its settings, program frequencies, and perform other operations with ease. This familiarity will enhance your overall scanning experience and allow you to make the most of the scanner’s capabilities.
Charging and Installing Batteries into the Baofeng Scanner
Before you start using your Baofeng scanner, it’s crucial to ensure that the batteries are properly charged and installed. Here’s a step-by-step guide to help you with this process:
- Check the Battery: Before installing the batteries, inspect them for any signs of damage or deterioration. Replace them if necessary.
- Choose the Right Batteries: Baofeng scanners are usually powered by rechargeable batteries. Make sure you have the correct battery model recommended by Baofeng for your specific scanner model.
- Charging the Batteries: Connect the charger to a power source and then attach the battery pack to the charger. Make sure the charger is compatible with the battery pack. The LED indicator on the charger will typically display the charging status, such as red for charging and green for fully charged.
- Charging Time: Allow the batteries to charge fully, as per the recommended duration provided in the scanner’s user manual. It is important not to overcharge the batteries, as it can degrade their performance and lifespan.
- Installing Batteries: Once the batteries are fully charged, turn off the scanner. Open the battery compartment, typically located on the back of the scanner, and carefully insert the batteries according to the polarity markings indicated inside the compartment.
- Secure the Battery Compartment: Close the battery compartment cover securely to ensure the batteries are properly connected and protected.
- Checking Battery Levels: Power on the scanner and check the battery indicator on the display screen. It should indicate a full or near-full battery level if the batteries are correctly installed and charged.
Remember to recharge your Baofeng scanner batteries regularly and ensure they are fully charged before your scanning sessions. This will help maintain optimal performance and ensure that you don’t run out of power during important monitoring activities.
It’s also a good practice to have spare fully charged batteries on hand so that you can quickly swap them out when needed, especially during extended scanning periods or emergencies.
By following these steps, you can safely and effectively charge and install batteries into your Baofeng scanner, ensuring that it remains powered and ready for your scanning needs.
Setting up Squelch and Volume on the Baofeng Scanner
Configuring the squelch and volume settings on your Baofeng scanner is essential for optimal audio reception and clarity. The squelch function helps eliminate background noise when there are no active transmissions on a specific frequency. Here’s how to set up squelch and volume on your Baofeng scanner:
- Power on your Baofeng scanner and ensure it is in the receive mode.
- Locate the squelch and volume controls. On most Baofeng scanner models, these controls can be found on the side of the device.
- Adjust the Squelch Level: Start by setting the squelch level to a low setting. This will allow more signals to be heard, including weak or distant transmissions. Gradually increase the squelch level until the background noise disappears. Avoid setting it too high, as it may result in missed transmissions. The squelch control may be labeled as “SQL” or “SQ” on your scanner.
- Adjust the Volume: Once the squelch level is set, adjust the volume control to a comfortable listening level. Too low of a volume may make it difficult to hear transmissions clearly, while setting the volume too high may result in distorted audio.
- Test the Settings: Tune to a known active frequency or have a friend transmit on a specific frequency while you listen. Fine-tune the squelch and volume levels based on the audio quality and signal strength you experience during this test.
Remember to periodically check and readjust the squelch and volume settings as needed, especially if the surrounding environment or signal conditions change.
Setting up the squelch and volume correctly ensures that you hear transmissions clearly without unnecessary background noise. This will allow you to stay informed and engaged in your scanning activities.
By following these steps, you can effectively set up the squelch and volume on your Baofeng scanner, maximizing the audio quality and improving the overall scanning experience.
Choosing a Frequency Range for Scanning
Choosing the right frequency range is crucial when programming your Baofeng scanner. It determines the types of communications you can monitor and the available channels to program. Here are some factors to consider when selecting a frequency range:
- Personal Interests: Identify the specific types of communications you are interested in monitoring. This could include amateur radio, public safety, aviation, marine, or other specific industries. Each of these areas has designated frequency ranges that you can tune into.
- Local Regulations: Familiarize yourself with the applicable laws and regulations governing radio communications in your location. Different regions have specific frequency allocations and restrictions that you need to abide by.
- Interference: Consider potential interference from nearby radio sources. If you live in an urban area with a high density of radio transmissions, you may need to select a frequency range that minimizes interference and ensures clearer reception.
- Available Channels: Research the available channels within your chosen frequency range. Some frequency ranges may offer a larger number of channels, allowing you to program a wider variety of frequencies for monitoring.
- Flexibility: Assess the flexibility you desire in terms of scanning options. Some Baofeng scanners allow you to program multiple frequency ranges, allowing you to monitor different types of communications without the need for multiple scanners.
To determine the appropriate frequency range for your scanning needs, consult the user manual of your Baofeng scanner or refer to resources such as frequency allocation charts or online databases specific to your country.
It’s worth noting that some Baofeng scanner models offer a wide frequency range, allowing you to cover multiple areas of interest. These scanners may offer options to switch between different frequency ranges or bands, making them versatile and suitable for a variety of scanning purposes.
By carefully considering these factors and selecting the right frequency range, you can program your Baofeng scanner to monitor the communications that matter to you, ensuring an engaging and informative scanning experience.
Programming Channels on the Baofeng Scanner
Programming channels on your Baofeng scanner allows you to easily access and monitor specific frequencies. Here’s a step-by-step guide on how to program channels:
- Power on your Baofeng scanner and ensure it is in the receive mode.
- Access the Menu: Press the Menu button on your scanner to enter the menu mode.
- Select the Channel Mode: Use the Up or Down buttons to navigate through the menu options. Look for the setting that allows you to select the channel mode. It may be labeled as “VFO/MR” or “Frequency Mode” in the menu.
- Choose a Channel: Once you are in the channel mode, use the keypad or the Up and Down buttons to select an available channel slot where you want to store a frequency.
- Enter the Frequency: Use the keypad to enter the desired frequency for the channel. Be sure to input the frequency in the correct format, following the guidelines specified in your Baofeng scanner’s user manual. You may need to enter the frequency in megahertz (MHz) or kilohertz (kHz), depending on the scanner model.
- Save the Channel: After entering the frequency, press the Menu button to save the channel. The scanner will typically prompt you to enter a name or label for the channel. Use the keypad to input a name that helps you easily identify the type of communication or the source of the frequency.
- Repeat the Process: Follow the same steps to program additional channels on your Baofeng scanner. You can program multiple channels for different frequencies or different locations.
- Accessing Programmed Channels: Once you have programmed channels, you can easily access them by using the Up or Down buttons to scroll through the channel list. Select the desired channel to tune in and listen to the corresponding frequency.
Remember to refer to your Baofeng scanner’s user manual for specific instructions and any additional features regarding programming channels. It’s also a good practice to keep a record of the frequencies and corresponding channel names for easy reference.
By following these steps, you can program channels on your Baofeng scanner and have quick access to the frequencies you wish to monitor, making your scanning experience efficient and organized.
Naming Channels for Easy Identification
Naming channels on your Baofeng scanner is a useful practice for easy identification and organization of programmed frequencies. Assigning meaningful names to your channels allows you to quickly recognize and access specific communications. Here are some tips for effectively naming channels:
- Keep it Descriptive: Choose names that accurately describe the type of communication or the source of the frequency. For example, if you are programming a channel for a local police department, you could name it “Police Dispatch.” Descriptive names make it easier to identify and locate the desired channel.
- Be Specific: Use specific names that provide relevant details about the frequency. Include important information such as the location, agency, or purpose of the communication. This specificity helps minimize confusion when you have multiple channels programmed.
- Avoid Abbreviations: While abbreviations can save space, they may become unclear or confusing over time. Opt for full words or phrases that are easily recognizable and understood. This ensures clarity and consistency in channel naming.
- Order Channels: Consider organizing your channels in a logical sequence. You can group them by frequency range, location, or topic. This arrangement allows for easier navigation and minimizes scrolling through a long list of channels.
- Use Alphanumeric Characters: If your Baofeng scanner allows it, make use of alphanumeric characters in channel names. This can provide additional information or help differentiate between similar types of communications.
- Create a Reference List: Maintain a separate reference list of your programmed channels and their corresponding names. This list can serve as a quick reference guide and make it easier to modify or add new channels in the future.
By naming your channels thoughtfully and consistently, you can enhance the functionality and ease of use of your Baofeng scanner. It allows for quick identification and selection of frequencies, optimizing your scanning experience.
Remember to refer to your Baofeng scanner’s user manual for specific instructions on how to name channels and any character limitations or restrictions that may apply. With a well-organized channel naming system, you can efficiently monitor the desired communications and stay informed.
Setting up CTCSS/DCS Tones on the Baofeng Scanner
CTCSS (Continuous Tone-Coded Squelch System) and DCS (Digital-Coded Squelch) are two methods used to encode and decode audio signals in two-way radio communications. Baofeng scanners offer the ability to set up CTCSS/DCS tones, which helps eliminate unwanted transmissions and reduces interference. Here’s how to set up CTCSS/DCS tones on your Baofeng scanner:
- Power on your Baofeng scanner and ensure it is in the receive mode.
- Access the Menu: Press the Menu button on your scanner to enter the menu mode.
- Find the CTCSS/DCS Setting: Use the Up or Down buttons to navigate through the menu options. Look for the CTCSS or DCS setting. It may be labeled as “CTCSS” or “Tone” for CTCSS tone settings, or “DCS” or “Code” for DCS settings.
- Select the Desired Tone: Once you have accessed the CTCSS or DCS settings, you can choose the specific tone you want to use. Consult the frequency chart or database for the correct tone corresponding to the desired channel or communication.
- Save the Settings: After selecting the appropriate CTCSS/DCS tone, press the Menu button to save the settings. The scanner will typically prompt you to select whether the tone is for transmit (TX), receive (RX), or both (TX/RX). Choose the appropriate option according to your scanning needs.
- Repeat the Process: Follow the same steps to set up CTCSS/DCS tones for additional channels. Different channels may require different tones, depending on the communication you want to monitor.
- Test the Settings: Tune to the programmed frequency and listen for any unwanted transmissions or interference. Adjust the CTCSS/DCS tones as needed to ensure clear reception of the desired communications.
It’s important to note that both parties involved in a communication need to program the same CTCSS/DCS tone for successful transmission and reception. Additionally, ensure that the CTCSS/DCS tones you choose are compatible with the frequencies and communication systems you plan to monitor.
By correctly setting up CTCSS/DCS tones on your Baofeng scanner, you can minimize interference and improve the signal quality, allowing for clearer and more reliable communications during your scanning sessions.
Programming Repeater Frequencies on the Baofeng Scanner
Repeater frequencies play a crucial role in extending the range of two-way radio communications. Baofeng scanners allow you to program repeater frequencies, enabling you to access distant transmissions and participate in wider-reaching conversations. Here’s a step-by-step guide on how to program repeater frequencies on your Baofeng scanner:
- Identify the Repeater Frequency: Obtain the repeater frequency you wish to program. This information can be obtained from online databases or repeater directories specific to your region or area of interest.
- Access the Menu: Press the Menu button on your Baofeng scanner to enter the menu mode.
- Select Repeater Settings: Use the Up or Down buttons to navigate through the menu options. Look for settings related to repeaters or offset frequencies. These settings may be labeled as “OFFSET,” “RPT OFFSET,” or similar variations, depending on your scanner model.
- Choose the Offset Direction: Depending on the repeater system, you may need to set the offset frequency to either positive (+) or negative (-). This determines the frequency difference between the transmit and receive frequencies.
- Program the Offset Frequency: Enter the offset frequency value using the keypad, following the guidelines specified in your scanner’s user manual. This value is typically provided alongside the repeater frequency.
- Set the Transmit Frequency: Use the keypad to enter the transmit frequency (your transmitted signal) for the repeater communications. Ensure that you enter the frequency in the correct format, following the scanner’s requirements (e.g., MHz or kHz).
- Save the Settings: Press the Menu button to save the programmed repeater frequency. The scanner may prompt you to input a name or label for the repeater, allowing for easy identification.
- Repeat the Process: Follow the same steps to program additional repeater frequencies on your Baofeng scanner.
Once you have programmed the repeater frequencies, you can tune to those channels and engage in conversations within the extended range provided by the repeater system. Keep in mind that using repeaters may require permission or an appropriate license depending on your area and local regulations.
It’s important to consult reputable sources and confirm the accuracy of repeater frequencies before programming them into your Baofeng scanner. Additionally, always be respectful of other users and adhere to the guidelines and etiquette of the repeater system you are accessing.
By programming repeater frequencies on your Baofeng scanner, you can greatly expand your communication capabilities and participate in conversations beyond the range of direct transmissions.
Setting up Scan Modes on the Baofeng Scanner
Scan modes allow your Baofeng scanner to automatically search through programmed channels or frequencies, enabling you to monitor multiple channels without manual tuning. This feature is especially useful when you want to stay updated on various communications simultaneously. Here’s how to set up scan modes on your Baofeng scanner:
- Power on your Baofeng scanner and ensure it is in the receive mode.
- Access the Menu: Press the Menu button on your scanner to enter the menu mode.
- Select Scan Settings: Use the Up or Down buttons to navigate through the menu options. Look for settings related to scanning, such as “SCAN MODE,” “SCAN,” or similar variations, depending on your scanner model.
- Choose the Scan Mode: Depending on your scanning preferences, you can select different scan modes such as “Priority,” “Dual Watch,” or “Scan All.” Each mode operates differently, allowing you to prioritize specific channels or scan through all available channels.
- Configure the Scan List: After choosing the scan mode, you may need to configure the scan list. This involves selecting the channels or frequencies that you wish to include in the scanning process. Refer to your Baofeng scanner’s user manual for specific instructions on how to add or remove channels from the scan list.
- Set the Scan Delay: The scan delay determines the pause between each channel scan. It allows for sufficient time to catch any transmissions on the monitored channels. Adjust the scan delay according to your preferences or as recommended in the user manual.
- Save the Settings: Once you have configured the scan mode and scan list, press the Menu button to save the settings.
- Initiate Scan Mode: To activate the scan mode, simply press the Scan button or the dedicated scan button specified for your Baofeng scanner model.
- Monitor Scanned Channels: Your scanner will now automatically scan through the programmed channels or frequencies according to your chosen scan mode. The scanner will stop and hold on any active channel it detects, allowing you to listen to the transmission. It will continue scanning once the transmission concludes or the scan delay is reached.
Experiment with different scan modes to find the one that best suits your scanning needs. Some modes prioritize specific channels, while others scan through all programmed channels. Adjust scan settings as necessary to ensure efficient monitoring of your desired communications.
Setting up scan modes on your Baofeng scanner enhances your scanning experience by providing the convenience of automatically cycling through multiple channels or frequencies. It allows you to stay updated on various communications without the need for manual tuning or selection of individual channels.
Storing and Saving Frequencies on the Baofeng Scanner
Storing and saving frequencies on your Baofeng scanner is essential for quick and easy access to the channels you want to monitor. By programming and organizing frequencies, you can optimize your scanning experience. Follow these steps to store and save frequencies on your Baofeng scanner:
- Power on your Baofeng scanner and ensure it is in the receive mode.
- Access the Menu: Press the Menu button on your scanner to enter the menu mode.
- Select Frequency Mode: Use the Up or Down buttons to navigate through the menu options. Look for settings related to frequency mode, known as “VFO” or “VFO/MR” mode. This mode allows you to directly enter and save frequencies.
- Select an Empty Channel Slot: Use the keypad or the Up and Down buttons to choose an available channel slot where you want to store a frequency.
- Enter the Frequency: Use the keypad to input the desired frequency for the selected channel. Make sure to enter the frequency in the correct format specified by your Baofeng scanner’s user manual, such as megahertz (MHz) or kilohertz (kHz).
- Save the Frequency: After entering the frequency, press the Menu button to save it. You may be prompted to enter a name or label for the frequency, allowing for easy identification. Use the keypad to input a descriptive name if desired.
- Repeat the Process: Follow the same steps to program and save additional frequencies on your Baofeng scanner. Remember to choose different channel slots to avoid overwriting previously stored frequencies.
- Accessing Stored Frequencies: Once you have programmed and saved frequencies, you can easily access them through the channel mode on your scanner. Use the Up or Down buttons to scroll through the channel list and select the desired frequency to monitor.
Keeping a record or reference list of the frequencies and their corresponding names can be helpful in managing and modifying your stored frequencies.
By storing and saving frequencies on your Baofeng scanner, you can quickly access the channels you wish to monitor, allowing for a streamlined and efficient scanning experience.
Locking and Unlocking the Keypad on the Baofeng Scanner
Locking the keypad on your Baofeng scanner prevents accidental button presses or changes to your programmed settings. This feature ensures that your scanner stays configured as desired during transportation or everyday use. Here’s how to lock and unlock the keypad on your Baofeng scanner:
- Power on your Baofeng scanner.
- Locate the keypad lock button or function key. On most Baofeng scanner models, this button is labeled as “LOCK” or indicated by a key icon.
- Press and hold the keypad lock button for a few seconds. The scanner will display a message or symbol indicating that the keypad is now locked.
- To unlock the keypad, press and hold the keypad lock button again for a few seconds. The scanner will display a message or symbol indicating that the keypad is now unlocked.
Locking the keypad is particularly useful when you want to avoid accidental changes to your programmed frequencies, settings, or scan modes. It also prevents unintended activation of buttons that could interrupt your scanning experience.
If your Baofeng scanner model does not have a dedicated keypad lock button, refer to the user manual for alternative methods to lock and unlock the keypad. Some models may require a specific key combination or menu setting to activate the keypad lock.
By employing the keypad lock feature, you can confidently carry and operate your Baofeng scanner without the worry of accidental button presses that could disrupt your scanning activities.
Adjusting Squelch Settings on the Baofeng Scanner
Adjusting the squelch settings on your Baofeng scanner is essential for optimal audio reception and eliminating background noise. Squelch helps suppress noise when there are no active transmissions on a specific frequency. Here’s how to adjust the squelch settings on your Baofeng scanner:
- Power on your Baofeng scanner and ensure it is in the receive mode.
- Locate the squelch control. On most Baofeng scanner models, this control is labeled as “SQL” or “SQ.”
- Set the Squelch Level: Turn the squelch control counterclockwise to reduce the squelch level, allowing more signals to be heard, including weak or distant transmissions. Gradually turn the control clockwise to increase the squelch level until the background noise disappears.
- Monitor Signal Strength: While adjusting the squelch level, monitor the signal strength indicator on your scanner’s display screen. Take note of the strength of the incoming signal and adjust the squelch level accordingly to achieve a proper balance between reducing noise and maintaining clear audio.
- Test the Settings: Tune to an active frequency or ask a friend to transmit on a specific frequency while you listen. Fine-tune the squelch settings based on the audio quality and signal strength you experience during this test.
It is important to find a balance when adjusting the squelch settings. Setting the squelch level too high may result in missed transmissions, while setting it too low can introduce unnecessary background noise.
Remember to refer to your Baofeng scanner’s user manual for specific instructions on adjusting the squelch settings, as the location and operation of the squelch control may vary depending on the scanner model.
By adjusting the squelch settings on your Baofeng scanner, you can enhance audio reception and clarity, allowing for a more enjoyable and effective scanning experience.
Customizing Display and Backlight Settings on the Baofeng Scanner
Customizing the display and backlight settings on your Baofeng scanner allows you to personalize your scanning experience and optimize visibility in various lighting conditions. Here’s how you can customize the display and backlight settings on your Baofeng scanner:
- Power on your Baofeng scanner and ensure it is in the receive mode.
- Access the Menu: Press the Menu button on your scanner to enter the menu mode.
- Scroll to Display Settings: Use the Up or Down buttons to navigate through the menu options. Look for settings related to the display, such as “DISPLAY,” “LCD,” or similar variations, depending on your scanner model.
- Adjust Backlight Brightness: Look for the backlight brightness setting in the display menu. This setting allows you to adjust the intensity or brightness of the LCD backlight. Choose the brightness level that suits your preferences and provides optimal visibility.
- Select Backlight Duration: In the same display menu, you may find an option to adjust the backlight duration. This determines how long the backlight remains on after a button press or an interaction with the scanner. Set the duration according to your needs or the available options provided by your scanner model.
- Customize Display Contrast: Some Baofeng scanner models allow you to customize the display contrast. Look for the contrast setting in the display menu and adjust it based on your preference to enhance the visibility of the information displayed on the screen.
- Save the Settings: After making the desired changes to the display and backlight settings, press the Menu button to save the settings and exit the menu mode.
Customizing the display and backlight settings allows you to tailor your Baofeng scanner to your specific requirements. You can optimize visibility in different lighting conditions, making it easier to read information on the display and minimizing eye strain.
Each Baofeng scanner model may have slightly different options and settings for display and backlight customization. Consult your scanner’s user manual for specific instructions and to explore additional features that may be available.
By personalizing the display and backlight settings on your Baofeng scanner, you can enhance readability and visibility, ensuring a more enjoyable and ergonomic scanning experience.
Enabling Dual Watch and Dual Reception on the Baofeng Scanner
Enabling the dual watch and dual reception functions on your Baofeng scanner allows you to monitor two different frequencies simultaneously. This feature can be particularly useful when you want to stay tuned to multiple communications or keep an ear on two important frequencies at once. Here’s how to enable dual watch and dual reception on your Baofeng scanner:
- Power on your Baofeng scanner and ensure it is in the receive mode.
- Access the Menu: Press the Menu button on your scanner to enter the menu mode.
- Find Dual Watch Settings: Use the Up or Down buttons to navigate through the menu options. Look for settings related to dual watch or reception, such as “Dual Watch,” “DW,” “Dual RX,” or similar variations, depending on your scanner model.
- Enable Dual Watch: Once in the dual watch settings, choose the option to enable dual watch or dual reception. This will allow you to monitor two frequencies simultaneously.
- Select the Dual Frequencies: Specify the two frequencies you want to monitor. Use the keypad to input the desired frequencies in the correct format, following the guidelines specified by your Baofeng scanner’s user manual.
- Save the Settings: After entering the dual frequencies, press the Menu button to save the settings and exit the menu mode.
- Monitor Dual Frequencies: Once the dual watch feature is enabled, your Baofeng scanner will continuously monitor both frequencies you programmed. It will alternately scan and check for activity on each frequency, allowing you to listen to both channels simultaneously.
- Adjust Dual Watch Settings: Some Baofeng scanner models provide additional options for customizing the behavior of the dual watch function, such as selecting the scan interval or adjusting the priority channel. Refer to your scanner’s user manual for specific instructions on adjusting these settings.
Enabling dual watch and dual reception on your Baofeng scanner provides the convenience of monitoring two frequencies at the same time. It allows you to stay informed about multiple communications or keep an ear on critical transmissions without constantly switching frequencies.
Keep in mind that dual reception requires both frequencies to be within the capability of your Baofeng scanner’s receiver. Ensure that the frequencies you choose are compatible with your scanner’s specifications.
By enabling dual watch and dual reception on your Baofeng scanner, you can effectively multitask and stay connected to multiple communications, enhancing your scanning capabilities and flexibility.
Configuring the Baofeng Scanner for NOAA Weather Alert
Configuring your Baofeng scanner to receive NOAA Weather Alert broadcasts allows you to stay informed about severe weather conditions and emergency alerts in your area. Here’s how you can set up your Baofeng scanner to receive NOAA Weather Alert:
- Power on your Baofeng scanner and ensure it is in the receive mode.
- Access the Menu: Press the Menu button on your scanner to enter the menu mode.
- Locate Weather Alert Settings: Use the Up or Down buttons to navigate through the menu options. Look for settings related to weather alert or NOAA alerts, such as “WX Alert,” “Alert,” or similar variations, depending on your scanner model.
- Enable the Weather Alert Function: Once you are in the weather alert settings, enable the weather alert function by selecting the appropriate option. This ensures that your scanner will automatically scan and listen for NOAA Weather Alert broadcasts.
- Specify the Weather Channel Frequency: Locate the setting where you can enter the weather channel frequency. By default, NOAA Weather Alert broadcasts are transmitted on one of seven VHF frequencies ranging from 162.400 MHz to 162.550 MHz. Consult your scanner’s user manual or NOAA’s website to determine the specific frequency for your region.
- Save the Settings: After entering the weather channel frequency, press the Menu button to save the settings and exit the menu mode.
- Monitor NOAA Weather Alerts: Once the weather alert function is enabled and the weather channel frequency is programmed, your Baofeng scanner will automatically scan for NOAA Weather Alert broadcasts on that frequency. When a weather alert is received, your scanner will sound an alarm, display a visual notification, or both, depending on your scanner model.
- Adjust Weather Alert Settings: Some Baofeng scanner models offer additional options for customizing weather alert settings, such as setting the alert mode, adjusting the alert tone volume, or activating specific types of weather alerts. Refer to your scanner’s user manual for specific instructions on adjusting these settings.
Configuring your Baofeng scanner to receive NOAA Weather Alert broadcasts ensures that you stay informed about critical weather events and emergency notifications, allowing you to take necessary precautions and stay safe.
It’s important to keep your scanner updated with the latest weather channel frequency and programming guidelines provided by NOAA for your region. This ensures accurate reception of NOAA Weather Alert broadcasts.
By configuring your Baofeng scanner for NOAA Weather Alert, you can receive timely and important weather information, enabling you to make informed decisions and stay prepared for severe weather conditions.
Scanning and Monitoring Frequencies with the Baofeng Scanner
Scanning and monitoring frequencies is the primary function of a Baofeng scanner, allowing you to listen to various communications happening in your area. Here’s how you can use your Baofeng scanner to scan and monitor frequencies:
- Power on your Baofeng scanner and ensure it is in the receive mode.
- Access the Menu: Press the Menu button on your scanner to enter the menu mode.
- Select Scan Settings: Use the Up or Down buttons to navigate through the menu options. Look for settings related to scanning, such as “SCAN,” “Scan Mode,” or similar variations, depending on your scanner model.
- Choose the Scan Type: Baofeng scanners offer different scan types, such as “Priority,” “Dual Watch,” “Scan All,” or “Program Scan.” Each scan type has a unique function, allowing you to prioritize specific channels, scan through all programmed channels, or perform custom scans based on your preferences.
- Configure the Scan List: Once you have chosen the scan type, you can configure the scan list by selecting the channels or frequencies you want to include in the scanning process. Refer to your Baofeng scanner’s user manual for specific instructions on how to add or remove channels from the scan list.
- Set the Scan Mode: Depending on your Baofeng scanner model, there may be options to customize the scan mode further, such as setting the scan delay or adjusting priority channels. Explore the scan settings menu to make any desired adjustments.
- Initiate Scanning: To start scanning, simply press the Scan button or the dedicated scan button specified for your Baofeng scanner model. The scanner will begin cycling through the programmed channels or frequencies in the scan list.
- Monitor Scanned Frequencies: As the scanner goes through the programmed channels, it will pause and check for activity or transmissions on each frequency. When activity is detected, the scanner will stop and hold on that channel, allowing you to listen to the communication until the transmission concludes or the scan delay is reached. The scan process will then continue to the next channel.
- Manually Stop Scanning: If you want to manually stop scanning and focus on a specific frequency, simply press any button on your Baofeng scanner, and it will hold on that channel until you resume scanning.
Scanning and monitoring frequencies with your Baofeng scanner allows you to stay informed about various communications happening in your vicinity. It enables you to listen to public safety broadcasts, amateur radio communications, aviation channels, and more.
Remember to adhere to any relevant laws and regulations regarding the use of scanners in your area, as certain frequencies or communications may be restricted. Respect the privacy and guidelines associated with the channels you monitor.
By using your Baofeng scanner to scan and monitor frequencies, you can explore a wide range of communications, enhance your situational awareness, and discover new aspects of your surrounding environment.
Understanding FM Radio Reception with the Baofeng Scanner
In addition to its scanning capabilities, your Baofeng scanner can also function as an FM radio receiver. Understanding FM radio reception can enhance your overall experience and allow you to enjoy music, news, and other FM broadcasts. Here’s what you need to know about FM radio reception with your Baofeng scanner:
Frequency Modulation (FM) is the modulation technique used in commercial FM radio broadcasts. Baofeng scanners support FM reception, allowing you to listen to FM radio stations within the specified frequency range.
To tune in to FM radio broadcasts on your Baofeng scanner:
- Power on your Baofeng scanner and ensure it is in the receive mode.
- Switch to FM Mode: Press the Menu button to access the menu mode and select the FM mode or frequency range. This mode enables your scanner to receive FM signals.
- Choose the FM Frequency: Use the tuning knob, keypad, or Up/Down buttons to select the desired FM frequency. FM radio stations typically operate within the range of 87.5 MHz to 108 MHz, but the available frequency range may vary depending on your region or scanner model.
- Listen to FM Broadcasts: Once you have tuned in to an FM frequency, you can listen to the broadcast using the scanner’s built-in speaker or by connecting earphones/headphones to the audio jack. Adjust the volume control to a comfortable listening level.
- Seeking Stations: Some Baofeng scanner models offer a feature called “seek” or “scan” that allows you to automatically search for and lock onto available FM radio stations in your area. Refer to your scanner’s user manual for specific instructions on how to use this feature.
Keep in mind that FM radio reception with your Baofeng scanner relies on the presence of FM radio stations broadcasting within range and a strong enough signal. Factors such as distance to a broadcasting tower, terrain, and atmospheric conditions can affect signal strength and clarity.
When using your Baofeng scanner for FM radio reception, it’s important to respect copyright laws and use the device for personal listening only. Broadcasting or retransmitting FM radio signals without proper authorization is illegal.
By understanding FM radio reception with your Baofeng scanner, you can enjoy FM radio broadcasts and expand the functionality of your device beyond scanning and monitoring frequencies.
Troubleshooting Common Issues with the Baofeng Scanner
While Baofeng scanners are reliable devices, you may encounter occasional issues that can be resolved with troubleshooting techniques. Understanding and troubleshooting these common issues can help you maintain optimal performance. Here are some troubleshooting tips for common problems with your Baofeng scanner:
- No Power or No Display:
- Make sure the batteries are properly installed and fully charged.
- Check the battery contacts for any dirt or corrosion and clean them if necessary.
- If using rechargeable batteries, ensure they are not overused and need replacement.
- Poor Reception or Weak Signal:
- Check that the antenna is properly connected and not damaged.
- Try repositioning the scanner or moving to a different location to improve the signal.
- Ensure that the squelch level is properly adjusted to allow for clear reception.
- Consider using an external antenna for enhanced signal reception.
- Frequency Programming Issues:
- Double-check the frequency input to ensure it is correctly entered, following the guidelines specified in the scanner’s user manual.
- Confirm that the programmed channel has not reached its maximum capacity and is not locked out.
- If experiencing programming errors, try deleting and reprogramming the frequency or channel.
- Ensure that the frequency range of your Baofeng scanner covers the programmed frequency.
- Audio Distortion or Interference:
- Check for any obstructions or interference sources near your scanner, such as electronics, metal objects, or power lines.
- Adjust the volume control to a level that eliminates distortion but provides clear audio.
- Try using headphones or external speakers for improved audio quality.
- Ensure that the batteries are not running low, as weak battery power can impact audio quality.
- Keypad or Button Malfunction:
- Ensure that the keypad is not locked. Follow the user manual to unlock the keypad if necessary.
- Remove any dirt, debris, or moisture that may be interfering with button functionality.
- If a specific button is not responding, try using a gentle cleaning solution or a compressed air canister to clean around the button area.
- If the issue persists, consult the manufacturer’s support or consider having the scanner serviced.
If you continue to experience issues with your Baofeng scanner, consult the scanner’s user manual for specific troubleshooting steps and contact the manufacturer’s support if necessary. They can provide further assistance or recommend a repair solution based on the nature of the problem.
By troubleshooting common issues with your Baofeng scanner, you can resolve problems swiftly and ensure the continued functionality and performance of your device.
Important Tips and Safety Precautions for Using the Baofeng Scanner
Using a Baofeng scanner involves responsibility and adherence to certain safety precautions. Here are some important tips to keep in mind for the safe and effective use of your Baofeng scanner:
- Read the User Manual: Familiarize yourself with the features, operation, and safety guidelines outlined in the Baofeng scanner’s user manual. This will ensure you have a comprehensive understanding of how to use the scanner properly.
- Comply with Regulations: Understand and follow the local regulations regarding scanner usage, including the frequencies you are allowed to monitor and any licensing requirements. Non-compliance can result in legal consequences.
- Respect Privacy: Be mindful of the information you obtain while monitoring communications. Avoid sharing or publicizing any personal or sensitive information that you may come across during scanning.
- Be Aware of Emergency Channels: Familiarize yourself with emergency communication channels and frequencies designated for public safety agencies. Avoid transmitting or causing interference on these channels to ensure critical communications are not disrupted.
- Use Headphones or External Speakers: When listening to broadcasts in public places, consider using headphones or external speakers to maintain privacy and avoid disturbing others.
- Update Firmware: Check for firmware updates for your Baofeng scanner periodically. Firmware updates may improve performance, fix bugs, or add new features to your device.
- Practice Proper Battery Usage: Charge and store batteries according to the manufacturer’s instructions. Avoid exposing batteries to extreme temperatures and dispose of them properly in accordance with local regulations.
- Handle with Care: Treat your Baofeng scanner with care to avoid damage. Avoid dropping the device, exposing it to water or extreme temperatures, or subjecting it to excessive force.
- Exercise Caution with Transmitting: If your Baofeng scanner supports transmitting capabilities, be cautious when using this feature. Ensure you have the necessary license and abide by the regulations for transmitting on specific frequencies or systems.
- Be Prepared: Use your Baofeng scanner responsibly and as a tool for staying informed. Remember that it is not a substitute for emergency services or official communication channels during critical situations.
Maintaining a responsible and safety-conscious approach while using your Baofeng scanner will ensure a positive experience and minimize any potential issues. By adhering to these tips and precautions, you can enjoy using your scanner while being respectful of others and compliant with the applicable laws and regulations.