
What is AirPrint?
AirPrint is a feature developed by Apple that allows you to print wirelessly from your iPhone to compatible printers. Gone are the days of needing to transfer files to a computer or use complicated printer setups. With AirPrint, you can directly print texts, photos, documents, and emails from your iPhone effortlessly.
AirPrint makes printing from your iPhone incredibly convenient. It eliminates the need for additional apps or software and provides a seamless and efficient printing experience. Whether you want to print an important email, a funny meme, or a boarding pass, AirPrint has got you covered.
One of the key benefits of AirPrint is its ease of use. Unlike traditional printing methods, AirPrint doesn’t require any drivers or cables. It operates on your iPhone’s existing Wi-Fi connection, allowing you to print documents with just a few taps on your phone screen.
Another advantage of AirPrint is its wide compatibility with printers. Many major printer manufacturers, such as HP, Epson, Canon, and Brother, offer AirPrint-enabled printers. This means that even if you don’t have the latest printer model, there’s a good chance that AirPrint can still work with your existing printer.
AirPrint also offers various features that enhance your printing experience. You can adjust the print settings to suit your preferences, such as selecting the paper size, choosing between black and white or color printing, and even printing multiple copies.
In addition, AirPrint supports printing from a wide range of iOS apps. Whether you’re using Safari to print a webpage, Photos to print a snapshot, or Documents to print a PDF, AirPrint seamlessly integrates with these apps, making it incredibly easy to send content to your printer.
Overall, AirPrint revolutionizes the way we print from our iPhones. It provides a user-friendly and convenient printing solution, eliminating the complexities of traditional printing methods. With AirPrint, you can quickly and wirelessly print documents and photos directly from your iPhone to compatible printers, making it a must-have feature for anyone who values ease and efficiency.
Setting up AirPrint on your iPhone
Setting up AirPrint on your iPhone is a simple process that allows you to start printing wirelessly in no time. Follow the steps below to get started:
- Check printer compatibility: The first step is to ensure that you have a compatible printer. AirPrint works with a wide range of printers from various manufacturers. Check the documentation or the manufacturer’s website to determine if your printer supports AirPrint.
- Connect to a Wi-Fi network: AirPrint relies on a stable Wi-Fi connection to communicate with your printer. Ensure that your iPhone is connected to the same Wi-Fi network as your printer. You can do this by going to the Settings app on your iPhone, selecting Wi-Fi, and connecting to the desired network.
- Update your iPhone software: It’s always a good idea to keep your iPhone software up to date, as it may include improvements and bug fixes related to AirPrint. Go to the Settings app, select General, and tap Software Update to check for any available updates. If an update is available, follow the on-screen instructions to install it.
- Ensure your printer is on and ready: Make sure your printer is turned on and in a ready state. Check that it has paper and ink or toner if necessary.
- Add the printer to your iPhone: Now it’s time to add the printer to your iPhone. Open the app from which you want to print, such as Mail or Photos. Find the Share or Action icon, usually represented by a square with an arrow pointing up or out. Tap on it, and then select the Print option.
- Select your printer: Your iPhone will search for available printers on the Wi-Fi network. Once it finds your printer, tap on it to select it.
- Adjust print settings: After selecting your printer, you can adjust the print settings to fit your needs. You can choose the number of copies, select the paper size, and decide between color or black and white printing.
- Start printing: Once you have adjusted the settings, tap the Print button to start printing. Your iPhone will communicate with the printer, and you should see your document or photo begin to print.
Congratulations! You have successfully set up AirPrint on your iPhone. Now you can enjoy the convenience of wirelessly printing from your iPhone to your compatible printer.
Checking printer compatibility
Before setting up AirPrint on your iPhone, it’s crucial to ensure that your printer is compatible with the AirPrint technology. While most modern printers support AirPrint, it’s always a good idea to double-check. Here’s how you can check the compatibility of your printer:
- Manufacturer’s website: Visit the official website of the printer’s manufacturer and navigate to the product page of your specific printer model. Look for any mention of AirPrint compatibility in the specifications or features section. Manufacturers often provide a list of AirPrint-enabled printers that you can consult.
- User manual: If you still have the physical or digital copy of your printer’s user manual, refer to it. Look for information regarding AirPrint compatibility or wireless printing capabilities. The user manual should provide clear instructions on whether or not your printer supports AirPrint.
- Online forums and communities: Another valuable resource for checking printer compatibility is online forums and communities dedicated to printing and technology. Engage in discussions and ask questions about your specific printer model. Experienced users and experts can provide insights based on their own experiences or knowledge.
- Contact the manufacturer or support: If you are still uncertain about your printer’s compatibility with AirPrint, reach out to the manufacturer’s customer support. Contacting the manufacturer directly can give you accurate and up-to-date information. They can also guide you on how to set up AirPrint if your printer is compatible.
Keep in mind that AirPrint is continuously evolving, and newer printer models are being released with AirPrint compatibility. If you find that your current printer does not support AirPrint, consider upgrading to a new printer that offers this convenient wireless printing feature.
Checking the compatibility of your printer ensures that you can fully utilize the benefits of AirPrint and enjoy seamless wireless printing from your iPhone. Remember to consult official sources, user manuals, online communities, or contact the manufacturer for accurate information on your printer’s compatibility with AirPrint.
Connecting to a Wi-Fi network
To use AirPrint and print wirelessly from your iPhone, it’s essential to connect both your iPhone and printer to the same Wi-Fi network. Here’s how you can easily connect to a Wi-Fi network on your iPhone:
- Open the Settings app: Tap on the Settings app on your iPhone’s home screen. It’s represented by a gear icon.
- Select Wi-Fi: In the Settings app, you’ll find a Wi-Fi option listed. Tap on it to access the Wi-Fi settings.
- Enable Wi-Fi: If Wi-Fi is not already enabled, make sure to toggle the switch to turn it on. Your iPhone will start scanning for available Wi-Fi networks.
- Select the Wi-Fi network: A list of available Wi-Fi networks will appear on the screen. Look for your desired Wi-Fi network and tap on its name to connect to it. If the network is secured, you may need to enter the password.
- Wait for the connection: Once you’ve selected the Wi-Fi network and entered the password if required, your iPhone will attempt to connect to the network. It may take a few moments for the connection to be established.
- Verify the connection: Once your iPhone is successfully connected to the Wi-Fi network, you’ll see a checkmark next to the network name in the Wi-Fi settings. You can now proceed with setting up AirPrint and printing wirelessly on your iPhone.
It’s important to note that the Wi-Fi network you connect to should be the same network that your AirPrint-compatible printer is connected to. This ensures that both devices can communicate and allow for seamless printing.
If you encounter any issues while connecting to a Wi-Fi network, ensure that you’re within range of the network, check the password entered, or restart your iPhone and router. In some cases, resetting the network settings on your iPhone can resolve connectivity issues.
By connecting your iPhone to a Wi-Fi network, you enable the necessary communication between your iPhone and the AirPrint-enabled printer, making it possible to print wirelessly with ease and convenience.
Printing from iOS apps
One of the great advantages of AirPrint is its seamless integration with various iOS apps, making it easy to print from a wide range of applications on your iPhone. Whether you want to print an email, a web page, or a photo, AirPrint simplifies the process. Here’s how you can print from iOS apps:
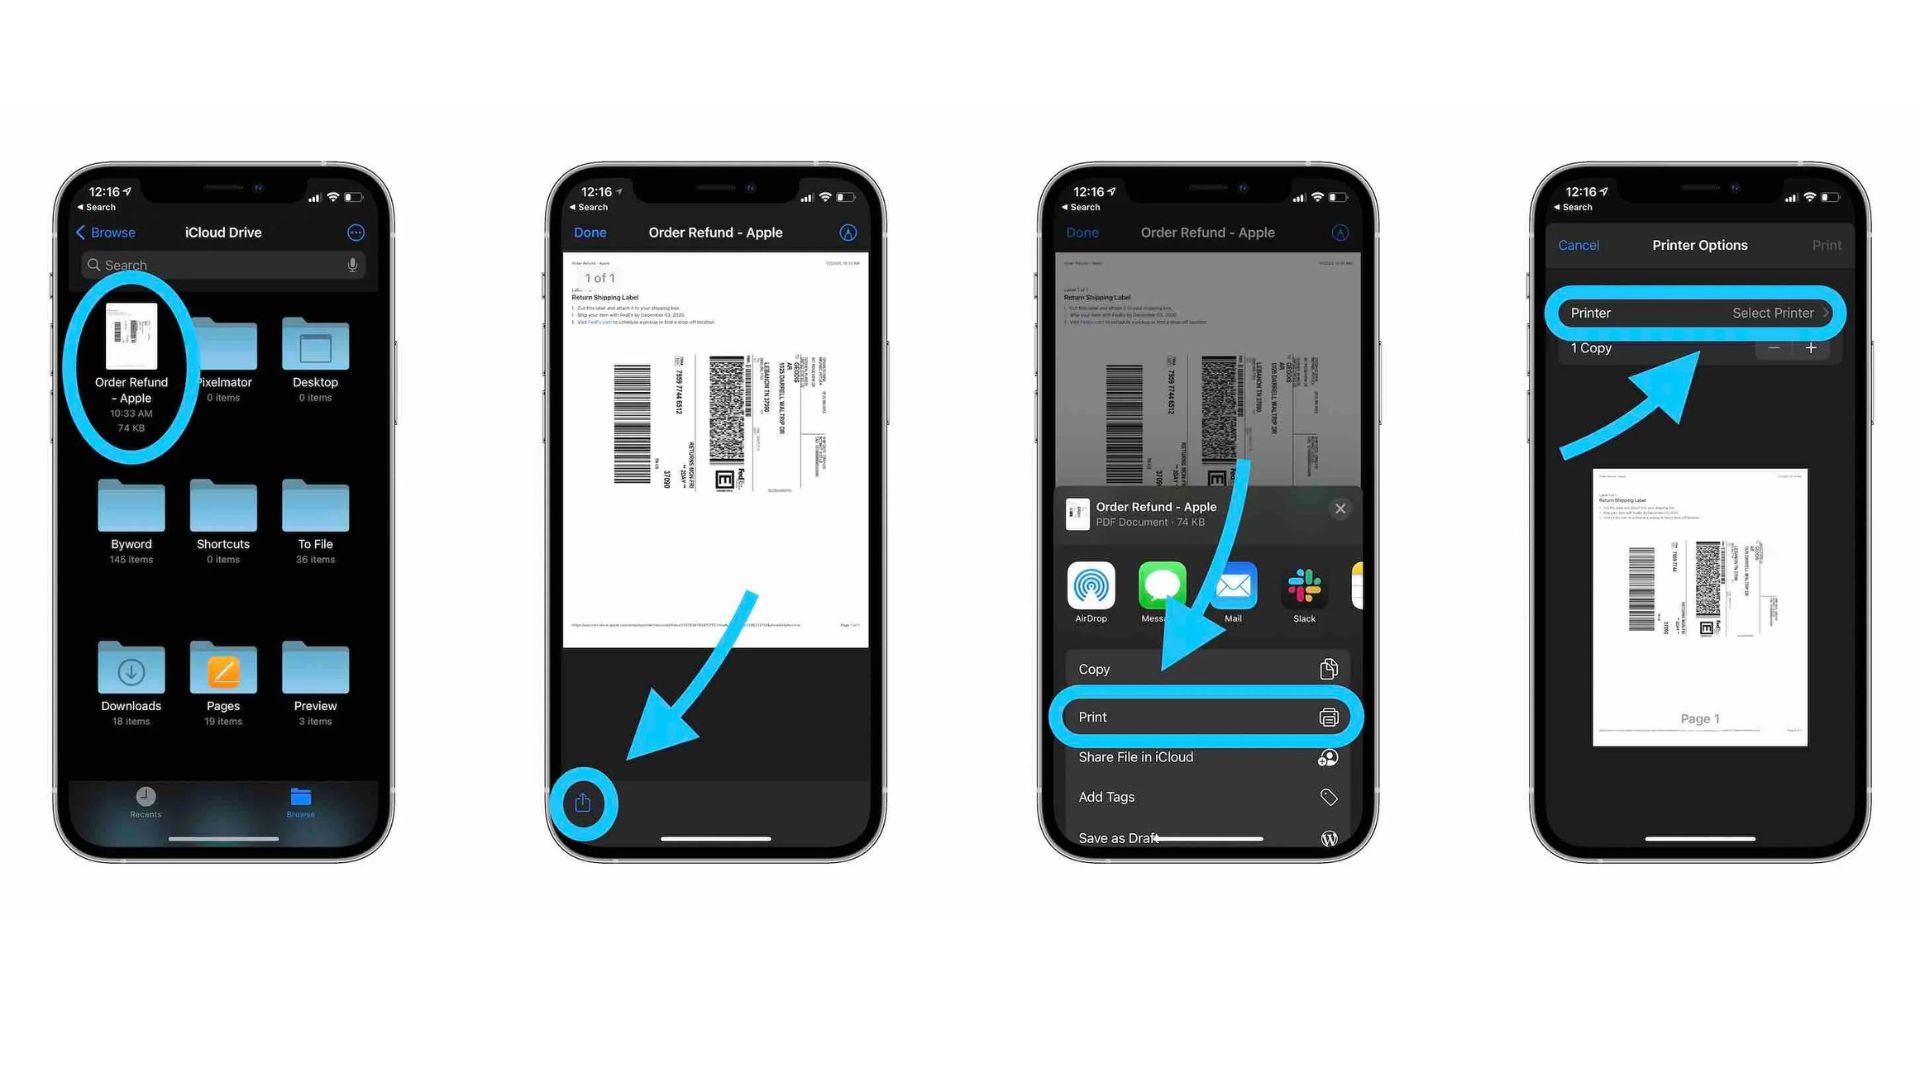
- Select the content you want to print: Open the app that contains the content you want to print, such as Mail, Safari, Photos, or Documents. Navigate to the desired email, web page, document, or photo.
- Find the Share or Action button: In most iOS apps, you’ll find a Share or Action button that allows you to perform various actions with the content. Look for the square icon with an arrow pointing up or out. Tap on it to access the sharing options.
- Tap on the Print option: Among the sharing options, you’ll see the Print option. Tap on it to proceed to the printing settings.
- Select the printer: Your iPhone will automatically search for available AirPrint-enabled printers on the same Wi-Fi network. Once it finds the printer, tap on it to select it as the printing destination.
- Adjust the print settings: Depending on the app and the content you’re printing, you may have the option to adjust the print settings. You can choose the number of copies, the paper size, the printing orientation, and more. Make the necessary adjustments according to your preferences.
- Start the printing process: After you’ve adjusted the print settings, tap on the Print button to initiate the printing process. Your iPhone will communicate with the printer, and you’ll see your content start to print.
Keep in mind that the specific steps for printing may vary slightly depending on the app you’re using. However, most iOS apps follow a similar process, where you access the sharing options and select the Print option.
AirPrint seamlessly integrates with various iOS apps, allowing you to print emails, web pages, documents, photos, and more directly from your iPhone. It simplifies the printing process and eliminates the need for additional software or complex settings, enhancing the convenience and efficiency of printing from your iOS device.
Using the Print function in iOS apps
The Print function in iOS apps is a convenient feature that allows you to customize and manage the printing process directly from your iPhone. With this function, you can make adjustments to the print settings, preview the printout, and perform other actions related to printing. Here’s how you can use the Print function in iOS apps:
- Open the app and select the content: Launch the iOS app that contains the content you wish to print, such as Mail, Safari, Photos, or Documents. Navigate to the specific email, web page, document, or photo you want to print.
- Access the Share or Action button: Look for the Share or Action button within the app’s interface. This button is usually represented by a square with an arrow pointing up or out. Tap on it to access the sharing options.
- Tap on the Print option: Among the sharing options, locate and tap on the Print option. This will take you to the Print interface, where you can manage the print settings and perform other actions related to printing.
- Adjust print settings: In the Print interface, you will find various print settings that you can customize according to your preferences. This includes choosing the number of copies, selecting the paper size, adjusting the print orientation, and more. Make the necessary adjustments to suit your needs.
- Preview the printout: Some apps provide a preview of the printout before proceeding with printing. Take advantage of this feature to ensure that the content appears as desired. You can zoom in, zoom out, and scroll through the preview to check for any formatting or layout issues.
- Select the printer: Ensure that your AirPrint-enabled printer is selected as the printing destination. Your iPhone will automatically search for available printers on the same Wi-Fi network. If multiple printers are available, choose the desired printer from the list.
- Perform additional actions: Depending on the app and its features, you may have additional options within the Print interface. These actions might include saving the printout as a PDF, emailing it to someone, or adding it to a cloud storage service.
- Initiate the printing process: Once you have adjusted the print settings and selected the printer, tap on the Print button to start printing. Your iPhone will communicate with the printer, and the printout will begin.
Using the Print function in iOS apps gives you more control over the printing process. It allows you to customize the print settings, preview the printout, and perform additional actions related to printing directly from your iPhone. This feature enhances the convenience and flexibility of printing from your iOS device.
Adjusting print settings
When printing from your iPhone using AirPrint, you have the option to adjust various print settings to ensure that the printout meets your specific requirements. These settings allow you to customize aspects such as the number of copies, paper size, print orientation, and more. Here’s how you can adjust print settings when using AirPrint:
- Access the print settings: After selecting the content you want to print and tapping on the Print option in the app, you will be taken to the Print interface. Look for a button or option that allows you to access the print settings. It may be labeled as “Options,” “Settings,” or a gear icon.
- Select the number of copies: In the print settings, you can specify how many copies of the content you want to print. Use the provided option to increase or decrease the number of copies as needed.
- Choose the paper size: If you have a specific paper size requirement, select it from the available options in the print settings. Common paper sizes include letter, legal, A4, and more.
- Select the print orientation: Depending on the content you’re printing, you may have the option to choose between portrait and landscape print orientation. Portrait is the vertical orientation, while landscape is the horizontal orientation.
- Enable or disable double-sided printing: If your printer supports double-sided printing, you can toggle the double-sided printing option in the print settings. This allows you to conserve paper by printing on both sides.
- Adjust other print preferences: Some apps may offer additional print settings, such as quality settings (e.g., draft, normal, high), color options (e.g., black and white, grayscale, color), and print layout preferences. Make adjustments according to your preferences and requirements.
- Preview the printout: Some apps provide a preview of the printout with the adjusted settings. Take advantage of this feature to visualize how the content will appear on paper.
- Confirm and initiate the printing: Once you’re satisfied with the print settings, confirm your selections and tap on the Print button to start the printing process. Your iPhone will communicate with the printer, and the printout will begin.
Adjusting print settings allows you to customize the printout to meet your specific needs. Whether you need multiple copies, a particular paper size, or a specific print orientation, AirPrint provides the flexibility to achieve the desired results. Take advantage of the available print settings to ensure that your printed documents, photos, and other content meet your expectations.
Troubleshooting common AirPrint issues
While AirPrint is a convenient feature for wireless printing from your iPhone, you may encounter issues from time to time. Here are some common AirPrint issues and troubleshooting steps to help you resolve them:
- Ensure Wi-Fi connectivity: Make sure that both your iPhone and AirPrint-enabled printer are connected to the same Wi-Fi network. Weak or unstable Wi-Fi connections can cause printing issues. Restarting your router or resetting the network settings on your iPhone may help resolve connectivity problems.
- Check printer compatibility: Verify that your printer is compatible with AirPrint. Visit the manufacturer’s website or consult the user manual for confirmation. If your printer doesn’t support AirPrint, consider using a third-party printing app or investing in an AirPrint-enabled printer.
- Update firmware and software: Ensure that both your printer and iPhone have the latest firmware and software updates installed. Manufacturers often release updates to improve AirPrint compatibility and address any issues. Check for updates through the printer’s settings menu or the iPhone’s settings app.
- Restart devices: Sometimes, a simple restart can resolve temporary glitches. Try turning off your iPhone and AirPrint-enabled printer, waiting a few seconds, and then turning them back on.
- Verify printer settings: Check that your printer is turned on, properly connected to the Wi-Fi network, and has enough paper and ink or toner. Also, ensure that there are no error messages or alert lights on the printer that may indicate an issue.
- Reset printing system (iOS): If you’re still encountering issues, you can try resetting the printing system on your iPhone. Go to Settings > General > Reset > Reset Printing System. This will remove all printers and their preferences from your iPhone. Afterward, set up AirPrint again and try printing.
- Reinstall printer drivers (printer): If the issue persists, reinstalling the printer drivers may help. Visit the manufacturer’s website and download the latest drivers specifically designed for your printer model. Follow the installation instructions provided.
- Try alternative printing methods: If you’re unable to print using AirPrint, consider using alternative printing methods. Explore third-party printing apps that offer compatibility with your printer model. These apps often provide additional features and settings for enhanced printing experiences.
- Contact support: If all else fails, reach out to the manufacturer’s customer support for further assistance. They can provide specialized guidance and troubleshooting specific to your printer model and help resolve any persistent AirPrint issues.
By following these troubleshooting steps, you can often resolve common AirPrint issues and get back to smooth wireless printing from your iPhone. Remember to ensure Wi-Fi connectivity, update firmware and software, check printer compatibility, and seek assistance from customer support if needed.