
What is APFS?
APFS, which stands for Apple File System, is a modern file system introduced by Apple in 2016. It was designed specifically for macOS, iOS, watchOS, and tvOS devices, offering improved performance, security, and reliability compared to its predecessor, HFS+. APFS is now the default file system for all Apple devices, including Macs, iPhones, iPads, Apple Watches, and Apple TVs.
One of the key benefits of APFS is its enhanced storage efficiency. APFS uses a technique called “cloning” to optimize disk space usage. Instead of creating multiple copies of the same file, APFS creates lightweight pointers to the original file, reducing storage requirements. This cloning feature is particularly useful when dealing with files that are frequently duplicated, such as system files and app installations.
Another notable feature of APFS is its integration with solid-state drives (SSDs) and flash storage. APFS incorporates advanced flash memory optimization algorithms to maximize the performance and lifespan of SSDs. It supports TRIM operations, which help maintain optimal SSD performance by erasing unused blocks and freeing up space. APFS also uses a copy-on-write mechanism, ensuring data integrity and minimizing the risk of data loss.
One of the most significant advantages of using APFS is its support for encryption. APFS natively supports FileVault encryption, which allows you to encrypt your entire disk or selected volumes, protecting your data from unauthorized access. With APFS, disk encryption becomes seamless and is integrated into the file system, providing a high level of security without sacrificing performance.
Furthermore, APFS introduces improved crash protection mechanisms. It includes a technology called “metadata checksumming,” which helps detect and correct errors in the file system’s metadata. In the event of a system crash or power failure, APFS can restore the file system to a consistent state, minimizing the risk of data corruption.
Overall, APFS is a modern file system that brings numerous benefits to Apple devices. Its storage efficiency, SSD optimization, encryption capabilities, and crash protection mechanisms make it a reliable and secure choice for managing data on macOS, iOS, watchOS, and tvOS devices. As APFS evolves with regular updates from Apple, users can look forward to additional features and enhancements to further enhance their data management experience.
Benefits of using APFS
Using APFS as the file system for your Apple devices offers a range of benefits that enhance performance, security, and data management. Below, we explore some of the key advantages of using APFS:
- Improved Performance: APFS is designed to deliver faster read and write speeds, resulting in improved overall system performance. Its optimized file system structures and advanced algorithms contribute to faster file access and reduced latency.
- Enhanced Storage Efficiency: APFS uses space-saving techniques like cloning and file compression to optimize disk space utilization. By creating lightweight references to files and compressing them on the fly, APFS reduces storage requirements, allowing you to store more data without compromising performance.
- Seamless Encryption: APFS comes with built-in encryption capabilities, making it easier than ever to protect your data. With support for FileVault, you can encrypt your entire disk or specific volumes, ensuring that your sensitive information remains secure, even if your device is lost or stolen.
- Data Integrity and Crash Protection: APFS incorporates advanced mechanisms to maintain data integrity and protect against crashes and power failures. With its copy-on-write feature and metadata checksumming, APFS ensures that your files and file system remain consistent and resilient, minimizing the risk of data corruption.
- Efficient Space Allocation: APFS efficiently allocates disk space, allowing you to create and resize volumes without the need to repartition your entire drive. This flexibility enables you to better organize your data and adjust storage allocations as your needs change, all while maximizing the use of available disk space.
- Seamless Integration with Apple Ecosystem: Being the default file system for Apple devices, APFS seamlessly integrates with macOS, iOS, watchOS, and tvOS. This integration ensures optimal performance, compatibility, and interoperability among different Apple devices, allowing for a cohesive user experience and easy data sharing.
These are just some of the benefits of using APFS as your file system. Whether it’s the improved performance, storage efficiency, encryption capabilities, or data integrity features, APFS offers a robust and reliable solution for managing your data on Apple devices. As Apple continues to refine and enhance APFS, users can expect even more advantages and features to accommodate their evolving storage needs.
How to Format a Drive to APFS
Formatting a drive to APFS is a straightforward process that can be done using the Disk Utility application on macOS. Follow the steps below to format a drive to APFS:
- Open the Disk Utility application. You can find it in the “Utilities” folder within the “Applications” folder or by searching for it using Spotlight.
- Select the drive you want to format to APFS from the sidebar in Disk Utility. Make sure you have a backup of any important data on the drive, as formatting will erase all existing data.
- Click on the “Erase” button at the top of the Disk Utility window.
- In the erase options, choose “APFS” as the format for the drive. You can also give the drive a new name and select any necessary partition scheme or scheme options, depending on your specific requirements.
- Click on the “Erase” button to start the formatting process. Disk Utility will warn you once again that all data on the drive will be erased, so make sure you have a backup if needed.
- Wait for the formatting process to complete. This may take some time depending on the size and speed of the drive.
- Once the formatting is finished, you will see the newly formatted drive appear in the sidebar of Disk Utility.
- You can now close Disk Utility and start using your newly formatted APFS drive.
It’s important to note that formatting a drive to APFS will erase all existing data on the drive. Make sure to back up any important files before proceeding with the formatting process. Additionally, not all older Mac models or external drives may support APFS. Ensure compatibility before formatting.
By following these steps, you can easily format a drive to APFS and take advantage of the enhanced performance, storage efficiency, and security features that APFS offers.
Understanding APFS Containers and Volumes
When working with APFS, it’s essential to understand the concepts of APFS containers and volumes. These two elements are fundamental to managing storage on APFS-formatted drives. Let’s delve into their definitions and functionalities:
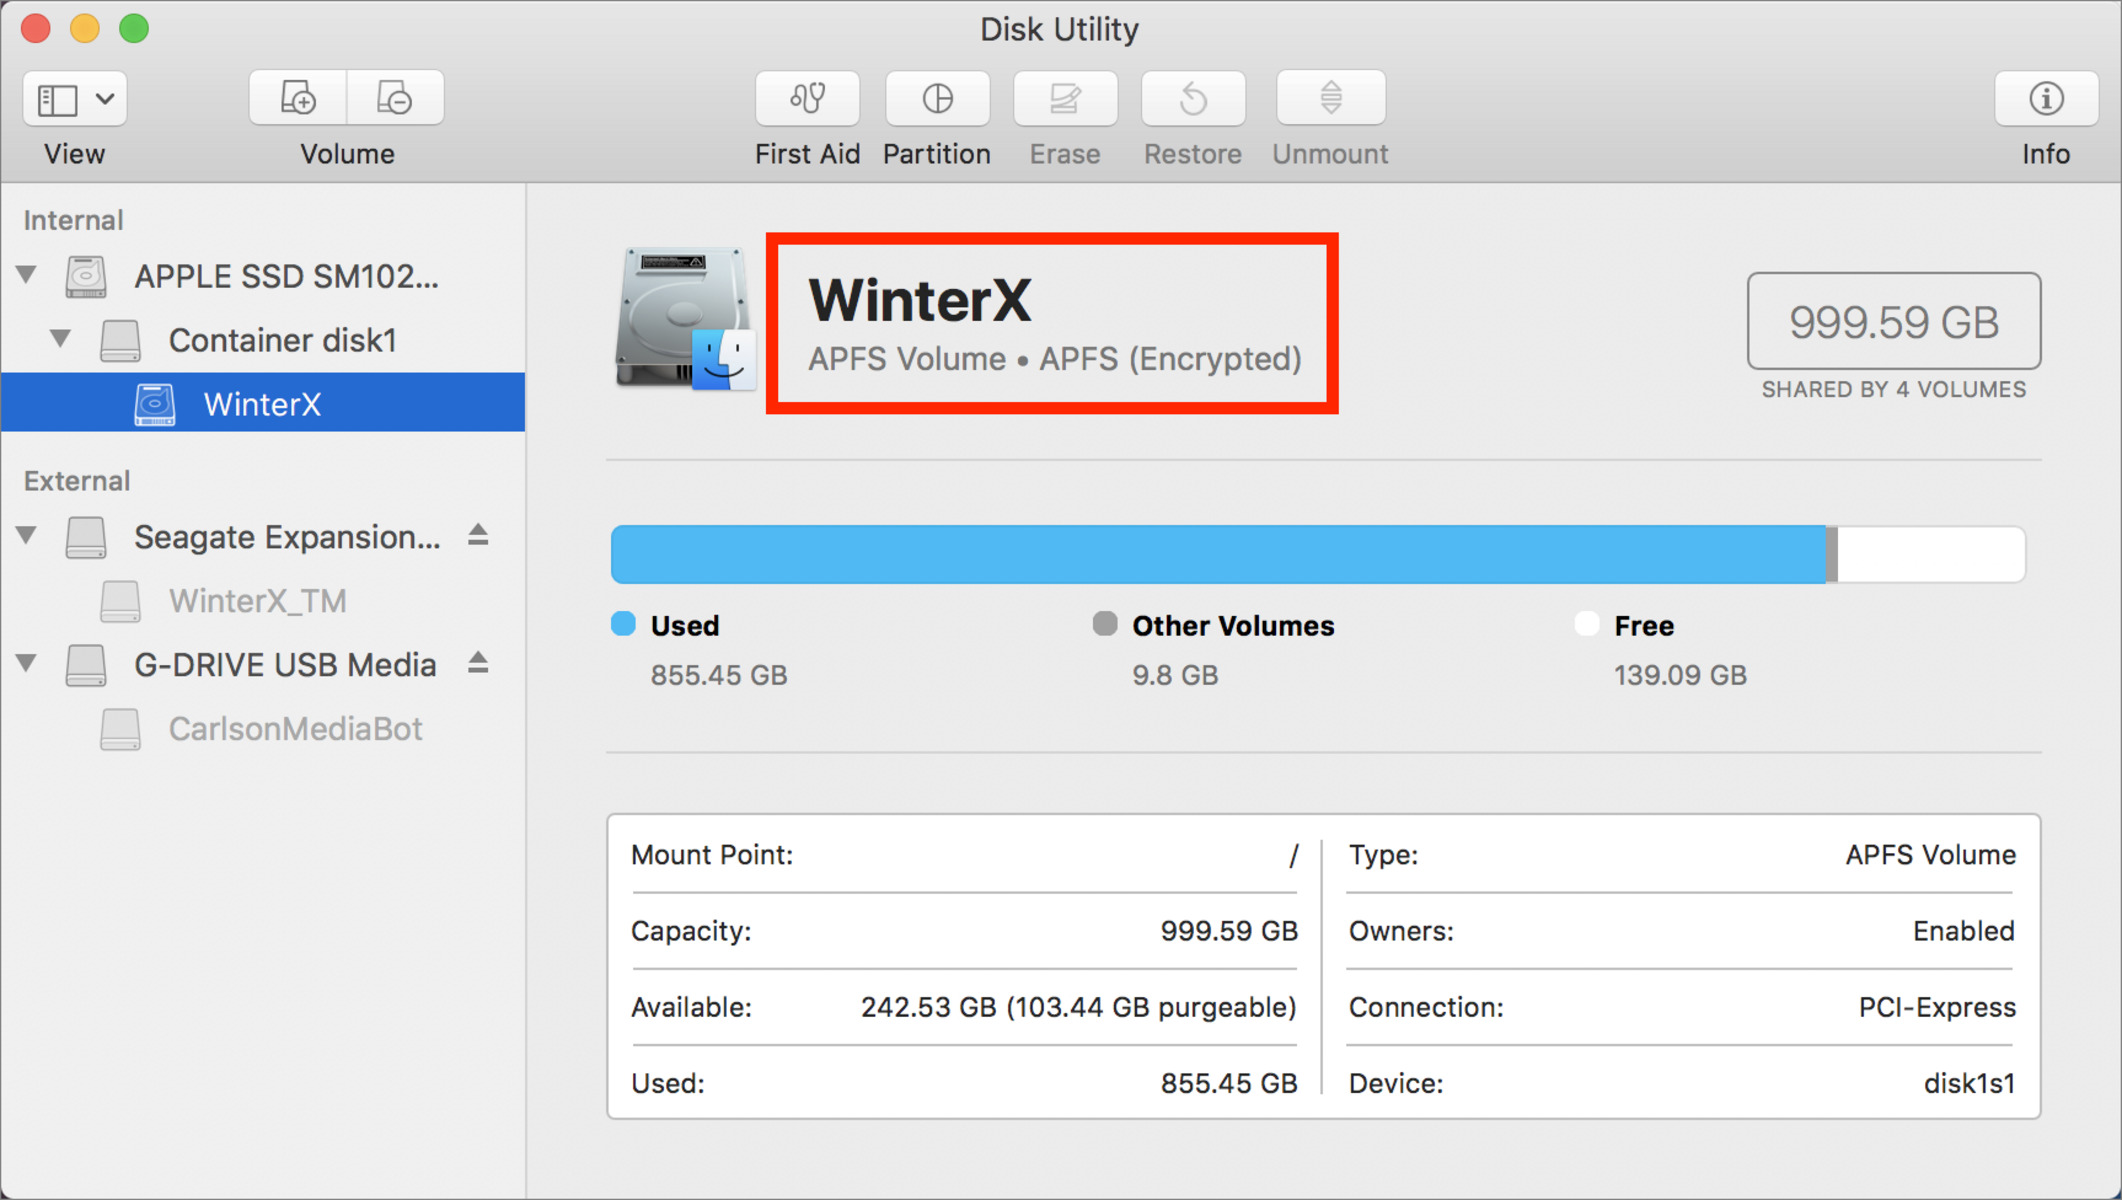
APFS Containers: An APFS container is a storage space that can hold one or more APFS volumes. It acts as a container for organizing and managing multiple volumes on a single physical disk. Think of it as a high-level structure that houses individual volumes within it. With APFS containers, you can allocate available disk space efficiently and create logical separations between volumes for different purposes.
APFS Volumes: APFS volumes reside within APFS containers and act as independent file systems. Each volume has its own file system hierarchy and storage properties. Multiple volumes within a single APFS container can have different purposes, such as separate data, applications, or user accounts. APFS volumes provide the flexibility to manage your data independently, allowing you to resize, encrypt, and manage them individually.
By separating the concepts of containers and volumes, APFS brings a new level of flexibility to storage management. Instead of relying on traditional partitions, which could limit the ability to allocate space dynamically, APFS containers offer adjustable storage allocations that can be shared among multiple volumes. This allows for more efficient use of disk space.
When you format a drive to APFS, an APFS container is created by default, encompassing the entire available space on the drive. Within this container, you can then create one or more APFS volumes. Each volume can be formatted with different settings and serve different purposes, providing compartmentalized storage for different needs.
One important aspect to note is that APFS volumes share the available space within their container dynamically. This means that if one volume has free space available, it can be used by other volumes within the same container. This flexibility allows for optimal utilization of disk space and avoids the need to allocate fixed partitions for each volume.
Managing APFS containers and volumes can be done using the Disk Utility application on macOS. From within Disk Utility, you have the ability to create, resize, delete, and manage both containers and volumes, providing a convenient interface for storage management tasks.
By understanding the concepts of APFS containers and volumes, you can effectively manage your storage space, create logical separations, and optimize the utilization of your APFS-formatted drive.
Managing APFS Containers
When working with APFS-formatted drives, managing APFS containers is an essential part of storage management. APFS containers provide a high-level structure for organizing and allocating disk space for multiple volumes. Let’s explore some of the tasks involved in managing APFS containers:
Creating an APFS Container: When you format a drive to APFS, an APFS container is automatically created, encompassing the entire available space on the drive. However, if you have unallocated space on a drive or wish to create additional containers, you can use the Disk Utility application on macOS to create new APFS containers.
Resizing an APFS Container: APFS containers offer flexibility in adjusting their sizes. Using Disk Utility, you can resize an APFS container by either increasing or decreasing its allocated disk space. This allows you to adapt to changing storage needs and allocate more or less space to a container as required.
Merging APFS Containers: In some cases, you may want to merge multiple APFS containers into a single container. Disk Utility provides the capability to merge containers, consolidating their storage space into one. However, it’s crucial to back up any data on the containers before initiating a merge, as the process will erase all data on the containers being merged.
Deleting an APFS Container: If you no longer need an APFS container, you can remove it using Disk Utility. This process involves erasing all data within the container, so it’s important to back up any necessary data before proceeding. Once deleted, the disk space previously occupied by the container becomes unallocated and can be utilized for other purposes.
Verifying APFS Container Health: Disk Utility allows you to verify the health and integrity of an APFS container. This is particularly useful if you suspect any issues with the container’s file system. Verifying the container can help identify and fix any errors or inconsistencies, ensuring the smooth operation of your storage.
Repairing APFS Container: If Disk Utility detects any issues with an APFS container, you can initiate the repair process to fix them. This is a vital step in maintaining the integrity of your data and preventing potential data loss. It’s recommended to perform regular checks and repairs on your APFS containers to ensure their optimal functionality.
By effectively managing APFS containers, you can allocate and adjust storage space, merge or delete containers as needed, and maintain the health and integrity of your storage. Disk Utility on macOS provides a user-friendly interface for performing these tasks and offers a comprehensive set of tools to manage APFS containers with ease.
Creating and Managing APFS Volumes
APFS volumes are independent file systems residing within APFS containers. They provide a means to organize and manage data on your APFS-formatted drives. Let’s explore the process of creating and managing APFS volumes:
Creating an APFS Volume: To create a new APFS volume, you can use the Disk Utility application on macOS. Within Disk Utility, select the APFS container where you want to create the volume. Click on the “+” button and choose “APFS Volume” from the dropdown menu. You can then specify the volume name, format options, and size. Once created, the new volume will appear within the APFS container.
Resizing an APFS Volume: If you need to adjust the size of an APFS volume, Disk Utility allows you to resize it easily. Simply select the volume and click on the “Partition” tab. From there, you can drag the resize handle to allocate more or less space to the volume. Keep in mind that resizing a volume may affect existing data, so it’s essential to have a backup before making any changes.
Renaming an APFS Volume: Disk Utility also provides the ability to rename APFS volumes. Select the volume you wish to rename and click on the “Rename” button. Enter the new name and press Enter/Return to save the changes. The renamed volume will be updated in the Disk Utility interface and Finder.
Mounting and Unmounting an APFS Volume: APFS volumes can be mounted or unmounted to control their availability in the file system. To mount a volume, select it in Disk Utility and click on the “Mount” button. This will make the volume accessible for reading and writing. If you want to remove a volume from the file system temporarily, you can unmount it by clicking on the “Unmount” button. Unmounted volumes are still present on the drive but are not accessible until they are mounted again.
Checking APFS Volume Health: Disk Utility offers the capability to check the health and integrity of APFS volumes. Select the volume you wish to check and click on the “First Aid” button. Disk Utility will scan the volume and report any errors or inconsistencies. If any issues are detected, you can proceed with repairing the volume to fix the problems.
Repairing an APFS Volume: If Disk Utility finds errors or inconsistencies in an APFS volume, you can initiate the repair process to resolve them. Select the volume and click on the “First Aid” button. Disk Utility will attempt to fix the problems and restore the volume’s functionality. It’s recommended to perform regular checks and repairs to maintain the health of your APFS volumes.
By creating and managing APFS volumes, you can effectively organize your data, control access to volumes, and ensure the integrity of your file systems. Disk Utility on macOS provides a user-friendly interface for performing these tasks and gives you the tools you need to manage your APFS volumes with ease.
Adjusting APFS Volume Sizes
One of the advantages of using APFS is the flexibility it offers in adjusting the sizes of volumes. Whether you need to increase or decrease the size of an APFS volume, you can easily do so using the Disk Utility application on macOS. Let’s explore how to adjust APFS volume sizes:
Resizing an APFS Volume: To resize an APFS volume, open Disk Utility and select the APFS container that contains the volume you want to resize. Click on the “Partition” tab, which will display a graphical representation of the container and its volumes. From there, you can adjust the size of the volume by clicking and dragging the resize handle. Alternatively, you can enter a specific size in the input field next to the volume. Once you have set the desired size, click “Apply” to apply the changes.
Expanding an APFS Volume: If you need to increase the size of an APFS volume, you can do so by taking available free space from the APFS container. As mentioned earlier, you can resize a volume by clicking and dragging its resize handle or entering a specific size. Make sure there is sufficient unallocated space within the container to accommodate the expansion. Once you have resized the volume, the additional space will be allocated to it, allowing you to store more data.
Shrinking an APFS Volume: Conversely, if you want to reduce the size of an APFS volume, you can reclaim space and make it available for other volumes or purposes. To shrink a volume, click and drag the resize handle or enter a specific size that is smaller than the current size. Keep in mind that shrinking a volume will result in the loss of data if it exceeds the new size. Therefore, it is crucial to back up any important data before reducing the volume’s size.
Adjusting Multiple Volumes: In some cases, you may need to adjust the sizes of multiple APFS volumes within the same container. Disk Utility allows you to resize volumes simultaneously by dragging their resize handles or entering specific sizes. This flexible allocation of available space enables you to adapt your storage allocation to better suit your needs.
Remember that resizing an APFS volume may affect existing data, so it is recommended to backup any critical files beforehand. Additionally, resizing a volume on APFS does not require repartitioning the entire drive, providing convenience and speed when adjusting storage allocations.
By knowing how to adjust APFS volume sizes, you can efficiently manage your storage space and customize your volumes to accommodate changes in data requirements. Disk Utility’s intuitive graphical interface makes the process simple and accessible, allowing you to resize, expand, and shrink APFS volumes with ease.
Renaming APFS Volumes
Renaming APFS volumes can be useful for better organization and identification of your storage. The process of renaming APFS volumes is straightforward and can be done using the Disk Utility application on macOS. Let’s explore how to rename APFS volumes:
Using Disk Utility: Open Disk Utility on your Mac. From the sidebar, select the APFS container that contains the volume you want to rename. The volumes within the container will be displayed in the main window. Locate the volume you wish to rename and click on it to highlight it.
Renaming the Volume: With the desired volume selected, click on the “Rename” button located at the top of the Disk Utility window. Alternatively, you can right-click on the volume and choose “Rename” from the contextual menu.
Entering the New Name: A text field will appear where you can enter the new name for the volume. Type in the desired name for the volume, ensuring that it is descriptive and easily recognizable. You can also include spaces, numbers, and special characters in the name, but avoid using any prohibited characters or symbols.
Applying the Name Change: After entering the new name for the volume, press the Enter or Return key to apply the change. The volume will be renamed with the new name you provided.
Verifying the Name Change: To confirm that the volume has been renamed, you can check the changes in Disk Utility. The new name should now be displayed for the renamed volume in the list of volumes within the APFS container.
Renaming APFS volumes can help you better organize your storage and make it easier to identify specific volumes. It is particularly useful when you have multiple volumes within an APFS container, each serving a different purpose or containing specific types of data.
Keep in mind that while renaming an APFS volume changes the display name, it does not affect the actual data stored on the volume. The renaming process only updates the label associated with the volume for easier navigation and identification.
By knowing how to rename APFS volumes using Disk Utility, you can customize and personalize your storage organization, making it more convenient to manage and access your files and data.
Mounting and Unmounting APFS Volumes
Mounting and unmounting APFS volumes are essential actions for controlling access to the volumes on your macOS device. When you mount a volume, it becomes accessible for reading and writing, while unmounting a volume removes it from the file system temporarily. Understanding how to mount and unmount APFS volumes can help you manage your storage effectively. Here’s how you can perform these actions:
Mounting an APFS Volume: To mount an APFS volume, open the Disk Utility application on your Mac. From the sidebar, select the APFS container that contains the volume you want to mount. In the main window, locate the desired volume and click on the “Mount” button at the top of the Disk Utility window. Alternatively, you can right-click on the volume and select “Mount” from the contextual menu. The volume will now be mounted and accessible from the file system.
Unmounting an APFS Volume: If you want to temporarily remove an APFS volume from the file system, you can unmount it. In Disk Utility, select the volume you wish to unmount and click on the “Unmount” button at the top of the window. Alternatively, right-click on the volume and choose “Unmount” from the contextual menu. The volume will be unmounted, and it will no longer be accessible or visible in Finder or other file browsing tools.
Remounting an APFS Volume: After unmounting an APFS volume, you may want to remount it to regain access to its contents. To remount a volume, open Disk Utility and select the unmounted volume. Click on the “Mount” button at the top of the window or right-click on the volume and choose “Mount” from the contextual menu. The volume will be remounted and become accessible again.
Unmounting Multiple APFS Volumes: If you have multiple APFS volumes mounted on your macOS device and you want to unmount them all simultaneously, you can use Terminal. Open Terminal and type the command “diskutil unmountAll.” Press Enter and authenticate with your administrator password when prompted. This command will unmount all mounted volumes, including APFS volumes.
Mounting and unmounting APFS volumes give you control over the accessibility and visibility of your volumes within the file system. Unmounting volumes can be helpful when performing maintenance tasks, such as disk repairs or data migrations. It ensures that the volumes are not affected during these processes.
By understanding how to mount and unmount APFS volumes, you can manage your storage efficiently and control access to your data as needed.
Checking APFS Volume Health
Checking the health of APFS volumes is an important aspect of maintaining the integrity and reliability of your storage. By regularly monitoring the health of your APFS volumes, you can detect and address any potential issues before they cause significant data loss or system instability. Here’s how you can check the health of APFS volumes:
Using Disk Utility: The Disk Utility application on macOS provides a straightforward way to check the health of APFS volumes. Open Disk Utility and select the APFS container that contains the volume you want to check. In the main window, select the specific volume and click on the “First Aid” button at the top of the Disk Utility window.
Initiating the Verification Process: Disk Utility will begin the process of verifying the APFS volume’s health. This process involves scanning the file system and metadata structures of the volume, checking for any errors, inconsistencies, or potential issues.
Viewing the Verification Results: After the verification process is complete, Disk Utility will display the results. If no errors or issues are found, Disk Utility will confirm that the volume appears to be healthy and functional. However, if any problems are detected, Disk Utility will provide information about the specific issues found and any actions that can be taken to address them.
Repairing the Volume: If Disk Utility finds any errors or issues with the APFS volume during the verification process, it will recommend initiating the repair process. Click on the “Repair” button to proceed with repairing the volume. Disk Utility will attempt to fix the detected issues, restoring the volume’s health and integrity.
Monitoring Regularly: It is recommended to check the health of your APFS volumes on a regular basis, especially if you notice any unusual behavior, system crashes, or data corruption. Regular monitoring allows you to identify and resolve issues early, reducing the risk of severe data loss.
Using Terminal Commands: For advanced users, there are also command-line options available within the Terminal to check the health of APFS volumes. Commands such as “diskutil verifyVolume” and “fsck_apfs” can be run to perform verification and repairs. However, caution should be exercised when using these commands, as they require a deeper understanding of the underlying file systems.
Proactively checking the health of your APFS volumes using Disk Utility provides peace of mind, ensuring that your data is stored on a stable and reliable file system. By regularly verifying and addressing any identified issues promptly, you can prevent potential data loss and maintain the overall health of your APFS volumes.
Repairing APFS Volumes
Repairing APFS volumes is a critical step in maintaining the stability and integrity of your storage. It involves resolving any detected errors or issues within the file system to prevent data loss and ensure optimal performance. Here’s how you can repair APFS volumes:
Using Disk Utility: The Disk Utility application on macOS provides a user-friendly interface for repairing APFS volumes. Open Disk Utility and select the APFS container that contains the volume you want to repair. In the main window, select the specific volume and click on the “First Aid” button at the top of the Disk Utility window.
Initiating the Repair Process: Disk Utility will begin the process of repairing the APFS volume. It will scan the file system, metadata, and directory structures, identifying and resolving any errors or inconsistencies it encounters.
Monitoring the Repair Process: During the repair process, Disk Utility will display progress updates, informing you of the actions being taken to fix the volume. Depending on the size and complexity of the volume, as well as the nature of the detected issues, the repair process may take some time to complete.
Reviewing the Repair Results: After the repair process is finished, Disk Utility will provide a summary of the repair results. If the repair was successful, Disk Utility will confirm that the volume has been fixed and is in a healthy state. However, if any issues could not be resolved, Disk Utility will indicate the remaining problems and recommend further actions, such as restoring the volume from backup or seeking professional assistance.
Verifying the Repaired Volume: It is recommended to perform a subsequent health check on the repaired APFS volume to ensure its continued stability. Follow the steps mentioned in the “Checking APFS Volume Health” section to verify the repaired volume and verify that no further issues are detected.
Using Terminal Commands: For advanced users, there are command-line options available within the Terminal to repair APFS volumes. Commands such as “diskutil repairVolume” and “fsck_apfs” can be utilized for repairs. However, caution should be exercised when using these commands, as they require a deep understanding of the underlying file systems.
Repairing APFS volumes is a necessary step to address any identified issues and maintain the stability of your storage. By promptly resolving errors and inconsistencies, you ensure the long-term integrity of your data and maximize the overall performance of your APFS volumes.
Backing Up APFS Volumes
Backing up your APFS volumes is crucial for safeguarding your data against potential loss or corruption. A reliable backup ensures that you can restore your files and volumes in the event of hardware failure, accidental deletion, or other unforeseen circumstances. Here’s how you can back up your APFS volumes:
Choosing a Backup Method: There are several backup methods available for APFS volumes. You can use Time Machine, which is Apple’s built-in backup solution, or opt for third-party backup applications that support APFS. Additionally, you can clone your APFS volumes using utilities like Carbon Copy Cloner or SuperDuper. Choose the method that best suits your backup needs and preferences.
Setting up Time Machine: To back up your APFS volumes using Time Machine, you’ll need an external hard drive or network storage device. Connect the storage device to your Mac and go to “System Preferences.” Click on “Time Machine” and select the storage device as the backup destination. Time Machine will automatically back up your APFS volumes at regular intervals, preserving your data and enabling easy restoration.
Cloning APFS Volumes: Cloning your APFS volumes creates an exact replica of the volume, allowing for easy restoration in case of data loss. Carbon Copy Cloner and SuperDuper are popular cloning applications that support APFS. These tools enable you to create bootable backups of your volumes, maintaining all your files, applications, and system settings.
Regularly Scheduling Backups: Whichever backup method you choose, it’s important to schedule regular backups to ensure that your data is continuously protected. Set up automatic backups at suitable time intervals or perform manual backups regularly to capture any changes since the last backup. Consistent backups help minimize data loss and reduce the risk of data being unavailable in the event of a system failure.
Testing and Verifying Backups: Periodically testing and verifying the integrity of your backups is essential to ensure their effectiveness. Restore a sample file or volume from the backup and confirm that the data can be accessed without any issues. Verifying backups gives you confidence that your data is stored safely and can be restored when needed.
Storing Backups Securely: It’s important to store your backups in a secure location, preferably an offsite or cloud storage solution. Protecting your backups from physical damage, theft, or loss ensures that you have a reliable copy of your data even if your primary system is compromised.
Backing up your APFS volumes is a proactive approach to data protection and enables you to recover from any unforeseen circumstances confidently. Whether you use Time Machine or other backup methods, regular and secure backups are essential for safeguarding your valuable data and ensuring peace of mind.
Restoring APFS Volumes from Backup
Restoring APFS volumes from a backup is a crucial process in recovering your data after an incident or system failure. With a reliable backup in place, you can restore your APFS volumes and get back to working with your files and applications. Here’s a guide on how to restore APFS volumes from a backup:
Identifying the Backup Source: Determine the source of your backup. This could be a Time Machine backup stored on an external hard drive, a network backup, or a cloned backup created using software like Carbon Copy Cloner or SuperDuper. Identify the backup source and make sure it is accessible on your Mac.
Restoring from Time Machine: If you backed up your APFS volumes using Time Machine, navigate to the folder where the backup is stored. Launch the Time Machine application and browse through the backups to locate the date and time when your desired volume was last backed up. Select the volume and click on the “Restore” button to initiate the restoration process.
Restoring from Cloned Backup: If you’ve created a cloned backup of your APFS volumes using Carbon Copy Cloner or SuperDuper, connect the backup drive to your Mac. Launch the cloning software, select the backup volume, and choose the option to restore or clone that volume back to your original APFS volume or a new location. Follow the prompts and options presented by the cloning software to complete the restoration process.
Confirming Restoration: Once the restoration process is complete, double-check that your APFS volumes are restored correctly. Verify that all your files, applications, and system settings have been successfully restored to the desired state. Take a moment to test and ensure that everything operates as expected.
Migrating User Data: If you are restoring a specific user’s data, you may need to migrate the recovered user data back to the appropriate account on your Mac. Follow the migration instructions provided by the backup software or use Apple’s Migration Assistant to transfer the user data back to its original location.
Verifying Restored Data: After the restoration process, it’s important to verify the integrity and accessibility of your data. Open your files and applications, and confirm that everything is working correctly. Check for any missing or corrupted data and address any issues promptly.
By understanding the restoration process from backups, you can confidently recover your APFS volumes and regain access to your valuable data. Having a reliable backup strategy is vital to ensure that you can restore your APFS volumes in a timely and efficient manner.
Encrypting APFS Volumes
Encrypting your APFS volumes provides an additional layer of security for your data, ensuring that it remains safe and protected even if your device falls into the wrong hands. APFS offers native encryption capabilities, making it easy to encrypt your volumes and keep your sensitive information secure. Here’s how you can encrypt your APFS volumes:
Using Disk Utility: Open Disk Utility on your macOS device. From the sidebar, select the APFS container that contains the volume you want to encrypt. In the main window, select the specific volume and click on the “Erase” button at the top of the Disk Utility window.
Choosing Encryption Options: In the erase options, you’ll find the “Format” dropdown menu. Choose “APFS (Encrypted)” as the format to enable volume encryption. This option ensures that the entire volume, including its contents, will be encrypted using industry-standard encryption algorithms.
Providing Encryption Password: After selecting the encryption option, you’ll be prompted to create an encryption passphrase or password. Choose a strong and unique passphrase that is easy for you to remember, but difficult for others to guess. Confirm the passphrase to ensure accuracy.
Enabling Encryption: Once you’ve entered and confirmed the encryption passphrase, you can proceed with the erasure and encryption process. Click on the “Erase” button to initiate the encryption process. Disk Utility will begin encrypting your APFS volume using the passphrase you provided.
Using FileVault: Alternatively, you can use the FileVault feature on macOS to encrypt your APFS volumes. Open “System Preferences” on your Mac, click on “Security & Privacy,” and navigate to the “FileVault” tab. Click on the padlock icon and enter your administrator password to make changes. Select the APFS volume you want to encrypt and click on the “Turn On FileVault” button. Follow the prompts to set up your encryption passphrase or use your iCloud account password for unlocking the volume.
Unlocking Encrypted Volumes: When you restart or power on your macOS device, any encrypted APFS volumes will prompt for the encryption passphrase or password. Enter the correct passphrase to unlock the volumes and gain access to their contents. The volumes will remain encrypted until you provide the passphrase during each session or use additional authentication methods like Touch ID or Apple Watch.
Encrypting your APFS volumes adds an essential layer of security to your data and ensures that even if your device is lost or stolen, your sensitive information remains protected. By following these steps, you can encrypt your APFS volumes and have peace of mind knowing that your data is secure.
Managing Users and Permissions on APFS Volumes
Managing users and permissions on APFS volumes allows you to control access to your files and folders, ensuring that only authorized individuals have the necessary privileges to view, modify, or delete data. APFS provides robust user and permissions management capabilities, making it easy to define and enforce access control on your volumes. Here’s how you can manage users and permissions on APFS volumes:
Creating User Accounts: First, you’ll need to create user accounts on your Mac for the individuals who will have access to your APFS volumes. Go to “System Preferences” and click on “Users & Groups.” From there, you can create new user accounts by clicking on the “+” button and following the prompts. Ensure that each user has a unique username and password.
Assigning Permissions: After creating user accounts, you can assign specific permissions to control access to your APFS volumes. Select the volume you want to manage, right-click, and choose “Get Info.” In the “Sharing & Permissions” section, you’ll see a list of existing users and their corresponding permissions. Click on the lock icon, enter your administrator password, and click on the “+” button to add users to the list.
Setting Access Privileges: For each user, you can customize their access privileges by selecting the desired user and choosing the appropriate permissions from the dropdown menu. The available permissions include “Read & Write,” “Read Only,” and “No Access.” The “Read & Write” permission allows users to view and modify files, “Read Only” permits only viewing, and “No Access” restricts access entirely.
Applying Permissions to Subfolders and Files: You can also apply permissions to specific subfolders and files within your APFS volumes. Select the item you want to manage, right-click, and choose “Get Info.” In the “Sharing & Permissions” section, you can add users and set their individual permissions. By default, the permissions applied to subfolders and files inherit those of their parent folders, but you can modify them individually if needed.
Group Permissions: To simplify permissions management for multiple users, you can create groups in the “Users & Groups” section of “System Preferences.” Assign appropriate users to the relevant groups, and then apply permissions to the groups rather than individual users. This helps streamline access control and ensures consistency across multiple users.
Testing Permissions: After setting up permissions, it’s important to test them to ensure they function as intended. Log in to the user accounts you’ve created and verify that the permissions allow or restrict the desired actions on the APFS volumes, subfolders, and files.
By effectively managing users and permissions on your APFS volumes, you can maintain control over access to your files and folders. It’s important to regularly review and update permissions as needed to accommodate changes in user requirements or organizational structure. With APFS’s user and permissions management capabilities, you can ensure that only authorized individuals have access to your data.
Sharing APFS Volumes over a Network
Sharing APFS volumes over a network allows you to provide access to your files and folders to other users on the same local network. With APFS, you can easily enable file sharing and configure permissions to control who can access and modify the shared content. Here’s how you can share APFS volumes over a network:
Enabling File Sharing: Open “System Preferences” on your Mac and click on “Sharing.” Enable the “File Sharing” option to enable sharing services on your Mac. You can also customize the settings by clicking on the “Options” button. Ensure that the volume you want to share is included in the list of shared folders.
Configuring Sharing Settings: Select the shared APFS volume in the list and click on the “Options” button. In the “Options” menu, you can set permissions for specific users or groups. Choose the appropriate sharing settings, such as allowing read or write access, or restricting access to specific users or groups.
Adding Users or Groups: To grant access to specific users or groups, click on the “+” button under “Users” or “Groups” and select the desired individuals or groups. Choose the appropriate access privileges, such as “Read & Write” or “Read Only,” for each user or group.
Customizing Advanced Settings: For more advanced sharing options, you can customize settings such as SMB or AFP protocols, access restrictions, or automatic login. Click on the “Advanced…” button to view and modify these settings according to your requirements.
Accessing Shared Volumes: After configuring sharing settings, other users on the network can access the shared APFS volumes from their Macs. In the Finder, they can click on “Go” in the menu bar and choose “Connect to Server.” Enter the address of your Mac or browse the list of available devices. Select the shared APFS volume and click on “Connect” to access the shared files and folders.
Managing Shared Access: As the owner of the shared APFS volume, you can monitor and manage access to the shared files. In the “Sharing” pane of “System Preferences,” you can view connected users, their activity, and disconnect users if needed. This allows you to maintain proper control and security of your shared data.
Sharing APFS volumes over a network provides convenient access to files and folders for collaboration or remote access. By configuring the appropriate permissions and monitoring shared access, you can ensure that your shared APFS volumes remain secure and accessible to the intended users.
Troubleshooting Common APFS Issues
While APFS is a reliable file system, you may encounter certain issues that can impact the performance or functionality of your APFS volumes. Understanding how to troubleshoot these common APFS issues can help you diagnose and resolve problems effectively. Here are some troubleshooting tips for common APFS issues:
1. Volume Not Mounting: If an APFS volume is not mounting or appearing in Finder, try remounting the volume manually. Open Disk Utility, select the volume, and click on the “Mount” button. If the issue persists, restart your Mac and try mounting the volume again.
2. Slow Performance: If you notice sluggish performance on an APFS volume, check the available disk space. Insufficient free space can impact performance. Delete unneeded files or move them to another volume to free up space. Additionally, check for any background processes or disk-intensive applications that may be affecting performance.
3. Data Corruption: If you suspect data corruption on an APFS volume, run Disk Utility’s First Aid feature. Select the volume, click on the “First Aid” button, and follow the prompts to scan and repair any issues that are detected. It’s also crucial to maintain regular backups of your APFS volumes to protect against data loss.
4. File or Folder Permissions Issues: If you encounter permissions-related problems, verify and adjust the permissions settings for the affected files or folders. Use the “Get Info” option in Finder to check the sharing and permissions settings. Ensure that the appropriate users or groups have the necessary read or read-and-write privileges.
5. External Drive Not Mounting: If an external drive formatted as APFS is not mounting correctly, try connecting it to a different USB port or using a different cable. Ensure that the drive is compatible with your macOS version. If the drive still doesn’t mount, use Disk Utility to repair the drive or reformat it if necessary.
6. System Crashes or Freezes: If your Mac experiences frequent crashes or freezes when working with APFS volumes, ensure that you have the latest macOS updates installed. Check for any software conflicts or incompatible applications that may be causing the issues. Consider resetting the System Management Controller (SMC) or running diagnostics on your Mac if the problem persists.
7. Error Messages: If you encounter error messages related to APFS volumes, note down the error code or message displayed. Use Apple’s support resources or online forums to search for the specific error information. You can find valuable insights and troubleshooting steps from other users who may have encountered similar issues.
8. Professional Assistance: If you’re unable to resolve the APFS issues on your own, consider seeking assistance from Apple Support or consulting with a professional technician who specializes in macOS and APFS troubleshooting. They can provide expert guidance and help resolve complex issues that you may encounter.
Remember to always maintain regular backups of your APFS volumes and exercise caution when making changes to the file system. By following these troubleshooting tips, you can address common APFS issues effectively and ensure the optimal performance and functionality of your APFS volumes.