
Reasons to Make Chrome Shortcuts on Your Windows Desktop
Are you tired of constantly switching between windows and tabs while browsing the web? Do you find it inconvenient to access your favorite websites quickly? If so, then creating Chrome shortcuts on your Windows desktop might be the perfect solution for you. Not only does it provide a convenient way to access your favorite sites, but it also offers several other benefits. Here are a few reasons why you should consider making Chrome shortcuts on your Windows desktop:
- Quick Access to Your Favorite Websites: By creating Chrome shortcuts on your Windows desktop, you can easily access your most frequently visited websites with just a single click. No more searching for bookmarks or typing in URLs; simply click on the shortcut icon, and you’ll be instantly directed to your desired website.
- Improved Productivity: With Chrome shortcuts on your desktop, you can save significant time and effort. Instead of opening a new tab and searching for a particular website, you can quickly launch it directly from your desktop. This can be especially helpful for work-related sites or online tools that you use frequently.
- Reduced Clutter: Having multiple tabs open in your browser can quickly clutter your workspace and make it difficult to find what you need. By creating Chrome shortcuts on your desktop, you can minimize the number of open tabs, keeping your browsing space clean and organized. You can even create specific folders to categorize and group your shortcuts, further enhancing your productivity.
- Customization Options: Chrome shortcuts on your Windows desktop offer customization options that allow you to personalize your browsing experience. You can change the icon of each shortcut to easily identify different websites, giving your desktop a more visually appealing look. This customization not only adds a touch of personalization but also helps in quickly identifying the website you want to access.
- Offline Access: With Chrome shortcuts, you can access web applications or web pages even when you are offline. By creating shortcuts for online tools or web-based apps, you can easily launch them without the need for an internet connection. This can be particularly useful for frequently accessed resources, such as online documents or project management tools.
Creating Chrome shortcuts on your Windows desktop can greatly enhance your browsing experience, saving you time and improving your productivity. With quick access to your favorite websites, reduced clutter, customization options, and the ability to access certain resources offline, it’s clear why making Chrome shortcuts is a beneficial choice. So, why wait? Start creating your Chrome shortcuts today, and simplify your browsing experience like never before.
How to Create a Chrome Shortcut on Your Windows Desktop
Creating Chrome shortcuts on your Windows desktop is a simple process that can be done in just a few steps. Follow these instructions to create a Chrome shortcut on your Windows desktop:
- Open Google Chrome: Launch the Google Chrome browser on your Windows computer.
- Go to the Website: Navigate to the website that you want to create a shortcut for. Make sure you are on the specific page you want the shortcut to open.
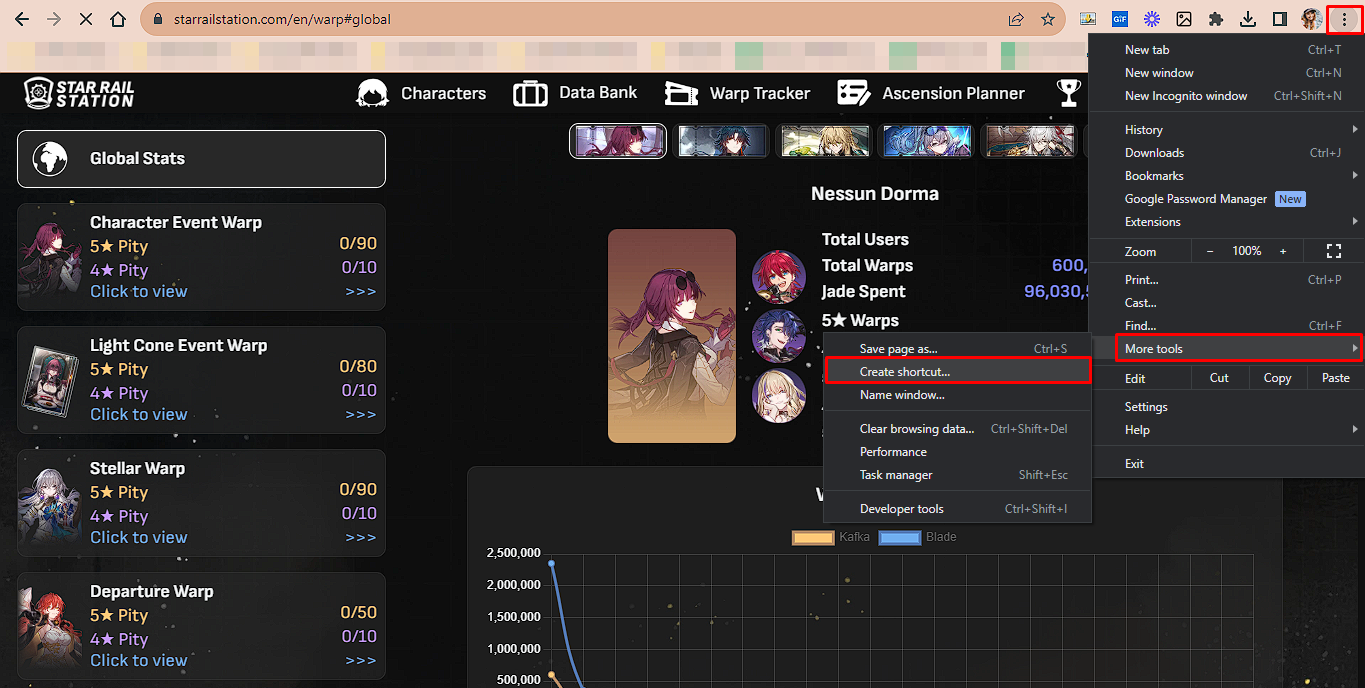
- Click on the Three-Dot Menu: In the top-right corner of the Chrome browser, click on the three-dot menu icon. A drop-down menu will appear.
- Select “More Tools”: From the drop-down menu, hover over the “More Tools” option, and another menu will appear.
- Choose “Create Shortcut”: From the “More Tools” menu, click on the “Create Shortcut” option. A pop-up window will appear.
- Customize the Shortcut Name: In the pop-up window, you can customize the name of the shortcut. This name will be displayed on your desktop.
- Check the “Open as Window” Option: To open the shortcut in its own window, check the “Open as Window” option. This will remove the toolbar and tabs, giving it a more app-like experience.
- Click on “Create”: Once you have customized the name and selected the desired options, click on the “Create” button. The Chrome shortcut will be created on your Windows desktop.
That’s it! You have successfully created a Chrome shortcut on your Windows desktop. Now, whenever you want to access your favorite website quickly, simply double-click on the shortcut icon on your desktop, and the website will open in your Google Chrome browser.
Creating Chrome shortcuts is a convenient way to access your frequently visited websites without the need to search through bookmarks or type in URLs. By following these easy steps, you can streamline your browsing experience and save valuable time navigating to your favorite websites. Start creating your Chrome shortcuts today and enjoy a more efficient browsing experience!
How to Customize Chrome Shortcut Icons on Your Windows Desktop
Customizing Chrome shortcut icons on your Windows desktop allows you to add a personal touch to your browsing experience. By changing the default icon, you can easily identify different websites or web applications with a single glance. Follow these steps to customize Chrome shortcut icons on your Windows desktop:
- Right-click on the Chrome Shortcut: Locate the Chrome shortcut on your desktop that you want to customize. Right-click on the shortcut icon to open a context menu.
- Select “Properties”: From the context menu, click on the “Properties” option. This will open a properties window with various customization options.
- Navigate to the “Shortcut” Tab: In the properties window, navigate to the “Shortcut” tab. Here, you will find options to customize the shortcut icon.
- Click on “Change Icon”: Once you are on the “Shortcut” tab, click on the “Change Icon” button. This will open a new window displaying a list of available icons.
- Browse for Custom Icons: If you have a specific icon file that you want to use, click on the “Browse” button and navigate to the location where the icon file is saved on your computer. Alternatively, you can choose from the list of available icons provided by Windows.
- Select the Desired Icon: In the icon selection window, browse through the available icons and select the one that you want to use for your Chrome shortcut. Click on the icon to highlight it, and then click “OK” to confirm your selection.
- Apply the Changes: Once you have selected the desired icon, click on the “Apply” button in the properties window to apply the changes. You will see the new icon appear on your Chrome shortcut.
- Click “OK”: After applying the changes, click “OK” to close the properties window. The customization of your Chrome shortcut icon is now complete.
By following these steps, you can easily personalize the icons of your Chrome shortcuts on your Windows desktop. Whether you want to use custom icons that you have downloaded or select from the pre-existing options, this customization option adds a visual flair to your desktop and makes it easier to identify your favorite websites and web applications.
Take a few minutes to customize your Chrome shortcut icons and make your browsing experience more visually appealing and personalized. Enjoy the convenience of recognizing your favorite websites at a glance and make your Windows desktop truly yours!
How to Pin Chrome Shortcuts to the Windows Taskbar
Pinning Chrome shortcuts to the Windows taskbar allows you to easily access your favorite websites with just a single click. By placing the shortcuts on the taskbar, you can quickly launch your preferred websites without the need to open the Chrome browser first. Follow these steps to pin Chrome shortcuts to the Windows taskbar:
- Create a Chrome Shortcut: First, create a shortcut for the website you want to pin. You can follow the steps mentioned earlier in this article on how to create a Chrome shortcut on your Windows desktop.
- Right-click on the Chrome Shortcut: Locate the Chrome shortcut that you want to pin on your Windows taskbar. Right-click on the shortcut icon to open a context menu.
- Select “Pin to Taskbar”: From the context menu, hover over the “Pin to” option, and another menu will appear. Select the “Taskbar” option to pin the shortcut to the Windows taskbar.
- Move the Shortcut on the Taskbar: Once you have pinned the Chrome shortcut to the taskbar, you can click and drag it to your desired position on the taskbar. This allows you to prioritize your most frequently accessed websites.
That’s it! You have successfully pinned a Chrome shortcut to the Windows taskbar. Now, whenever you want to access the website quickly, simply click on the shortcut icon on the taskbar, and the website will open in your default Chrome browser.
Pinning Chrome shortcuts to the Windows taskbar provides a convenient way to access your favorite websites without the need to open the browser first. You can pin multiple shortcuts to the taskbar, allowing for quick access to a variety of websites. Take advantage of this feature to streamline your browsing experience and improve your productivity.
How to Organize Your Chrome Shortcuts on Your Windows Desktop
Organizing your Chrome shortcuts on your Windows desktop can help you keep your favorite websites and web applications easily accessible and neatly arranged. By creating folders, grouping related shortcuts, and arranging them in a logical manner, you can enhance your browsing experience. Follow these steps to organize your Chrome shortcuts on your Windows desktop:
- Create Shortcut Folders: Start by creating folders to categorize your Chrome shortcuts. Right-click on your desktop, select “New,” and choose “Folder.” Give the folder a descriptive name that represents the type of websites or web applications you will be placing inside it.
- Move Shortcuts into Folders: Drag and drop the Chrome shortcuts into their respective folders. You can select multiple shortcuts at once by holding down the “Ctrl” key while clicking on the desired shortcuts. This will help you group similar websites together and keep your desktop clean and organized.
- Arrange Folders and Shortcuts: Arrange your folders and shortcuts in a way that makes sense to you. You can organize them alphabetically, based on frequency of use, or any other criteria that suits your browsing habits. Play around with the layout until you find a structure that is intuitive and easy to navigate.
- Customize Folder Icons (Optional): If you want to further enhance the organization of your Chrome shortcuts, you can customize the folder icons. Right-click on the folder, select “Properties,” and go to the “Customize” tab. From there, click on the “Change Icon” button to select a new icon for the folder. Choose an icon that represents the content of the folder to easily identify it at a glance.
- Adjust Desktop Grid Size (Optional): If you have a large number of shortcuts and folders, you may want to adjust the desktop grid size to fit more icons on the screen. Right-click on your desktop, select “View,” and choose a smaller grid option from the available sizes. This will allow you to organize and display more shortcuts on your desktop.
By following these steps, you can easily organize and arrange your Chrome shortcuts on your Windows desktop. Creating folders, moving shortcuts inside them, arranging them in a logical manner, and customizing folder icons can help you quickly access your favorite websites and web applications, while keeping your desktop clutter-free.
Take some time to organize your Chrome shortcuts and create a browsing environment that is both functional and visually pleasing. With a well-organized desktop, you’ll be able to navigate your favorite websites with ease and increase your productivity while browsing the web.
Additional Tips for Chrome Shortcuts on Your Windows Desktop
Now that you know how to create, customize, pin, and organize Chrome shortcuts on your Windows desktop, here are some additional tips to further enhance your browsing experience:
- Keyboard Shortcuts: Take advantage of keyboard shortcuts to access your Chrome shortcuts even faster. For example, you can use the Windows key + the number key that corresponds to the position of the shortcut on the taskbar to launch it quickly without using your mouse.
- Synchronize Your Shortcuts: If you have multiple devices using Google Chrome, consider synchronizing your shortcuts. This way, your Chrome shortcuts will be available on all your devices, allowing for a consistent browsing experience across different platforms.
- Regularly Update and Remove Shortcuts: Periodically review your Chrome shortcuts and remove any shortcuts that you no longer use or that have become outdated. This will help keep your desktop organized and ensure that you can easily find the shortcuts you need.
- Backup Your Shortcuts: It’s always a good idea to back up your Chrome shortcuts in case of computer crashes or other unexpected events. You can simply copy the shortcut files to an external storage device or cloud storage to protect your shortcuts from being lost.
- Experiment with Customization: Don’t be afraid to experiment with different customization options for your Chrome shortcuts. Try different icon styles, colors, and arrangements to find a visual scheme that suits your personal preferences and makes your desktop unique.
By utilizing these additional tips, you can maximize the efficiency and customization of your Chrome shortcuts on your Windows desktop. Whether it’s using keyboard shortcuts, synchronizing your shortcuts across devices, or regularly reviewing and updating your shortcuts, incorporating these tips will help you create a personalized and streamlined browsing experience.
Now that you have a solid understanding of creating, customizing, pinning, organizing, and optimizing Chrome shortcuts, you can start applying these techniques to maximize your productivity, convenience, and enjoyment while browsing the web on your Windows desktop.