
Changing the Home Page in Internet Explorer
Internet Explorer, the web browser developed by Microsoft, allows users to customize their browsing experience by changing the default home page. The home page is the first website that opens when you launch the browser. It can be set to a search engine, a news website, or even a personal webpage. Changing the home page in Internet Explorer is a simple process that can be done in just a few steps.
To change the home page in Internet Explorer, follow these steps:
- Open Internet Explorer by clicking on the icon on your desktop or from the Start menu.
- Click on the gear icon in the top-right corner of the browser window. This will open the Tools menu.
- In the Tools menu, select “Internet options”.
- A new window will pop up. In the General tab, you will see a section labeled “Home page”.
- Enter the URL of the website you want to set as your home page in the text field.
- Click on “Apply” followed by “OK” to save the changes.
Once you have completed these steps, the next time you open Internet Explorer, it will automatically load the website you set as your home page. If you ever want to change the home page again, simply follow the same steps and enter a new URL.
Customizing the home page in Internet Explorer allows you to personalize your browsing experience and have quick access to your favorite website. Whether you prefer a search engine for quick searches or a news website to stay updated, Internet Explorer gives you the flexibility to choose what you see when you open the browser.
Now that you know how to change the home page in Internet Explorer, you can customize it to suit your preferences and make your browsing experience more efficient and enjoyable.
Changing the Home Page in Microsoft Edge
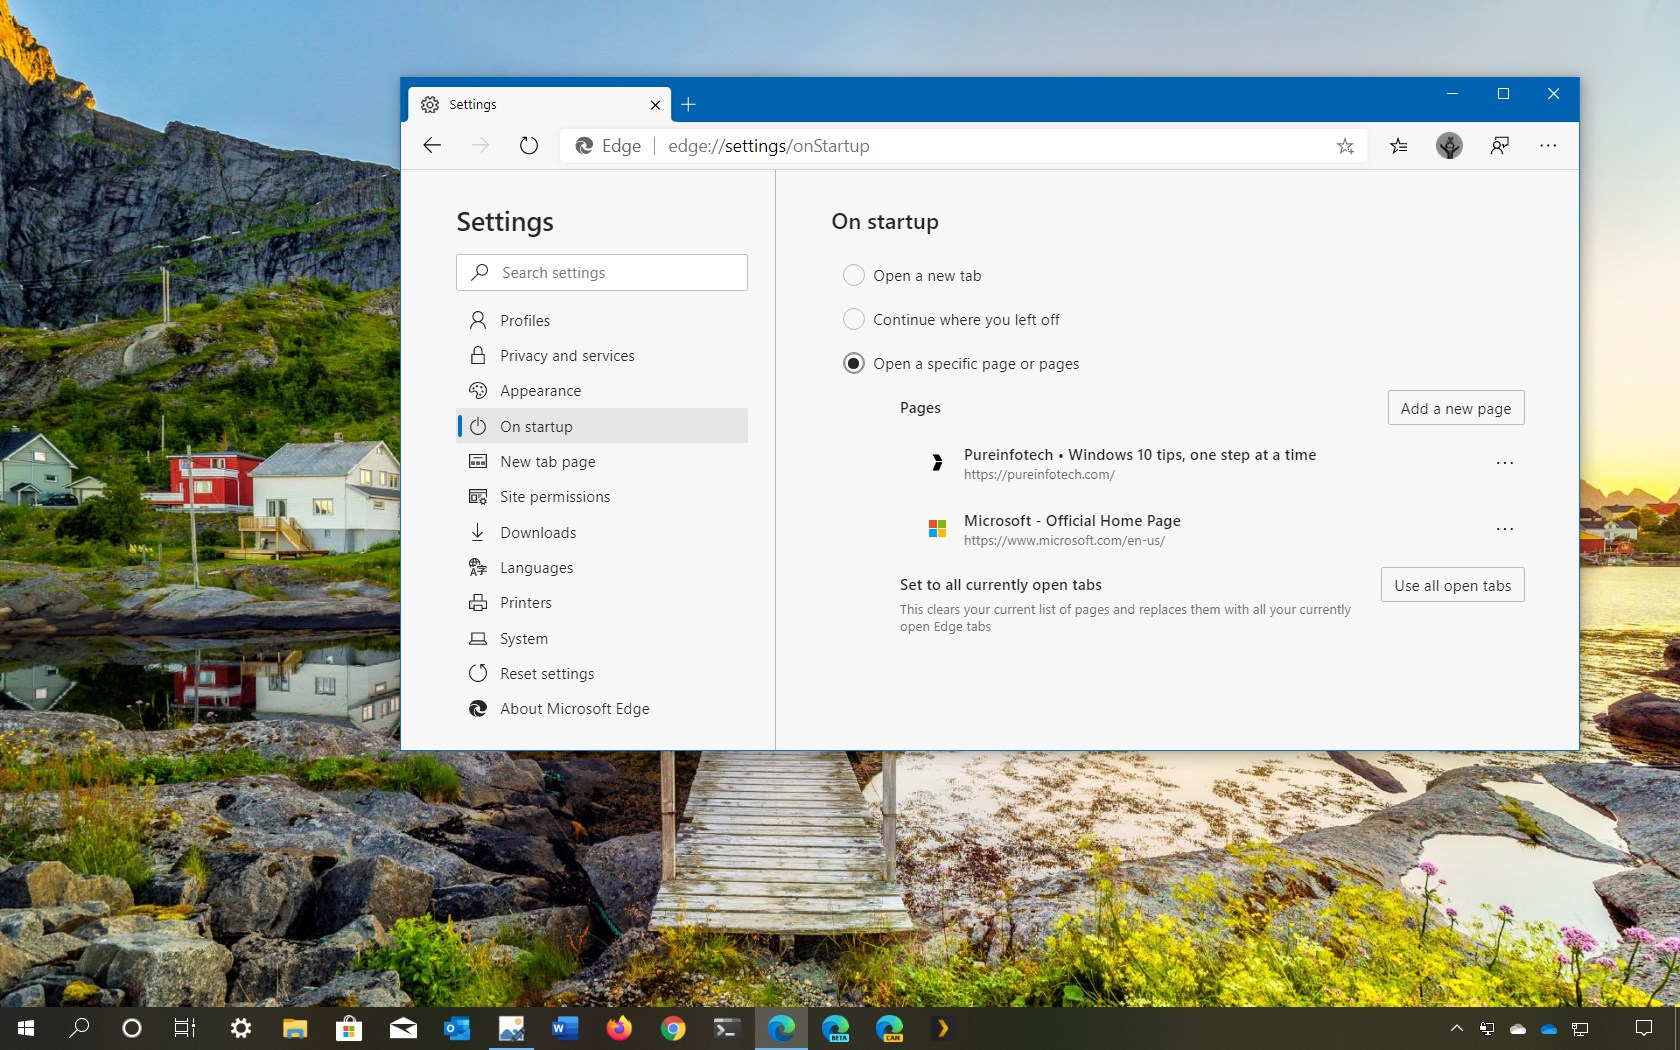
Microsoft Edge, the default web browser in Windows 10, allows users to easily customize their home page. The home page is the initial webpage that opens when you launch the browser. By changing the home page, you can set a website that you frequently visit or a search engine as the default page in Microsoft Edge. The process of changing the home page in Microsoft Edge is straightforward and can be done in a few simple steps.
To change the home page in Microsoft Edge, follow these steps:
- Open Microsoft Edge by clicking on its icon located on the taskbar or by searching for it in the Start menu.
- Click on the three-dot menu icon in the top-right corner of the browser window. This will open the Edge menu.
- In the menu, select “Settings”.
- Scroll down and locate the “Open Microsoft Edge with” section.
- Click on the drop-down menu next to “A specific page or pages”.
- Enter the URL of the website you want to set as your home page.
- Click on the “Save” button to apply the changes.
Once you have completed these steps, the next time you launch Microsoft Edge, it will automatically load the website you set as your home page. You can also set multiple web pages as your home page by entering each URL separated by a comma.
Changing the home page in Microsoft Edge allows you to tailor your browsing experience to your preferences and have quick access to your favorite websites. Whether you want to stay updated with the latest news or use a search engine for quick searches, Microsoft Edge provides the flexibility to set the home page that suits your needs.
Now that you know how to change the home page in Microsoft Edge, you can personalize your browsing experience and make your web browsing more efficient and convenient.
Changing the Home Page in Google Chrome
Google Chrome, one of the most popular web browsers, allows users to customize their browsing experience by changing the default home page. The home page is the webpage that opens when you launch the browser or click on the home button. It can be set to a search engine, a news website, or any other webpage you prefer. Changing the home page in Google Chrome is a simple process that can be done in just a few steps.
To change the home page in Google Chrome, follow these steps:
- Open Google Chrome by double-clicking on its icon on the desktop or searching for it in the Start menu.
- Click on the three-dot menu icon in the top-right corner of the browser window. This will open the Chrome menu.
- In the menu, select “Settings”.
- Scroll down and find the “On startup” section.
- Select the option for “Open a specific page or set of pages”.
- Click on “Add a new page”.
- Enter the URL of the website you want to set as your home page.
- Click on “Add” and then click on the three-dot menu icon next to the new page you added.
- Select “Use as default” from the menu.
- Click on “Done” to apply the changes.
After following these steps, the next time you open Google Chrome, it will automatically load the website you set as your home page. You can also choose to set multiple pages as your home page by adding them individually using the “Add a new page” button.
Changing the home page in Google Chrome allows you to have quick access to your favorite websites or search engines. You can personalize your browsing experience and start your web sessions with the information and content that is most relevant to you.
Now that you know how to change the home page in Google Chrome, you can customize it to your preferences and make your browsing experience more tailored and efficient.
Changing the Home Page in Mozilla Firefox
Mozilla Firefox, a popular web browser known for its flexibility and customization options, allows users to change the default home page to suit their preferences. The home page is the webpage that opens when you launch the browser or click on the home button. It can be set to a search engine, a news website, or any other webpage you prefer. Changing the home page in Mozilla Firefox is a quick and simple process.
To change the home page in Mozilla Firefox, follow these steps:
- Open Mozilla Firefox by double-clicking on its icon on the desktop or searching for it in the Start menu.
- Click on the three-line menu icon in the top-right corner of the browser window. This will open the Firefox menu.
- In the menu, select “Options”.
- A new tab will open with various options. In the General section, you will see the “Home Page” field.
- Enter the URL of the website you want to set as your home page in the text field.
- Click on “OK” to save the changes.
After following these steps, the next time you open Mozilla Firefox, it will automatically load the website you set as your home page. You can also choose to set multiple pages as your home page by entering each URL separated by the pipe symbol (|).
Customizing the home page in Mozilla Firefox allows you to personalize your browsing experience and have quick access to your favorite websites or search engines. You can start your web sessions with the information and content that is most relevant to you.
Now that you know how to change the home page in Mozilla Firefox, you can tailor it to your preferences and make your browsing experience more efficient and enjoyable.
Changing the Startup Behavior in Windows 10
Windows 10 offers a variety of startup options that allow you to customize how your computer behaves when it boots up. By changing the startup behavior, you can determine which apps and programs automatically launch upon startup, ensuring a streamlined and efficient user experience. Here’s how you can change the startup behavior in Windows 10:
- Open the Task Manager by right-clicking on the taskbar and selecting “Task Manager” from the context menu.
- In the Task Manager, click on the “Startup” tab.
- You will see a list of programs and apps that are set to launch at startup. To disable a program from launching, simply right-click on it and select “Disable”.
- If you wish to enable a program or app to launch at startup, right-click on it and choose “Enable”.
- To add a new program or app to the startup list, click on the “More details” button at the bottom of the Task Manager window.
- Click on the “Startup” tab again and then click on the “Open” option.
- A new window will open, displaying the startup folder. Simply drag and drop a shortcut of the program or app you want to add into this folder.
- Close the startup folder and Task Manager to save the changes.
By following these steps, you can easily modify the startup behavior in Windows 10. Whether you want to speed up your computer’s boot time by disabling unnecessary programs or ensure that essential apps launch automatically, customization options are at your fingertips.
Managing the startup behavior allows you to optimize your computer’s performance and improve productivity. It ensures that the necessary programs are readily available without having to manually launch them each time you boot up the system.
Now that you know how to change the startup behavior in Windows 10, you can customize it according to your preferences and make your computing experience more efficient and tailored to your needs.
Changing the Startup Behavior in Windows 8/8.1
In Windows 8 and 8.1, you have the ability to customize which programs and apps launch automatically when your computer starts up. This allows you to streamline your startup process and ensure that only the essential applications are loaded, resulting in a faster and more efficient experience. Here’s how you can change the startup behavior in Windows 8/8.1:
- Press the Windows key + R to open the Run dialog box.
- Type “msconfig” into the Run dialog box and press Enter. This will open the System Configuration window.
- In the System Configuration window, click on the “Startup” tab.
- You will see a list of programs and apps that are set to launch at startup. To disable a program from launching, simply uncheck the box next to its name.
- If you want to enable a program or app to launch at startup, check the box next to its name.
- Click on “Apply” and then “OK” to save the changes.
- If prompted, restart your computer for the changes to take effect.
By following these steps, you can easily modify the startup behavior in Windows 8/8.1. Whether you want to speed up startup by disabling unnecessary programs or ensure that essential apps launch automatically, customization options are available to you.
Managing the startup behavior allows you to optimize your computer’s performance and improve productivity. It ensures that the necessary programs are readily available without having to manually launch them each time you start your computer.
Now that you know how to change the startup behavior in Windows 8/8.1, you can customize it according to your needs and preferences, resulting in a more efficient and personalized computing experience.
Changing the Startup Behavior in Windows 7
In Windows 7, you have the ability to control which programs and applications launch automatically when your computer starts up. By changing the startup behavior, you can optimize your computer’s boot time and ensure that only the necessary applications are loaded, resulting in a faster and more efficient experience. Here’s how you can change the startup behavior in Windows 7:
- Click on the “Start” button and then select “All Programs”.
- In the list of programs, locate the “Startup” folder and click on it to open it.
- You will see a list of shortcuts to programs and applications that currently launch at startup. To disable a program from launching, simply right-click on its shortcut and select “Delete”.
- To add a new program or application to the startup list, navigate to the program or application’s location on your computer.
- Right-click on the program or application’s executable file and select “Create Shortcut”.
- Drag and drop the newly created shortcut into the “Startup” folder.
- Close the “Startup” folder.
By following these steps, you can easily modify the startup behavior in Windows 7. Whether you want to speed up startup by disabling unnecessary programs or ensure that essential applications launch automatically, customization options are available to you.
Managing the startup behavior allows you to optimize your computer’s performance and improve productivity. It ensures that the necessary programs are readily available without having to manually launch them each time you start your computer.
Now that you know how to change the startup behavior in Windows 7, you can customize it according to your needs and preferences, resulting in a more efficient and personalized computing experience.
Changing the Startup Behavior in Windows Vista
In Windows Vista, you can easily customize which programs and applications launch automatically when your computer starts up. By changing the startup behavior, you can personalize your computing experience and ensure that only the necessary applications are loaded, resulting in a faster and more efficient startup process. Here’s how you can change the startup behavior in Windows Vista:
- Click on the “Start” button and then select “All Programs”.
- In the list of programs, locate the “Startup” folder and click on it to open.
- You will see a list of shortcuts to programs and applications that currently launch at startup. To disable a program from launching, right-click on its shortcut and select “Delete”.
- To add a new program or application to the startup list, navigate to the program or application’s location on your computer.
- Right-click on the program or application’s executable file and select “Create Shortcut”.
- Drag and drop the newly created shortcut into the “Startup” folder.
- Close the “Startup” folder.
By following these steps, you can easily modify the startup behavior in Windows Vista. Whether you want to speed up startup by disabling unnecessary programs or ensure that essential applications launch automatically, customization options are available to you.
Managing the startup behavior allows you to optimize your computer’s performance and improve productivity. It ensures that the necessary programs are readily available without having to manually launch them each time you start your computer.
Now that you know how to change the startup behavior in Windows Vista, you can customize it according to your needs and preferences, resulting in a more efficient and personalized computing experience.
Changing the Startup Behavior in Windows XP
In Windows XP, you can easily customize the startup behavior of your computer by controlling which programs and applications launch automatically upon startup. By managing the startup behavior, you can optimize your computer’s performance and ensure that only the necessary applications are loaded, resulting in a faster and more efficient startup process. Here’s how you can change the startup behavior in Windows XP:
- Click on the “Start” button and then select “All Programs”.
- In the list of programs, locate the “Startup” folder and click on it to open.
- You will see a list of shortcuts to programs and applications that currently launch at startup. To disable a program from launching, right-click on its shortcut and select “Delete”.
- To add a new program or application to the startup list, navigate to the program or application’s location on your computer.
- Right-click on the program or application’s executable file and select “Create Shortcut”.
- Drag and drop the newly created shortcut into the “Startup” folder.
- Close the “Startup” folder.
By following these steps, you can easily modify the startup behavior in Windows XP. Whether you want to speed up startup by disabling unnecessary programs or ensure that essential applications launch automatically, customization options are available to you.
Managing the startup behavior allows you to optimize your computer’s performance and improve productivity. It ensures that the necessary programs are readily available without having to manually launch them each time you boot up your computer.
Now that you know how to change the startup behavior in Windows XP, you can customize it according to your needs and preferences, resulting in a more efficient and personalized computing experience.