
What Is Windows Terminal?
Windows Terminal is a powerful command-line interface (CLI) application developed by Microsoft for Windows. It provides a modern and streamlined way to work with command-line tools, shells, and Linux distributions on the Windows operating system.
Previously, Windows users had to rely on separate command-line applications like Command Prompt, PowerShell, and Windows Subsystem for Linux (WSL) to interact with the command-line interface. However, Windows Terminal combines all of these tools into a single, unified application.
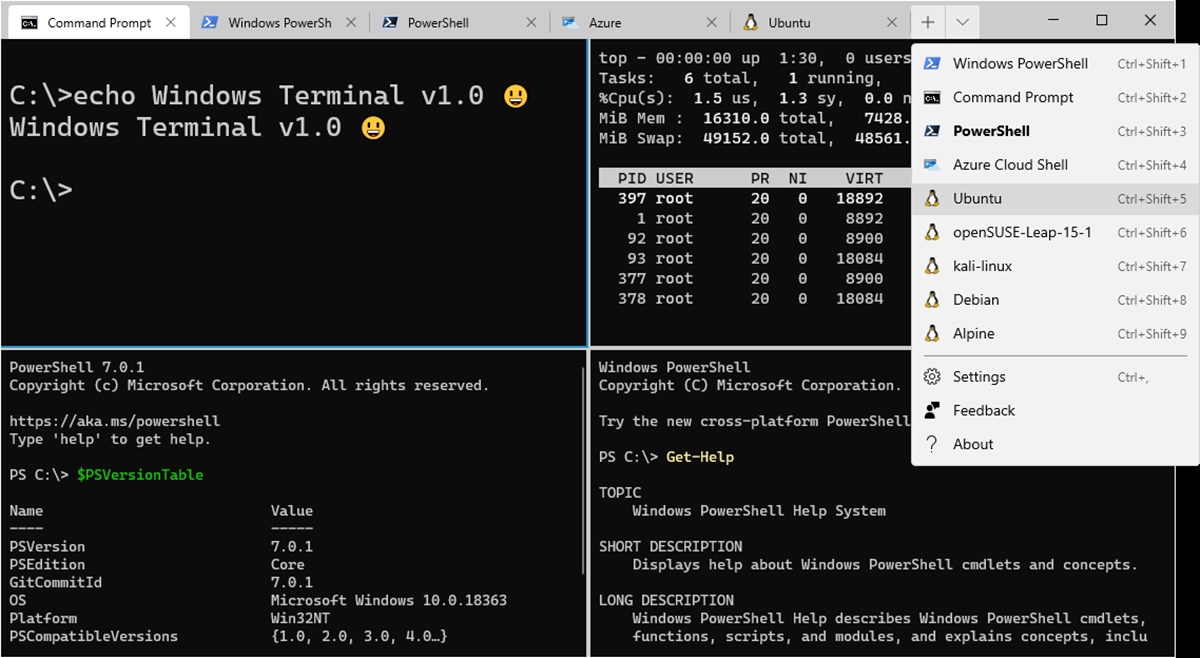
With Windows Terminal, users can open multiple command-line instances in separate tabs or split panes, allowing for efficient multitasking and quick access to different command-line tools. It offers a sleek and customizable interface that caters to the needs of both casual and power users.
One of the standout features of Windows Terminal is its support for different shells, including Command Prompt, PowerShell, Azure Cloud Shell, and various Linux distributions such as Ubuntu, Debian, and Fedora through WSL. This versatility provides users with the flexibility to choose the environment that best suits their workflow.
In addition to the shell support, Windows Terminal offers a range of customization options. Users can modify the appearance of the application by selecting their preferred theme, font, and color scheme. It also supports the use of keyboard shortcuts to enhance productivity.
Windows Terminal supports UTF-8 encoding, enabling users to work with a wide range of characters, including emojis and Unicode symbols. This makes it ideal for developers, system administrators, and anyone who regularly interacts with the command-line interface.
Whether you’re a developer who prefers using Git Bash, a system administrator who relies on PowerShell, or a Linux enthusiast running WSL, Windows Terminal provides a unified and efficient solution for managing your command-line tasks seamlessly.
In the next sections, we’ll dive deeper into the various features and customization options available in Windows Terminal, allowing you to harness its full potential and optimize your command-line experience.
Features of Windows Terminal
Windows Terminal is packed with an array of features that make it a powerful tool for command-line enthusiasts. Let’s explore some of its key features:
- Multiple Tab Support: Windows Terminal allows users to open multiple command-line instances in separate tabs. This makes it easy to switch between different shells or command-line tools within a single application window, enhancing productivity and organization.
- Split Panes: In addition to tabbed interface, Windows Terminal also supports split panes. Users can divide the terminal window horizontally or vertically, allowing them to run multiple commands or view different outputs simultaneously. This feature is particularly useful for comparing results, running command-line tools side by side, or monitoring logs and outputs in real-time.
- Shell Selection: Windows Terminal supports a variety of shells, including Command Prompt, PowerShell, Azure Cloud Shell, and various Linux distributions through WSL. Users can select their preferred shell and easily switch between them based on their needs and preferences.
- Customization Options: Windows Terminal offers a high level of customization. Users can personalize the application’s appearance by selecting different themes, fonts, and color schemes. It also provides the option to define custom key bindings and shortcuts, allowing for a tailored and efficient command-line experience.
- Unicode Support: Windows Terminal fully supports UTF-8 encoding, enabling users to work with a wide range of characters, including emojis and Unicode symbols. This is particularly beneficial for developers or system administrators who work with multiple languages or special characters.
- Hyperlinks and Styling: Windows Terminal supports hyperlinks and styling within the terminal. This means that URLs and file paths can be automatically detected and are clickable, making it easy to open relevant resources directly from the terminal interface. Users can also apply formatting styles to command output for improved readability.
- Search Functionality: Windows Terminal includes a search feature that allows users to find specific strings or commands within their command-line session. This feature is especially useful when working with large logs or searching for specific information within a lengthy output.
- Multi-Platform Support: Although Windows Terminal is primarily built for Windows, it can also be used on other platforms like macOS and Linux. This cross-platform compatibility ensures a consistent command-line experience across different operating systems.
These are just a few of the notable features that Windows Terminal offers. Its intuitive interface, extensive customization options, and support for various shells make it a versatile and indispensable tool for developers, system administrators, and command-line enthusiasts.
Installing Windows Terminal
Installing Windows Terminal is a straightforward process. Follow these steps to get started:
- Check Operating System Compatibility: Windows Terminal is compatible with Windows 10 May 2019 Update (version 1903) and later versions. Ensure that your system meets this requirement before proceeding with the installation.
- Open Microsoft Store: Launch the Microsoft Store application on your Windows PC. You can find it by searching for “Microsoft Store” in the start menu.
- Search for Windows Terminal: In the search bar of the Microsoft Store, type “Windows Terminal” and hit enter. The Windows Terminal application page will appear in the search results.
- Install Windows Terminal: Click on the Windows Terminal application in the Microsoft Store and then click on the “Install” button. The installation process will begin, and once completed, you will be able to launch Windows Terminal from your start menu or by searching for “Windows Terminal”.
- Verify Installation: To ensure that Windows Terminal is installed correctly, open the application by clicking on the corresponding icon. You should see the default terminal interface, ready for you to start using.
That’s it! You have successfully installed Windows Terminal on your Windows PC. Now you are ready to start exploring its various features and customization options, making your command-line experience more efficient and enjoyable.
Note that if you prefer alternative installation methods, Windows Terminal is also available for manual download from the Microsoft Terminal GitHub repository. There, you can find the latest release of Windows Terminal in the form of an installer package, which can be used to install the application on your system.
Now that you have Windows Terminal up and running, let’s move on to the next section, where we will delve into the customization options available to tailor your Windows Terminal experience.
Customizing Windows Terminal
Windows Terminal provides various customization options to personalize the application according to your preferences. Here are some ways to customize Windows Terminal:
- Themes and Color Schemes: Windows Terminal supports different color schemes, allowing you to choose the appearance that best suits your style. You can select from a range of built-in themes or even create your own by modifying the color values in the settings file.
- Font and Text Settings: Customize the font family, size, and style used in the terminal. Whether you prefer a sleek monospaced font or a more decorative typeface, Windows Terminal gives you the flexibility to choose a font that enhances readability and aesthetics.
- Background Image: Add a background image to your terminal window to personalize its appearance. You can use a favorite image, logo, or artwork to create a unique and visually appealing terminal environment.
- Tab Bar and Title Bar: Modify the layout and appearance of the tab bar and title bar to suit your preferences. You can choose to hide or show the tab bar, customize its position, and adjust its size and color. Similarly, you can configure the title bar to display the desired information.
- Key Bindings: Windows Terminal allows you to define custom key bindings to enhance your productivity. You can assign shortcuts to specific commands or configure macros to automate repetitive tasks. This feature enables you to optimize your workflow and execute commands more efficiently.
- Profiles: Windows Terminal supports multiple profiles, which allow you to configure different shell settings for specific tasks or command-line tools. You can customize each profile by modifying parameters such as shell executable, startup directory, and command-line arguments.
- Command-Line Arguments: Customizing command-line arguments for each profile lets you launch specific applications or scripts when starting a new terminal instance. This allows for more streamlined and efficient workflows, as you can directly start working on your desired tasks without the need for manual navigation.
To customize Windows Terminal, you can modify the settings in the JSON-based configuration file. This file contains all the options and properties that control the behavior and appearance of the application. You can access the settings file by opening the settings menu in Windows Terminal or by manually locating it on your system.
By experimenting with these customization options, you can create a Windows Terminal setup that matches your personal style and workflow. The ability to tailor the terminal to your needs enhances productivity and makes working on the command-line a more enjoyable experience.
In the next section, we will explore how to split panes in Windows Terminal, enabling you to multitask and run multiple commands simultaneously.
Split Panes in Windows Terminal
Split panes in Windows Terminal are a powerful feature that allows users to divide the terminal window into multiple panes, facilitating multitasking and enhancing productivity. Here’s how you can utilize split panes in Windows Terminal:
- Splitting Panes: To split the terminal window horizontally, use the keyboard shortcut
Alt + Shift + -or right-click on the terminal tab and select “Split Pane.” To split vertically, use the keyboard shortcutAlt + Shift + +or right-click on the terminal tab and choose “Split Pane Vertically.” These actions will divide the window into two panes, each containing its own command-line instance. - Navigating Between Panes: To switch between different panes, use the keyboard shortcuts
Alt + Left,Alt + Right,Alt + Up, andAlt + Down. Alternatively, you can use the mouse to click on a specific pane to bring it into focus. - Resizing Panes: Adjust the size of each pane by clicking and dragging the border between them. You can make a pane larger or smaller based on your needs. This flexibility allows you to allocate more space to the panes requiring more attention or screen real estate.
- Closing Panes: To close a split pane, focus on the pane you want to close and use the keyboard shortcut
Ctrl + Shift + W. Alternatively, you can right-click the pane tab and select “Close Pane.” Closing a pane merges the remaining panes back into a single terminal window. - Pinning Panes: To prevent accidental closure, you can pin panes using the keyboard shortcut
Ctrl + Shift + Por right-clicking the pane tab and selecting “Pin Pane.” Pinned panes cannot be closed, providing a way to keep essential panes open while freely closing and reopening others.
Split panes are immensely useful for various tasks such as monitoring logs, comparing outputs, running multiple commands simultaneously, or working with different command-line tools side by side. They enable users to efficiently multitask within a single terminal window and streamline their command-line workflow.
Now that you are familiar with split panes, let’s move on to the next section, where we will explore another useful feature of Windows Terminal – the tabbed interface.
Using Tabbed Interface in Windows Terminal
The tabbed interface in Windows Terminal provides a convenient way to manage multiple command-line instances within a single application window. Here’s how you can make the most of the tabbed interface in Windows Terminal:
- Opening New Tabs: To open a new tab, use the keyboard shortcut
Ctrl + Shift + Tor click on the plus icon (+) on the tab bar. Each tab represents a separate command-line instance, allowing you to work on different tasks or switch between different shells effortlessly. - Navigating Between Tabs: To switch between different tabs, use the keyboard shortcuts
Ctrl + Shift + TabandCtrl + Shift + PageUpto move to the previous tab, andCtrl + Shift + PageDownto move to the next tab. Alternatively, you can click on a specific tab to bring it into focus. - Reordering Tabs: Rearrange the order of tabs by clicking and dragging them on the tab bar. This allows you to organize your tabs based on priority or workflow, making it easier to locate and access specific command-line instances.
- Closing Tabs: To close a tab, use the keyboard shortcut
Ctrl + Shift + Wor click on the close icon (x) on the tab. Closing a tab removes the associated command-line instance, but other tabs remain unaffected, allowing you to continue working uninterrupted. - Duplicating Tabs: Duplicate a tab by right-clicking on a tab and selecting “Duplicate Tab.” This creates a new tab with the same command-line instance, allowing you to run the same commands or view the same output simultaneously.
- Switching Profiles: Customize each tab by selecting different profiles. Right-click on a tab, go to “Switch To,” and choose the desired profile. This allows you to work with different shells or command-line tools in separate tabs, tailoring the environment to each specific task.
The tabbed interface in Windows Terminal simplifies the management of multiple command-line sessions. It prevents clutter and makes it easier for users to navigate between different tasks, shells, or command-line tools. With this feature, you can efficiently organize your working environment and optimize your productivity.
Now that you’re familiar with the tabbed interface, let’s move on to the next section and explore how to customize profiles in Windows Terminal.
Customizing Profiles in Windows Terminal
In Windows Terminal, profiles represent the different command-line environments or shells that you can use. Each profile has its own set of settings and configurations that can be customized to suit your preferences. Here’s how you can customize profiles in Windows Terminal:
- Opening the Profiles Settings: To access the profiles settings, open Windows Terminal and click on the down-arrow icon (v) located at the right side of the tab bar. This will open a drop-down menu. Select “Settings” to open the profiles.json file, where you can customize the profiles.
- Modifying Profile Properties: In the profiles.json file, you can modify properties such as the shell executable, the startup directory, and the command-line arguments for each profile. For example, you can define a PowerShell profile with a specific set of starting commands or a profile that launches Git Bash with a predefined working directory.
- Adding New Profiles: To add a new profile, copy an existing profile structure and modify the properties to create a unique profile. Each profile requires a unique “name” property to differentiate it from other profiles. You can define profiles for different shells, such as Command Prompt, PowerShell, or WSL distributions.
- Customizing Appearance: You can customize the appearance of individual profiles by modifying the “colorScheme” property. Each color scheme corresponds to the predefined color schemes available in Windows Terminal, allowing you to differentiate the appearance of different profiles for easier visual recognition.
- Assigning Shortcut Keys: You can assign shortcut keys to specific profiles by modifying the “keybindings” property. This allows you to quickly switch between profiles using the assigned keyboard shortcuts, increasing your efficiency when working with different command-line environments.
- Defining Starting Directory: Specify the starting directory for each profile by modifying the “startingDirectory” property. This ensures that the command-line instance associated with a particular profile opens in the desired directory, saving you from manually navigating to the required location.
By customizing profiles in Windows Terminal, you can create a tailored environment for each command-line tool or shell you use. This flexibility allows you to optimize your workflow based on specific requirements and preferences, making your command-line experience more efficient and personalized.
Now that you know how to customize profiles in Windows Terminal, let’s move on to the next section and explore how to work with multiple tabs in Windows Terminal.
Working with Multiple Tabs in Windows Terminal
Windows Terminal allows users to work with multiple tabs, each representing a separate command-line instance. This feature enables efficient multitasking and improves organization. Here’s how you can work with multiple tabs in Windows Terminal:
- Opening New Tabs: To open a new tab, you can use the keyboard shortcut
Ctrl + Shift + Tor click on the plus icon (+) on the tab bar. Each new tab represents a separate command-line instance, allowing you to work on different tasks simultaneously. - Switching Between Tabs: To switch between tabs, use the keyboard shortcuts
Ctrl + Shift + Tab(previous tab) andCtrl + Shift + PageUp(next tab). Alternatively, you can click on a specific tab to bring it into focus. This allows for easy navigation and swift access to specific command-line instances. - Duplicating Tabs: Duplicate a tab by right-clicking on the tab and selecting “Duplicate Tab.” This creates a new tab with the same command-line instance, allowing you to run the same commands or view the same output simultaneously. This comes in handy when you want to compare results or have multiple instances of the same shell.
- Moving Tabs: Rearrange the order of tabs by clicking and dragging them on the tab bar. This allows you to organize your tabs based on priority or workflow, making it easier to locate and access specific command-line instances.
- Closing Tabs: To close a tab, use the keyboard shortcut
Ctrl + Shift + Wor click on the close icon (x) on the tab. Closing a tab removes the associated command-line instance, allowing you to clean up your workspace and focus on the remaining tasks. - Opening Profiles in New Tabs: You can open specific profiles in new tabs by right-clicking on the tab bar and selecting “New Tab.” This prompts a drop-down menu with a list of available profiles. Select the desired profile to open it in a new tab, allowing you to work with different shells or command-line tools side by side.
- Switching to Recently Used Tabs: Windows Terminal provides a convenient way to switch to recently used tabs. Use the keyboard shortcut
Ctrl + Tabto cycle through the previously used tabs. This allows for quick switching between tabs without the need to remember their order or manually navigate to a specific tab.
Working with multiple tabs in Windows Terminal enhances productivity by allowing you to effectively manage multiple command-line instances. It seamlessly caters to various tasks and ensures a streamlined workflow.
Now that you are familiar with working with multiple tabs, let’s move on to the next section where we will explore the keyboard shortcuts available in Windows Terminal for efficient navigation and execution of commands.
Keyboard Shortcuts in Windows Terminal
Windows Terminal provides several keyboard shortcuts to enhance your navigation and productivity when working with command-line instances. Here are some useful keyboard shortcuts you can use in Windows Terminal:
- Tab Management:
Ctrl + Shift + T: Open a new tab.Ctrl + Shift + W: Close the current tab.Ctrl + Shift + Tab: Switch to the previous tab.Ctrl + Shift + PageUp: Switch to the next tab.
- Pane Management:
Alt + Shift + -: Split the current pane horizontally.Alt + Shift + +: Split the current pane vertically.Alt + Left/Right/Up/Down: Navigate between panes.
- Profile Selection:
Ctrl + Shift + N: Open a new tab with the default profile.Ctrl + Shift + 1-9: Switch to the corresponding profile tab.
- Terminal Navigation:
Ctrl + Home/End: Scroll to the top/bottom of the buffer.Ctrl + Up/Down/PageUp/PageDown: Scroll within the terminal buffer.
- Text Selection and Copy:
Ctrl + Shift + Left/Right: Select text within the terminal.Ctrl + Shift + C: Copy the selected text to the clipboard.
- Command Execution:
Ctrl + Insert: Copy selected text without entering selection mode.Shift + Insert: Paste text from the clipboard.Ctrl + Shift + V: Paste text from the clipboard preserving formatting.
These keyboard shortcuts help streamline your workflow and make it easier to navigate, manage, and interact with command-line instances within Windows Terminal. By utilizing these shortcuts, you can save time and execute commands more efficiently.
Feel free to explore more keyboard shortcuts and customize them based on your preferences using the settings file in Windows Terminal. This allows you to further enhance your productivity and tailor your command-line experience.
Now that you’re familiar with the keyboard shortcuts, let’s move on to the next section where we will explore additional settings and configuration options available in Windows Terminal.
Additional Settings and Configuration Options in Windows Terminal
Windows Terminal provides a wide range of settings and configuration options that allow you to further customize and optimize your command-line experience. Here are some additional settings and configuration options available in Windows Terminal:
- Appearance Settings: Customize the appearance of Windows Terminal by modifying properties such as the background color, foreground color, cursor shape, and more. You can choose from a variety of predefined color schemes or create your own by editing the settings file.
- Font Settings: Adjust the font family, size, and weight used in Windows Terminal to match your preferences. You can select and configure a monospaced font that best suits your readability and aesthetics requirements.
- Startup Actions: Define actions to be executed when Windows Terminal starts. This can include running specific commands, scripts, or initializing certain tools or environments automatically. Startup actions help streamline your workflow by eliminating the need to manually execute these commands every time you open Windows Terminal.
- Copy and Paste Configuration: Customize the behavior of copy and paste actions in Windows Terminal by specifying whether the selection should automatically be copied to the clipboard or if a modifier key is required. You can also enable or disable the automatic copying of a selection as soon as it is made.
- Mouse Configuration: Adjust the behavior of the mouse in Windows Terminal by defining how mouse input is processed. You can specify actions for various mouse button clicks or scrolling gestures, allowing you to perform specific functions or navigate through the terminal more efficiently.
- Input Settings: Configure the input behavior of Windows Terminal by modifying settings such as whether to enable or disable input processing, control key behavior, or whether to use legacy mode for compatibility with older applications.
- Key Binding Overrides: Modify or override the default keyboard shortcuts in Windows Terminal to suit your preferences. You can define custom keyboard shortcuts for various actions or override existing shortcuts based on your workflow, allowing for a personalized command-line experience.
- Environment Variables: Customize the environment variables used within Windows Terminal by defining or modifying specific variables. This provides you with the flexibility to adapt Windows Terminal to your specific needs or integrate it with other tools and environments.
By exploring and utilizing these additional settings and configuration options in Windows Terminal, you can tailor the application to match your workflows, increase productivity, and optimize your command-line experience.
Now that you’re familiar with these settings and configuration options, you can leverage them to make Windows Terminal even more efficient and personalized to meet your specific requirements.
Troubleshooting Windows Terminal
While Windows Terminal is a robust and reliable command-line application, you may encounter occasional issues or errors. Here are some common troubleshooting techniques to help resolve problems in Windows Terminal:
- Update Windows Terminal: Ensure that you have the latest version of Windows Terminal installed. Newer versions often include bug fixes and performance improvements that can resolve various issues.
- Restart Windows Terminal: If you encounter any unexpected behavior or performance issues, try restarting Windows Terminal. Sometimes, simply closing and reopening the application can resolve minor issues.
- Check System Requirements: Verify that your system meets the minimum requirements for running Windows Terminal. Ensure that you are running a compatible version of Windows and have the necessary dependencies installed.
- Review Configuration Settings: If you have made customizations to the Windows Terminal settings file (profiles.json), review your configuration settings for any syntax errors or conflicting configurations. Correct any issues and restart Windows Terminal to apply the changes.
- Reset Settings: If you are experiencing persistent issues, you can try resetting Windows Terminal to its default settings. This can be done by renaming or deleting the settings file (profiles.json), and then relaunching Windows Terminal to generate a fresh configuration file.
- Remove Problematic Extensions: If you have installed any third-party extensions or plugins for Windows Terminal, try disabling or removing them to see if they are causing any conflicts or issues. Sometimes, incompatible or outdated extensions can cause instability or unexpected behavior.
- Check for System Updates: Ensure that your Windows operating system is up to date with the latest patches and updates. System updates often include fixes for known issues and security vulnerabilities.
- Search Documentation and Forums: If you are still experiencing difficulties, consider searching the Windows Terminal documentation, Microsoft forums, or online communities for specific error messages or symptoms that you are encountering. Oftentimes, others may have experienced similar issues and found solutions or workarounds.
- Contact Support: If none of the above troubleshooting steps resolves your issue, consider reaching out to the Windows Terminal support channels. Microsoft provides official support through their website, where you can submit bug reports or seek assistance from their support team.
By following these troubleshooting techniques, you can resolve common issues and ensure a smooth and reliable experience with Windows Terminal.
Now that you are equipped with troubleshooting strategies, you can confidently troubleshoot and resolve any issues that may arise while using Windows Terminal.