
Understanding the Mouse
A mouse is an essential input device that allows users to interact with their computers. It provides a convenient way to navigate, select, and interact with various elements on the screen. On a Mac, the mouse is primarily used for left-clicking, which is the most common action performed. Understanding how the mouse works and its different features can help you make the most out of your Mac experience.
The mouse typically consists of a right-click button, a left-click button, and a scroll wheel or trackpad. The left-click button is used to select and activate items on the screen. When you left-click on an icon, file, or application, it performs the default action, such as opening a file or launching an application.
Mac computers also come with a built-in trackpad, which can be used as an alternative to a traditional mouse. The trackpad offers the same left-click functionality but allows you to perform gestures and other multi-touch actions as well.
Configuring the mouse settings can help customize the way it behaves on your Mac. You can adjust the tracking speed, scrolling options, and button assignments according to your preferences. To access the mouse settings, go to the Apple menu, select “System Preferences,” and then click on “Mouse.” From there, you can explore the different settings and make adjustments as needed.
Left-clicking with the mouse is a simple action. To perform a left-click, position the cursor over the item you want to select, and then press the left-click button once. The selection will be highlighted, and any associated action will be performed. Remember to release the button after clicking.
If you are using a trackpad on your Mac, the left-click action can be done by tapping the trackpad with one finger or pressing down on it with a single finger. You can adjust the trackpad settings to determine the sensitivity of the tap or click action.
Using a Bluetooth mouse is another option for Mac users. It offers the flexibility of wireless connectivity and can be paired with your Mac easily. Once the Bluetooth mouse is connected, you can perform left-click actions in the same way as with a traditional mouse.
In some cases, you may encounter issues with left-clicking, such as the mouse not responding or the left-click button not working correctly. If this happens, there are a few troubleshooting steps you can try. Restarting your Mac, updating the mouse driver, or reconnecting the Bluetooth mouse can often resolve these issues.
Alternatively, if you prefer not to use a mouse or trackpad, there are alternative ways to perform a left-click on a Mac. You can use keyboard shortcuts or enable the “Tap to Click” option on the trackpad, allowing you to perform a left-click by tapping on the trackpad surface with one finger.
Understanding how to use the mouse effectively and troubleshooting any issues that may arise can greatly improve your Mac experience. Whether you prefer a traditional mouse or a trackpad, the left-click function is crucial for interacting with your computer and performing various actions.
Configuring Mouse Settings
Configuring your mouse settings on a Mac can help tailor its behavior to your liking and enhance your overall user experience. By accessing the mouse settings, you can adjust various parameters such as tracking speed, scrolling options, and button assignments. Here is a guide on how to configure mouse settings on your Mac.
To access the mouse settings, start by clicking on the Apple menu in the top-left corner of your screen. Next, select “System Preferences” from the drop-down menu. In the System Preferences window, click on “Mouse” to open the mouse settings panel.
Once you are in the mouse settings panel, you will find several tabs or options that allow you to customize different aspects of the mouse. The exact options and layout might vary depending on your macOS version, but the core settings should be similar.
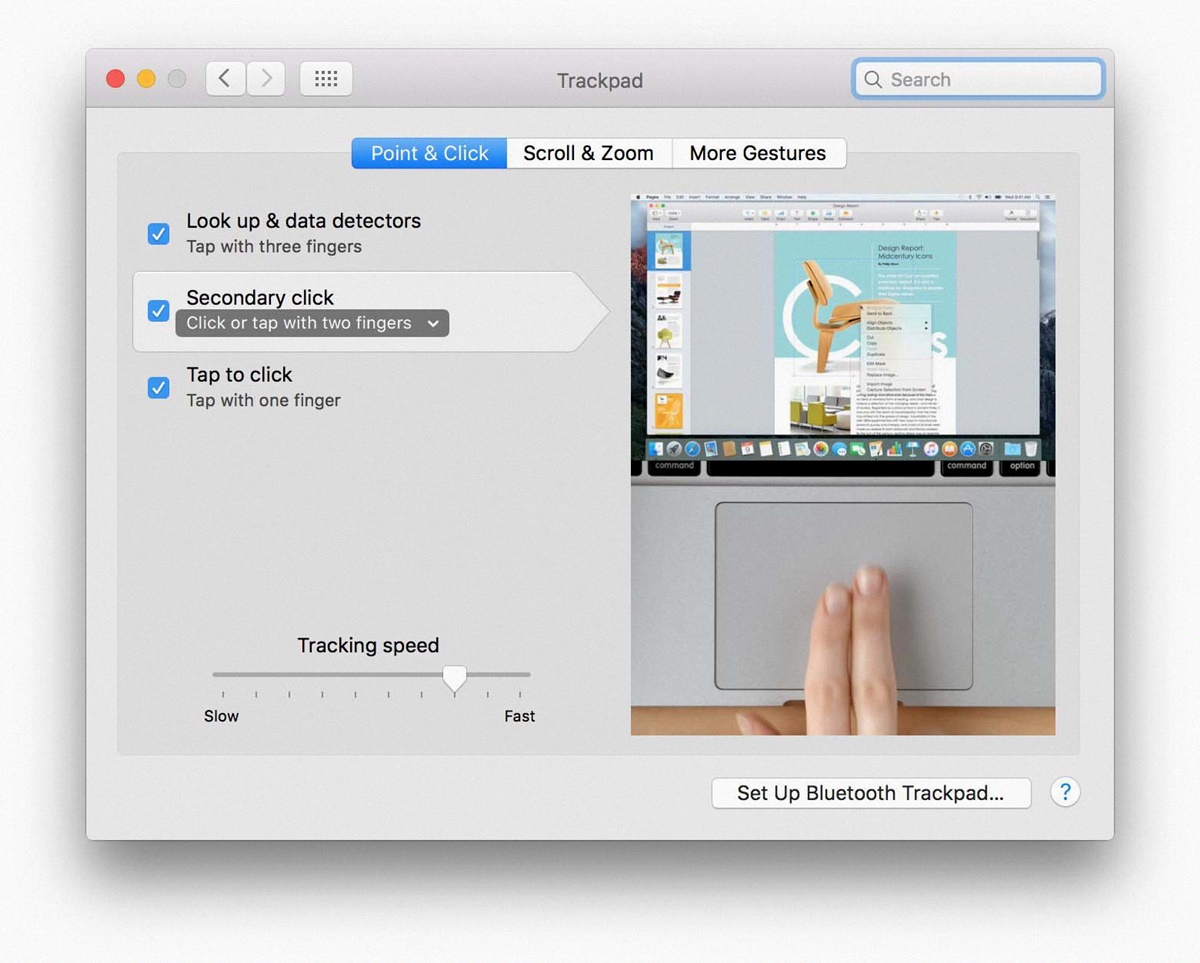
The first tab you will likely come across is the “Point & Click” tab. Here, you can adjust the tracking speed of the mouse cursor. Move the slider to the right to increase the cursor speed, or to the left to decrease it. Experiment with different settings until you find a cursor speed that feels comfortable for your needs.
Another option in the “Point & Click” tab is “Scroll direction: natural.” By default, macOS has the scroll direction set to “natural,” which means scrolling up on the mouse wheel or trackpad moves the content down, similar to the natural motion of flipping a page. If you prefer the traditional scroll direction, uncheck this option.
If your mouse has additional buttons or features, you can assign functions to them under the “Button” tab. You may be able to configure actions such as opening Mission Control, launching Launchpad, or activating the Application Switcher with these buttons. Find the button you want to customize and select the desired function from the drop-down menu.
For precise control over the mouse pointer, you can enable the “Scrolling” feature under the “More Gestures” tab. This allows you to scroll up, down, left, or right by moving two fingers on the trackpad or scrolling on the mouse wheel.
Once you have made the desired changes to the mouse settings, you can close the mouse settings panel. Your settings will be automatically saved, and the new configuration will take effect immediately.
It’s important to note that not all mouse models may have extensive customization options available. The available settings will depend on the specific mouse and its compatibility with macOS.
By tweaking and customizing the mouse settings on your Mac, you can optimize the mouse’s behavior to suit your preferences and needs. Experiment with different configurations until you find the settings that provide you with the most comfortable and efficient mouse experience.
Left-Clicking with the Mouse
Left-clicking with the mouse is a fundamental action that allows you to select and interact with items on your Mac. Whether you’re navigating through folders, clicking on icons, or interacting with applications, mastering the art of left-clicking is crucial for efficient computer usage. Here is a guide on how to left-click with the mouse on your Mac.
To perform a left-click, start by positioning the mouse cursor over the item you want to select or interact with. This can be an icon, a file, a button, or any other clickable element on your screen.
Once the cursor is in the desired position, press the left-click button on your mouse once. The left-click button is typically located on the left side of the mouse, opposite the right-click button or scroll wheel.
When you press the left-click button, the item you have selected will be highlighted or activated, and any associated action will be performed. For example, if you left-click on a file, it will open in the appropriate application for viewing or editing.
Remember to release the left-click button after clicking. Holding the button down will not continuously perform the left-click action.
If you’re using a trackpad on your Mac instead of a traditional mouse, left-clicking can be done by tapping the trackpad with one finger or pressing down on it with a single finger. The trackpad is pressure-sensitive, so a light tap or press is enough to register a left-click.
You can adjust the sensitivity of the trackpad in the mouse settings to determine how lightly or firmly you need to tap or press for a left-click to occur. Experiment with the settings and find the level of sensitivity that feels comfortable for you.
In addition to the physical left-click button or trackpad action, there are other ways to perform a left-click on your Mac. Keyboard shortcuts can be used as an alternative to clicking. For example, pressing the “Enter” key or the “Spacebar” can initiate a left-click action on a selected item.
Furthermore, if you have enabled the “Tap to Click” option in the trackpad settings, you can perform a left-click by simply tapping on the trackpad surface with one finger. This eliminates the need for a physical press or click.
Mastering the art of left-clicking with the mouse is essential for navigating and interacting with your Mac. Whether you’re using a traditional mouse or a trackpad, understanding the mechanics of left-clicking allows you to effortlessly select, activate, and perform actions with ease.
Using the Built-in Trackpad
Mac computers come equipped with a built-in trackpad that provides a versatile and intuitive way to interact with your device. The trackpad offers advanced gestures and multi-touch capabilities, allowing you to perform various actions without the need for an external mouse. Here’s a guide on how to use the built-in trackpad on your Mac.
To begin, locate the trackpad below your keyboard on your MacBook or in front of the keyboard on your iMac. The trackpad is a smooth, touch-sensitive surface that responds to your fingertips.
One of the key functions of the trackpad is left-clicking. To perform a left-click, position your finger on the trackpad’s surface and press down lightly to initiate the click. The trackpad is pressure-sensitive, so there’s no need for a physical button. Once you release your finger, the left-click action will be completed.
If you find it more comfortable, you can enable the “Tap to Click” option in the trackpad settings. This allows you to perform a left-click simply by tapping lightly on the trackpad surface with one finger. With this option enabled, you don’t need to press down to initiate a left-click, making it a more convenient and efficient method.
In addition to left-clicking, the trackpad offers a range of multi-touch gestures that enhance your navigation and interaction experience. Here are a few commonly used gestures:
- Scrolling: Place two fingers on the trackpad and move them up or down to scroll through documents, web pages, or other content vertically.
- Zooming: Pinch two fingers together to zoom out or spread them apart to zoom in on a document, image, or web page.
- Swiping: Use three fingers to swipe left or right on the trackpad to switch between desktops or full-screen apps.
- Mission Control: Swipe up with three fingers to access Mission Control, which displays an overview of all open windows and spaces on your Mac.
These are just a few examples of the many gestures you can perform with the built-in trackpad. Experiment with different gestures and explore the trackpad settings to discover the full range of options available.
Just like with a traditional mouse, you can adjust the trackpad’s sensitivity and other settings to suit your preferences. To do this, go to the Apple menu, select “System Preferences,” then click on “Trackpad.” From there, you can customize options such as tracking speed, tap to click, and gesture settings.
The built-in trackpad on your Mac offers a seamless and intuitive way to navigate and interact with your device. Whether you’re performing left-clicks, scrolling through content, or using advanced gestures, the trackpad provides a versatile and efficient input method for your Mac experience.
Using a Bluetooth Mouse
If you prefer using a wireless mouse with your Mac, a Bluetooth mouse offers a convenient and clutter-free solution. Bluetooth mice can easily connect to your Mac without the need for additional cables or dongles. Here’s a guide on how to use a Bluetooth mouse with your Mac.
Before connecting the Bluetooth mouse, ensure that it is powered on and in pairing mode. Most Bluetooth mice have a button or switch that needs to be pressed or toggled to initiate the pairing process.
On your Mac, click on the Apple menu located at the top left of your screen. From the drop-down menu, select “System Preferences” and then click on “Bluetooth.”
In the Bluetooth preferences window, ensure that Bluetooth is turned on. Your Mac will start searching for nearby Bluetooth devices.
Locate your Bluetooth mouse in the list of available devices and click on it to initiate the pairing process. Follow any on-screen prompts if required.
Once your Bluetooth mouse is successfully connected, it should appear as “Connected” or “Ready to use” in the Bluetooth preferences window.
Now that your Bluetooth mouse is connected, you can begin using it with your Mac. Move the mouse to control the cursor on your screen. Left-click by pressing the left-click button on the mouse.
If your Bluetooth mouse has additional functionality, such as customizable buttons or gestures, you may need to install additional software or drivers provided by the manufacturer. Check the mouse’s documentation or the manufacturer’s website for any specific software requirements or instructions.
Bluetooth mice offer the flexibility of wireless connectivity, allowing you to move around freely without the constraints of a physical cable. They are particularly beneficial for MacBook users who require a mouse when working on the go or in limited spaces.
To conserve battery life, remember to turn off the Bluetooth mouse when not in use. Some Bluetooth mice also have an auto-sleep feature that activates when the mouse is idle for a certain period.
If you experience any issues with your Bluetooth mouse, such as a connection problem or unresponsiveness, try turning off and on the mouse or restarting your Mac. You can also try removing the mouse from the Bluetooth preferences and re-pairing it.
Using a Bluetooth mouse on your Mac provides a wireless and convenient way to interact with your computer. Whether you’re working on a desktop or a MacBook, a Bluetooth mouse offers the flexibility and ease of use that enhances your productivity and overall user experience.
Troubleshooting Left-Click Issues
If you’re experiencing issues with left-clicking on your Mac, such as the left-click button not responding or not functioning correctly, there are several troubleshooting steps you can take to resolve the problem. Here’s a guide on how to troubleshoot left-click issues.
1. Check the mouse or trackpad: Ensure that your mouse or trackpad is properly connected to your Mac and that it has power. If you’re using a wired mouse, check the cable for any damage or loose connections. For a wireless mouse or trackpad, make sure the batteries are charged or replace them if necessary.
2. Restart your Mac: Sometimes, a simple restart can resolve minor software or connectivity issues. Go to the Apple menu and select “Restart” to reboot your Mac and see if the left-click issue persists.
3. Update macOS and mouse drivers: Keeping your Mac’s operating system and mouse drivers up to date can help resolve compatibility issues. Check for any available updates by going to the Apple menu, selecting “System Preferences,” and clicking on “Software Update.” Also, check the manufacturer’s website for any driver updates specifically for your mouse model.
4. Check mouse settings: Verify that the mouse settings are configured correctly. Go to the Apple menu, select “System Preferences,” and click on “Mouse” or “Trackpad.” Ensure that the left-click button or tap action is set to the desired function and sensitivity is adjusted appropriately.
5. Repair Bluetooth connection: If you’re using a Bluetooth mouse or trackpad and experiencing left-click issues, try repairing the Bluetooth connection. Go to the Apple menu, select “System Preferences,” and click on “Bluetooth.” Remove the mouse or trackpad from the list of connected devices, then re-pair it following the initial setup process.
6. Try a different USB port or Bluetooth receiver: If you’re using a wired mouse with a USB connection, try plugging it into a different USB port on your Mac. For a wireless mouse, try using a different Bluetooth receiver or connecting it to another device to rule out any hardware-related issues.
7. Test with another mouse or trackpad: If possible, try using a different mouse or trackpad to see if the left-click issue persists. This will help identify whether the problem lies with the device or your Mac’s settings.
8. Reset NVRAM/PRAM: Resetting the NVRAM (non-volatile random-access memory) or PRAM (parameter random-access memory) can sometimes resolve hardware-related issues. Restart your Mac and immediately press and hold the “Option + Command + P + R” keys until you hear the startup chime or see the Apple logo appear and disappear for the second time.
If none of the above steps resolve the left-click issue, it may be necessary to seek further assistance from Apple Support or contact the manufacturer of your mouse or trackpad for additional troubleshooting guidance.
By following these troubleshooting steps, you can identify and resolve left-click issues on your Mac, allowing you to regain full functionality and optimize your productivity.
Alternative Ways to Perform a Left-Click
While the traditional left-clicking method using a mouse or trackpad is the most common way to interact with your Mac, there are alternative methods available that can be helpful in certain situations. These alternative methods provide additional flexibility and convenience when performing a left-click action. Here are some alternative ways to perform a left-click on your Mac:
1. Keyboard shortcuts: Keyboard shortcuts are a quick and efficient way to perform various actions on your Mac, including left-clicking. The “Enter” key on your keyboard often serves as a shortcut for triggering a left-click action. For example, when a button or icon is selected, pressing the “Enter” key will activate the default action associated with it.
2. Tap to Click: If you’re using a trackpad, you can enable the “Tap to Click” option in the trackpad settings. This allows you to perform a left-click action by simply tapping on the trackpad’s surface with one finger. With this feature enabled, you can bypass the need to physically press down on the trackpad to perform a left-click.
3. Assistive Touch: Assistive Touch is a feature available on macOS that provides an on-screen virtual trackpad and mouse button. It allows you to perform left-click actions by clicking on the virtual button with your mouse pointer. Assistive Touch can be particularly useful for users with mobility issues who may have difficulty using physical mouse buttons or trackpads.
4. Third-party software: There are various third-party software programs available that offer alternative ways to perform a left-click on your Mac. These programs typically provide customizable options, such as assigning different gestures, button combinations, or voice commands to trigger a left-click action. Examples of such software include BetterTouchTool, USB Overdrive, and SteerMouse.
5. Single Switch Assistive Devices: For individuals with limited mobility or who require assistive devices, single switch assistive devices can be used to perform left-click actions. These devices often have a large accessible button that can be activated using a simple press or a different input method, such as a sip or puff.
It’s worth noting that these alternative methods may require specific settings or third-party software installations. Depending on your needs and preferences, you can explore these options to find the alternative method that best suits your requirements.
By utilizing these alternative ways to perform a left-click, you can enhance accessibility, streamline your workflow, and tailor your Mac experience to your specific needs. Experiment with different methods to find the one that works best for you and makes interacting with your Mac more efficient and convenient.