
Enable secondary click
One of the first things you might want to configure on your Mac’s trackpad is the secondary click, also known as right-click. By enabling this feature, you can access context menus and perform additional actions with a simple tap or click using two fingers.
To enable secondary click on your Mac, follow these steps:
- Click on the Apple menu in the top-left corner of your screen and select “System Preferences.”
- In the System Preferences window, click on “Trackpad.”
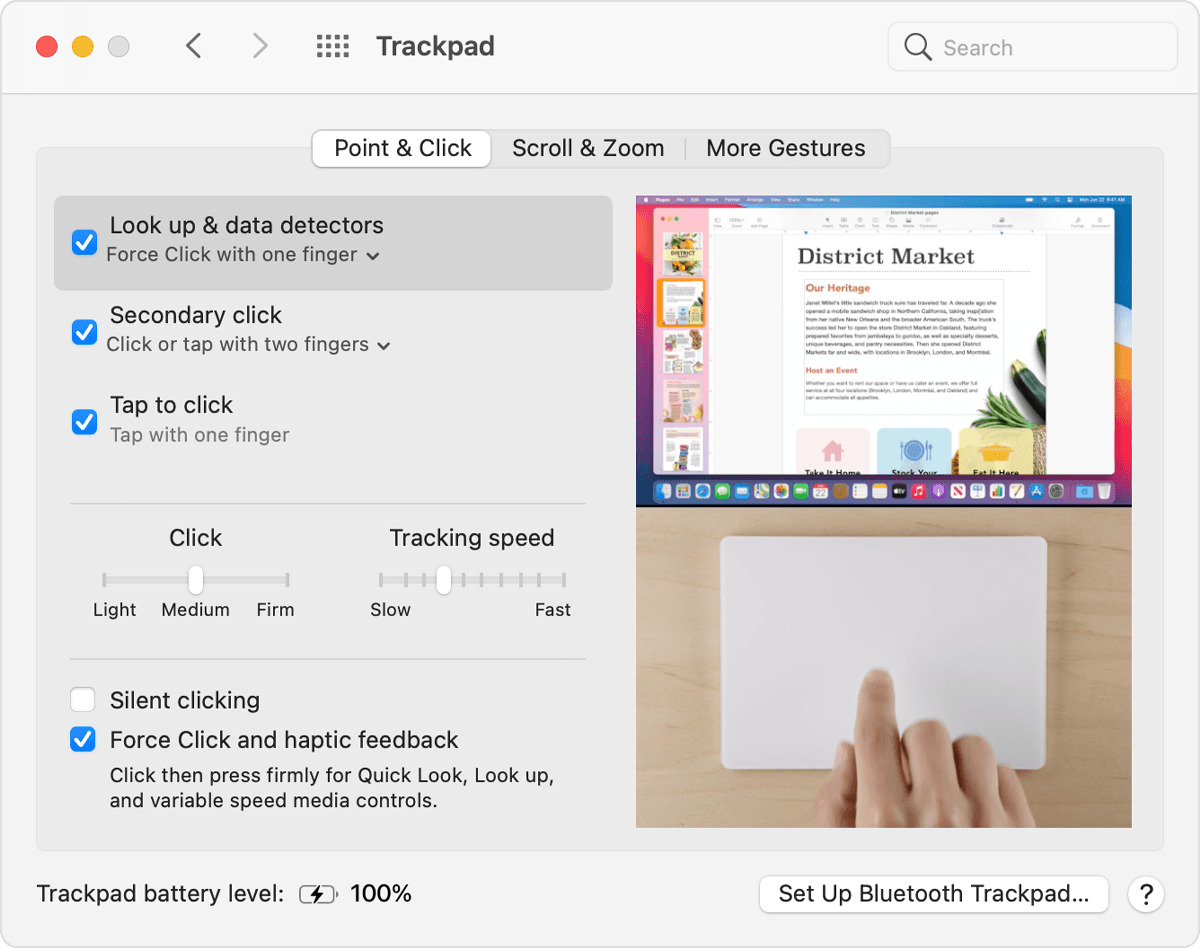
- Click on the “Point & Click” tab.
- Under the “Secondary click” section, select the checkbox next to “Click or tap with two fingers.”
Once you have enabled secondary click, you can use it to access various options and functions in different applications. Simply place two fingers on the trackpad and click or tap to bring up the context menu specific to the item or area you interact with.
Customizing the secondary click options is also possible. By clicking on the “Trackpad Options” button in the “Point & Click” tab, you can choose the positioning and behavior of the secondary click, such as whether it appears at the bottom-right or bottom-left of the trackpad when you perform the gesture.
Enabling the secondary click on your Mac can greatly enhance your productivity and ease of use, as it provides quick access to additional functionality without the need for complex keyboard shortcuts or menu navigation.
Adjust tracking speed
The tracking speed of your Mac’s trackpad determines how fast the cursor moves in response to your finger movements. By adjusting the tracking speed to your preference, you can find a balance that feels comfortable and responsive.
To adjust the tracking speed on your Mac, follow these steps:
- Click on the Apple menu in the top-left corner of your screen and select “System Preferences.”
- In the System Preferences window, click on “Trackpad.”
- Click on the “Point & Click” tab if it is not already selected.
- Slide the “Tracking speed” slider to the left or right to adjust the speed.
Move the slider to the left for a slower cursor movement or to the right for a faster cursor movement. You can test the changes by moving your finger on the trackpad to see the updated cursor speed in real-time.
It’s important to find a tracking speed that suits your preference and allows you to navigate smoothly across the screen. If the cursor feels too slow, increasing the tracking speed can help you cover more distance with less finger movement. On the other hand, if the cursor feels too fast, reducing the tracking speed can make it easier to control precise movements.
Experiment with different tracking speeds until you find the one that feels most comfortable for you. It’s worth noting that the optimal tracking speed might vary depending on factors such as the size of your display and your personal dexterity.
Adjusting the tracking speed can significantly improve your overall user experience by providing a smooth and responsive trackpad navigation, allowing you to work more efficiently and effortlessly on your Mac.
Customize scrolling direction
By default, the scrolling direction on a Mac’s trackpad is set to natural scrolling, where swiping up with two fingers moves the content upward, similar to scrolling on a touchscreen device. However, if you prefer a traditional scrolling experience where swiping up moves the content down, you can easily customize the scrolling direction to your liking.
To customize the scrolling direction on your Mac, follow these steps:
- Click on the Apple menu in the top-left corner of your screen and select “System Preferences.”
- In the System Preferences window, click on “Trackpad.”
- Click on the “Scroll & Zoom” tab.
- Uncheck the “Scroll direction: Natural” option.
Once you have disabled natural scrolling, the scrolling direction on your trackpad will be reversed, matching the traditional scroll behavior where swiping up moves the content down, and swiping down moves the content up.
Some users may find the natural scrolling direction more intuitive, particularly if they are accustomed to touchscreen devices. However, if you have been using computers with traditional scrolling for a long time, customizing the scrolling direction to match that experience can make the transition to a Mac trackpad smoother.
It’s worth noting that the ability to customize the scrolling direction is not limited to the trackpad alone. If you have a mouse connected to your Mac, you can also adjust the scrolling direction for the mouse by selecting the “Scroll direction: Natural” checkbox in the “Mouse” section of the “Scroll & Zoom” tab.
By customizing the scrolling direction on your Mac, you can personalize your trackpad experience to suit your preferences and make it feel more familiar and comfortable.
Enable tap to click
One of the convenient features offered by Mac’s trackpad is the ability to enable tap to click. Instead of physically pressing down on the trackpad to perform a click, you can simply tap on it to register a click. This can help reduce strain and fatigue on your fingers, especially during prolonged use.
To enable tap to click on your Mac, follow these steps:
- Click on the Apple menu in the top-left corner of your screen and select “System Preferences.”
- In the System Preferences window, click on “Trackpad.”
- Click on the “Point & Click” tab.
- Under the “Tap to click” section, select the checkbox next to “Click or tap with one finger.”
Once you have enabled tap to click, you can now perform clicks on the trackpad simply by lightly tapping your finger on its surface. This can be particularly useful for those who find physically pressing down on the trackpad uncomfortable or prefer a lighter touch for navigation.
Additionally, you can adjust the sensitivity of the tap to click feature to suit your preference. By clicking on the “Trackpad Options” button in the “Point & Click” tab, you can fine-tune the sensitivity settings to make the trackpad more or less responsive to your taps.
Enabling tap to click can improve your overall productivity and ease of use, making clicking actions on your Mac’s trackpad more intuitive and effortless. It eliminates the need for a physical click, providing a smoother and more seamless navigation experience.
It’s important to note that if you’re using a MacBook with a built-in trackpad, the tap to click feature is typically enabled by default. However, if it’s disabled or you’re using an external trackpad, you can easily enable it following the steps mentioned earlier.
Configure three-finger drag
Mac’s trackpad offers a variety of multitouch gestures to help streamline your navigation and interactions. One such gesture is the three-finger drag, which allows you to move windows, select text, and perform other tasks with ease. By configuring the three-finger drag, you can customize its behavior to better suit your preferences and make your Mac experience even more efficient.
To configure the three-finger drag on your Mac, follow these steps:
- Click on the Apple menu in the top-left corner of your screen and select “System Preferences.”
- In the System Preferences window, click on “Accessibility.”
- In the left sidebar, scroll down and select “Pointer Control.”
- Click on the “Trackpad Options” button located next to the “Mouse & Trackpad” section.
- Check the box next to “Enable dragging” and choose “Three finger drag” from the dropdown menu.
Once you have configured the three-finger drag, you can now use three fingers on the trackpad to perform various tasks. For example, you can easily move windows by placing three fingers on the window and dragging it across the screen. You can also select text by placing three fingers on the trackpad and swiping across the desired text. This gesture provides a quick and intuitive way to interact with your Mac, especially for tasks that involve dragging or selecting items.
Aside from enabling the three-finger drag, you can adjust its sensitivity by using the “Tracking Speed” slider in the “Pointer Control” section of the Accessibility preferences. Experiment with different settings until you find a sensitivity level that suits your preferences and makes the three-finger drag smooth and responsive.
Configuring the three-finger drag allows you to customize your Mac’s trackpad gestures to match your workflow and preferences. It can greatly enhance your productivity and efficiency by providing a seamless and intuitive way to navigate and interact with your Mac.
Enable and customize gestures
Mac’s trackpad offers a wide range of gestures that can help you navigate and interact with your system more efficiently. From swiping between pages to accessing Mission Control, gestures provide quick and intuitive ways to perform various actions on your Mac. By enabling and customizing gestures, you can tailor your trackpad experience to suit your needs and enhance your workflow.
To enable and customize gestures on your Mac, follow these steps:
- Click on the Apple menu in the top-left corner of your screen and select “System Preferences.”
- In the System Preferences window, click on “Trackpad.”
- Click on the “More Gestures” tab.
On this tab, you will find a list of various trackpad gestures that you can enable or disable, such as:
- Swipe between pages: Allows you to swipe with two fingers to navigate between pages in applications like Safari or Finder.
- Zoom in and out: Lets you pinch with two fingers to zoom in or out on images, webpages, and documents.
- Rotate: Allows you to rotate two fingers on the trackpad to rotate images, documents, and other content.
- Mission Control: Provides a gesture for accessing Mission Control, which displays all open windows and spaces on your Mac.
- App Exposé: Allows you to quickly view all open windows for the current application by using a gesture.
You can enable or disable any of these gestures by checking or unchecking the checkboxes next to each gesture. Additionally, you can click on each gesture to see a short video demonstration of how it works.
Furthermore, you can customize the behavior of some gestures by clicking on their respective dropdown menus to choose alternative actions or adjust the sensitivity level. This allows you to personalize your trackpad gestures to match your workflow and preferences.
By enabling and customizing gestures, you can navigate your Mac more efficiently, access important functions with ease, and streamline your workflow. Experiment with different gestures and customization options to find the ones that work best for you.