
What is a Split Screen on a Laptop?
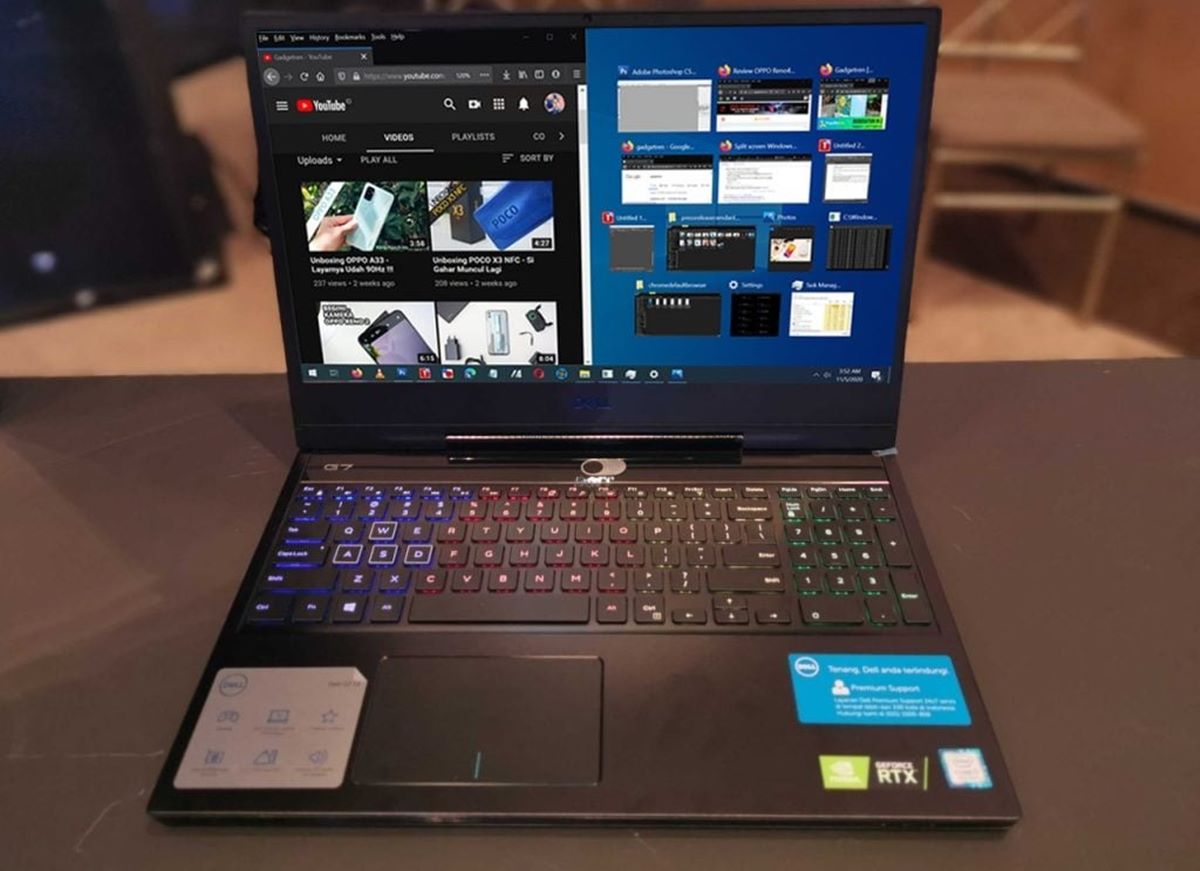
A split screen on a laptop refers to the ability to view and work with multiple applications or windows simultaneously, side by side, on the same screen. This feature allows users to optimize their productivity by multitasking and easily comparing information between different programs, without the need to switch back and forth.
Split screen functionality is especially useful for tasks such as writing an email while referencing a document, working on a presentation while researching information on the internet, or participating in a video conference while taking notes. With a split screen, users can have multiple windows open and visible at the same time, maximizing their efficiency and streamlining their workflow.
The split screen feature is available on both Windows and Mac laptops, offering users the flexibility to work in a way that best suits their needs. Whether you are a student, professional, or casual user, being able to split your laptop screen can greatly enhance your productivity and make your computing experience more convenient and efficient.
By utilizing the split screen feature, you can have two or more windows displayed simultaneously, allowing for easier navigation and a seamless transition between applications. Whether you need to copy and paste information from one window to another, compare data side by side, or simply have multiple windows open for convenience, the split screen function provides a convenient way to manage your tasks efficiently.
Benefits of Using a Split Screen
Using a split screen on your laptop offers numerous benefits that can significantly improve your productivity and overall user experience. Here are some key advantages of utilizing this feature:
- Enhanced Multitasking: With a split screen, you can easily work on multiple tasks simultaneously, eliminating the need to constantly switch between different windows. This allows for more efficient multitasking and saves valuable time and effort.
- Improved Workflow: By having multiple applications or windows open side by side, you can seamlessly move between them, eliminating the need to constantly minimize or maximize different windows. This streamlines your workflow and increases efficiency.
- Easy Information Comparison: Splitting the screen allows you to compare information from different sources or documents more conveniently. Whether you’re comparing data, referencing sources, or cross-referencing information, a split screen makes the process much smoother and faster.
- Optimal Collaboration: During collaborative work, a split screen enables team members to view and discuss content simultaneously. This feature is especially beneficial for virtual meetings, presentations, and brainstorming sessions, as everyone can have the same visual context without the need for screen sharing.
- Increased Efficiency: The split screen feature helps you stay organized and reduces the time wasted on searching for specific windows or switching between applications. By having everything you need visible on one screen, you can work more efficiently and complete tasks faster.
- Improved Focus: Splitting your laptop screen allows you to devote your attention to multiple tasks without distractions. By keeping relevant information readily available and visible, you can stay focused on the task at hand, enhancing your productivity.
- Customized Viewing Experience: With a split screen, you have the flexibility to customize the size and placement of different windows according to your preferences. This allows for a personalized and optimized viewing experience tailored to your specific needs.
By taking advantage of the benefits offered by a split screen on your laptop, you can optimize your productivity, streamline your workflow, and make your computing experience more efficient and enjoyable.
How to Split Screen on Windows Laptops
Splitting the screen on Windows laptops is a straightforward process that allows you to work with multiple applications side by side. Here are three methods you can use to split your screen:
- Using the Snap Feature: Windows laptops have a built-in Snap feature that allows you to easily split your screen. Open the first application you want to work with and click and hold the title bar, then drag it to the left or right side of the screen. Release the mouse button, and the window will automatically resize to fit that half of the screen. Next, open the second application and drag it to the remaining side of the screen. Both windows will now be displayed side by side, allowing you to work with them simultaneously.
- Using Keyboard Shortcuts: Windows provides convenient keyboard shortcuts to split the screen. With the first application open, press the Windows key + left arrow to dock it to the left side of the screen. Then, open the second application and press the Windows key + right arrow to dock it to the right side. Your screen will now be split, and you can work with both applications simultaneously.
- Using the Taskbar: If you have multiple applications open on your Windows laptop, you can use the taskbar to split the screen. Click and hold the first application’s title bar, and drag it to the left or right edge of the screen until your cursor reaches the edge. Release the mouse button, and the window will automatically resize to fit that half of the screen. Repeat the process with the second application on the opposite side of the screen. The screen will be split, and you can work with both applications side by side.
With these simple methods, you can easily split the screen on your Windows laptop and work with multiple applications simultaneously. This feature enhances your productivity and improves your multitasking abilities, making it easier to complete tasks efficiently.
Using the Snap Feature
The Snap feature on Windows laptops is a built-in functionality that allows you to split your screen and work with multiple applications side by side. Follow these steps to use the Snap feature:
- Open the first application or window you want to work with.
- Click and hold the title bar of the window.
- Drag the window to the left or right side of the screen.
- Release the mouse button, and the window will automatically snap to fit that half of the screen.
- Open the second application or window you want to work with.
- Drag it to the remaining side of the screen.
- Release the mouse button, and the window will snap into place on the opposite side of the screen.
Once you have snapped both windows, they will be displayed side by side, allowing you to work with them simultaneously. You can resize the windows by clicking and dragging the divider between them, allowing you to adjust the amount of space each window occupies.
The Snap feature is not limited to splitting the screen into equal halves. You can also snap windows to the corners of the screen by dragging them to the top-left, top-right, bottom-left, or bottom-right corner. This is useful for situations where you want to work with three or four windows at once.
To return a window to its original size, click and drag the title bar away from the screen edge, and it will automatically resize to its original dimensions. Alternatively, you can use the keyboard shortcut Windows key + Up arrow or Windows key + Down arrow to maximize or restore a window to its previous size.
By utilizing the Snap feature, you can easily split the screen on your Windows laptop and work with multiple applications side by side. This allows for seamless multitasking and enhances your productivity by providing a convenient way to view and work with different windows simultaneously.
Using Keyboard Shortcuts
Windows laptops offer convenient keyboard shortcuts that allow you to quickly split the screen and work with multiple applications simultaneously. Here are the steps to use keyboard shortcuts for splitting the screen:
- Open the first application or window you want to work with.
- Press the Windows key and the left arrow key at the same time to dock the window to the left side of the screen.
- Next, open the second application or window you want to work with.
- Press the Windows key and the right arrow key simultaneously to dock the window to the right side of the screen.
By using these keyboard shortcuts, your screen will be split, and both applications will be displayed side by side. This allows you to work with them simultaneously without the need to manually resize or arrange the windows.
Additionally, you can use the Windows key and the up arrow key together to maximize a window to full screen, and the Windows key and the down arrow key to restore it to its previous size.
These keyboard shortcuts provide a quick and efficient way to split the screen on your Windows laptop. They are especially useful when you want to switch between applications seamlessly and optimize your productivity.
It’s important to note that the availability of specific keyboard shortcuts may vary depending on the version of Windows you’re using. If the above shortcuts don’t work, you can explore alternative shortcuts specific to your Windows version or adjust your keyboard settings accordingly.
By utilizing keyboard shortcuts, you can easily split your screen and work with multiple applications side by side, enhancing your multitasking abilities and improving your overall productivity.
Using the Taskbar
Another method to split the screen on a Windows laptop is by utilizing the taskbar. The taskbar provides a convenient way to manage and arrange open windows. Here’s how you can use the taskbar to split your screen:
- Ensure you have multiple applications or windows open on your laptop.
- Click and hold the title bar of the first application you want to work with.
- Drag the window to the left or right edge of the screen until your cursor reaches the edge.
- Release the mouse button, and the window will automatically resize to fit that half of the screen.
- Open the second application or window you want to work with.
- Click and hold its title bar, and drag it to the opposite side of the screen.
- Release the mouse button, and the window will snap into place on the other half of the screen.
Once you have snapped both windows, they will be displayed side by side, allowing you to work with them simultaneously. You can adjust the size of the windows by clicking and dragging the divider between them, or by dragging their respective title bars towards the center or edge of the screen.
The taskbar method is particularly useful when you have several windows open and want to split the screen quickly without rearranging them manually. It offers a simple and intuitive way to achieve a split screen configuration.
If you have difficulty dragging windows to the edge of the screen, ensure that the Windows “Snap” feature is enabled in your system settings. You can access this by going to “Settings” > “System” > “Multitasking” and enabling “Snap windows.”
Using the taskbar to split the screen on your Windows laptop provides a convenient way to work with multiple applications side by side. It allows for efficient multitasking and enhances your productivity by providing quick access to different windows without the need for manual resizing or arrangement.
How to Split Screen on Mac Laptops
Splitting the screen on Mac laptops is a useful feature that allows you to work with multiple applications at the same time. Here are three methods to split the screen on a Mac:
- Using Mission Control: Mission Control is a built-in feature on Mac laptops that allows you to view all open windows and spaces at once. To activate Mission Control, swipe up with three or four fingers on the trackpad (or press the Mission Control key on the keyboard, if available). Once in Mission Control, drag the desired window to the top of the screen until it hovers over a separate space. Release the window, and it will create its own workspace. You can then open another application and drag it to the new space. This will split the screen, allowing you to work with both applications side by side.
- Using Keyboard Shortcuts: Mac laptops offer convenient keyboard shortcuts for splitting the screen. With the first application open, press and hold the full-screen button (green button) in the top-left corner of the window. The window will shrink and you can drag it to the left or right side of the screen. Release the mouse or trackpad, and the window will snap into place. Next, open the second application and click the full-screen button again. The screen will split, and both applications will be displayed side by side.
- Using Third-Party Software: If the built-in methods don’t meet your needs, there are third-party applications available that provide additional features for splitting the screen on a Mac laptop. Applications such as Magnet, BetterSnapTool, and Divvy offer advanced window management options including customizable screen splitting and automatic resizing. Simply download the software of your choice from the App Store or a trusted website, follow the installation instructions, and you’ll have access to additional screen-splitting capabilities.
By using these methods, you can easily split the screen on your Mac laptop and work with multiple applications side by side. This enhances your multitasking capabilities and allows for seamless switching between different windows, improving your productivity and workflow.
Using Mission Control
Mission Control is a powerful feature available on Mac laptops that allows you to easily manage and organize your open windows, applications, and spaces. It provides a convenient way to split the screen and work with multiple applications simultaneously. Here’s how you can use Mission Control to split the screen on your Mac laptop:
- To activate Mission Control, you can swipe up on the trackpad with three or four fingers if you have this gesture enabled, or press the Mission Control key on your keyboard (usually F3 or a dedicated Mission Control key). Alternatively, you can click the Mission Control icon in the Dock or launch it from the Launchpad or Applications folder.
- Once in Mission Control, you will see all your open windows and spaces displayed as thumbnails across the top of the screen.
- Click and hold on the window you want to split and drag it upwards towards the top of the screen. As you do this, a new space will be created, and the window will enlarge to fill that space.
- Now that you have created a new space, you can open another application or window and drag it towards the new space. Release it when the cursor is at the edge of the screen, and it will snap into place in the new space alongside the first window.
With Mission Control, you have the flexibility to switch between different spaces and work with multiple applications side by side. To switch between spaces, you can swipe left or right with three fingers on the trackpad or use the Control + Left Arrow or Control + Right Arrow keys.
Manipulating the size and arrangement of windows within Mission Control is also possible. To resize a window, move your cursor to the top-left corner of the window within Mission Control. When your cursor changes to a resize cursor, click and drag to adjust the size as desired.
By leveraging Mission Control, you can easily split the screen on your Mac laptop and have a clear view of multiple applications simultaneously. This allows for efficient multitasking and provides an organized workspace to enhance your productivity.
Using Keyboard Shortcuts
Mac laptops offer convenient keyboard shortcuts that allow you to easily split the screen and work with multiple applications side by side. Here’s how you can use keyboard shortcuts to split the screen on your Mac:
- Full-Screen Shortcut: Open the first application you want to work with. Move your cursor to the top-left corner of the window until you see the green full-screen button. Press and hold the Option key on your keyboard while clicking the full-screen button. The window will shrink and you can drag it to the left or right side of the screen. Release the Option key and the mouse or trackpad, and the window will snap into place.
- Create New Space: To create a new space for the second application, open it and go to the top-right corner of the window. Click the green full-screen button while holding the Option key. The second application will enter full-screen mode and occupy its own space next to the first application.
Alternatively, you can use the following keyboard shortcut: Press Control + Up Arrow to enter Mission Control. From there, drag a window to the top of the screen until a new space is created, and then drag the second window to that new space.
With the keyboard shortcuts, you can easily split the screen and have two applications side by side. You can switch between the applications by swiping left or right with three fingers on the trackpad or by using the Control + Left Arrow or Control + Right Arrow keys. To exit split screen mode, simply drag a window out of the split screen area, or swipe up on the trackpad with three or four fingers to exit Mission Control.
These keyboard shortcuts make splitting the screen on your Mac laptop quick and efficient. They provide a seamless way to work with multiple applications simultaneously, enhancing your productivity and multitasking abilities.
Using Third-Party Software
If the built-in methods for splitting the screen on your Mac laptop do not meet your specific needs, you have the option to explore third-party software. Several applications are available that offer advanced window management features, allowing for more customizable screen splitting and automatic resizing. Here are a few examples of popular third-party software:
- Magnet: Magnet is a highly-rated window manager app available on the Mac App Store. It allows you to easily snap windows to different areas of your screen with customizable keyboard shortcuts. You can split your screen into halves, quarters, or even create your own custom layouts.
- BetterSnapTool: BetterSnapTool offers similar functionality to Magnet, allowing you to resize and snap windows to predefined areas or custom grids with keyboard shortcuts or trackpad gestures. It also provides additional features like window snapping animations and window stretching.
- Divvy: Divvy is a powerful window management app that lets you resize and position windows by using customizable keyboard shortcuts or a visual grid system. It provides a simple and intuitive way to create custom layouts and split screens to match your specific workflow preferences.
To use third-party software, you’ll need to download and install the application of your choice from a trusted source, such as the developer’s website or the Mac App Store. Once installed, follow the instructions to set up and configure the software to suit your needs. These applications typically provide intuitive interfaces and guides to help you make the most of their features.
Using third-party software offers additional flexibility and customization options for splitting the screen on your Mac. Depending on your preferences and requirements, you can choose the software that best fits your workflow and provides the features you desire. Be sure to explore reviews and ratings of different applications to ensure you select a reliable and reputable option.
With third-party software, you can extend the capabilities of your Mac laptop’s screen-splitting functionality and create a more tailored working environment that suits your unique needs.
Tips for Optimizing Split Screen Usage
When utilizing the split screen feature on your laptop, there are several tips and techniques you can employ to optimize your usage and enhance your productivity. Consider the following tips:
- Adjusting the Screen Ratio: Depending on your tasks and preferences, you can adjust the ratio of the split screen. Drag the divider between the two windows to resize them and allocate more space to the application you need to focus on. You can easily readjust the ratio as needed.
- Rearranging Windows: If you want to change the positions of the windows or swap their locations on the split screen, simply click and drag the title bar of an application and move it to the desired side.
- Using Multiple Screens: If your laptop supports it, consider using an external monitor or connecting to a dual-monitor setup. This enables you to allocate each application or window to a separate screen, providing even more space for multitasking and increasing overall workflow efficiency.
- Optimizing Window Sizes: Within each split screen, ensure that the windows are sized appropriately to display the content you need. This might involve resizing windows or adjusting the zoom level within specific applications to improve readability and visibility.
- Utilizing Window Snapping: Take advantage of window snapping features available in some operating systems or third-party applications. These allow you to easily resize and position windows with a simple drag and drop gesture, making it quicker to arrange and switch between applications on the split screen.
- Using Virtual Desktops or Spaces: Explore the use of virtual desktops or spaces, if available on your operating system. These features allow you to create multiple desktops where you can assign different applications or sets of windows. This enhances organization and makes it easier to navigate between different tasks without cluttering a single split screen.
By implementing these tips, you can optimize your split screen usage and tailor it to your specific needs. This will help streamline your workflow, improve multitasking capabilities, and ultimately enhance your productivity when working with multiple applications simultaneously.
Adjusting the Screen Ratio
One of the key aspects of optimizing your split screen usage is adjusting the screen ratio to suit your needs and preferences. Here are some tips for effectively adjusting the screen ratio:
- Drag the Divider: Most split screen features allow you to resize the windows by dragging the divider between them. Click and hold the divider, then drag it left or right to increase or decrease the size of one window relative to the other. This flexibility allows you to allocate more screen space to the application you need to focus on and adjust the ratio to your liking.
- Customize the Ratio: Depending on your tasks, you may find that certain applications require more screen real estate than others. For example, if you’re working on a document while referencing a web page, you might want to allocate more space to the document for better readability. Adjust the screen ratio by dragging the divider until you find a balance that suits your specific needs.
- Experiment with Different Ratios: Don’t be afraid to experiment with different screen ratios to find what works best for you. You may find that a 50/50 split works well for some tasks, while a 70/30 or 60/40 split is more suitable for others. Experimenting with different ratios will help you discover the most comfortable and efficient setup for your workflow.
- Consider Screen Resolution: Keep in mind that the resolution of your laptop’s screen can impact the screen ratio. Higher resolutions may allow for narrower splits, while lower resolutions might benefit from wider splits. Consider the limitations of your display and adjust the screen ratio accordingly to ensure optimal visibility and usability.
- Dynamic Adjustments: Some split screen features and applications allow for dynamic adjustments of the screen ratio. With a simple gesture or shortcut, you can cycle through predefined ratios or resize windows with preconfigured layouts. This can be useful when you frequently switch between different tasks and need to adapt the screen ratio accordingly.
By adjusting the screen ratio to your liking, you can maximize the usability and comfort of your split screen setup. Finding the optimal ratio will enhance your overall productivity by providing an efficient workspace that suits your specific workflow and task requirements.
Rearranging Windows
Another important aspect of optimizing your split screen usage is the ability to rearrange windows to suit your workflow and preferences. Here are some tips for effectively rearranging windows on your split screen:
- Click and Drag: To rearrange windows on the split screen, simply click and hold the title bar of the window you want to move, then drag it to the desired position. You can drag it to the left or right side, swap positions with another window, or move it to another monitor if you have a multiple-monitor setup. Release the mouse or trackpad button to drop the window in its new position.
- Utilize Window Snapping: Some operating systems or third-party applications offer window snapping features, making it easier to position and organize windows on the split screen. With window snapping, you can easily snap a window to the edges or corners of the screen for precise placement. This helps ensure windows are aligned and maximizes the available space on the split screen.
- Resize and Rebalance: As you rearrange windows, you may need to resize them to fit your desired configuration. Click and drag the window’s edges or corners to adjust its size. You can also use the feature’s keyboard shortcuts or options within the window management software to automatically resize and rebalance windows on the split screen.
- Consider Task Priority: When rearranging windows, consider the priority of your tasks and the need to have certain applications within easy reach. Place the windows you frequently interact with closer to your primary workspace, while less frequently used ones can be moved to secondary locations. This allows you to focus on the primary tasks without unnecessarily cluttering your primary workspace.
- Experiment with Different Layouts: Don’t hesitate to experiment with different window arrangements and layouts on the split screen. Try splitting the screen horizontally or vertically, stacking windows, or creating a grid-like configuration. By exploring different options, you may discover a layout that best suits your workflow and enhances your productivity.
By rearranging windows on your split screen, you can create a personalized working environment that optimizes efficiency and suits your specific needs. Experimenting with different layouts and finding the best configuration will contribute to a seamless workflow, making it easier to navigate between applications and tasks on your split screen.
Using Multiple Screens
If your laptop supports it, utilizing multiple screens can greatly enhance the benefits of working with a split screen setup. Connecting an external monitor or using a dual-monitor setup provides additional screen real estate, allowing for even more efficient multitasking and productivity. Here are some tips for utilizing multiple screens:
- Connect an External Monitor: If your laptop has a video output port, such as HDMI or VGA, you can connect an external monitor to extend your display. This gives you an additional screen to work with, which can be especially useful for tasks that require reference materials, coding, design work, or working on multiple projects simultaneously.
- Set Up Dual Monitors: Dual-monitor setups involve connecting two external monitors or combining your laptop screen with an external display. This configuration provides even more screen space, allowing you to dedicate one monitor for your primary tasks and use the other for reference materials, communications, or other secondary tasks. Dual monitors provide a seamless and expansive workspace.
- Configure Display Settings: Once you have connected the additional screen(s), make sure to configure display settings according to your preference. You can choose to extend your desktop across all screens, which effectively creates a large virtual workspace, or set individual screens to display separate activities. Adjust the positioning and orientation of the screens to match your physical setup and create a comfortable working environment.
- Manage Windows Across Screens: With multiple screens, you can drag windows between displays to seamlessly move applications or documents from one screen to another. This allows for smoother workflow transitions and easy access to resources and tools across different screens.
- Designate Primary and Secondary Screens: In a dual-monitor setup, designate one screen as the primary monitor where you primarily focus on your main tasks. The other screen can serve as a secondary monitor for supporting activities, such as displaying supplemental information, monitoring communications, or keeping reference materials readily accessible.
- Utilize Virtual Spaces: Some operating systems offer virtual spaces or desktops, also known as workspaces or virtual desktops. These allow you to have separate desktop layouts and applications open on each screen. You can switch between virtual spaces to focus on specific tasks or projects, creating an organized and efficient workspace.
By utilizing multiple screens, you can significantly expand your working area and productivity. This setup enables a seamless transition between applications, reduces clutter on a single screen, and provides a more immersive and efficient multitasking environment.
Troubleshooting Common Issues
While using the split screen feature on your laptop can greatly enhance your productivity, you may encounter some common issues. Here are a few troubleshooting tips for resolving these issues:
- Incompatible Apps: Certain applications may not work well in a split screen setup or may not support the feature at all. If you experience issues with a specific application, try using an alternative method, such as resizing windows manually or using virtual desktops, or consider using compatible applications.
- Issues with Resolution or Scaling: If you notice that the content on one of the split screens appears too small or too large, you may need to adjust the resolution or scaling settings. Go to your system’s display settings and modify the resolution or scaling to ensure a balanced and clear visual experience across both screens.
- Mouse/Trackpad Precision: Sometimes, aligning windows precisely on a split screen can be challenging. Ensure that your mouse or trackpad settings are properly configured for precise cursor control. You may want to adjust the cursor speed, acceleration, or sensitivity to make window management smoother.
- Performance Impact: Running multiple applications simultaneously on a split screen setup can put additional strain on your laptop’s resources and potentially impact performance. If you notice lag, slowdowns, or excessive CPU or memory usage, try closing unnecessary applications or reducing resource-heavy tasks to optimize performance.
- Window Management Software Conflicts: If you’re using third-party window management software, conflicts may arise that affect the functionality of the split screen feature. Ensure that your software is up to date and compatible with your operating system version. You can also try disabling or uninstalling window management software that may interfere with the built-in split screen functionality.
- System Updates: Occasionally, system updates can introduce new features or fix bugs related to split screen functionality. Make sure your laptop has the latest operating system updates installed. These updates may address known issues and improve the overall performance and stability of the split screen feature.
If you encounter persistent issues with the split screen feature, it may be helpful to consult official documentation or support resources provided by your laptop manufacturer or operating system developer. They can offer specific troubleshooting steps tailored to your device.
By applying these troubleshooting tips, you can address common issues and ensure a smooth and efficient experience while using the split screen feature on your laptop.
Incompatible Apps
While the split screen feature is a convenient way to multitask and work with multiple applications side by side, you may encounter compatibility issues with certain apps. Some applications may not work well or may not support the split screen feature at all. If you come across an incompatible app, here are some tips to troubleshoot the issue:
- Try Alternative Methods: If an app doesn’t work properly or disables the split screen feature, consider using alternative methods to achieve a similar result. You can manually resize and position the windows on the screen without relying on the built-in split screen functionality. This way, you can still work with multiple applications, although it may require more manual effort.
- Explore Compatibility Options: Check if there are any compatibility settings or preferences within the app itself. Some applications offer special modes or compatibility options that enable them to work better in a split screen environment. Review the app’s settings or preferences and see if there’s an option to enable or improve compatibility with split screen functionality.
- Consider Alternative Apps: If an app consistently causes issues with the split screen feature, you may want to explore alternative apps that have better compatibility. Look for similar apps that offer the functionality you need, but are known to work well with split screen features. Read reviews and seek recommendations from other users to find apps that seamlessly integrate with the split screen workflow.
- Contact App Developer: If you encounter persistent incompatibility issues with an app, it can be worth reaching out to the app developer’s support or customer service. Notify them about the problem and inquire if there are any known issues or upcoming updates that address compatibility with split screen features. They may provide guidance or offer solutions to help resolve the issue.
- Update App and Operating System: Ensure that both the app and your operating system are up to date. Developers often release updates that address compatibility issues and improve the overall performance of their applications. Similarly, operating system updates may include bug fixes and enhancements related to split screen functionality. Keeping both your apps and operating system up to date may resolve compatibility issues.
While encountering incompatible apps can be frustrating, exploring alternative methods, checking compatibility options, and reaching out to app developers can often provide viable solutions. With some troubleshooting and flexibility, you can still maximize your efficiency and multitasking capabilities on your laptop’s split screen setup.
Issues with Resolution or Scaling
When using the split screen feature on your laptop, you may encounter issues related to resolution or scaling. These issues can affect the overall visual experience and the display of content on the split screen. Here are some tips to troubleshoot and resolve issues with resolution or scaling:
- Adjust Display Settings: Check your display settings to ensure that the resolution and scaling options are set correctly. Open the display settings on your laptop and review the available resolution and scaling options. Experiment with different settings to find the configuration that provides the best balance between visual clarity and the number of applications or windows you want to fit on the split screen.
- Check Recommended Settings: Many operating systems provide recommended display settings based on your laptop’s hardware specifications. Look for the recommended resolution and scaling settings and apply them if available. These settings are often optimized to provide an optimal viewing experience, including split screen usage.
- Adjust Scaling: If the content on your split screen appears too small or too large, adjusting the scaling settings might resolve the issue. Increase the scaling percentage to enlarge the content, or decrease it to fit more on the screen. Keep in mind that extreme scaling adjustments may affect the clarity of the content, so it’s important to find a balance that works for you.
- Consider External Monitor Compatibility: If you’re using an external monitor for your split screen setup, ensure that it is compatible with your laptop’s resolution and scaling settings. Some monitors have specific requirements to provide a seamless split screen experience. Check the monitor’s specifications or consult the manufacturer’s documentation to ensure compatibility.
- Update Graphics Drivers: Outdated or incompatible graphics drivers can affect the resolution and scaling performance of your laptop. Check for updates from your GPU manufacturer’s website or use the automatic driver update functionality provided by your operating system. Keeping your graphics drivers up to date can resolve issues and ensure optimal performance for split screen usage.
- Restart or Reset Display Settings: If resolution or scaling issues persist, try restarting your laptop or resetting your display settings to their default values. A simple restart can sometimes resolve temporary display glitches, while resetting the display settings can revert any misconfigured options to their original state.
By adjusting display settings, considering external monitor compatibility, and keeping graphics drivers up to date, you can address resolution or scaling issues and improve the quality of the split screen experience on your laptop. Finding the optimal visual settings will enhance your productivity and ensure a comfortable viewing experience across multiple applications or windows.