
Checking the IP address through System Preferences
When it comes to finding the IP address on a Mac, one of the simplest methods is to use the System Preferences. Here’s how you can do it:
- Click on the Apple menu located on the top-left corner of your screen.
- Select “System Preferences” from the dropdown menu.
- In the System Preferences window, locate and click on the “Network” icon.
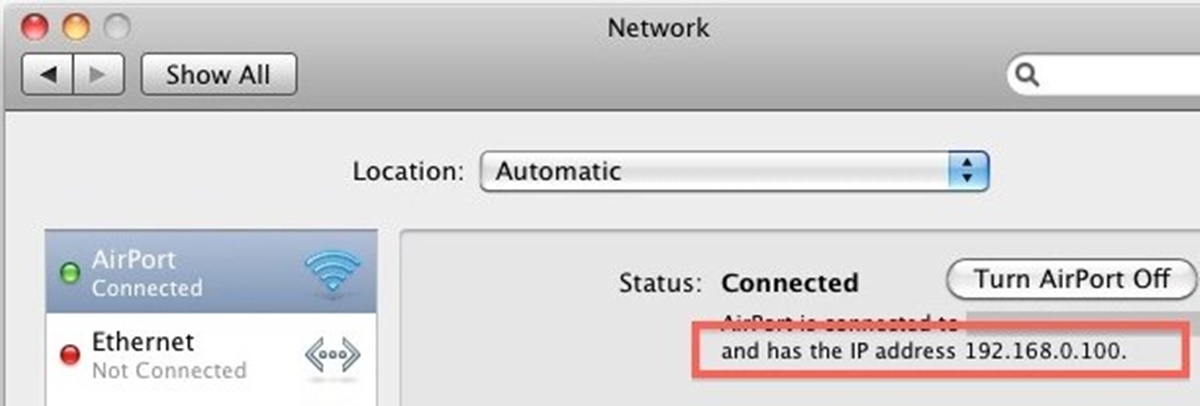
- Select the network connection you are using from the left-hand column. It could be Wi-Fi, Ethernet, or any other connection you are using to connect to the internet.
- Once you’ve selected the connection, you will see the IP address listed on the right-hand side. The IP address will be displayed under the “Status” section, labeled as “IP Address” or “IPv4 Address.”
By following these steps, you can easily check the IP address of your Mac through the System Preferences. It’s a straightforward and convenient method, especially if you’re already familiar with navigating through the settings of your Mac.
Remember that the IP address displayed here is the IPv4 address assigned to your Mac. If you’re looking for the IPv6 address or other network details, you may need to dig deeper or explore alternative methods.
Now that you know how to find the IP address through System Preferences, let’s explore other methods to check the IP address on a Mac.
Using the Network Utility app
If you prefer a more advanced method to find the IP address on your Mac, you can utilize the built-in Network Utility app. Follow these steps to access and use the Network Utility app:
- Open Finder on your Mac by clicking on the magnifying glass icon in the top-right corner of your screen and type “Network Utility” in the search bar.
- Double-click on the Network Utility app from the search results to launch it.
- Once the Network Utility app is open, click on the “Info” tab.
- In the “Info” tab, you will see several options including “Interface,” “MAC Address,” and “IP Address.”
- Select the network connection you are currently using from the “Interface” dropdown menu.
- After selecting the interface, the IP address associated with that connection will be displayed next to “IP Address.”
The Network Utility app provides additional network details apart from the IP address, such as MAC address, subnet mask, and more. It’s a powerful tool for advanced users who want a comprehensive overview of their network settings.
Keep in mind that the Network Utility app may not be readily available on your Dock or Applications folder. However, you can easily access it by using the search feature in Finder as described above.
Now that you’ve learned how to use the Network Utility app to find your IP address, let’s move on to the next method.
Finding the IP address through Terminal
For users comfortable with the command line interface, finding the IP address through Terminal offers a quick and efficient method. Here’s how you can do it:
- Launch the Terminal app on your Mac. You can find it by navigating to Applications > Utilities > Terminal or by using the Spotlight search.
- Once the Terminal window is open, type the following command:
ifconfigand hit Enter. - You will see a list of network interfaces and their corresponding details. Look for the interface you are currently using, which could be en0 for Ethernet, en1 for Wi-Fi, etc.
- Once you’ve identified the relevant interface, scan through the output until you find the line labeled as “inet”. The IP address will be listed next to it.
Using Terminal to find the IP address provides a direct and precise way to retrieve this information. It is especially useful for advanced users who prefer command-based interactions or need to gather IP address details programmatically.
Remember that the IP address displayed here will be the IPv4 address assigned to your Mac. If you’re looking for the IPv6 address or other network details, you may need to specify the interface or use additional commands.
Now that you know how to find the IP address through Terminal, let’s explore another method for checking the IP address on a Mac.
Checking the IP address through the Wi-Fi icon
If you prefer a quick and easy method to check the IP address on your Mac, you can do so directly through the Wi-Fi icon in the menu bar. Here’s how:
- Look at the top-right corner of your screen and locate the Wi-Fi icon in the menu bar. It looks like a series of concentric arcs.
- Click on the Wi-Fi icon to open a dropdown menu.
- In the dropdown menu, you will find various options related to your Wi-Fi connection. Look for the “Open Network Preferences” option and click on it.
- The Network Preferences window will open, with the Wi-Fi connection selected on the left-hand side.
- Under the Wi-Fi connection details, you will see the IP address displayed next to the “Status” section. It will be labeled as “IP Address” or “IPv4 Address.”
Using the Wi-Fi icon to check the IP address is a convenient method, as it allows you to view the information with just a few clicks. This method is especially useful when you need to quickly check your IP address without navigating through multiple settings menus.
Keep in mind that the IP address displayed here is the IPv4 address associated with your Wi-Fi connection. If you are using an Ethernet connection or have multiple network connections on your Mac, you may need to explore alternative methods.
Now that you’ve learned how to check the IP address through the Wi-Fi icon, let’s move on to explore another method.
Using a third-party app to find the IP address
If you prefer a more user-friendly and visually appealing way to find the IP address on your Mac, you can utilize a third-party app designed for that purpose. There are several apps available in the App Store that provide network analysis and IP address information. Here’s how you can use a third-party app to find your IP address:
- Open the App Store on your Mac.
- In the search bar, type in keywords such as “IP address,” “network utilities,” or “network analyzer.”
- Browse through the search results and select a third-party app that suits your preferences.
- Click on the app to view its details and click “Get” or “Install” to download and install it on your Mac.
- Once the app is installed, launch it from the Applications folder or Launchpad.
- Follow the instructions provided within the app to discover your IP address. The interface and features may vary depending on the app you choose.
Using a third-party app to find the IP address offers a user-friendly and feature-rich experience. These apps often provide additional functionalities like network speed test, ping analysis, and MAC address lookup, making them useful for both novice and advanced users.
It’s important to note that while third-party apps can provide a convenient way to find your IP address, ensure that you download apps from reputable sources to protect your Mac from potential security risks.
Now that you know how to use a third-party app to find the IP address, let’s move on to explore another method for checking the IP address on a Mac.
Finding the IP address on a Mac with multiple network connections
If your Mac has multiple network connections, such as both Wi-Fi and Ethernet, you may need to follow different steps to find the IP address for each connection. Here’s how you can do it:
- Click on the Apple menu located on the top-left corner of your screen.
- Select “System Preferences” from the dropdown menu.
- In the System Preferences window, locate and click on the “Network” icon.
- In the left-hand column, you will see a list of network connections, such as Wi-Fi, Ethernet, and more. Click on the desired connection from the list.
- Once you’ve selected the connection, you will see the IP address listed on the right-hand side under the “Status” section, labeled as “IP Address” or “IPv4 Address.”
- If you have multiple network connections, repeat the above steps for each connection to find the IP address for each one.
By following these steps, you can easily find the IP address for each network connection on your Mac. This method allows you to access the IP address specific to each connection, providing you with the necessary details for each network interface you are using.
Remember to select the desired network connection from the list before checking the IP address. Each connection may have a different IP address assigned, so ensure that you’re looking at the correct connection for accurate information.
Now that you know how to find the IP address on a Mac with multiple network connections, let’s explore another method.
Resetting the IP address on a Mac
If you’re experiencing network issues or need to troubleshoot connectivity problems, resetting the IP address on your Mac can sometimes help. Here’s how you can reset the IP address:
- Click on the Apple menu located on the top-left corner of your screen.
- Select “System Preferences” from the dropdown menu.
- In the System Preferences window, locate and click on the “Network” icon.
- In the left-hand column, select the network connection for which you want to reset the IP address.
- Click on the “Advanced” button located in the lower-right corner of the window.
- In the “TCP/IP” tab, you will find a button labeled “Renew DHCP Lease” or “Renew Lease.” Click on it.
By clicking on the “Renew DHCP Lease” (or similar) button, your Mac will attempt to release and obtain a new IP address from the DHCP server. This process can help resolve any IP address conflicts or network configuration issues that may be causing connectivity problems.
It’s important to note that resetting the IP address should only be done when necessary and as part of troubleshooting network issues. In most cases, your Mac will automatically obtain a new IP address when it renews the DHCP lease.
If resetting the IP address does not resolve the network issues, you may need to seek further assistance from your internet service provider (ISP) or a network specialist.
Now that you know how to reset the IP address on a Mac, you have an additional troubleshooting step to try if you encounter network connectivity problems.