
How to Change IP Address on a Mac
Changing the IP address on a Mac can be essential for troubleshooting network issues, setting up a home network, or accessing restricted websites. Fortunately, the process is straightforward and can be done in multiple ways. In this section, we will explore three methods to change the IP address on a Mac.
Method 1: Changing IP Address Manually
If you prefer to have complete control over your network settings, manually changing the IP address is the way to go. Start by opening the “System Preferences” from the Apple menu. Next, click on “Network” and select the active network interface, Ethernet or Wi-Fi. Click on the “Advanced” button and navigate to the “TCP/IP” tab. Here, you can enter a new IP address, subnet mask, router address, and DNS servers. Remember to click “OK” to save the changes.
Method 2: Changing IP Address Using DHCP
For most users, the Dynamic Host Configuration Protocol (DHCP) offers an easier way to change the IP address. DHCP automatically assigns IP addresses from a pool of available addresses, making network configuration hassle-free. To use DHCP, open “System Preferences,” select “Network,” and choose the active network interface. Click on the “Advanced” button and go to the “TCP/IP” tab. Set the “Configure IPv4” option to “Using DHCP” and click “Renew DHCP Lease” to obtain a new IP address.
Method 3: Changing IP Address Using Network Preferences
If you want a quick and effortless way to change the IP address, you can use the Network Preferences panel. To access this, click on the network icon in the menu bar and select “Open Network Preferences.” In the preferences window, select the active network interface and click on the “Advanced” button. Then, go to the “TCP/IP” tab and choose the “Renew DHCP Lease” option. This will provide you with a new IP address without much manual intervention.
Understanding IP Addresses
Before diving into the process of changing an IP address on a Mac, it’s essential to have a solid understanding of what an IP address actually is. IP stands for Internet Protocol, and an IP address serves as a unique identifier for devices connected to a network. It allows devices to communicate and exchange data over the internet or within a local network.
IP addresses come in two versions: IPv4 and IPv6. IPv4 addresses are the most widely used and consist of a series of four numbers separated by periods, such as 192.168.0.1. Each section of the address can range from 0 to 255. However, with the growing number of connected devices, IPv6 addresses were introduced to provide a much larger address space.
An IP address consists of two main components: the network ID and the host ID. The network ID represents the network the device is connected to, while the host ID identifies the specific device on that network. This division allows for efficient routing of network traffic.
In addition to the IP address itself, there are other related components to be aware of:
- Subnet Mask: The subnet mask determines which part of the IP address represents the network and which part represents the host. It is usually represented by a set of four numbers, like the IP address.
- Default Gateway: The default gateway is the IP address of the network’s router. It acts as an intermediary between the local network and external networks, facilitating the transfer of data between them.
- DNS Servers: DNS servers translate domain names (e.g., www.example.com) into IP addresses. Each device connected to a network must have at least one DNS server specified to access websites or other resources by their domain names.
Understanding these components is crucial when changing an IP address on a Mac. It ensures that the new IP address and related settings are properly configured to maintain network connectivity and access to the internet.
Checking Current IP Configuration
Before attempting to change the IP address on your Mac, it’s important to check the current IP configuration to ensure you have accurate information about your network settings. Here’s how you can check the current IP configuration:
Step 1: Start by clicking on the Apple menu in the top-left corner of your screen and selecting “System Preferences.”
Step 2: In the System Preferences window, click on the “Network” icon.
Step 3: On the left-hand side of the Network window, you’ll see a list of network interfaces. The active interface will be highlighted and marked with a green dot. It can be either Ethernet (wired connection) or Wi-Fi (wireless connection).
Step 4: Once you’ve selected the active interface, you’ll see its current configuration displayed on the right-hand side. Look for the “Status” section, which will show whether your connection is active or not. Underneath that, you’ll find the IP address, subnet mask, and router address.
Step 5: To view the DNS servers, click on the “Advanced” button in the bottom-right corner of the Network window. Go to the “DNS” tab, and you’ll see a list of DNS servers that your Mac is currently configured to use.
Taking note of the current IP address, subnet mask, router address, and DNS servers will be helpful when manually changing the IP address or troubleshooting network issues. It ensures that you have accurate information to configure the new IP address correctly.
If you’re using the DHCP method to change the IP address, checking the current IP configuration is still important. It allows you to verify whether the IP address is assigned automatically by DHCP or manually configured. Additionally, it gives you insights into the current subnet mask, router address, and DNS servers that DHCP is providing.
Changing IP Address Manually
If you prefer to have full control over your network settings, you can change the IP address on your Mac manually. Here’s how you can do it:
Step 1: Click on the Apple menu, select “System Preferences,” and then click on the “Network” icon.
Step 2: In the Network window, you’ll see a list of network interfaces on the left-hand side. Choose the active interface (Ethernet or Wi-Fi) that you want to change the IP address for.
Step 3: Click on the “Advanced” button in the bottom-right corner of the Network window.
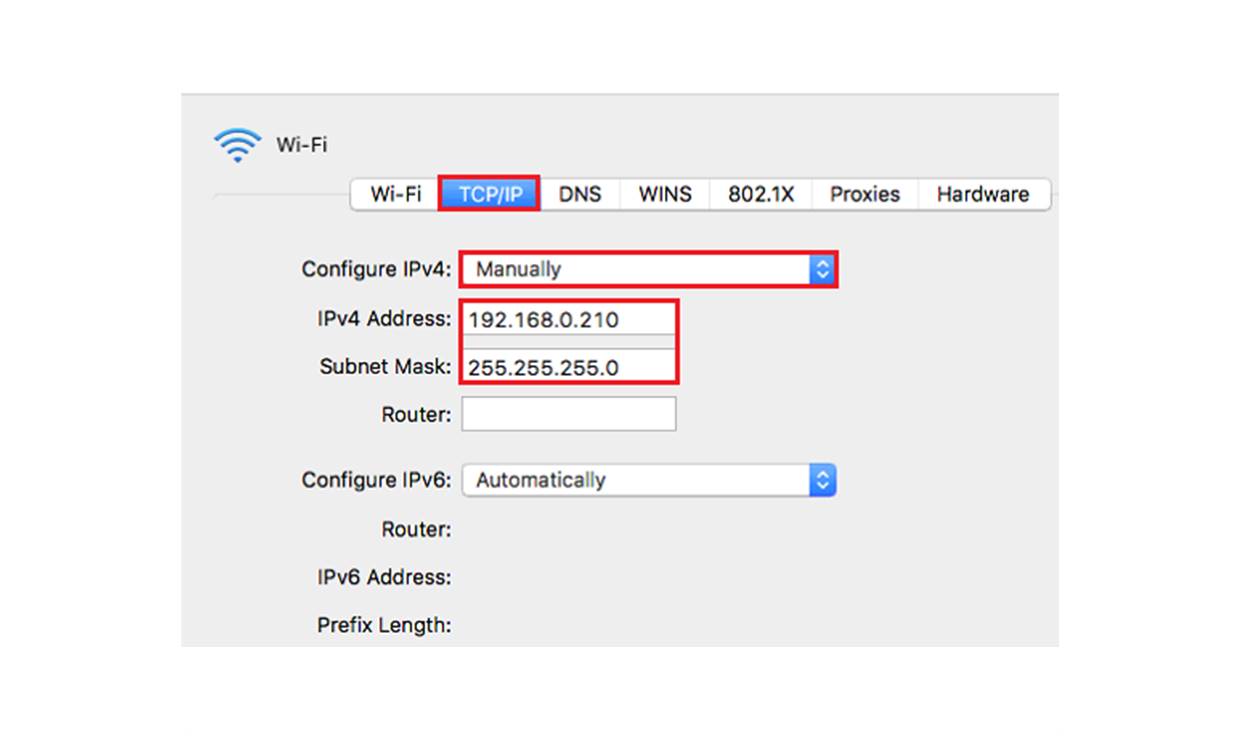
Step 4: In the Advanced window, go to the “TCP/IP” tab. Here, you’ll see the current IPv4 configuration for your network interface.
Step 5: To change the IP address manually, click on the “Configure IPv4” dropdown menu and select “Manually.”
Step 6: Now, you can enter a new IPv4 address that you want to assign to your Mac. Make sure to choose an address within the same subnet as your current configuration.
Step 7: Fill in the subnet mask, router address, and DNS server addresses if necessary. You can obtain this information from your network administrator or Internet Service Provider (ISP).
Step 8: Once you’ve entered the new IP address and other details, click on the “OK” button to save the changes.
Your Mac will now use the new manually configured IP address. It’s important to note that changing the IP address manually can lead to connectivity issues if the entered information is incorrect. Double-check all the details before saving the changes to ensure a smooth transition to the new IP address.
Keep in mind that manually changing the IP address is usually recommended for advanced users who have a thorough understanding of networking concepts. If you’re not confident in your abilities or unsure about the impact of changing the IP address, it’s best to seek assistance from a network professional or refer to the DHCP or Network Preferences method described later in this article.
Changing IP Address Using DHCP
If you prefer a more automated and hassle-free way of changing the IP address on your Mac, you can use the Dynamic Host Configuration Protocol (DHCP). This method allows your Mac to automatically obtain an IP address from a DHCP server. Here’s how you can change the IP address using DHCP:
Step 1: Begin by clicking on the Apple menu, selecting “System Preferences,” and then clicking on the “Network” icon.
Step 2: In the Network window, choose the active network interface (Ethernet or Wi-Fi) that you want to change the IP address for.
Step 3: Click on the “Advanced” button in the bottom-right corner of the Network window.
Step 4: In the Advanced window, go to the “TCP/IP” tab. Here, you’ll see the current IPv4 configuration for your network interface.
Step 5: To change the IP address using DHCP, make sure the “Configure IPv4” dropdown menu is set to “Using DHCP.”
Step 6: Click on the “Renew DHCP Lease” button to obtain a new IP address from the DHCP server. This will release the current IP address and request a new one.
Step 7: After clicking “Renew DHCP Lease,” your Mac will attempt to contact the DHCP server and obtain a new IP address, subnet mask, router address, and DNS server addresses.
Step 8: Once the process is complete, you’ll see the new IP address and other updated configuration details in the TCP/IP tab. The network interface will now be using the newly assigned IP address through DHCP.
Changing the IP address using DHCP is a convenient option for most users, as it eliminates the need for manual configuration and ensures compatibility with the network’s DHCP server. However, keep in mind that the availability of IP addresses from the DHCP server may vary, especially in larger networks or when connecting to public Wi-Fi hotspots. In some cases, multiple devices might be assigned the same IP address, leading to connectivity issues. If you encounter any problems, manually assigning a unique IP address might be a better solution.
Changing IP Address Using Network Preferences
If you’re looking for a quick and effortless way to change the IP address on your Mac, you can utilize the Network Preferences panel. This method allows you to easily renew the DHCP lease and obtain a new IP address without much manual intervention. Here’s how you can change the IP address using Network Preferences:
Step 1: Click on the network icon in the menu bar, usually located in the top-right corner of the screen, and select “Open Network Preferences.”
Step 2: In the Network Preferences window, you’ll see a list of network interfaces on the left-hand side. Choose the active interface (Ethernet or Wi-Fi).
Step 3: Click on the “Advanced” button in the bottom-right corner of the Network Preferences window.
Step 4: In the Advanced window, go to the “TCP/IP” tab.
Step 5: In the TCP/IP tab, click on the “Renew DHCP Lease” button. This will release your current IP address and request a new one from the DHCP server.
Step 6: After clicking “Renew DHCP Lease,” your Mac will contact the DHCP server and obtain a new IP address, subnet mask, router address, and DNS server addresses.
Step 7: Once the process is complete, you’ll see the updated IP address and other configuration details in the TCP/IP tab.
Changing the IP address using Network Preferences is a straightforward approach that suits users who prefer a simple and automated method. It’s particularly useful when you’re connected to multiple networks and want a quick way to obtain a new IP address without going through the extensive settings in System Preferences.
However, keep in mind that this method relies on DHCP to assign the IP address, and the availability of IP addresses might be limited in certain scenarios. If you encounter any issues or need to specify a specific IP address or subnet, using the manual or DHCP method discussed earlier would be more appropriate.
Troubleshooting IP Address Issues
While changing the IP address on a Mac is usually a straightforward process, issues can occasionally arise. Here are some common troubleshooting steps to help resolve IP address-related problems:
1. Check Network Connectivity: Ensure that your Mac is properly connected to the network, either through Ethernet or Wi-Fi. Verify that cables are securely plugged in and that the network router is functioning correctly.
2. Restart Network Devices: Sometimes, restarting your modem, router, or access point can resolve connectivity issues. Power off the devices, wait a few minutes, and then power them back on.
3. Verify IP Configuration: Double-check the IP configuration settings on your Mac. Ensure that the IP address, subnet mask, router address, and DNS servers are correctly entered. Compare them to the settings provided by your network administrator or ISP.
4. Try a Different IP Address: If you’re experiencing connection problems, try changing to a different IP address. Manually assign a new IP address within the same subnet to eliminate conflicts or issues with the current IP configuration.
5. Reset DHCP Lease: If you’re using DHCP and experiencing connectivity issues, renewing the DHCP lease can help. Go to the Network Preferences or Network settings and click on the “Renew DHCP Lease” button to obtain a new IP address from the DHCP server.
6. Reset Network Settings: If all else fails, resetting your network settings can often resolve stubborn IP address issues. In the Network Preferences, select the active network interface, click on the gear icon at the bottom of the list, and choose “Make Service Inactive.” Then, repeat the process and select “Make Service Active” to reset the network settings.
7. Contact Your Network Administrator: If you’re on a corporate network or using a network managed by your ISP, it’s best to reach out to your network administrator or support team for assistance. They can provide specific troubleshooting steps and guidance tailored to your network environment.
By following these troubleshooting steps, you can address common IP address-related issues and restore network connectivity on your Mac. If you’re still experiencing problems, it may be necessary to seek further technical assistance from a professional.
Tips for a Smooth IP Address Change
When changing the IP address on your Mac, it’s important to ensure a smooth transition to avoid any disruptions in network connectivity. Here are some tips to help you navigate the process smoothly:
1. Plan Ahead: Before making any changes to your IP address, gather all the necessary information. Know your current IP configuration, including the IP address, subnet mask, router address, and DNS server addresses. This information will be useful when configuring the new IP address.
2. Understand Network Requirements: Familiarize yourself with the network requirements, such as subnet ranges, available IP addresses, and any specific settings or restrictions imposed by your network administrator.
3. Choose the Right Method: Select the most appropriate method to change the IP address based on your level of expertise and the specific requirements of your network. You can opt for manual configuration, DHCP, or the Network Preferences method discussed earlier.
4. Double-Check Configuration Settings: When configuring the new IP address, subnet mask, router address, and DNS server addresses, ensure that you’ve entered the correct information. Mistakes in these settings can cause connectivity issues.
5. Test the New IP Address: Once you’ve updated the IP address, verify its functionality by testing connectivity to the internet and other network resources. Ensure that you can access websites, send and receive emails, and connect to other devices on the network.
6. Document Changes for Future Reference: Take note of the new IP address and other configuration details for future reference. This documentation will be helpful in troubleshooting network issues or reverting back to the previous IP address if needed.
7. Communicate the Change to Others: If there are other devices or users on the same network, it’s essential to communicate the IP address change to ensure seamless connectivity for all. Inform network administrators, colleagues, or family members who might be affected by the change.
8. Monitor Network Performance: After the IP address change, keep an eye on the network performance to identify any unexpected issues or anomalies. Pay attention to any connectivity problems, slow internet speeds, or issues accessing specific resources.
9. Seek Professional Assistance if Needed: If you’re unsure about the IP address change or encounter persistent network problems, don’t hesitate to seek help from a network professional or your ISP’s support team. They can provide expert guidance and assistance tailored to your specific situation.
By following these tips, you can ensure a smooth transition when changing the IP address on your Mac. Taking the time to plan, configure the settings accurately, and test the new IP address will help maintain uninterrupted network connectivity.