
Why Insert a Link Into an Email with Outlook?
Inserting a link into an email with Outlook is an effective way to share information, direct recipients to relevant websites, or provide easy access to resources. By including links, you can make your email more interactive, engaging, and user-friendly. Here are a few reasons why inserting links into emails with Outlook is beneficial:
- Enhanced Communication: Links allow you to provide additional information, such as relevant articles, documents, or product pages, directly within the email. This facilitates clear and concise communication, eliminating the need for lengthy explanations or attachments.
- Improved Accessibility: Adding links to your email enables recipients to access specific webpages or documents with just a click. This eliminates the hassle of manually searching for information or opening multiple tabs, ensuring a seamless and efficient user experience.
- Increased Engagement: Including links in your emails encourages recipients to take action. Whether it’s directing them to register for an event, explore a new product, or participate in a survey, clickable links make it easy for them to engage with your content and respond to your call-to-action.
- Trackable Metrics: By using specialized link tracking tools or services, you can gather valuable data on how your recipients interact with the provided links. This data allows you to measure the effectiveness of your email campaigns, identify the most engaging content, and make informed decisions to optimize future communications.
With these benefits in mind, incorporating links into your emails using Outlook is a simple and effective way to enhance your communication, improve accessibility, and drive engagement with your audience. So, let’s dive into the steps on how to insert a link into an email with Outlook.
Step 1: Open Outlook
Before you can start inserting a link into an email with Outlook, you need to open the Outlook application on your computer or access it through your web browser. Outlook is a widely used email client that provides a range of features and functionalities to facilitate effective communication.
To open Outlook, follow these simple steps:
- Locate the Outlook app icon on your desktop or navigate to the Outlook website on your preferred browser.
- If you’re using the desktop application, double-click on the Outlook icon to launch the program. Alternatively, if you’re accessing it through a browser, enter the Outlook website URL and log in to your account.
- Once Outlook is open, you will be greeted with your email inbox. Take a moment to familiarize yourself with the Outlook interface if you haven’t used it before.
By opening Outlook, you gain access to an array of email management features, including the ability to compose, send, and receive emails. Now that you have successfully opened Outlook, you’re ready to move on to the next step of inserting a link into your email.
Step 2: Create a New Email
Once you have opened Outlook, the next step is to create a new email in which you will insert the link. Creating a new email is a simple process that allows you to compose your message and customize it according to your needs.
Follow these steps to create a new email:
- In Outlook, locate the “New Email” button. This button is usually located at the top left corner of the Outlook interface and is labeled with a “+” symbol or the word “New”.
- Click on the “New Email” button to open a blank email composition window.
- In the email composition window, you will see various fields such as “To”, “Subject”, and the body of the email.
- Enter the recipient’s email address in the “To” field. You can either type it manually or select it from your Outlook contacts list.
- Next, enter a relevant subject for your email in the “Subject” field. This will give the recipient an idea about the content of your email.
- In the body of the email, you can type your message, add images, format the text, and, most importantly, insert the link.
Creating a new email in Outlook allows you to have full control over the content and format of your message. Once you have created a new email, you can proceed to the next step of actually inserting the link into the body of the email.
Step 3: Type or Paste the Text for the Link
After creating a new email in Outlook, the next step is to type or paste the text that you want to turn into a clickable link. This text will serve as the anchor text for the link, meaning it is the visible and clickable part of the link that users will see in your email.
Follow these steps to type or paste the text for the link:
- In the body of the email, position your cursor where you want to insert the link or select the text that you want to turn into a link.
- Type the desired text for the link directly if you haven’t copied it from elsewhere. Make sure to use clear and descriptive text that indicates what the link is leading to. For example, instead of using generic text such as “Click here,” use specific text like “Learn more about our services.”
- If you have already copied the text from another source, paste it into the email body at the desired location. Ensure that the pasted text is smooth and properly formatted.
Typing or pasting the text for the link allows you to provide context and engage the reader before they click on the link. It’s important to choose text that accurately represents the destination of the link to avoid confusion and improve user experience. Once you have inserted the text, you are ready to move on to the next step of actually creating the link itself.
Step 4: Highlight the Text
After typing or pasting the text for the link in Outlook, the next step is to highlight the text that you want to turn into a clickable link. By highlighting the text, you indicate to Outlook that you want to apply a hyperlink to the selected portion of the email.
Follow these steps to highlight the text:
- In the body of the email, position your cursor at the beginning of the text that you want to turn into a link.
- Click and hold the left mouse button while dragging the cursor over the text you want to highlight. This will create a highlighted selection of the text.
- Ensure that you have selected the entire text that you want to turn into a link. If needed, you can adjust the selection by holding the mouse button and dragging it over the desired text.
Highlighting the text allows you to specify the exact portion of the email that will become clickable. By selecting the appropriate text, you can ensure that the hyperlink is applied to the correct words or phrase. Once you have successfully highlighted the text, you can move on to the next step of inserting the hyperlink.
Step 5: Click on the “Insert” Tab
With the text highlighted, the next step in inserting a link into an email with Outlook is to click on the “Insert” tab. The “Insert” tab contains several options for adding different elements and objects to your email, including hyperlinks.
Follow these steps to access the “Insert” tab:
- In the Outlook email composition window, locate the ribbon at the top of the screen. The ribbon contains several tabs, including “Home,” “Insert,” “Format Text,” and more.
- Click on the “Insert” tab to switch to the tab’s view. This action will display a range of options related to inserting different elements into your email.
By clicking on the “Insert” tab, you are now ready to access the specific button that will allow you to insert the hyperlink into the selected text. The “Insert” tab provides a convenient and centralized location within the Outlook interface for managing various types of insertions and customization options for your email content.
Step 6: Click on the “Hyperlink” Button
After accessing the “Insert” tab in Outlook, the next step is to locate and click on the “Hyperlink” button. This button allows you to add a hyperlink to the selected text in your email, turning it into a clickable link.
Follow these steps to click on the “Hyperlink” button:
- In the “Insert” tab, look for the “Links” group. This group typically contains options related to hyperlinking and linking elements.
- Within the “Links” group, you will find the “Hyperlink” button. The button is usually represented by a chain link icon or labeled with the word “Hyperlink”.
- Click on the “Hyperlink” button to open the hyperlink editing dialog box.
Clicking on the “Hyperlink” button is a crucial step in adding a hyperlink to your email. This action allows you to specify the URL that the selected text will link to. It opens a dialog box where you can enter the necessary information for the hyperlink, including the URL, additional link options, and formatting.
Once you have clicked on the “Hyperlink” button, you’re ready to proceed to the next step of entering the link URL itself.
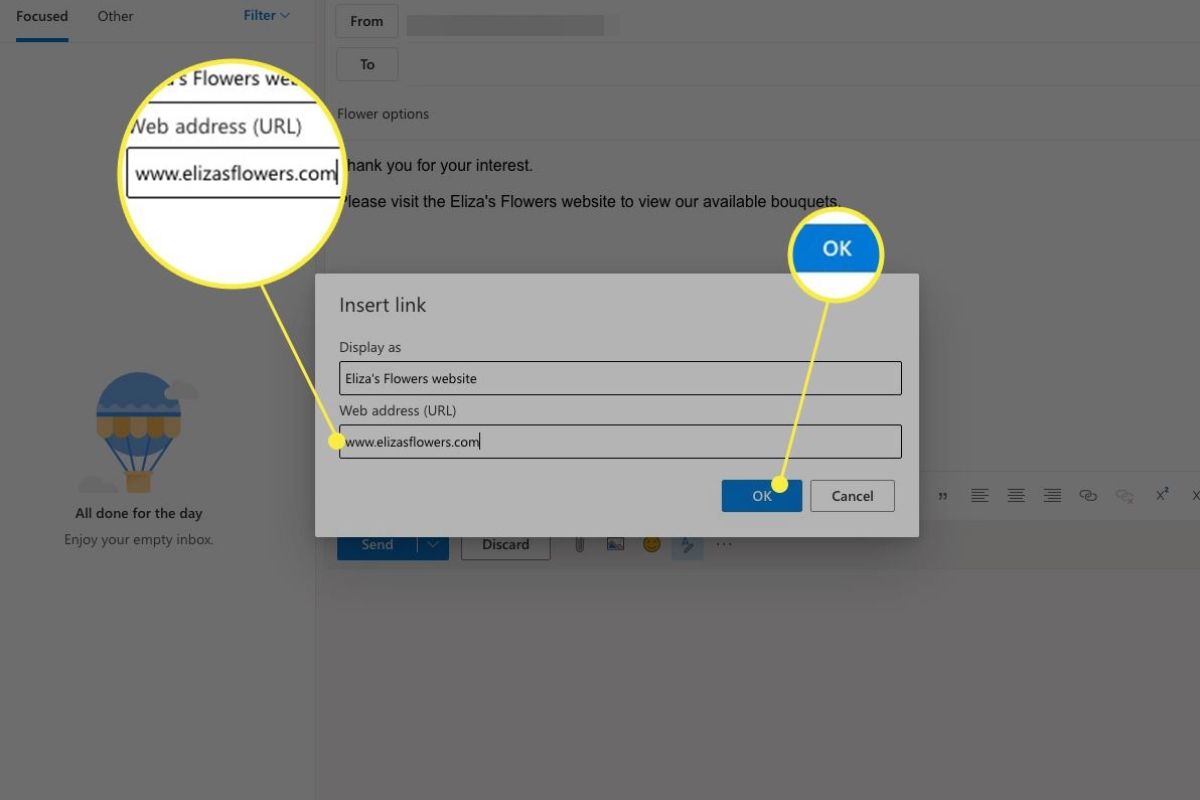
Step 7: Enter the Link URL
After clicking on the “Hyperlink” button in Outlook, the next step is to enter the link URL. The link URL is the web address that the selected text will be linked to, allowing recipients to navigate to the specified webpage or destination.
Follow these steps to enter the link URL:
- In the hyperlink editing dialog box that appears after clicking on the “Hyperlink” button, locate the field labeled “Address” or “URL”. This is where you will enter the link URL.
- Ensure that the selected text in your email is still highlighted, as the hyperlink will be applied to this text.
- Type or paste the desired link URL into the “Address” or “URL” field. Make sure to include the full web address, including the “https://” or “http://” prefix.
Entering the link URL accurately is crucial, as it ensures that recipients are directed to the intended webpage or destination when they click on the link in your email. Double-check the URL for any errors or misspellings, as even minor mistakes can lead to broken or non-functioning links.
Once you have entered the link URL, you can move on to the next step of adding any additional link information, if desired.
Step 8: Add Additional Link Information (Optional)
After entering the link URL in Outlook, you have the option to add additional link information, such as a tooltip or screen tip, to provide more context or details about the link. This additional information can help recipients understand where the link leads or what it relates to before they click on it.
Follow these steps to add additional link information:
- In the hyperlink editing dialog box, locate the field labeled “Text to display” or “ScreenTip”. This is where you can enter the additional link information.
- If desired, delete the default text in the field and replace it with the preferred additional information. You can provide a brief description, title, or any relevant details that can help recipients understand the purpose of the link.
Adding additional link information can enhance the user experience and improve the clarity of your email. The extra details can help recipients make an informed decision before clicking on the link, especially if the text alone doesn’t provide sufficient context.
Once you have added any desired additional link information, you’re ready to move on to the next step of finalizing the hyperlink by clicking “OK”.
Step 9: Click “OK”
After entering the link URL and any additional information, the next step in inserting a link into an email with Outlook is to click the “OK” button. This finalizes the process and applies the hyperlink to the selected text in your email.
Follow these steps to click “OK”:
- Review the entered link URL and additional information to ensure their accuracy.
- If everything looks correct, locate the “OK” button in the hyperlink editing dialog box. This button is typically located towards the bottom right corner of the dialog box.
- Click the “OK” button to apply the hyperlink to the selected text in your email.
Clicking “OK” saves your changes and inserts the hyperlink into the email. The selected text will now appear as a clickable link, allowing recipients to navigate to the specified webpage or destination with a simple click.
It’s a good practice to double-check the applied hyperlink after clicking “OK” to ensure that it leads to the intended destination and displays the desired additional link information correctly.
Once you have clicked “OK”, you can proceed to the final step of previewing and sending your email, which we will cover in the next section.
Step 10: Preview and Send Your Email
After inserting the link into your email with Outlook, the final step is to preview and send your email. Previewing your email allows you to check for any errors, verify the appearance of the hyperlink, and ensure the overall quality of your message before sending it to the recipients.
Follow these steps to preview and send your email:
- Review the entire email, including the inserted hyperlink, to ensure that everything looks as intended.
- If you want to preview how your email will appear to recipients, click on the “Preview” option, if available. This allows you to see a rendered version of the email with formatting and the functioning hyperlink.
- If you’re satisfied with the email, click on the “Send” button to send the email to the designated recipient(s).
- Before clicking “Send,” it is advisable to send a test email to yourself or a colleague to verify that the hyperlink works properly and displays correctly in different email clients or devices.
Previewing your email and sending a test email can help catch any issues or discrepancies before the email reaches the intended recipients. It allows you to ensure that the hyperlink functions correctly, the text appears as expected, and the overall email meets your standards of professionalism and coherence.
Once you have carefully reviewed and confirmed the email’s content and the functioning of the hyperlink, click “Send” to deliver it to the recipients.