
Steps to Change Your Signature in Outlook
Microsoft Outlook is a popular email client that allows users to send and receive emails efficiently. One of the features that makes Outlook versatile is the ability to customize email signatures. Changing your signature in Outlook helps leave a professional and personal touch on your emails. In this section, we will walk you through the steps to change your signature in Outlook, whether you are using the desktop application or the web app.
Method 1: Changing the Signature in Outlook Desktop
Follow these steps to change your signature in Outlook desktop:
- Open Outlook on your desktop.
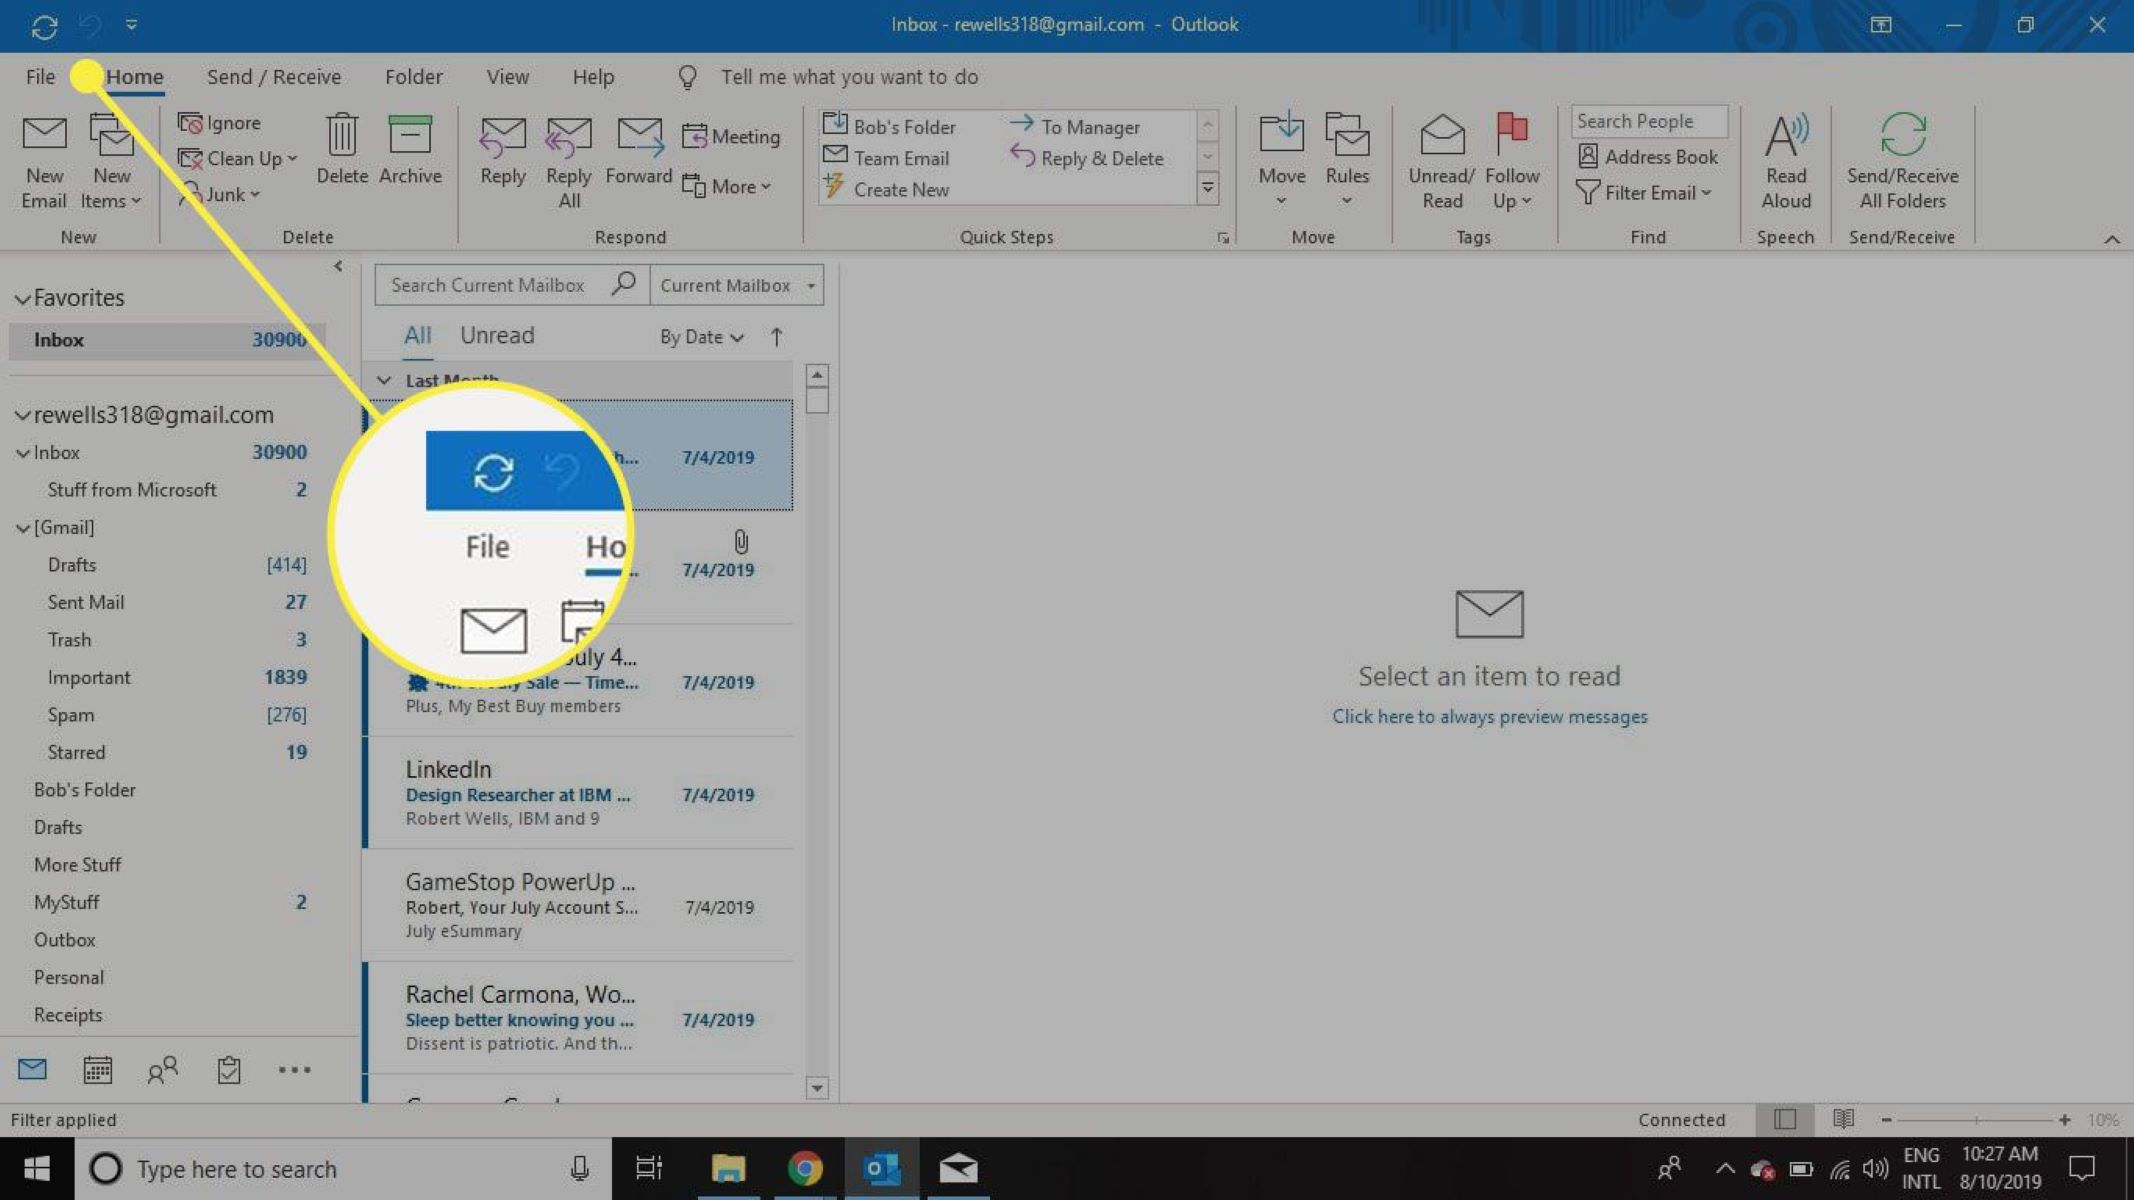
- Click on “File” in the top left corner of the screen.
- Select “Options” from the drop-down menu.
- In the Outlook Options window, click on “Mail” in the left sidebar.
- Under the “Compose messages” section, click on the “Signatures” button.
- In the Signatures and Stationery window, select the email account for which you want to change the signature.
- Click on the “New” button to create a new signature, or select an existing one to modify.
- Type your desired signature in the text box.
- Customize the font, size, color, and other formatting options for your signature.
- If desired, add an image or logo to your signature by clicking on the “Insert Picture” button.
- Click “OK” to save your changes and close the Signatures and Stationery window.
Method 2: Changing the Signature in Outlook Web App
To change your signature in Outlook Web App, follow these steps:
- Open Outlook Web App in your browser.
- Click on the settings gear icon in the top right corner of the screen.
- In the drop-down menu, select “Options.”
- In the Outlook Options window, click on “Mail” in the left sidebar.
- Under the “Layout” section, click on “Email signature.”
- In the Email signature window, select the email account for which you want to change the signature.
- Type your desired signature in the text box.
- Customize the font, size, color, and other formatting options for your signature.
- If desired, add an image or logo to your signature by clicking on the “Insert Picture” button.
- Click “Save” to save your changes and close the Email signature window.
By following these simple steps, you can easily change your signature in Outlook and make a lasting impression with every email you send. Whether you prefer the desktop application or the web app, Outlook offers flexible options for customizing your signature to suit your personal or professional needs.
Method 1: Changing the Signature in Outlook Desktop
If you are using Microsoft Outlook desktop application, follow the steps below to change your signature:
- Open Outlook on your desktop. Launch the application by selecting it from your Start menu or desktop shortcut.
- Click on “File” in the top left corner of the screen. This will open a drop-down menu.
- Select “Options” from the drop-down menu. A new window titled “Outlook Options” will appear.
- In the Outlook Options window, click on “Mail” in the left sidebar. This will display the mail settings options.
- Under the “Compose messages” section, click on the “Signatures” button. This will open the “Signatures and Stationery” window.
- In the Signatures and Stationery window, select the email account for which you want to change the signature. If you have multiple email accounts configured in Outlook, make sure to choose the correct account.
- Click on the “New” button to create a new signature, or select an existing one to modify. If you want to create a new signature, a pop-up window will appear where you can enter a name for the signature.
- Type your desired signature in the text box. The text box is where you can enter and customize your signature.
- Customize the font, size, color, and other formatting options for your signature. Outlook provides a variety of formatting options to make your signature visually appealing.
- If desired, add an image or logo to your signature by clicking on the “Insert Picture” button. You can insert an image from your computer or an online source to further personalize your signature.
- Click “OK” to save your changes and close the Signatures and Stationery window. Your new signature will now be applied to the selected email account in Outlook desktop.
Changing your signature in Outlook desktop is a straightforward process that allows you to create a professional and unique email signature. By following these steps, you can customize the appearance of your signature and make it more compelling, helping you leave a memorable impression on your recipients.
Step 1: Open Outlook on your desktop.
To change your signature in Outlook desktop, the first step is to open the application on your computer. Follow the instructions below to access Outlook:
- Launch Outlook on your desktop. You can do this by selecting the Outlook app from your Start menu or by clicking on the Outlook icon on your desktop if you have created a shortcut.
- If prompted, enter your email address and password. This step ensures that you have successfully logged into your Outlook account.
- Wait for Outlook to load. The time it takes to open Outlook may vary depending on the speed of your computer and the size of your mailbox.
- Once Outlook is open, you will see the main Outlook window. This window provides access to your emails, calendar, contacts, and other features.
Ensure that you have a stable internet connection to avoid any disruptions while using Outlook. It is also essential to have the latest version of Outlook installed on your computer to ensure optimal functionality. Opening Outlook brings you one step closer to changing your signature and personalizing your email communications.
By following this first step, you are now ready to proceed with the remaining steps to change your signature in Outlook desktop. Remember, each step builds upon the previous one, so be sure to follow the instructions carefully to successfully modify your signature according to your preferences.
Step 2: Click on “File” in the top left corner of the screen.
After opening Outlook on your desktop, the next step in changing your signature is to click on the “File” tab. Follow these instructions to locate and click on the “File” option:
- Look at the top left corner of the Outlook window. You will see a menu bar containing different tabs, such as “File,” “Home,” “Send/Receive,” “Folder,” and more.
- Locate and click on the “File” tab. It is typically the first tab in the menu bar, positioned at the leftmost side.
By clicking on the “File” tab, you will initiate a drop-down menu that provides access to various settings and options in Outlook. This menu serves as a gateway to perform various tasks and make customizations according to your preferences.
Take a moment to familiarize yourself with the options available in the “File” tab. In addition to changing your signature, you can access features such as account settings, mailbox cleanup, automatic replies, and more. Understanding the available options will enable you to make the most of Outlook’s functionality and tailor the application to meet your needs.
Remember to click on “File” in the top left corner of the screen to proceed to the next steps of changing your signature in Outlook. Each step brings you closer to personalizing your email communications and enhancing your professional image.
Step 3: Select “Options” from the drop-down menu.
After clicking on the “File” tab in Outlook, the next step to change your signature is to select “Options” from the drop-down menu. Follow these instructions to locate and select the “Options” menu:
- Once you click on the “File” tab, a drop-down menu will appear.
- Scan through the options in the drop-down menu, and look for the “Options” button. It is usually located towards the bottom of the menu.
- Click on “Options” to access the Outlook Options window.
When you select “Options,” a separate window titled “Outlook Options” will open. This window contains various settings and configurations that you can modify to personalize your Outlook experience.
Take a moment to explore the different options available in the “Outlook Options” window. Here, you can adjust settings related to mail, calendar, contacts, reading pane, and much more. Familiarize yourself with the available options to maximize your productivity and customize Outlook to suit your needs.
For now, focus on accessing “Options” as part of the process to change your signature. By selecting “Options” from the drop-down menu, you are one step closer to modifying your email signature and giving your emails a personal touch. Remember to follow the remaining steps to complete the process successfully.
Step 4: In the Outlook Options window, click on “Mail” in the left sidebar.
After selecting “Options” in the previous step, you will find yourself in the “Outlook Options” window. The next step to change your signature is to click on “Mail” in the left sidebar. Follow these instructions to locate and click on the “Mail” option:
- Once you are in the “Outlook Options” window, take a look at the left sidebar. It contains a list of different categories or sections related to Outlook settings.
- Locate and click on “Mail” in the left sidebar. This will display the mail-related options and settings in the main window.
By clicking on “Mail,” you will have access to a range of settings and configurations that pertain specifically to your email account in Outlook. This includes options related to composing and reading emails, message handling, signatures, and more.
Take a few moments to explore the different options available within the “Mail” category. Familiarize yourself with the settings and configurations that you can modify to enhance your email experience. Understanding these options will enable you to make informed decisions when customizing your signature and other aspects of Outlook.
Remember to click on “Mail” in the left sidebar of the “Outlook Options” window to proceed with changing your signature. Each step navigates you closer to personalizing your email communications and making a lasting impression with your recipients.
Step 5: Under the “Compose messages” section, click on the “Signatures” button.
After clicking on “Mail” in the left sidebar of the “Outlook Options” window, it’s time to proceed to the next step to change your signature. Follow these instructions to locate and click on the “Signatures” button:
- In the “Outlook Options” window, scroll down until you find the “Compose messages” section. This section contains settings related to composing new emails.
- Within the “Compose messages” section, look for the “Signatures” button. It is usually located towards the middle of the options list under the “Signatures” subcategory.
- Click on the “Signatures” button to open the “Signatures and Stationery” window.
By clicking on the “Signatures” button, you will access the dedicated window where you can create and manage your email signatures. This window allows you to customize your signature by adding text, formatting, images, and more.
Take a moment to explore the different options available within the “Signatures and Stationery” window. Here, you can create multiple signatures, specify default signatures for new emails and replies, and adjust various formatting settings. This level of customization allows you to tailor your signature to match your personal or professional style.
Remember to click on the “Signatures” button under the “Compose messages” section to proceed with changing your signature. Each step brings you closer to personalizing your email communications and ensuring that your unique signature is included in every email you send.
Step 6: In the Signatures and Stationery window, select the email account for which you want to change the signature.
Once you have opened the “Signatures and Stationery” window by clicking on the “Signatures” button in the previous step, it’s time to select the email account for which you want to change the signature. Follow these instructions to proceed:
- Inside the “Signatures and Stationery” window, you will see a section labeled “Select signature to edit.”
- Under this section, you will find a drop-down menu where you can choose the email account for which you want to change the signature. If you have multiple email accounts configured in Outlook, ensure that you select the correct one.
- Click on the drop-down menu and choose the desired email account.
By selecting the specific email account, you are indicating to Outlook which signature you would like to modify. This is especially helpful if you have different signatures for different email accounts, enabling you to personalize your communication for each account.
Take a moment to review the options and settings available for the selected email account. This includes the ability to create a new signature, edit an existing one, or remove a signature altogether. You can also set a default signature for new messages and replies specific to this email account.
Remember to select the email account for which you want to change the signature in the “Select signature to edit” section of the “Signatures and Stationery” window. Each step brings you closer to customizing your signature and making a memorable impact with every email you send.
Step 7: Click on the “New” button to create a new signature, or select an existing one to modify.
After selecting the desired email account in the “Signatures and Stationery” window, you have the option to either create a new signature or modify an existing one. Follow these instructions to proceed:
- Inside the “Signatures and Stationery” window, you will see a list of existing signatures. If you have previously created signatures, they will be displayed here.
- To create a new signature, click on the “New” button. This will open a dialog box where you can enter a name for your new signature.
- If you want to modify an existing signature, select the desired signature from the list. You can then click on the “Modify” button to make changes to the selected signature.
By clicking on the “New” button, you can create a fresh signature from scratch and give it a unique name for easy identification. This is useful when you want to create a brand new signature for a specific email account or purpose.
On the other hand, selecting an existing signature and clicking on the “Modify” button allows you to make edits and updates to that particular signature. This is ideal when you want to refine an existing signature to reflect changes in your personal or professional information.
Take a moment to consider whether you want to create a new signature or modify an existing one, and then proceed accordingly in the “Signatures and Stationery” window. Customizing your signature to suit your preferences is an important step in personalizing your email communications.
Remember, depending on your choice, click on either the “New” button or select an existing signature to modify. Each step brings you closer to the desired changes in your signature, allowing you to make a lasting impression with every email you send.
Step 8: Type your desired signature in the text box.
Once you have created a new signature or selected an existing one to modify in the “Signatures and Stationery” window, it’s time to enter your desired signature. Follow these instructions to proceed:
- In the selected signature section, you will see a text box where you can input your desired signature.
- Click inside the text box to activate it and begin typing your signature.
- Enter the text that you want to include in your signature. This can include your name, job title, contact information, social media links, or any other details you want to include.
The text box provided in the “Signatures and Stationery” window allows you to customize your signature according to your preferences. You can use a mix of text, numbers, symbols, and special characters to create a signature that reflects your personal or professional branding.
Consider the layout, formatting, and overall design of your signature. You may want to include line breaks, use bold or italicized font, customize the font size, and experiment with different fonts to make your signature visually appealing.
Take your time to perfect the content of your signature by proofreading it for any errors or omissions. Ensure that you include all the necessary information and that it accurately reflects your identity or the image you want to project.
Remember to type your desired signature in the text box provided in the “Signatures and Stationery” window. Your signature should be professional, concise, and relevant to your personal or professional brand. Each step brings you closer to personalizing your email communications and making a memorable impact with your recipients.
Step 9: Customize the font, size, color, and other formatting options for your signature.
After typing your desired signature in the text box, the next step is to customize the font, size, color, and other formatting options. Follow these instructions to proceed:
- In the “Signatures and Stationery” window, select the text of your signature using your mouse or keyboard. This will allow you to apply formatting changes to the selected text.
- Once you have selected the desired text, click on the formatting options provided in the toolbar above the text box. These options include font style, size, color, bold, italic, underline, alignment, and more.
- Experiment with different formatting settings to find the combination that suits your preferences. You can make your signature more visually appealing by using different font styles, adjusting the size to enhance readability, and selecting an appropriate color scheme.
- Consider the overall appearance and legibility of your signature. Ensure that the font style and size make your signature easily readable, both on desktop and mobile devices.
- Don’t forget to proofread your signature after applying formatting changes. Check for any errors or inconsistencies and make necessary adjustments.
Customizing the font, size, color, and other formatting options for your signature allows you to add a personal touch and create a visually appealing signature that aligns with your brand identity. However, it’s important to maintain a professional look and ensure that the formatting choices enhance the readability of your signature.
Remember to select the text of your signature and apply the desired formatting options in the “Signatures and Stationery” window. This step ensures that your signature stands out and leaves a positive impression on your email recipients.
Step 10: If desired, add an image or logo to your signature by clicking on the “Insert Picture” button.
In addition to text, you may want to include an image or logo in your signature to make it visually appealing and further reinforce your personal or professional branding. Follow these instructions to add an image or logo to your signature:
- In the “Signatures and Stationery” window, place your cursor at the desired location within the text box where you want to insert the image or logo.
- Click on the “Insert Picture” button, typically represented by a picture icon. This will open a dialog box that allows you to browse your computer’s files to select an image.
- Navigate to the location where the image or logo is stored on your computer and select it.
- Click “Insert” to add the image or logo to your signature.
Once you have inserted the image or logo, you can resize it if necessary by clicking and dragging its corners. This will ensure that the image fits appropriately within your signature without distorting its proportions.
Please note that inserting images or logos into your signature may increase the size of your emails, especially if the image is large or in high-resolution. This can impact email load times for recipients, particularly those on slower internet connections. Therefore, it’s important to consider the file size and dimensions of the image you choose for your signature.
Remember to click on the “Insert Picture” button and follow the steps to add an image or logo to your signature if desired. Adding visual elements can enhance the impact of your signature and leave a memorable impression on your recipients.
Step 11: Click “OK” to save your changes and close the Signatures and Stationery window.
After you have made all the desired changes to your signature in the “Signatures and Stationery” window, the final step is to save your modifications and close the window. Follow these instructions to complete the process:
- Review your signature to ensure that it reflects the desired text, formatting, and any added images or logos.
- Once you are satisfied with your signature, click on the “OK” button located within the “Signatures and Stationery” window.
By clicking “OK,” you are confirming your changes and saving your signature settings. This action ensures that the modifications you made will be applied to the selected email account in Outlook.
Before closing the “Signatures and Stationery” window, take a moment to verify that your changes have been successfully saved. You can do this by composing a new email or selecting an existing draft to see your updated signature in action.
Remember to click “OK” within the “Signatures and Stationery” window to save your changes. By doing so, you complete the process of changing your signature in Outlook and ensure that your personalized signature will be automatically added to your emails.
Method 2: Changing the Signature in Outlook Web App
If you prefer to use the Outlook Web App to manage your emails, you can also change your signature through this platform. Follow the steps below to update your signature in Outlook Web App:
- Open your web browser and navigate to the Outlook Web App. Enter your email address and password to log in.
- Once you are logged in, look for the settings gear icon in the top right corner of the screen. Click on this icon to open a drop-down menu.
- In the drop-down menu, select “Options.” This will open the Outlook Options window in the web browser.
- In the Outlook Options window, locate and click on “Mail” in the left sidebar. This will display the mail-related settings and options.
- Under the “Layout” section, find and click on “Email signature.” This will open the Email signature window.
- In the Email signature window, you will see a dropdown menu where you can select the email account for which you want to change the signature. Choose the appropriate account from the list.
- Next, type your desired signature into the text box provided. This is where you can enter and customize your signature using the available formatting options.
- Customize the font, size, color, and other formatting options for your signature to make it visually appealing and aligned with your personal or professional branding.
- If desired, you can also add an image or logo to your signature by clicking on the “Insert Picture” button. This allows you to further customize and enhance your signature.
- Once you have made all the necessary changes to your signature, click “Save” to save your changes and close the Email signature window.
By following these steps in the Outlook Web App, you can easily change your signature and ensure that your personalized signature will be included in your emails. Whether you prefer the desktop application or the web app, Outlook offers flexible options for customizing your signature to suit your personal or professional needs.
Step 1: Open Outlook Web App in your browser.
To change your signature in Outlook Web App, the first step is to open the application in your preferred web browser. Follow these instructions to proceed:
- Launch your web browser on your computer.
- In the address bar, enter the URL for the Outlook Web App. This URL is typically provided by your organization’s IT department or your email service provider. Alternatively, you can search for “Outlook Web App” in a search engine and follow the link to access the login page.
- On the login page, enter your email address and password associated with your Outlook account.
- Click on the “Sign in” or “Log in” button to access your Outlook Web App account.
Make sure you have a stable internet connection to ensure a smooth experience while using the Outlook Web App. Also, ensure that you have the correct login credentials to access your account successfully.
By opening the Outlook Web App in your browser, you are ready to proceed with changing your signature. Each step brings you closer to customizing your email communications and making a memorable impact with your recipients.
Step 2: Click on the settings gear icon in the top right corner of the screen.
After opening the Outlook Web App in your browser, the next step to change your signature is to locate and click on the settings gear icon. Follow these instructions to proceed:
- In the top right corner of the Outlook Web App interface, you will see a gear icon. This icon represents the settings menu.
- Click on the settings gear icon to open a drop-down menu with various options.
By clicking on the settings gear icon, you initiate access to the customization options available in the Outlook Web App. This menu provides you with the ability to personalize your Outlook experience and access different settings and features.
Take a moment to familiarize yourself with the options available in the drop-down menu. From here, you can access settings related to your account, calendar, email organization, and more. Understanding the available options will enable you to make the most of Outlook Web App’s functionality and tailor it to your specific needs.
Remember to click on the settings gear icon in the top right corner of the screen to proceed with changing your signature. Each step brings you closer to personalizing your email communications and ensuring that your unique signature is included in every email you send.
Step 3: In the drop-down menu, select “Options.”
After clicking on the settings gear icon in the previous step, the next step to change your signature in Outlook Web App is to select “Options” from the drop-down menu. Follow these instructions to proceed:
- Click on the settings gear icon located in the top right corner of the Outlook Web App window. This will open a drop-down menu with various options.
- In the drop-down menu, scroll down and look for the “Options” button. It is typically located towards the bottom.
- Click on the “Options” button to access the Outlook Options window.
By selecting “Options” from the drop-down menu, you will access a window that allows you to customize various settings and preferences in Outlook Web App.
Take a moment to explore the different options available in the Outlook Options window. Here, you can customize your email layout, manage your calendar settings, set automatic replies, and more. Understanding these options will enable you to personalize your email experience and optimize your productivity.
Remember to select “Options” from the drop-down menu in the Outlook Web App interface. This step brings you closer to changing your signature and allows you to access the settings necessary for customization. Each step builds upon the previous one, guiding you towards a personalized email signature that aligns with your professional or personal branding.
Step 4: In the Outlook Options window, click on “Mail” in the left sidebar.
After selecting “Options” from the drop-down menu in the previous step, you will be directed to the Outlook Options window. The next step to change your signature in Outlook Web App is to click on “Mail” in the left sidebar. Follow these instructions to proceed:
- Once you are in the Outlook Options window, take a look at the left sidebar. This sidebar contains different categories or sections related to Outlook settings.
- Locate and click on “Mail” in the left sidebar. This will display the mail-related settings and options in the main window.
By clicking on “Mail,” you will have access to various options and configurations that are specific to your email account in Outlook Web App. This includes settings for reading and composing emails, organizing your inbox, managing rules, and more.
Take a moment to explore the different options available within the “Mail” category. Familiarize yourself with the settings and configurations that you can modify to customize your email workflow and experience in Outlook Web App.
Remember to click on “Mail” in the left sidebar of the Outlook Options window to proceed with changing your signature. This step ensures that you are on the right track towards personalizing your email communications and making a memorable impact with your recipients.
Step 5: Under the “Layout” section, click on “Email signature.”
After clicking on “Mail” in the left sidebar of the Outlook Options window, the next step to change your signature in Outlook Web App is to find and click on “Email signature” under the “Layout” section. Follow these instructions to proceed:
- Within the Outlook Options window, locate the “Layout” section. This is typically located towards the top or middle of the options list on the left sidebar.
- Under the “Layout” section, look for the “Email signature” option. It is usually listed among other options related to email customization.
- Click on “Email signature” to access the email signature settings.
By clicking on “Email signature,” you will open a dedicated window that allows you to modify and customize your email signature in Outlook Web App.
Take a moment to explore the different options available within the email signature settings window. Here, you can create, modify, and manage your signature text, font settings, and other customization options.
Remember to locate and click on “Email signature” under the “Layout” section of the Outlook Options window. This step ensures that you are on the right track towards personalizing your email communications and making a memorable impact with your recipients.
Step 6: In the Email signature window, select the email account for which you want to change the signature.
After accessing the email signature settings window by clicking on “Email signature” in the previous step, the next step is to choose the email account for which you want to change the signature. Follow these instructions to proceed:
- Within the Email signature window, you will see a dropdown menu or a list where you can select the email account for which you want to change the signature.
- Click on the dropdown menu or select the email account from the list.
In Outlook Web App, you may have multiple email accounts connected, such as personal and work accounts. Selecting the specific email account ensures that changes made to the signature will only apply to that particular account.
Take a moment to review the available email accounts and ensure that you are selecting the correct one. This step is crucial to ensure that the desired changes are applied to the intended account’s email signature.
Remember to select the email account for which you want to change the signature in the dropdown menu or from the list provided in the Email signature window. Each step brings you closer to customizing your email communications and leaving a professional and personal touch with your recipients.
Step 7: Type your desired signature in the text box.
In the Email signature window, the next step is to type your desired signature in the provided text box. Follow these instructions to proceed:
- Locate the text box within the Email signature window. This is where you can enter and customize your signature.
- Click inside the text box to activate it and start typing your desired signature.
- Enter the text that you want to include in your signature. This can be your name, contact information, job title, company details, or any other relevant information you wish to display.
The text box in the Email signature window allows you to create a personalized signature that reflects your unique style and professional image. You have the freedom to include the information that you consider necessary or relevant for your recipients.
Consider the formatting and layout of your signature. You may want to separate different pieces of information into separate lines, use bullet points, or apply specific formatting options like bold or italicized text to make certain elements stand out.
Take your time to carefully compose and finalize your signature. Proofread the text to ensure accuracy and make any necessary edits or adjustments before moving on to the next step.
Remember to type your desired signature in the text box provided in the Email signature window. Each step brings you closer to customizing your signature and creating an email communication that makes a lasting impression.
Step 8: Customize the font, size, color, and other formatting options for your signature.
After typing your desired signature in the text box, the next step is to customize the font, size, color, and other formatting options. Follow these instructions to proceed:
- Select the text of your signature in the text box by highlighting it with your cursor.
- Once the text is selected, locate the formatting toolbar or options provided in the Email signature window.
- Use the available options to customize the font, size, color, and other formatting elements of your signature.
- Experiment with different formatting settings to find the combination that aligns with your personal or professional branding.
- Consider the legibility and overall appearance of your signature. Ensure that the font size and color are easy to read for your recipients.
Customizing the font, size, color, and other formatting options allows you to add a personal touch and make your signature visually appealing. It is crucial to maintain a professional look and ensure that the formatting choices enhance the readability of your signature.
Take your time to select the best font style, size, and color that align with your branding and convey your desired tone. Remember to keep it consistent with your personal or company’s style guidelines.
After applying the desired formatting, take a moment to review your signature to ensure it appears as intended. Proofread the text one more time to ensure accuracy and correct any errors or inconsistencies.
Remember to customize the font, size, color, and other formatting options for your signature. Each step brings you closer to creating a visually appealing signature that leaves a memorable impression with your recipients.
Step 9: If desired, add an image or logo to your signature by clicking on the “Insert Picture” button.
In addition to text, you have the option to further customize your signature by adding an image or logo. Follow these instructions to add an image or logo to your signature:
- Locate the “Insert Picture” button within the Email signature window. This button is typically represented by an icon resembling a picture or photo.
- Click on the “Insert Picture” button to open a dialog box where you can browse your computer for the desired image.
- Navigate to the location on your computer where the image or logo is stored.
- Select the image or logo file and click “Insert” to add it to your signature.
By adding an image or logo to your signature, you can further enhance its visual appeal and make it stand out. This is particularly useful if you want to display your company logo, a professional headshot, or any other image relevant to your personal or business brand.
Consider the file size and dimensions of the image you choose. It’s important to use an image that is appropriately sized and optimized for digital display to avoid distorting the look of your signature or creating unnecessarily large email attachments.
Remember to click on the “Insert Picture” button and follow the steps to add an image or logo to your signature if desired. By doing so, you can add an extra visual element to your signature that aligns with your overall branding and enhances your email communications.
Step 10: Click “Save” to save your changes and close the Email signature window.
After customizing your email signature in the Outlook Web App, the final step is saving your changes. Follow these instructions to complete the process:
- Review your signature to ensure that it reflects the desired text, formatting, and any added images or logos.
- Once you are satisfied with your signature, locate the “Save” button within the Email signature window.
- Click on the “Save” button to apply and save your signature.
By clicking “Save,” your customizations will be saved, and your signature changes will be applied to your email account in the Outlook Web App.
Take a moment to double-check your saved signature by composing a new email or looking at a previous email’s signature. This allows you to ensure that the changes have been successfully applied and that your signature appears as intended to your recipients.
Remember to click “Save” within the Email signature window to save your customized signature. By doing so, you complete the process of changing your signature in the Outlook Web App and ensure that your personalized signature will be included in your emails going forward.