
Check for Conflicting Software
If you’re experiencing a black screen issue while using Google Chrome, it could be caused by conflicting software on your computer. Certain applications or programs may interfere with Chrome’s functionality and lead to this problem. Here’s how you can check for conflicting software and resolve the issue:
- Disable Antivirus or Firewall: Temporarily disable your antivirus program or firewall and check if the black screen issue still persists. Sometimes, overprotective security software can interfere with Chrome’s operation.
- Close Unnecessary Background Processes: Open the Task Manager by pressing Ctrl + Shift + Esc on your keyboard. Look for any unnecessary background processes that could be consuming system resources. Right-click on them and select “End Task.”
- Update or Uninstall Conflicting Software: Check if you have recently installed any new applications that might be conflicting with Chrome. Ensure that all your software, including anti-malware programs and system utilities, are up to date. If you suspect a specific program is causing the issue, uninstall it and see if the black screen problem is resolved.
- Restart in Safe Mode: Boot your computer into Safe Mode to identify if any third-party software is causing conflicts with Chrome. In Safe Mode, only essential system processes are loaded, and third-party applications will be disabled. If the black screen issue does not occur in Safe Mode, it suggests that there may be a conflict with software on your computer.
By following these steps, you can identify and address any conflicting software that may be causing the black screen problem in Google Chrome. Remember to enable your antivirus and firewall once you have resolved the issue. If the problem persists, proceed to the next troubleshooting step.
Disable Hardware Acceleration
Hardware acceleration is a feature in Google Chrome that utilizes your computer’s hardware to enhance performance. However, in some cases, it can cause compatibility issues and result in a black screen problem. If you suspect that hardware acceleration is causing the issue, follow these steps to disable it:
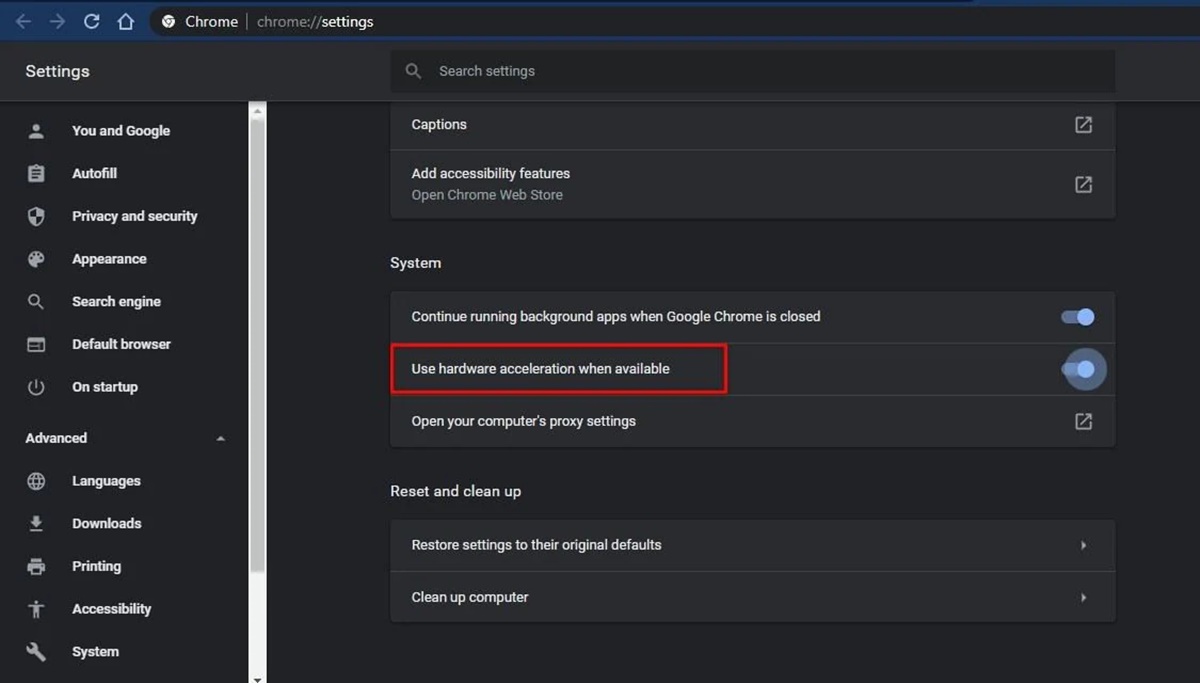
- Open Chrome Settings: Click on the three-dot menu icon at the top-right corner of the browser window and select “Settings” from the dropdown menu.
- Scroll to Advanced Settings: Scroll down to the bottom of the settings page and click on the “Advanced” option.
- Disable Hardware Acceleration: Under the “System” section, toggle off the option that says “Use hardware acceleration when available.”
- Relaunch Chrome: After disabling hardware acceleration, close and reopen Google Chrome for the changes to take effect.
By disabling hardware acceleration, you are allowing Chrome to rely solely on software rendering, which can help resolve black screen issues caused by hardware compatibility problems. If the black screen problem persists, you can proceed to the next troubleshooting step.
Keep in mind that disabling hardware acceleration may result in slightly slower performance, especially when dealing with graphics-intensive tasks. If you notice any performance impact, you can re-enable hardware acceleration following the same steps.
Update Graphics Drivers
Outdated or incompatible graphics drivers can often lead to various issues, including a black screen problem in Google Chrome. To ensure that your graphics drivers are up to date, follow the steps below:
- Determine Your Graphics Card: To update your graphics drivers, you need to know the make and model of your graphics card. Press the Windows + R key on your keyboard to open the Run dialog box. Type “dxdiag” and press Enter. In the DirectX Diagnostic Tool window that opens, go to the “Display” tab and make note of the information under the “Device” section.
- Visit Manufacturer’s Website: Once you have the details of your graphics card, visit the manufacturer’s official website. Common manufacturers include NVIDIA, AMD, and Intel. Look for a “Drivers” or “Support” section on the website.
- Search for Your Graphics Card Model: In the Drivers or Support section, locate the option to search for drivers specific to your graphics card model. Enter the details of your card, such as the make and model, and search for the latest drivers available.
- Download and Install Updated Drivers: Once you find the latest drivers for your graphics card, download them to your computer. Follow the manufacturer’s instructions to safely install the updated drivers. Make sure to close any running applications, including Google Chrome, before installing the drivers.
Updating your graphics drivers can often resolve compatibility issues and improve performance, potentially fixing the black screen problem in Google Chrome. After updating the drivers, restart your computer and launch Chrome to see if the issue has been resolved.
If updating the graphics drivers does not fix the problem, consider other troubleshooting methods such as clearing the browsing data, disabling extensions, or resetting Chrome settings.
Clear the Browsing Data
If you’re encountering a black screen problem in Google Chrome, one potential solution is to clear the browsing data. Over time, accumulated cache, cookies, and other temporary files can affect Chrome’s performance and result in various issues. Follow these steps to clear the browsing data:
- Open Chrome Settings: Click on the three-dot menu icon at the top-right corner of the browser window and select “Settings” from the dropdown menu.
- Access the Clear Browsing Data Menu: Scroll down to the bottom of the settings page and click on “Advanced.” Under the “Privacy and security” section, select “Clear browsing data.”
- Choose Time Range: In the “Clear browsing data” window, select the time range for which you want to clear the data. You can choose to clear the data from the past hour, day, week, month, or all time.
- Select Types of Data to Clear: Choose the types of data you want to clear. It is recommended to select “Browsing history,” “Cookies and other site data,” and “Cached images and files.” You can also select other types of data you wish to remove.
- Click “Clear Data”: Once you have selected the desired options, click on the “Clear data” button to proceed. Chrome will begin clearing your browsing data.
After the browsing data is cleared, relaunch Google Chrome and check if the black screen problem persists. Clearing the accumulated data can help eliminate potential conflicts and improve Chrome’s performance.
If clearing the browsing data does not resolve the issue, you can proceed to other troubleshooting methods such as disabling extensions or resetting Chrome settings.
Disable Extensions
Extensions are additional features and functionalities that you can add to Google Chrome. However, certain extensions can conflict with the browser or cause compatibility issues, resulting in a black screen problem. To determine if any extensions are causing the issue, you can try disabling them using the following steps:
- Access Chrome Extensions: Click on the three-dot menu icon at the top-right corner of the browser window and select “More tools” > “Extensions.”
- Disable Extensions: In the Extensions page, you will see a list of all the installed extensions in Chrome. To disable an extension, toggle the switch next to it to the off position. You can disable them one by one or choose to disable all extensions at once.
- Restart Chrome: After disabling the extensions, close and reopen Google Chrome to see if the black screen issue still persists.
If the black screen problem is resolved after disabling the extensions, it indicates that one or more of the extensions was causing the issue. To identify the specific extension causing the problem, you can try enabling the extensions one by one and checking if the black screen issue reoccurs. This process will help you narrow down the problematic extension.
If you find a specific extension causing the issue, you can either remove it completely or update it to the latest version. Keep in mind that some extensions may not be actively maintained or compatible with the current version of Chrome, so it may be best to remove them entirely.
Disabling or removing problematic extensions can eliminate conflicts and help resolve the black screen issue in Google Chrome. If disabling extensions doesn’t fix the problem, you can consider performing a reset of Chrome settings or reinstalling the browser.
Reset Chrome Settings
If you’re still encountering a black screen issue in Google Chrome, resetting the browser settings can be an effective troubleshooting step. Resetting Chrome will revert the browser to its default state, eliminating any customized settings or configurations that might be causing conflicts. Here’s how you can reset Chrome settings:
- Open Chrome Settings: Click on the three-dot menu icon at the top-right corner of the browser window and select “Settings” from the dropdown menu.
- Scroll to Advanced Settings: Scroll down to the bottom of the settings page and click on the “Advanced” option.
- Reset Chrome Settings: Under the “Reset and clean up” section, select “Restore settings to their original defaults.”
- Confirm Reset: A dialog box will appear confirming the reset. Click on the “Reset settings” button to proceed.
- Relaunch Chrome: After resetting Chrome settings, close and reopen the browser to allow the changes to take effect.
Resetting Chrome settings will revert back to the default settings, including homepage, search engine, startup pages, and new tab pages. It will also disable extensions and clear temporary data like cookies and cached files.
After resetting Chrome, check if the black screen problem still exists. If the issue persists, you may want to consider reinstalling Google Chrome as a final troubleshooting step.
Please note that resetting Chrome settings will remove any personalized configurations and saved data. Therefore, be sure to export and backup any important bookmarks, passwords, or other browser data before proceeding.
Disable GPU Process
Google Chrome utilizes the GPU (Graphics Processing Unit) to enhance graphics performance while browsing. However, in some cases, enabling the GPU process can lead to conflicts and result in a black screen issue. Disabling the GPU process can help resolve this problem. Here’s how you can disable the GPU process in Chrome:
- Open Chrome Settings: Click on the three-dot menu icon at the top-right corner of the browser window and select “Settings” from the dropdown menu.
- Scroll to Advanced Settings: Scroll down to the bottom of the settings page and click on the “Advanced” option.
- Disable Hardware Acceleration: Under the “System” section, locate and toggle off the option that says “Use hardware acceleration when available.”
- Restart Chrome: After disabling the GPU process, close and reopen Google Chrome for the changes to take effect.
By disabling the GPU process, Chrome will rely on software rendering instead of utilizing the graphics hardware. This can help resolve conflicts that may be causing the black screen issue. However, it’s important to note that disabling the GPU process may impact graphics performance, especially for tasks that require heavy graphics rendering.
If the black screen problem persists even after disabling the GPU process, you can try running Chrome in compatibility mode.
It’s worth mentioning that each computer setup is unique, and the impact of disabling the GPU process may vary. If you experience any adverse effects or notice a significant decrease in performance, consider re-enabling the GPU process using the same steps.
Run Chrome in Compatibility Mode
If you’re still facing a black screen issue in Google Chrome, running the browser in compatibility mode can help resolve compatibility-related conflicts. Compatibility mode allows the application to mimic the behavior of an older version of Windows, which can sometimes work around certain issues. Here’s how you can run Chrome in compatibility mode:
- Locate Chrome Shortcut: Find the shortcut icon for Google Chrome on your desktop or in the Start menu.
- Right-click on the Shortcut Icon: Right-click on the Chrome shortcut icon and select “Properties” from the context menu.
- Access Compatibility Settings: In the Properties window, navigate to the “Compatibility” tab.
- Enable Compatibility Mode: Under the Compatibility mode section, check the box that says “Run this program in compatibility mode for:”
– From the dropdown menu, select a previous version of Windows, such as Windows 7 or Windows 8.
– Optionally, you can also check the box that says “Run this program as an administrator” to grant elevated privileges to Chrome.
- Apply and Launch: Click on the “Apply” button to save the changes, and then click “OK” to close the Properties window. Double-click on the Chrome shortcut icon to launch the browser in compatibility mode.
Running Chrome in compatibility mode can help overcome compatibility conflicts that might be causing the black screen issue. However, it’s important to note that this solution may not work for everyone, and it might limit the browser’s ability to use certain features that rely on newer operating system functionalities.
If the black screen problem persists even after running Chrome in compatibility mode, you may consider reinstalling the browser as a final troubleshooting step.
Please keep in mind that compatibility mode may affect the overall performance and stability of other applications on your computer. If you encounter any issues with other software, you can revert the compatibility settings or remove Chrome from compatibility mode.
Reinstall Chrome
If you have tried all the previous troubleshooting steps and are still experiencing a persistent black screen issue in Google Chrome, reinstalling the browser can help resolve any underlying installation or compatibility problems. Here’s a step-by-step guide on how to reinstall Chrome:
- Uninstall Chrome: Press the Windows + R key on your keyboard to open the Run dialog box. Type “appwiz.cpl” and press Enter. In the Programs and Features window that opens, locate Google Chrome and right-click on it. Select “Uninstall” from the dropdown menu and follow the on-screen instructions to remove Chrome from your computer.
- Clean Up Remaining Files: After uninstalling Chrome, it’s important to remove any remaining files to ensure a clean installation. Open the Run dialog box again by pressing Windows + R, type “%appdata%”, and press Enter. In the window that opens, delete the “Google” folder. Next, type “%localappdata%” in the Run dialog box and delete the “Google” folder here as well.
- Download Chrome Installer: Visit the official Google Chrome website using another browser. Click on the “Download” button to download the Chrome installer file.
- Run the Installer: Locate the downloaded installer file on your computer and double-click on it to run the installation. Follow the on-screen instructions to install Google Chrome.
- Launch Chrome: After the installation is complete, launch Chrome and check if the black screen issue has been resolved.
Reinstalling Chrome can often fix complex issues that may not be resolved by other troubleshooting methods. It ensures a fresh installation of the browser, eliminating any potential conflicts or corrupted files.
Once Chrome is reinstalled, you may need to reconfigure your preferred settings, sign in to your Google account, and reinstall any necessary extensions or add-ons. Additionally, remember to import any bookmarks or favorites that you had previously saved.
If the black screen issue persists even after reinstalling Chrome, it could be an indication of a deeper underlying problem with your operating system or hardware. In such cases, it may be advisable to seek further technical assistance.