
Reasons why you should empty the trash on Android regularly
When it comes to managing your Android device, emptying the trash may not be at the top of your priority list. However, regularly emptying the trash can have several benefits for your device’s performance, storage space, and overall user experience. Here are some compelling reasons why you should make it a habit to empty the trash on your Android device:
- Reclaim storage space: Emptying the trash on Android can help free up valuable storage space on your device. Deleted files that are sent to the trash bin continue to occupy storage until they are permanently deleted. By emptying the trash, you can reclaim this space and ensure that your device has enough room for new files, apps, and updates.
- Enhance device performance: Accumulating a large number of files in the trash can cause a slowdown in your device’s performance. This is because the device still needs to manage and process these files even though they are technically in the trash. By emptying the trash, you can help optimize your device’s performance and ensure smoother operation.
- Protect your privacy: The trash bin on Android stores deleted files temporarily. While they may seem out of sight, they are not completely erased from your device. This means that sensitive information, such as photos, documents, or videos, could still be accessible to others if they gain access to your device. Emptying the trash regularly can help safeguard your privacy and prevent unauthorized access to deleted files.
- Organize your files: Emptying the trash allows you to maintain a clean and organized file system on your Android device. When files are deleted, they can end up in different locations, such as the Gallery app, File Manager, or Google Photos trash. By emptying the trash, you can consolidate these deleted files in one place, making it easier to manage and locate files when needed.
- Promote good digital hygiene: Emptying the trash regularly is a good digital hygiene practice. It helps you declutter your device and stay organized, similar to cleaning up physical clutter in your living space. By developing this habit, you can maintain a well-optimized and efficient Android device.
These are just a few reasons why it is important to empty the trash on your Android device regularly. By doing so, you can reclaim storage space, improve device performance, protect your privacy, organize your files, and promote good digital hygiene. Now that you understand the benefits, let’s explore how you can empty the trash on Android using different apps and settings.
How to empty trash on Android using Google Photos
Google Photos is a popular photo management app that comes pre-installed on many Android devices. It not only allows you to store and organize your photos but also has a trash feature where deleted photos are temporarily stored. Here’s a step-by-step guide on how to empty the trash on Android using Google Photos:
- Open Google Photos: Locate the Google Photos app on your Android device and tap on it to open the app.
- Access the menu: Tap on the three horizontal lines, also known as the hamburger menu, located at the top-left corner of the app screen. This will open the main menu.
- Select “Trash”: From the main menu, tap on the “Trash” option. This will take you to the trash folder.
- Empty the trash: Once you’re in the trash folder, you will see all the photos that you have deleted. To permanently delete them and free up storage space, tap on the “Empty trash” option. Confirm the action when prompted.
- Deleted photos are gone: After confirming the deletion, the photos will be permanently removed from your device, and the storage space they occupied will be reclaimed.
It is important to note that emptying the trash in Google Photos is irreversible. Once you delete photos from the trash, they cannot be recovered. Therefore, it is recommended to double-check the contents of the trash folder before emptying it.
By following these steps, you can easily empty the trash on your Android device using the Google Photos app. Keep in mind that the process may slightly vary depending on the version of the app or the device you’re using, but the general steps should remain the same. Now, let’s explore another method of emptying the trash on Android using the Google Drive app.
How to empty trash on Android using the Google Drive app
The Google Drive app is not only a great tool for storing and accessing files, but it also has a trash feature where deleted files are temporarily stored. If you use Google Drive on your Android device and want to empty the trash, follow these steps:
- Launch Google Drive: Locate the Google Drive app on your Android device and tap on it to launch the app.
- Access the menu: Tap on the three horizontal lines, also known as the hamburger menu, located at the top-left corner of the app screen. This will open the main menu.
- Select “Trash”: From the main menu, scroll down and tap on the “Trash” option. This will take you to the trash folder.
- Review and select files: In the trash folder, you will see a list of all the files you have deleted. Take a moment to review the contents and select the files you want to permanently delete.
- Empty the trash: Once you have selected the files, tap on the three vertical dots, also known as the overflow menu, located at the top-right corner of the app screen. From the options that appear, select “Delete forever” or “Empty trash” to permanently delete the selected files.
- Confirm deletion: A prompt will appear, asking you to confirm the deletion. Read the prompt carefully and tap “OK” or “Delete” to confirm. The selected files will then be permanently deleted from your device.
It is important to note that once you delete files from the trash in Google Drive, they cannot be recovered. Therefore, make sure to double-check your selection before proceeding with the deletion.
By following these steps, you can easily empty the trash on your Android device using the Google Drive app. Remember that the process may vary slightly depending on the version of the app or the device you’re using, but the general steps should remain consistent. Now, let’s move on to another method of emptying the trash on Android using the Gallery app.
How to empty trash on Android using the Gallery app
The Gallery app on Android provides a convenient way to view and manage your photos and videos. If you have deleted any files using the Gallery app and want to permanently remove them, you can follow these steps to empty the trash:
- Open the Gallery app: Locate and open the Gallery app on your Android device. It is usually represented by an icon that resembles a stacked set of photos.
- Access the trash folder: In the Gallery app, tap on the three dots or the overflow menu icon, typically located in the top-right corner of the screen. From the options that appear, select “Trash” or “Deleted items”.
- Select files for permanent deletion: Inside the trash folder, you will find all the photos and videos that you have previously deleted using the Gallery app. Review the contents of the folder and select the files you want to permanently delete.
- Delete selected files: Once you have made your selection, tap on the “Delete” or “Empty trash” option to permanently delete the selected files from your device.
- Confirm deletion: A confirmation prompt will appear, asking you to confirm the deletion. Read the prompt carefully and tap “OK” or “Delete” to proceed. The selected files will be permanently removed from your device.
It is important to note that once you empty the trash in the Gallery app, the deleted files cannot be recovered. Therefore, it is advisable to double-check your selection before confirming the deletion.
By following these steps, you can easily empty the trash on your Android device using the Gallery app. Keep in mind that the process may vary slightly depending on the version of the app or the device you’re using, but the general steps should remain consistent. Now, let’s explore another method of emptying the trash on Android using the File Manager app.
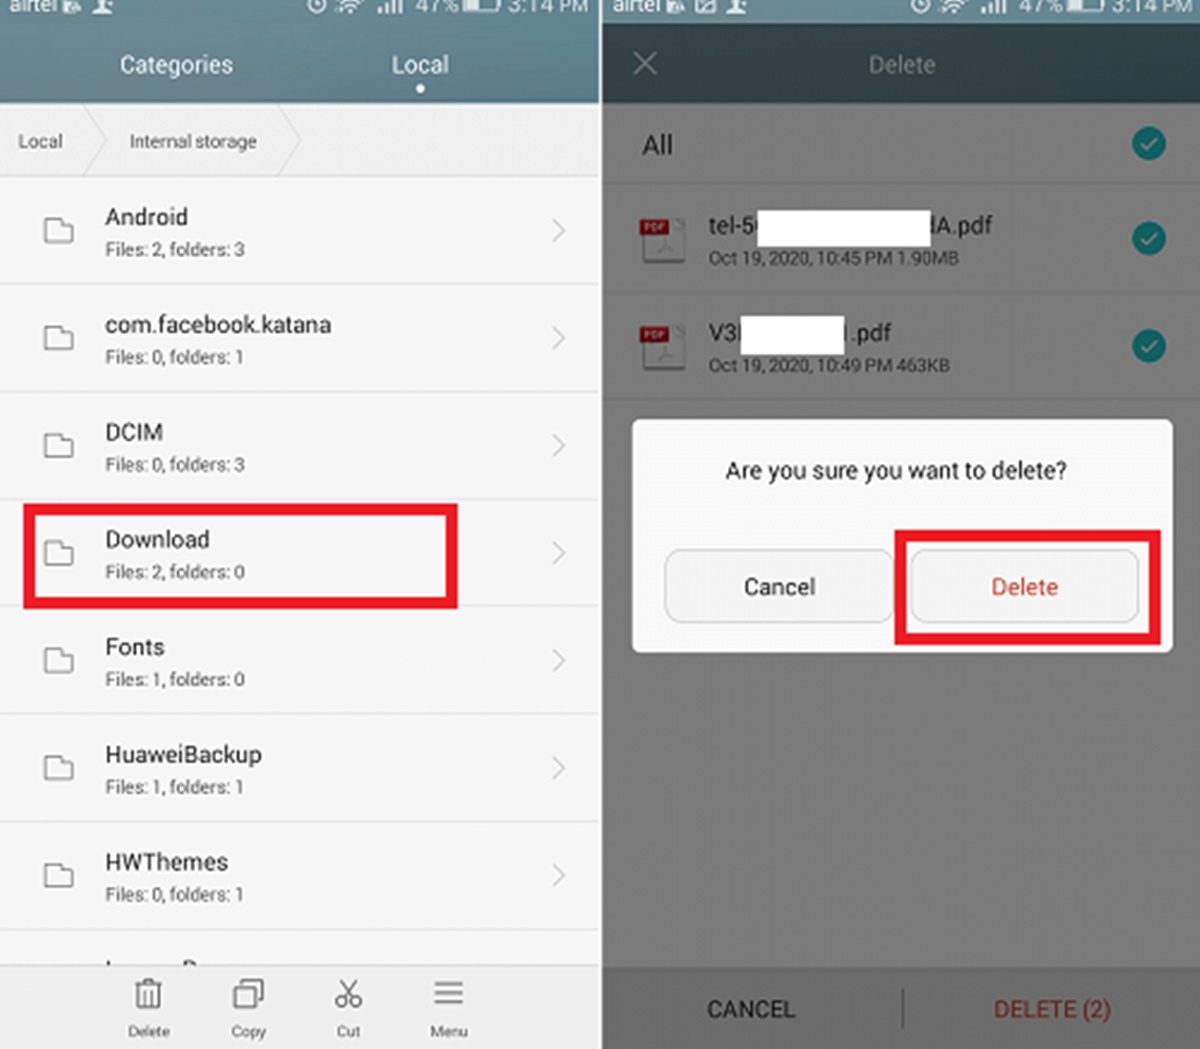
How to empty trash on Android using the File Manager app
The File Manager app on Android provides a comprehensive way to manage files and folders on your device. If you have deleted any files using the File Manager app and want to permanently remove them, here’s a step-by-step guide on how to empty the trash:
- Open the File Manager app: Locate and open the File Manager app on your Android device. It may be labeled as “Files,” “File Manager,” or have a similar name.
- Navigate to the trash folder: In the File Manager app, look for a folder or section labeled “Trash,” “Deleted Items,” “Recycle Bin,” or something similar. Tap on that folder to access the contents of the trash.
- Select files for permanent deletion: Inside the trash folder, you will find all the files and folders that you have previously deleted using the File Manager app. Review the items in the folder and select the files you want to permanently delete.
- Delete selected files: Once you have made your selection, tap on the “Delete” or “Empty trash” option to permanently delete the selected files from your device.
- Confirm deletion: Before permanently deleting the files, a confirmation prompt will appear. Carefully review the prompt and tap “OK” or “Delete” to proceed. The selected files will be permanently removed from your device.
It is important to note that once you empty the trash in the File Manager app, the deleted files cannot be recovered. Therefore, exercise caution and double-check your selection before confirming the deletion.
By following these steps, you can easily empty the trash on your Android device using the File Manager app. Keep in mind that the process may vary slightly depending on the version of the app or the device you’re using, but the general steps should remain consistent. Now, let’s move on to setting up automatic trash emptying on Android.
How to set up automatic trash emptying on Android
Setting up automatic trash emptying on your Android device can save you the hassle of manually emptying the trash regularly. Here’s how you can enable this feature:
- Open Settings: Locate and open the “Settings” app on your Android device. It is usually represented by a gear or cogwheel icon.
- Find the storage settings: Scroll down or search for the “Storage” or “Storage & USB” option in the Settings menu. Tap on it to access the storage settings.
- Manage storage: Within the storage settings, look for an option called “Manage storage,” “Storage cleaner,” or something similar. Tap on it to proceed.
- Enable automatic trash emptying: In the storage management section, you should find an option to enable automatic trash emptying. It may be labeled as “Auto empty trash,” “Empty trash automatically,” or similar. Toggle the switch to enable this feature.
- Set frequency: Once you enable automatic trash emptying, you may have the option to set the frequency at which the trash will be emptied. You can choose from options like “Every 30 days,” “Every week,” or customize the frequency according to your preference.
- Confirm and save settings: After selecting the desired frequency, confirm your settings and save them. From now on, your Android device will automatically empty the trash at the specified interval.
It is important to note that the exact steps and options for enabling automatic trash emptying may vary depending on the Android version and device manufacturer. If you cannot find these settings, refer to your device’s user manual or search for specific instructions online.
By following these instructions, you can set up automatic trash emptying on your Android device and ensure that the trash is regularly emptied without manual intervention. Now, let’s explore what happens when you empty the trash on Android and how you can recover deleted files if needed.
What happens when you empty the trash on Android
When you empty the trash on your Android device, the deleted files are permanently removed from your device’s storage. Here’s what happens when you empty the trash:
- Files are permanently deleted: Once you confirm the emptying of the trash, all the files within the trash folder are permanently deleted from your device. This means they cannot be recovered using normal methods.
- Storage space is reclaimed: By emptying the trash, the storage space that was occupied by the deleted files is freed up. This allows you to utilize the space for new files, apps, or updates.
- Files cannot be restored from the trash: Once you empty the trash, there is no way to restore the deleted files from the trash folder. It is important to ensure that you have retrieved any important or necessary files before emptying the trash.
- Deleted files may still be recoverable: Although emptying the trash on Android removes the files from the trash folder, it doesn’t necessarily mean they are completely erased from your device’s storage. In some cases, specialized data recovery tools may be able to retrieve deleted files if they haven’t been overwritten by new data.
It’s crucial to keep in mind that permanent deletion is irreversible. Therefore, it is recommended to carefully review the contents of the trash folder before emptying it to avoid losing any important files. Moreover, regular backups of your data are highly recommended to mitigate the risk of losing valuable files.
Now that you understand what happens when you empty the trash on Android, let’s explore how you can recover deleted files from the trash in case you accidentally delete something important.
How to recover deleted files from Android trash
If you have accidentally deleted files from the trash on your Android device and need to recover them, here are a few methods you can try:
- Check other apps’ trash folders: Some apps, such as Google Photos, Google Drive, or the Gallery app, have their own trash folders where deleted files are temporarily stored. Open the respective app and look for the trash or bin icon. Access the folder and see if your deleted files are still there. If so, you can restore them from within the app.
- Use a file recovery app: There are several file recovery apps available on the Google Play Store that can help you recover deleted files from your Android device. Install a reputable file recovery app, such as DiskDigger or Recuva, and follow the app’s instructions to scan for and recover deleted files.
- Check cloud backups: If you have enabled cloud backup services on your device, such as Google Drive or Dropbox, your deleted files may still be backed up in the cloud. Access the respective cloud storage service and search for the deleted files to restore them.
- Connect to a computer: If your Android device supports USB connectivity, you can connect it to a computer and use data recovery software, such as EaseUS Data Recovery Wizard or Dr.Fone, to scan for and recover deleted files. Follow the software’s instructions to complete the recovery process.
- Consult professional help: In some cases, if the deleted files are of utmost importance and none of the above methods work, it may be best to consult a professional data recovery service. These services have specialized tools and expertise to recover data from Android devices.
Remember, the sooner you try to recover deleted files, the better chance you have of retrieving them successfully. Avoid using your Android device extensively until the recovery process is completed, as this can decrease the chances of successful recovery due to potential data overwriting.
Now that you have multiple options to recover deleted files from the trash on your Android device, take immediate action to retrieve your important data. Prevention is always the best practice, so remember to regularly back up your files to avoid potential data loss.
Final Thoughts on Emptying Trash on Android
Emptying the trash on your Android device is an essential task that helps you free up storage space, improve device performance, protect your privacy, and maintain an organized file system. Here are a few final thoughts to consider:
- Make it a habit: Emptying the trash should become a regular part of your device maintenance routine. Set a reminder or schedule to ensure that you regularly empty the trash and avoid accumulating unnecessary files.
- Double-check before emptying: Before you empty the trash, take a moment to review the contents and ensure that you are not permanently deleting any important files. Mistakenly emptying the trash can lead to irreversible data loss.
- Consider automatic trash emptying: If available, enable automatic trash emptying on your Android device. This feature saves you time and ensures that the trash is regularly emptied without manual intervention.
- Keep backups: To further safeguard your important files, regularly back up your data to a secure location, such as a cloud storage service or an external hard drive. Backups provide an extra layer of protection against accidental data loss.
- Know your recovery options: In the event that you accidentally delete important files from the trash, familiarize yourself with the available recovery methods. Depending on the situation, you may be able to restore files from app-specific trash folders, use file recovery apps, or consult professional data recovery services.
Ultimately, emptying the trash is a proactive step towards maintaining a clutter-free and optimized Android device. By regularly clearing out unnecessary files, you can improve storage space, enhance device performance, and protect your privacy. Additionally, combining this practice with regular backups ensures that your important files are secure even in the event of accidental deletion.
Now that you have a comprehensive understanding of how to empty the trash on Android and the benefits it brings, you can take control of your device’s storage management and enjoy a smooth and efficient user experience.