
Delete Files from the Google Drive Website
Google Drive is a popular cloud storage service that offers users the ability to store, organize, and access their files from any device. Whether you want to free up space or remove unnecessary files, deleting files from your Google Drive account is easy. Follow the steps below to delete files directly from the Google Drive website.
1. Log in to your Google Drive account by visiting https://drive.google.com/ and entering your credentials.
2. Once you are logged in, locate the file you want to delete. You can browse through your folders or use the search bar to find specific files.
3. Right-click on the file you wish to delete. A drop-down menu will appear.
4. In the drop-down menu, click on “Remove” or “Move to Trash” option. Note that the wording may vary slightly depending on the version of Google Drive you are using.
5. A confirmation message will appear, asking you to confirm the deletion. Click “Move to Trash” to proceed.
6. Once the file is moved to the trash, it will still be accessible for a period of 30 days. During this time, you can recover the file if needed. After 30 days, the file will be permanently deleted from your Google Drive.
Remember, deleting a file from Google Drive will remove it from all devices and shared folders. If you want to keep a copy of the file, make sure to backup or download it before deleting.
Deleting files from the Google Drive website is a straightforward process. It allows you to efficiently manage your storage space and keep your account organized. By following the steps outlined above, you can easily delete unwanted files and ensure a clutter-free Google Drive experience.
Delete Files from the Google Drive Desktop App
In addition to accessing Google Drive through the web interface, you can also manage your files and folders using the Google Drive desktop app. This app provides a seamless way to delete files directly from your computer. Here’s how you can delete files from the Google Drive desktop app:
1. Ensure that you have the Google Drive desktop app installed on your computer. If you don’t have it, visit the Google Drive website and download the appropriate version for your operating system.
2. Open the Google Drive folder on your computer. You can typically find it in your file explorer or by clicking on the Google Drive icon in your system tray.
3. Locate the file you want to delete. You can browse through the folders or use the search bar to find the specific file.
4. Right-click on the file and select “Delete” from the context menu. Alternatively, you can also select the file and press the “Delete” key on your keyboard.
5. A confirmation dialog box will appear, asking you to confirm the deletion. Click “Yes” or “OK” to proceed with the deletion.
6. Once the file is deleted, it will be moved to the trash in your Google Drive account. The file will still be accessible for 30 days, allowing you to recover it if needed.
Note that deleting files from the Google Drive desktop app will remove them from your computer and your Google Drive account. If the file was shared with others, they will no longer have access to it. If you want to keep a copy of the file, make sure to back it up or download it prior to deleting.
The Google Drive desktop app makes it convenient to manage your files without needing to open a web browser. By following the steps outlined above, you can easily delete files from your Google Drive directly from your computer.
Delete Files from the Google Drive Mobile App
In today’s mobile-driven world, it is essential to have access to your files on the go. The Google Drive mobile app allows you to manage your files from your smartphone or tablet. If you need to delete files from your Google Drive while on the move, follow these steps:
1. Download and install the Google Drive app from the App Store (for iOS devices) or the Google Play Store (for Android devices).
2. Launch the Google Drive app and sign in to your Google account if prompted.
3. Once you are logged in, navigate to the file you want to delete. You can use the search bar or browse through your folders to locate the file.
4. Tap and hold on the file you wish to delete. A contextual menu will appear.
5. In the contextual menu, tap on the “Delete” option. Confirm the deletion when prompted.
6. The file will be moved to the trash in your Google Drive account and will remain there for 30 days.
Deleting files from the Google Drive mobile app is a quick and convenient process, allowing you to manage your files while on the go. It is important to note that when you delete files from the mobile app, it removes them from your device and your Google Drive account. However, if the file was shared with others, they will no longer have access to it.
If you accidentally delete a file, you can easily recover it within the 30-day window by accessing the “Trash” section in the app.
With the Google Drive mobile app, you can easily delete files from your Google Drive, freeing up valuable storage space and ensuring that your files are organized, even when you are away from your computer. Follow the steps above to delete files from the Google Drive mobile app with ease.
Empty the Trash in Google Drive
When you delete files from your Google Drive, they are moved to the Trash or Bin folder where they are stored for a period of 30 days. If you want to permanently delete these files and free up storage space, you’ll need to empty the trash in Google Drive. Here’s how you can do it:
1. Open your web browser and go to https://drive.google.com/.
2. Sign in to your Google Drive account if you haven’t already done so.
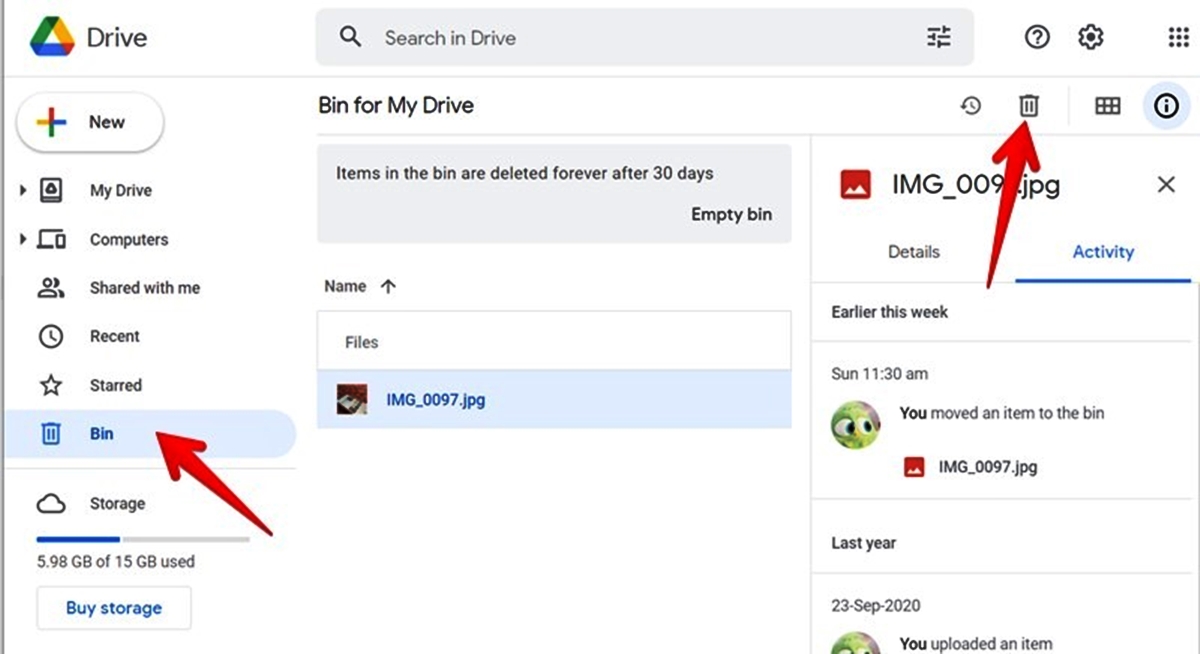
3. On the left side of the screen, you’ll find a sidebar. Click on “Trash” or “Bin” to access your deleted files.
4. Once you’re in the Trash/Bin folder, you can see a list of all the files that have been deleted and are awaiting permanent deletion.
5. To permanently delete all the files in the trash, click on the “Empty Trash” or “Empty Bin” button. A warning message will appear, informing you that all the files will be permanently deleted.
6. Confirm the action by clicking on “Empty Trash” or “Delete Forever”. Once you confirm, all the files in the trash will be permanently deleted and cannot be recovered.
Emptying the trash in Google Drive is a crucial step to permanently remove files that you no longer need. It helps to free up storage space and keep your Google Drive organized.
It’s important to note that emptying the trash will remove the files from all devices connected to your Google Drive account, including the web interface, desktop app, and mobile app. If you have any doubts, make sure to review the contents of the trash folder before emptying it to avoid accidental deletion of important files.
By following these steps, you can easily empty the trash in Google Drive and permanently delete your files, freeing up storage space and maintaining a clutter-free online storage experience.
Restore Deleted Files from the Trash in Google Drive
Accidentally deleting a file can be a frustrating experience, but fear not – if you have deleted a file from your Google Drive, there’s a good chance you can restore it from the Trash. Google Drive keeps deleted files in the Trash for 30 days before permanently removing them. Here’s how you can restore deleted files from the Trash in Google Drive:
1. Open your web browser and go to https://drive.google.com/.
2. Sign in to your Google Drive account if you haven’t already.
3. Locate and click on “Trash” or “Bin” in the sidebar on the left side of the screen. This will display all the files that have been deleted and are waiting to be permanently removed.
4. Find the file you want to restore from the Trash. You can use the search bar or browse through the list of deleted files.
5. Right-click on the file and select “Restore” from the drop-down menu. The file will be restored to its original location in your Google Drive.
Alternatively, you can select the file and click on the “Restore” button located in the toolbar at the top of the screen.
6. After restoring the file, it will be available in your Google Drive account, just like before it was deleted. You can access and use it as you normally would.
Restoring deleted files from the Trash in Google Drive is a simple and straightforward process. Just make sure to do it within the 30-day period before the files are permanently deleted.
It’s worth noting that if you have deleted a file and then removed it from the Trash, it cannot be restored. Additionally, if you have permanently deleted a file from the Trash, it cannot be recovered.
By following the steps outlined above, you can easily restore deleted files from the Trash in Google Drive, ensuring that accidental deletions don’t result in permanent data loss.
Permanently Delete Files from Google Drive
Deleting files in Google Drive moves them to the Trash, allowing you to recover them if needed. However, if you want to permanently delete files from Google Drive without keeping them in the Trash, follow these steps:
1. Open your web browser and go to https://drive.google.com/.
2. Sign in to your Google Drive account if you haven’t already.
3. On the left side of the screen, click on “Trash” or “Bin” to access the deleted files.
4. In the Trash, find the file or files you want to permanently delete. You can either browse through the list or use the search bar to find specific files.
5. Right-click on the file and select “Delete Forever” from the drop-down menu. Alternatively, you can select the file and click on the “Delete Forever” button located in the toolbar at the top of the screen.
6. A confirmation message will appear, informing you that the file will be permanently deleted and cannot be recovered. Click “Delete Forever” to confirm the action.
7. The file will be permanently deleted from your Google Drive. Once deleted, there is no way to recover it.
Permanently deleting files from Google Drive ensures that they are no longer taking up storage space and won’t be accidentally restored from the Trash. It’s important to note that once a file is deleted forever, it cannot be retrieved, so make sure you no longer need the file before permanently deleting it.
By following these steps, you can easily permanently delete files from Google Drive, freeing up storage space and ensuring that your account is clutter-free and organized.
Organize and Manage Files in Google Drive
Google Drive offers a range of features to help you organize and manage your files effectively. With these tools, you can keep your files organized, easily find what you need, and collaborate with others seamlessly. Here are some tips for organizing and managing files in Google Drive:
Create Folders: One of the simplest ways to organize your files is by creating folders. You can create folders to categorize your files based on projects, clients, or any other classification that makes sense to you. To create a folder, click on the “New” button and select “Folder”. Give the folder a name and start organizing your files within it.
Use Subfolders: If you have a large number of files or want to further categorize your files, consider using subfolders. Subfolders allow you to create a hierarchical structure within your main folders. To create a subfolder, right-click on an existing folder and select “New folder” to create a nested folder within it.
Color-Code Folders: To visually distinguish between folders, you can apply color-coding. Right-click on a folder, select “Change color” and choose a color from the available options. Color-coding is especially useful when you have multiple projects or categories, making it easier to identify folders at a glance.
Add Descriptive File Names: When saving files, use descriptive and meaningful names. This will make it easier to identify files and locate them later. Avoid generic names like “Document1” or “Untitled” and instead include specific details to help you quickly find the file you need.
Utilize Search Bar: Google Drive has a powerful search functionality that allows you to quickly find files based on keywords, file types, owners, and more. Simply enter your search query in the search bar at the top of the Google Drive interface to quickly narrow down your search results.
Use Starred Files: To mark important files or files that require immediate attention, you can use the “Star” feature. Click on the star icon next to a file or folder, and it will be added to your “Starred” section for easy access later.
Collaborate with Others: Google Drive allows easy collaboration with colleagues, clients, or friends. You can share files and folders with specific individuals, granting them view or edit permissions. Collaborators can leave comments, make suggestions, and work on the files together in real-time.
Implement File Versioning: In Google Drive, you can enable file versioning to keep track of changes made to a particular file. This allows you to revert to previous versions if necessary. To enable file versioning, right-click on a file, go to “Manage versions,” and choose the appropriate options.
By following these tips, you can effectively organize and manage files in Google Drive. Creating a logical folder structure, using descriptive names, utilizing search functions, and collaborating with others will help optimize your workflow and ensure that your files are easily accessible.