
Enabling the Facebook Download Your Information Feature
Facebook is a treasure trove of memories and moments captured in photos. If you’ve been using the platform for years, chances are you have a vast collection of images scattered across your albums and timeline. Instead of spending hours scrolling through your profile to find and download each photo individually, Facebook offers a convenient feature called “Download Your Information” that allows you to retrieve all your photos and videos in one go. In this guide, we will walk you through the process of enabling this feature and downloading your precious memories.
To begin, you’ll need to access the Facebook settings page. You can do this by clicking the inverted triangle icon located at the top right corner of the screen. In the dropdown menu, select “Settings” to proceed.
Once you’re on the settings page, navigate to the “Your Facebook Information” section. Here, you’ll find a variety of options related to your data on the platform. Look for the “Download Your Information” option and click on it.
Next, you’ll be taken to the Download Your Information page. To request a copy of your data, click on the “Create File” button. This action will initiate the process of gathering and preparing your photos, videos, and other selected data for download.
Before proceeding, you have the option to customize the data that will be included in your download. By default, all your uploaded photos and videos will be selected. However, you can also choose to include other types of data such as comments, likes, and messages. Select your preferences based on what you want to download.
Once you’ve made your selections, proceed to the “Format” section. Here, you can choose the file format and quality for your download. Facebook offers two file formats: HTML and JSON. The HTML format is recommended for most users as it provides a user-friendly interface for viewing and accessing your photos. Additionally, you can choose between high, medium, and low quality for your media files.
After configuring the format and quality, click on the “Create File” button to initiate the download request. At this stage, Facebook may prompt you to verify your identity through your account password or other authentication methods. This step is crucial for privacy and security purposes.
Once your identity is verified, you will need to wait for Facebook to prepare your download. The time needed for this process depends on the amount of data you have on the platform, so it may take a while. Facebook will notify you via email or a notification when your files are ready for download.
When you receive the notification, return to the Download Your Information page. You will find a “Available Files” section where you can download the archive file. Click on the “Download” button next to the file name to save the archive to your computer.
When the archive file is downloaded, you will need to extract your photos and videos from it. This can be done by using file extraction software or built-in utilities on your computer. Once extracted, you will have access to all your photos and videos in their original formats.
Take the time to review and organize the downloaded files. You can create separate folders for specific albums or events to keep everything organized. This way, you can easily locate and cherish your cherished memories whenever you want.
With the Facebook Download Your Information feature, you can quickly and easily retrieve all your photos and videos from the platform. Whether you’re looking to back up your files or simply reminisce about past moments, this feature makes it hassle-free. So, go ahead and take a trip down memory lane by enabling and utilizing this powerful tool on Facebook.
Accessing the Facebook Settings Page
Accessing the Facebook settings page is the first step towards enabling the “Download Your Information” feature and retrieving your photos. By following a few simple steps, you can easily navigate to the settings page and begin the process. In this section, we will guide you on how to access the Facebook settings page effectively.
To get started, open your web browser and visit the Facebook website. On the homepage, you will need to log in to your account using your email address or phone number and password. Once logged in, you will be directed to your Facebook News Feed.
At the top-right corner of the Facebook page, you will see an inverted triangle icon. Click on this icon, and a dropdown menu will appear.
In the dropdown menu, look for the “Settings” option. Clicking on this option will take you to the Facebook settings page.
On the settings page, you will find various options and tabs related to your Facebook account’s configuration and privacy settings. This page allows you to customize your account according to your preferences and provides you with access to features like “Download Your Information.”
It is essential to familiarize yourself with the different sections and options on the settings page to ensure you can make the necessary changes effectively. Take your time to explore the various tabs and options available, but for now, let’s focus on the “Your Facebook Information” section, where you’ll find the feature we want – “Download Your Information.”
Remember that the Facebook settings page may be updated periodically, so the location or layout of certain options might change. However, the general process of accessing the settings page remains consistent.
Successfully accessing the Facebook settings page is the crucial first step towards retrieving your photos and other data. By following the steps outlined above, you can easily navigate to the settings page and proceed with enabling the “Download Your Information” feature. Once you’re on the settings page, you’re one step closer to accessing and downloading all your precious memories from Facebook.
Navigating to the Your Facebook Information Section
Once you’ve accessed the Facebook settings page, the next step in enabling the “Download Your Information” feature is to locate the “Your Facebook Information” section. Within this section, you’ll find the options related to managing and controlling your data on Facebook. In this section, we will guide you through the process of navigating to the “Your Facebook Information” section.
On the Facebook settings page, you’ll notice a sidebar on the left-hand side of the screen. This sidebar contains various categories and options that allow you to customize different aspects of your Facebook account.
Scroll through the sidebar until you come across the category titled “Your Facebook Information.” This category is usually located in the middle or towards the bottom of the sidebar.
Once you’ve located the “Your Facebook Information” category, click on it to expand the options within this section.
Within the “Your Facebook Information” section, you will find several options that allow you to control and manage the data associated with your Facebook account. These options may include “Access Your Information,” “Download Your Information,” “Activity Log,” “Privacy Shortcuts,” and more.
The option we’re interested in is “Download Your Information.” This is the feature that enables you to retrieve all your photos and videos from Facebook. Take a moment to become familiar with the other options in this section, as they may offer additional tools and controls for managing your Facebook data.
After clicking on “Download Your Information,” you will be taken to the specific page where you can request and customize your data download. This page provides you with the necessary tools to select and control the types of data you want to include in your download, such as photos, videos, comments, likes, and more.
Within the “Download Your Information” page, you’ll have the opportunity to configure the format and quality of your downloaded files. Additionally, you can request specific time ranges for the data you want to retrieve, allowing you to focus on specific periods or events within your Facebook history.
Navigating to the “Your Facebook Information” section is crucial for accessing the “Download Your Information” feature. By following the steps outlined above, you can easily find and enter this section within your Facebook settings. Once you’re in the “Download Your Information” page, you’re ready to customize and request the download of your photos and videos, bringing your cherished memories from Facebook right to your fingertips.
Requesting a Copy of Your Data
Once you’ve navigated to the “Download Your Information” section within the Facebook settings page, you’re ready to request a copy of your data. By following a few simple steps, you can start the process of retrieving all your photos and videos from Facebook. In this section, we will guide you through the process of requesting a copy of your data.
On the “Download Your Information” page, you’ll find an option to “Create File.” Click on this button to initiate the data download process.
After clicking on “Create File,” Facebook will begin the process of gathering and preparing your data for download. You may be prompted to verify your identity during this stage. This authentication step is in place to ensure the privacy and security of your information.
Follow the instructions provided by Facebook to verify your identity. This may involve entering your account password or going through additional security measures, such as two-factor authentication.
Once your identity is verified, Facebook will begin the process of gathering your data and creating a comprehensive archive file. The time required for this process depends on the size and complexity of your data. It could take a few minutes to several hours.
While waiting for your archive file to be prepared, you can continue using Facebook as usual. You don’t need to remain on the “Download Your Information” page during this time.
Facebook will notify you via email or a notification on the platform when your data is ready for download. You should also receive a message indicating that your archive file is available on the “Download Your Information” page.
Once you receive the notification, return to the “Download Your Information” page. Scroll down to the “Available Files” section, where you’ll find the download link for your archive file.
Next to the file name, you’ll see a “Download” button. Click on this button to save the archive file to your computer.
It’s important to note that the archive file will be in a compressed format, such as a ZIP file, to reduce its size for easier downloading and storage. You will need the appropriate software or utility to extract the contents of the archive.
After downloading the archive file, locate it on your computer and extract the contents. This will typically involve right-clicking on the file and selecting the “Extract” or “Extract All” option from the context menu. Choose a destination folder where you’d like to save the extracted files.
Once the files are extracted, you’ll have access to all your photos and videos in their original formats. Take some time to review and organize them based on your preferences and memories associated with each file.
By following these steps, you can easily request a copy of your data from Facebook and start the process of retrieving your photos and videos. Remember to keep your archived files stored in a safe location to ensure you can access and enjoy your cherished memories for years to come.
Configuring the Data Options
When requesting a copy of your data from Facebook, you have the option to configure the data options to suit your preferences. This allows you to customize the types of data that will be included in your download. In this section, we will guide you through the process of configuring the data options for your download.
After accessing the “Download Your Information” page within the Facebook settings, you will see a list of data categories that you can include in your download. By default, all your uploaded photos and videos will be selected.
Take a moment to review the available data options. Alongside photos and videos, you may also have the option to include data such as posts, comments, likes, friend lists, and more. Choose the data categories that you want to include in your download.
Consider your reasons for wanting to download your data and focus on the types of information that are most important to you. If you’re primarily interested in retrieving your photos and videos, make sure these options are selected.
Keep in mind that including additional data categories may result in a larger download file size and take longer to prepare.
If you’re unsure about including certain data categories, you can hover over the information icon next to each option to learn more about what it includes.
In some cases, you may want to narrow down the timeframe for the data you’re requesting. For example, you might only want to retrieve photos and videos from a specific year or event. In this case, look for the “Date Range” option and specify the desired timeframe.
By selecting specific date ranges, you can customize your download to focus on the memories that are most significant to you.
Once you’ve configured the data options to your liking, proceed to the next step of configuring the format and quality of your download.
Configuring the data options is an essential part of requesting a copy of your data from Facebook. By selecting the appropriate categories and narrowing down the date range, you can ensure that you retrieve the specific information that matters most to you. Take your time to customize the data options to create a unique and personalized download that reflects your memories and experiences on the platform.
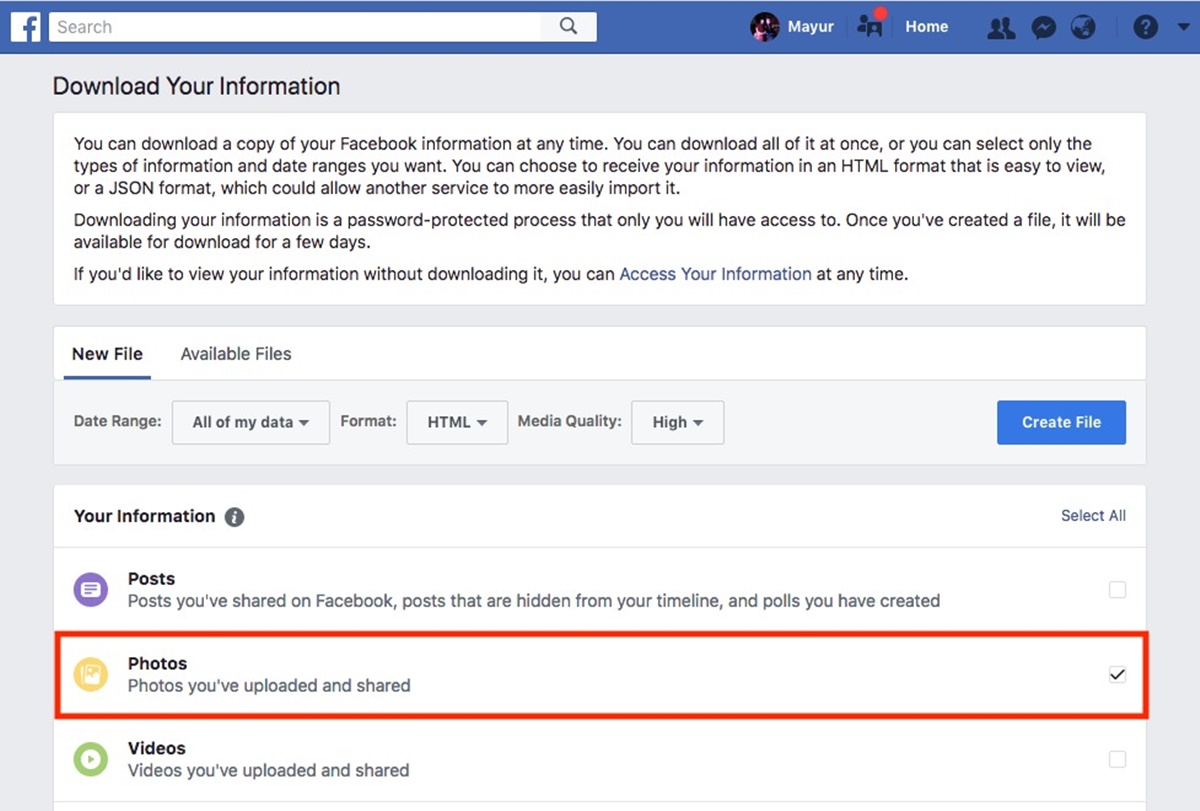
Selecting Photo and Video Downloads
Among the various data options available for download from Facebook, photos and videos hold a special place in preserving memories. To ensure you retrieve all your precious moments, it’s crucial to select and configure the settings for photo and video downloads. In this section, we will guide you through the process of selecting photo and video downloads.
On the “Download Your Information” page within the Facebook settings, you will find a list of data categories that you can include in your download. Look for the options specifically related to photos and videos.
By default, all your uploaded photos and videos will be selected. However, you can further customize your download by choosing specific albums, events, or tagged photos and videos.
If you have organized your photos into separate albums on Facebook, click on the “Deselect All” button to clear the selection, and then manually select the specific albums you want to download.
In addition, Facebook allows you to choose a specific date range for your photo and video downloads. This is useful if you only want to retrieve media from a specific time period or event. Adjust the date range accordingly to narrow down your selection.
Keep in mind that selecting a large number of albums or a wide date range may result in a larger download file and longer processing time.
Additionally, you have the option to include photos and videos in which you have been tagged. These are media files that others have uploaded and tagged you in. Choose this option if you want to include these tagged photos and videos in your download.
Once you’ve selected the photo and video options that suit your preferences, proceed to the next step of configuring the format and quality of your download.
Choosing the right photo and video options ensures that you retrieve all your cherished memories from Facebook. By selecting specific albums, events, or tagged media, you can customize your download to focus on the moments that hold the most significance for you. Take your time to choose the options that reflect your memories and experiences, allowing you to relive those precious moments offline.
Customizing Other Data Types
Aside from photos and videos, Facebook offers the ability to customize the download of other data types, allowing you to retrieve a comprehensive collection of your information from the platform. In this section, we will guide you through the process of customizing other data types for download.
On the “Download Your Information” page within the Facebook settings, you will find a list of data categories that you can include in your download. In addition to photos and videos, there may be options such as posts, comments, likes, friend lists, messages, and more.
If you’re interested in downloading additional types of data beyond photos and videos, review the available options and select the categories that are relevant to you.
For example, selecting the “Posts” option will include all your published posts on Facebook, while choosing “Comments” will include the comments you have made on other users’ posts or within groups.
If you want a comprehensive download of your activity on Facebook, consider selecting options like “Likes” to include the pages, posts, and comments you have liked, or “Friend Lists” to include the lists you have created to organize your friends.
Furthermore, if you wish to access your chat history and personal messages, make sure to select the “Messages” option. This will include your direct messages with friends and any archived conversations.
Customizing the data types allows you to create a download package tailored to your preferences and needs. Whether you want a complete digital archive of your Facebook activity or just specific categories of data, take the time to make the appropriate selections.
Keep in mind that selecting additional data types may result in a larger download file size and longer processing time. Be prepared for the potential impact on your storage capacity and the time it takes to complete the download.
Once you have customized the other data types to include in your download, proceed to the next step of choosing the file format and quality options.
By customizing the other data types, you can create a personalized download that captures various aspects of your Facebook experience. Select the options that hold value to you, ensuring a comprehensive and meaningful collection of your data from the platform.
Choosing the File Format and Quality
When preparing to download your data from Facebook, it’s important to choose the appropriate file format and quality settings that suit your needs. These settings determine the format and level of detail in which your downloaded files will be saved. In this section, we will guide you through the process of choosing the file format and quality options for your download.
On the “Download Your Information” page within the Facebook settings, you will find the “Format” section. This section allows you to choose between two file formats: HTML and JSON.
The HTML format is recommended for most users as it provides a user-friendly interface for viewing and accessing your downloaded data. It allows you to browse through your photos, videos, and other information easily.
On the other hand, the JSON format is a structured data format primarily used for developers or advanced users who plan to manipulate the data programmatically.
Consider your technical skills and the purpose of the download when selecting the file format. If you’re unsure, it’s generally safe and more convenient to opt for the HTML format.
Once you’ve chosen the file format, you can also configure the quality settings for your media files. This option is specifically applicable to photos and videos.
For photos, Facebook offers three quality options: high, medium, and low. The higher the quality, the more detailed and higher-resolution the downloaded photos will be. However, keep in mind that higher quality files will take up more storage space on your device and may take longer to download.
Similarly, for videos, you can choose between different quality options, such as high resolution or lower resolutions suitable for mobile devices or slower internet connections.
Consider factors such as your storage capacity, internet speed, and the purpose of your downloads when selecting the file format and quality. If you intend to keep an archival copy of your files or if you value the highest possible image and video quality, opt for higher quality settings.
Ensure that your chosen settings match your preferences, as you may not have a chance to change them once the download process begins.
Once you’ve made your selections, proceed to the next step of initiating the download request.
Choosing the file format and quality options allows you to customize the way your data is saved and presented. By selecting the appropriate settings that align with your needs, you can ensure a satisfactory and optimized download experience.
Initiating the Download Request
After customizing the file format and quality settings for your downloaded data, it’s time to initiate the download request. This step will begin the process of compiling your selected data and preparing it for download. In this section, we will guide you through the process of initiating the download request.
On the “Download Your Information” page within the Facebook settings, review your selected options, including the data types, photo and video selections, and file format and quality settings. Ensure that everything is configured according to your preferences.
When you’re ready, locate the “Create File” button, and click on it to initiate the download request.
After clicking the “Create File” button, Facebook will start gathering the data you have requested. Depending on the size and complexity of your data, this process may take some time, ranging from a few minutes to several hours. The progress and estimated completion time will be displayed on the screen.
During this time, Facebook may prompt you to re-enter your account password or go through an additional authentication process to verify your identity. This step helps ensure the security and privacy of your data during the download process.
Follow the instructions provided by Facebook to complete the authentication process successfully. This may involve entering a verification code sent to your connected mobile phone number or confirming your identity through other security measures.
After successfully verifying your identity, Facebook will continue the process of preparing your data for download. You don’t need to stay on the “Download Your Information” page during this time. You can navigate away and use Facebook as usual.
It’s important to note that once the download request is initiated, you may not have the option to modify your selected data or settings. So, make sure you have selected everything accurately before clicking the “Create File” button.
Once Facebook has finished preparing your download, you will receive a notification via email or on the platform itself, indicating that your files are ready for download. At this point, you can proceed to the next stage of receiving the download link.
Initiating the download request is an important step in the process of retrieving your data from Facebook. By following the steps outlined above, you can begin the compilation and preparation of your selected data for download. Now it’s time to be patient and wait for Facebook to notify you when your files are ready to be retrieved.
Verifying Your Identity
As a security measure, Facebook may require you to verify your identity before allowing you to download your data. Verifying your identity ensures that unauthorized individuals do not gain access to your private information. In this section, we will guide you through the process of verifying your identity.
After initiating the download request on the “Download Your Information” page within the Facebook settings, you may be prompted to verify your identity. This step ensures that you are the authorized account holder requesting the download.
To complete the identity verification process, Facebook may ask for your account password or employ additional security measures such as two-factor authentication.
If prompted to enter your account password, type it accurately into the designated field. Make sure to use the password associated with your Facebook account. Double-check for any typing errors or caps lock issues that might prevent a successful verification.
In some cases, Facebook may request additional verification steps. This could include sending a verification code to your connected mobile phone number or alternate email address. If prompted for a verification code, check your mobile device or alternative email account for the code and enter it as instructed.
Follow the instructions provided on the screen to successfully complete the identity verification process. This step is essential to ensure the security and privacy of your data during the download process.
By verifying your identity, you demonstrate to Facebook that you are the authorized account holder who is requesting to download your data. This protective measure helps prevent unauthorized access to your personal information, ensuring that your privacy is maintained.
After successfully verifying your identity, Facebook will continue the process of preparing your data for download. You can now proceed to the next stage of waiting for your files to be prepared.
Verifying your identity is an important step to ensure the security of your data when downloading from Facebook. By providing the necessary information to prove your identity, you can rest assured that your private information remains protected as you retrieve your data from the platform.
Waiting for the Download to be Prepared
After initiating the download request and verifying your identity, you’ll enter the stage of waiting for Facebook to prepare your data for download. The time required for this process depends on the amount and complexity of your data. In this section, we will guide you through the process of waiting for your files to be prepared.
Once you’ve completed the identity verification process, Facebook will begin the task of gathering and organizing your selected data for download. This process involves compiling all the photos, videos, and other requested information into a comprehensive archive file.
It’s important to note that the time needed for data preparation can vary significantly. For users with a substantial amount of data, it may take several hours or even longer. Meanwhile, users with smaller amounts of data may see a much quicker turnaround time.
While waiting for your files to be prepared, you don’t need to stay on the “Download Your Information” page. Feel free to navigate away and continue using Facebook as you normally would.
Facebook will notify you via email or a notification on the platform when your files are ready for download. This notification will inform you that your archive file is available on the “Download Your Information” page.
During this waiting period, it’s crucial to be patient. Avoid attempting to initiate multiple download requests or modify your selected options, as doing so may disrupt the data preparation process and further delay the availability of your files.
Ensure that you keep your contact information up-to-date in your Facebook account settings, as this will be used to notify you when your files are ready. Check your email inbox regularly and be on the lookout for notifications from Facebook about your download status.
Remember, the waiting period can be an excellent opportunity to gather any additional files or information you might need for organizing your downloaded data. Consider creating dedicated folders on your computer to store and catalog your Facebook memories in preparation for downloading them.
Waiting for your files to be prepared is an integral part of the download process. While it may require some patience, it’s crucial to allow Facebook sufficient time to organize your data accurately. Once you receive the notification that your files are ready, you can proceed to the next stage of downloading the archive file containing your files.
Receiving the Download Link
After Facebook has finished preparing your data for download, you will receive a notification informing you that your files are ready. This notification will include a download link that allows you to retrieve your archive file. In this section, we will guide you through the process of receiving the download link.
Once your data is prepared and ready, Facebook will send you a notification via email or display a notification on the platform itself. Make sure to check your email inbox and keep an eye on your Facebook notifications to receive timely updates.
When you receive the notification, it will contain important information about your download, such as the file size and a link to access your archive file. Review the notification carefully to ensure you have all the necessary details.
Click on the provided download link to proceed to the “Download Your Information” page within the Facebook settings. This page will allow you to retrieve your archive file, which contains all your selected data.
On the “Download Your Information” page, you will find a section titled “Available Files.” Here, you will see the archive file associated with your download request. The file name will typically include the date or time of your request to help you identify it.
Next to the file name, you will find a “Download” button. Click on this button to initiate the download process.
Depending on your web browser and its settings, the download may start automatically, or you may be prompted to choose a download location on your computer. Select the appropriate folder or location where you want to save the archive file.
It’s important to note that the archive file will be in a compressed format, such as a ZIP file, to reduce its size for easier downloading and storage. Keep this in mind when choosing where to save the file and ensure you have sufficient storage space available.
Once the download is complete, you will have successfully retrieved your archive file containing all your selected data from Facebook. It’s now time to proceed to the next stage of extracting the photos and videos from the archive.
Receiving the download link is an exciting step in the process of retrieving your data from Facebook. By following the steps outlined above, you can easily access the link provided in the notification and proceed to download your archive file. Prepare yourself to relive your cherished memories as you move forward to extract and explore the content within the file.
Downloading the Archive File
Once you have received the download link for your archive file from Facebook, you can proceed with the process of downloading it to your computer. This file contains all the selected data you requested, including photos, videos, and other information. In this section, we will guide you through the process of downloading the archive file.
Click on the provided download link, either from the email notification or the “Download Your Information” page within the Facebook settings. This will take you to the download page specifically for your archive file.
On the download page, review the information related to your archive file, such as the file size and any additional details provided by Facebook. Make sure your internet connection is stable to ensure a smooth and uninterrupted download process.
Click on the “Download” button located next to the file name to initiate the download. Depending on your web browser and its settings, the download may start automatically, or you may be prompted to choose a download location on your computer.
Choose the folder or location on your computer where you want to save the archive file. Ensure that you have sufficient storage space available to accommodate the file’s size, as it may be larger due to containing multiple photos, videos, and other data.
During the download process, you will see a progress indicator on your web browser, showing the percentage of the download completed. Be patient as the download may take some time, especially if the file size is substantial or if your internet connection speed is slower.
Once the download is complete, you will have successfully downloaded the archive file containing all your selected data from Facebook. The file will typically be in a compressed format, such as a ZIP file, to make it easier to manage and transfer.
Locate the downloaded archive file on your computer and ensure it is safely stored in a location where you can access it easily for further processing.
Now that you have successfully downloaded the archive file, you can proceed to the next step of extracting the photos and videos from the file and organizing them into your preferred folder structure.
By following the steps outlined above, you can easily download the archive file containing your selected data from Facebook. Enjoy the anticipation of finally accessing your precious memories as you move forward to extract and explore the content within the archive.
Extracting the Photos and Videos from the Archive
After successfully downloading the archive file from Facebook, the next step is to extract the photos and videos contained within it. The archive file is typically in a compressed format, such as a ZIP file, to reduce its size for easier storage and transfer. In this section, we will guide you through the process of extracting the photos and videos from the archive.
Locate the downloaded archive file on your computer. It is commonly saved in your computer’s default downloads folder or in the location you specified during the download process. The file will have a file extension, such as .zip or .rar.
Right-click on the archive file and select the “Extract” or “Extract All” option from the context menu. This will initiate the extraction process.
Choose a destination folder or location where you want to extract the files. Consider creating a dedicated folder specifically for your extracted Facebook photos and videos to keep them organized.
Click the “Extract” button or proceed through the prompts to start the extraction process. Depending on the size of the archive and the performance of your computer, this process may take some time. Be patient and avoid interrupting the extraction process.
Once the extraction is complete, navigate to the destination folder you chose earlier. You will now see individual files and folders that correspond to the different types of data included in the archive.
To access your photos and videos, locate the respective folders within the extracted files. They are typically organized based on album names, events, or dates.
Browse through the folders and subfolders to find your desired photos and videos. You can open them using the default image viewer or media player on your computer, or using any other software of your choice.
Take the time to review and enjoy your retrieved photos and videos. Organize them further if needed, create new folders, and rename files to suit your preference.
Ensure that you have enough storage space on your computer to accommodate the extracted files, as they may take up a significant amount of disk space, particularly if you had a large collection of photos and videos on Facebook.
By successfully extracting your photos and videos from the archive, you now have direct access to your cherished memories. Take your time to explore and organize your retrieved files, reliving past moments and creating new ways to enjoy and share them.
Reviewing and Organizing the Downloaded Files
Now that you have successfully extracted the photos and videos from the archive you downloaded from Facebook, it’s time to review and organize your cherished memories. Taking the time to categorize and arrange your downloaded files will make it easier for you to find specific photos and videos whenever you want to revisit them. In this section, we will guide you through the process of reviewing and organizing your downloaded files.
Start by reviewing the folders and files that were extracted from the archive. Take note of the different categories, such as albums, events, or dates, that were created during the extraction process.
Open each folder and browse through the photos and videos stored within them. Take your time to reminisce and enjoy the memories associated with each file.
If you notice any duplicate files, take the opportunity to declutter your collection by removing the duplicates. This will help you save storage space and keep your files more organized.
Consider creating new folders or subfolders based on themes or occasions that are meaningful to you. For example, you could create folders for “Family,” “Vacations,” “Special Events,” or any other categorization that aligns with your personal memories.
Move the relevant photos and videos into the newly created folders or rearrange the files within the existing folders to match your desired organization structure.
If you have a large collection of photos and videos, consider using a photo management software or applications to help you organize and manage your files more efficiently. These tools often provide additional features, such as tags, ratings, and search options, to further enhance your organization process.
Consider renaming your files if you prefer a different naming convention or want to add more descriptive titles. This can be particularly useful in making your files more easily recognizable and searchable.
Take the time to add any additional details or metadata to your files, such as captions or keywords, to help you remember specific details about the photos and videos.
Backup your organized folders to external storage devices or cloud storage platforms to ensure the safety and longevity of your precious memories. Having multiple copies of your files helps protect against data loss or unforeseen circumstances.
Regularly review and update your organized files to incorporate new photos and videos that you may capture in the future. This will ensure that your collection remains up-to-date and well-organized.
By thoroughly reviewing and organizing your downloaded files, you can preserve and relive your precious memories from Facebook in a more structured and accessible way. Enjoy the journey down memory lane as you browse through the organized folders, taking pride in the effort you’ve made to create a meaningful and organized collection of your cherished photos and videos.