
Why Delete Photos from Facebook?
Facebook is undoubtedly an incredibly popular platform for sharing photos and memories with friends and family. However, there might come a time when you need to delete certain photos from your Facebook profile. Whether it’s to declutter your albums, protect your privacy, or simply move on from past experiences, deleting photos from Facebook can be a necessary step. Here are a few compelling reasons why you might consider deleting photos from your Facebook account:
- Privacy concerns: Over time, you may have posted photos that you no longer feel comfortable having on a public platform. Deleting these photos can help protect your privacy and ensure that you have control over what is shared.
- Outdated or irrelevant content: As life progresses, certain photos may become outdated or no longer relevant. Perhaps you’ve changed jobs, moved to a different city, or your personal circumstances have changed. Deleting these photos allows you to present a more accurate representation of who you are now.
- Maintaining a professional image: If you’re using Facebook for professional purposes, it’s crucial to curate your online presence. Deleting photos that may be inappropriate or unprofessional can help you establish a more polished image to prospective employers or business connections.
- Respecting others’ privacy: Sometimes, the photos we post on Facebook may inadvertently involve other people. If a friend or family member requests that you delete a photo involving them, it’s important to respect their wishes and promptly remove the image.
While the reasons for deleting photos from Facebook can vary from person to person, it’s essential to remember that you have the right to control your online presence and the content you share. Facebook provides tools and options to help you manage your photos effectively, ensuring that you have a positive online experience.
How to Delete Photos from Facebook on Desktop
If you prefer using Facebook on a desktop or laptop, here’s a step-by-step guide on how to delete photos from your Facebook account:
- Open your preferred web browser and navigate to the Facebook website.
- Log in to your Facebook account by entering your username/email and password.
- Navigate to your profile by clicking on your profile picture in the top right corner of the screen.
- Click on the “Photos” tab below your cover photo. This will allow you to access all the photo albums you have created or been tagged in.
- Select the album that contains the photo you want to delete.
- Locate the photo you wish to remove and hover your mouse over it. You should see a small pencil icon appear in the top right corner of the photo.
- Click on the pencil icon, and a dropdown menu will appear.
- Select the “Delete Photo” option from the dropdown menu. A confirmation dialog box will appear.
- Review the information in the dialog box, ensuring that you are deleting the correct photo, and click “Delete” to confirm.
- The selected photo will be deleted from your Facebook account, and it will no longer be visible to you or anyone else.
- Repeat the process for any additional photos you wish to remove.
It’s important to note that when you delete a photo from Facebook, it is permanently removed from your profile and cannot be recovered. Therefore, it’s essential to double-check your selection before confirming the deletion.
By following these simple steps, you can easily delete photos from your Facebook account using the desktop version. Deleting unnecessary photos can help declutter your profile and ensure that your online presence accurately reflects who you are.
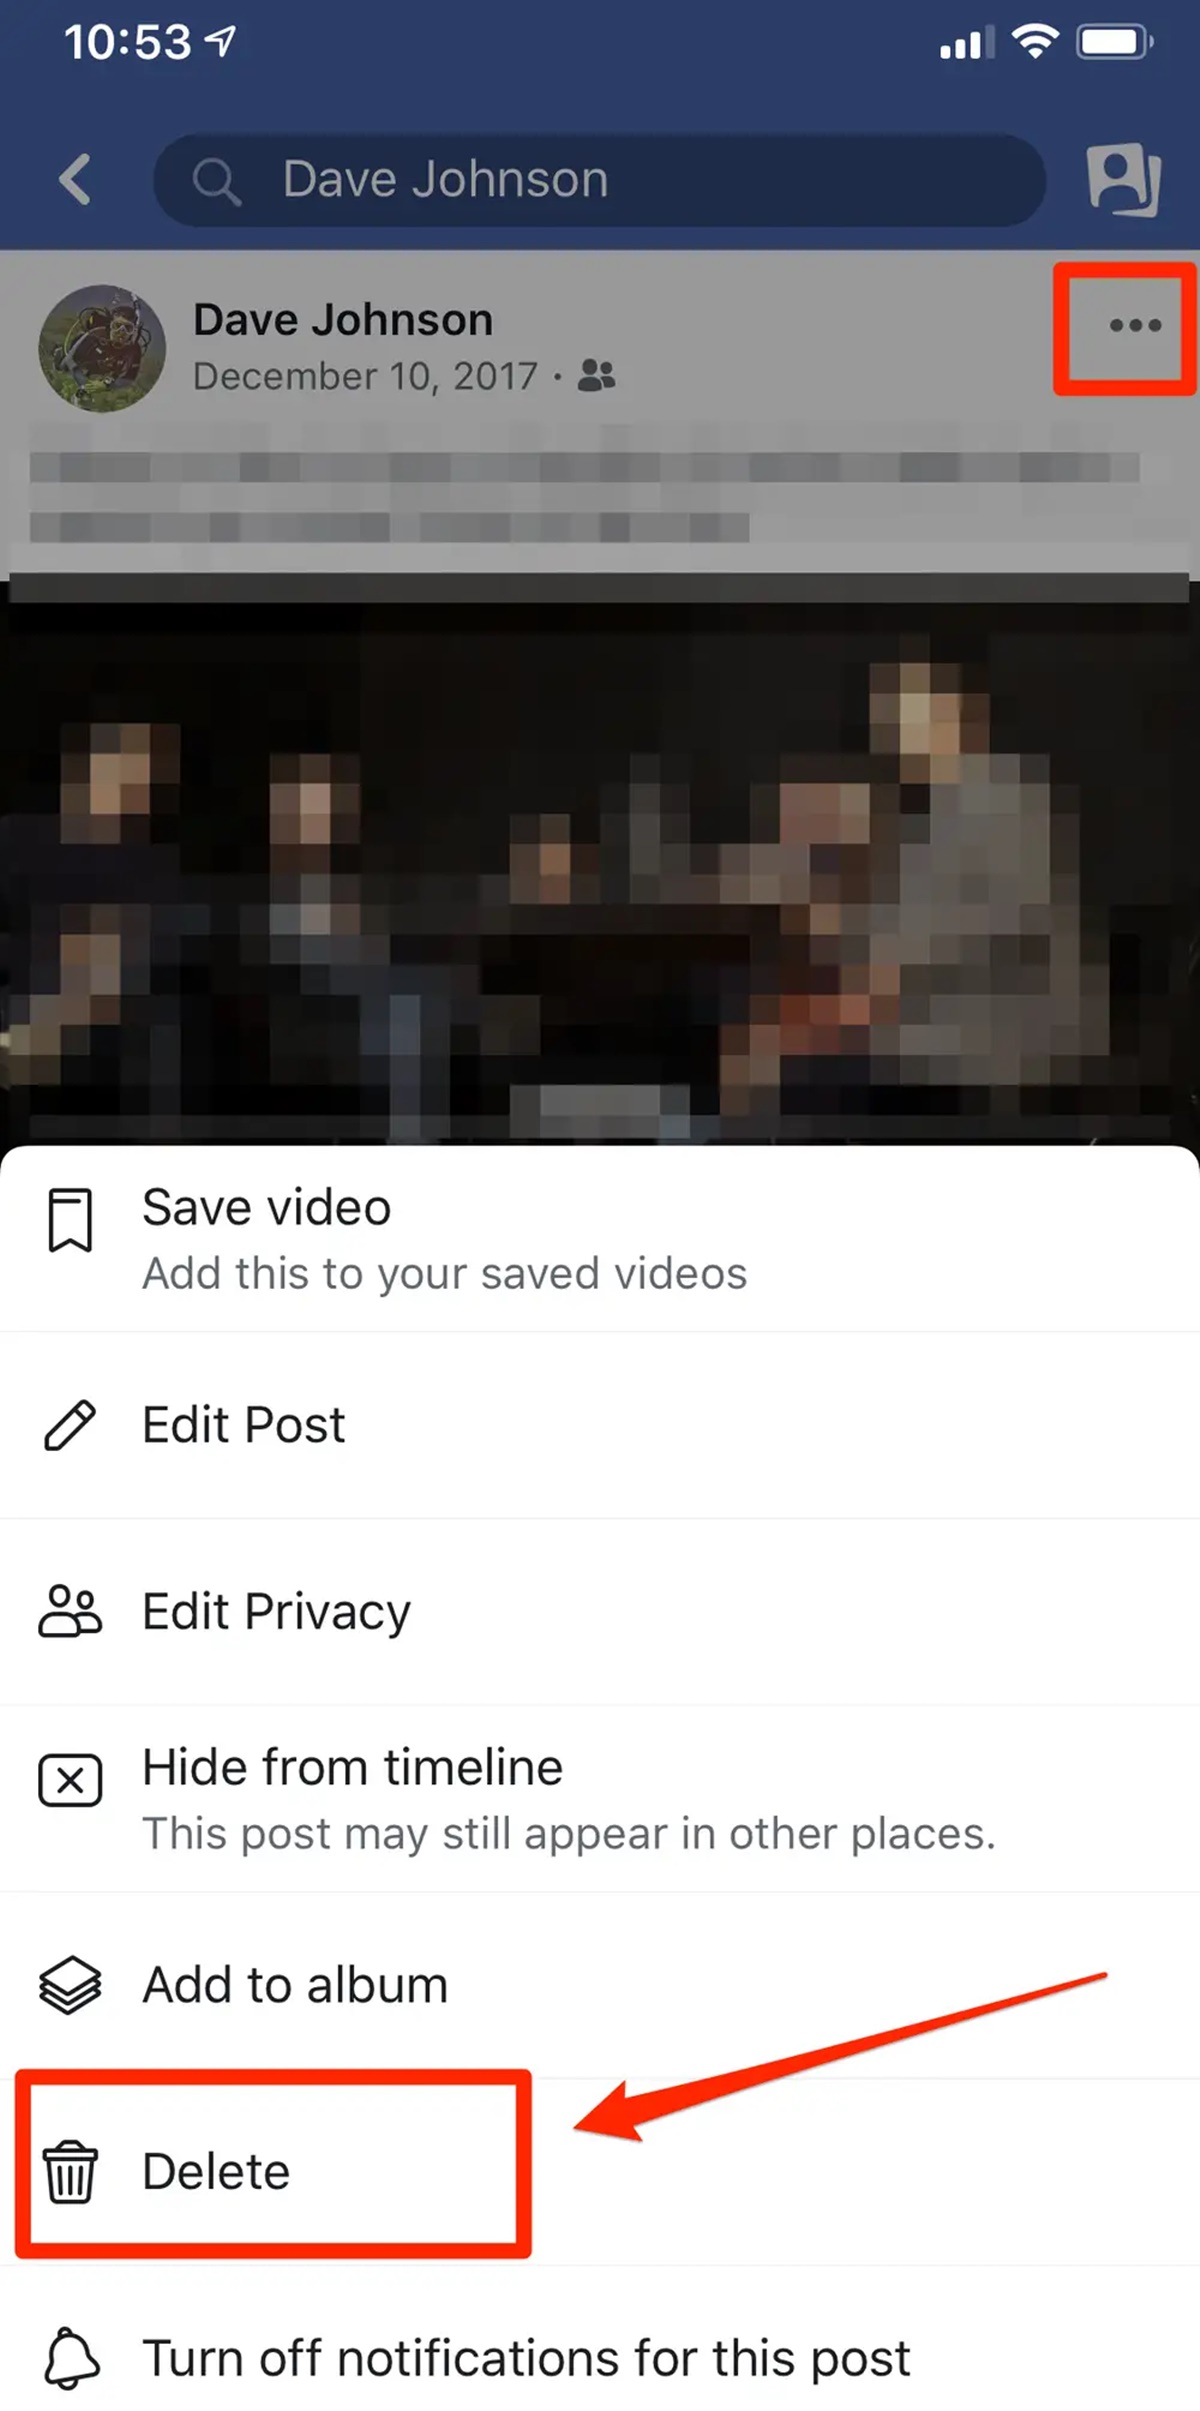
How to Delete Photos from Facebook on Mobile
If you prefer accessing Facebook on your mobile device, whether it’s an Android or iOS device, you can easily delete photos from your Facebook account using the Facebook mobile app. Here’s a step-by-step guide on how to do so:
- Open the Facebook app on your mobile device.
- Log in to your Facebook account by entering your credentials.
- Tap on the three horizontal lines in the top right corner of the app to access the menu.
- Scroll down and tap on your name to navigate to your profile.
- Tap on the “Photos” tab located just below your cover photo. This will display all your photo albums.
- Select the album that contains the photo you want to delete.
- Navigate to the specific photo you wish to remove and tap on it to open it.
- Tap on the three dots (Android) or the gear icon (iOS) located in the top right corner of the screen.
- In the options that appear, tap on the “Delete Photo” or “Delete” button.
- A confirmation dialog will appear asking if you want to delete the photo. Confirm the deletion by tapping on “Delete” or a similar option.
- The selected photo will be deleted from your Facebook account, and it will no longer be visible to you or anyone else.
- Repeat the process for any additional photos you wish to delete.
It’s important to note that once a photo is deleted from Facebook, it cannot be recovered. Take extra care to ensure that you are deleting the correct photo before confirming the deletion.
By following these straightforward steps, you can easily delete photos from your Facebook account using the Facebook mobile app. Whether you’re using an Android or iOS device, this process provides a convenient way to manage and curate your Facebook photo albums on the go.
Deleting Multiple Photos from Facebook
If you have multiple photos on Facebook that you want to delete in one go, Facebook provides an option to delete entire photo albums at once. This can be a time-saving method if you have numerous photos you wish to remove. Here’s how you can delete multiple photos from Facebook:
- Open the Facebook website or mobile app and log in to your account.
- Navigate to your profile and click on the “Photos” tab to access your photo albums.
- Select the album that contains the photos you want to delete.
- In the album view, click on the three dots (desktop) or the gear icon (mobile) located in the top right corner of the screen.
- A dropdown menu will appear. Click on the option that says “Delete Album.”.
- Facebook will display a confirmation dialog box asking if you want to delete the album and all the photos inside it.
- Review the information provided and click on “Delete Album” to confirm.
- The selected album and all the photos inside it will be permanently deleted from your Facebook account.
This method allows you to delete an entire photo album at once, rather than removing each photo individually. It is particularly useful when you have multiple photos in one album that you no longer wish to keep on Facebook.
It’s essential to note that once an album is deleted, all the photos contained within it will be permanently removed from your Facebook account. Take extra care before deleting any albums to ensure that you want to permanently erase all the photos in that specific album.
By utilizing this method, you can efficiently delete multiple photos from your Facebook account, saving time and effort compared to deleting them one by one.
Recovering Deleted Photos on Facebook
If you’ve accidentally deleted a photo or changed your mind about removing it from Facebook, there is a possibility to recover deleted photos, but it largely depends on the circumstances. Here’s what you can do to try and recover deleted photos on Facebook:
Check your “Trash” or “Recently Deleted” folder: When you delete a photo from Facebook, it is moved to a folder called “Trash” or “Recently Deleted,” depending on the platform you are using. This folder keeps deleted photos for a certain period of time before permanently deleting them. You can often find this folder in the “Photos” or “Albums” section of your profile. If you find the deleted photo in this folder, you can restore it by selecting the photo and choosing the option to restore or move it back to its original album.
Contact Facebook support: In some cases, if you are unable to find the deleted photo in the “Trash” or “Recently Deleted” folder, you may be able to reach out to Facebook support for assistance. They might be able to help you recover the deleted photo if it is still available in their systems.
Backup copies: If you had previously backed up your photos on Facebook using the “Download Your Information” tool, you may be able to retrieve the deleted photo from your backup copy. This tool allows you to download a copy of all your Facebook data, including photos, posts, and messages.
Other sources: If the photo was originally uploaded from a different source, such as a smartphone or digital camera, you may still have a copy of the photo on that device or in a connected cloud storage account. You can check these alternative sources to see if you can retrieve the deleted photo.
It’s important to note that while there are options available to try and recover deleted photos on Facebook, they are not guaranteed to work in every case. It’s always recommended to regularly back up your important photos and double-check before deleting any content from your Facebook account to avoid permanent loss.
If all else fails, unfortunately, it is likely that the deleted photo is irretrievable. Therefore, it’s crucial to exercise caution and carefully consider your choices before deleting any photos from your Facebook account.
Tips for Managing Photos on Facebook
Managing your photos on Facebook can help you maintain a clean and organized profile, protect your privacy, and ensure a positive online presence. Here are some useful tips to help you effectively manage your photos on Facebook:
- Regularly review and delete: Take the time to review your albums and photos regularly. Delete any outdated, irrelevant, or inappropriate photos that no longer reflect who you are.
- Adjust your privacy settings: Facebook allows you to customize the privacy settings for your photos. Consider segmenting your friends into specific groups and adjusting the privacy settings accordingly. This way, you can control who can see specific albums or individual photos.
- Tag with caution: Be careful when tagging people in your photos. Always ask for their consent before tagging them, as some individuals may not want their photos associated with certain contexts or events.
- Un-tagging photos: If someone has tagged you in a photo that you no longer want to be associated with, you can un-tag yourself. Go to the photo, click on the options menu (the three-dot icon), and select “Remove Tag.”
- Enable photo review: Utilize the “Photo Review” feature on Facebook, which allows you to review and approve tags before they appear on your profile. This gives you greater control over the photos you’re associated with on the platform.
- Create custom albums: Organize your photos into specific albums based on events, locations, or themes. This makes it easier for you to find and manage your photos, as well as allows your friends to navigate through your albums more seamlessly.
- Utilize audience selectors: Facebook provides audience selectors that allow you to choose who can see your photos. Take advantage of these selectors to control the visibility of your albums and individual photos.
- Consider archiving: If you don’t want to delete a photo permanently but still want to remove it from your profile, you can utilize the “Archive” feature. This allows you to hide the photo from your timeline and profile without deleting it.
- Backup your photos: It’s always a good idea to backup your Facebook photos on another device or cloud storage service. This way, you have an additional copy in case of any unforeseen circumstances.
By following these tips, you can effectively manage your photos on Facebook, ensuring a well-organized profile and maintaining control over your online presence. Regularly reviewing, updating privacy settings, and utilizing the various features provided by Facebook will help you have a positive and enjoyable experience on the platform.