
Step 1: Backup Your Data
Before you proceed with deleting your Facebook account, it’s crucial to backup any important data or information that you wish to retain. With years of activity stored on your profile, including photos, videos, and messages, it’s essential to take the necessary steps to safeguard your memories.
Fortunately, Facebook provides a simple way to download a copy of your data. Here’s how:
- Log into your Facebook account using a web browser.
- Click on the down arrow in the top right corner of the Facebook page and select “Settings & Privacy.”
- In the left-hand column, click on “Your Facebook Information.”
- Click on “Download Your Information.”
- You’ll be presented with various options for the type of data you can include. Choose the categories you want to backup, such as photos, videos, posts, messages, and more.
- Set the date range for the data you want to download. You can select a specific time period or choose to download everything.
- Choose the format of your download, either HTML or JSON.
- Click on “Create File” to start the backup process.
- Facebook will notify you when your file is ready for download. You can check the progress of your request in the “Available Files” section.
- Once the file is ready, click on “Download” to save it to your computer or preferred storage device.
Once your data is backed up, you can proceed with confidence knowing that you have a copy of your Facebook activity should you ever need it.
Step 2: Understand the Difference Between Deactivating and Deleting
Before you make the decision to delete your Facebook account, it’s essential to understand the difference between deactivating and deleting.
Deactivating your account:
When you deactivate your Facebook account, your profile becomes temporarily disabled. This means that:
- Your profile, photos, posts, and other information will no longer be visible to others on Facebook.
- People won’t be able to search for you or access your profile, but some information, such as messages you’ve sent, may still be visible to others.
- You can reactivate your account at any time by simply logging back in. Your profile and all your previous information will be restored.
Deleting your account:
If you choose to delete your Facebook account, it is a permanent action. Here’s what happens when you delete your account:
- Your profile, photos, posts, and other information will be permanently deleted from Facebook’s servers.
- You won’t be able to reactivate your account or retrieve any of the content or information you had on your profile.
- It may take up to 90 days for all your data to be completely removed from the Facebook servers.
- Some information, such as messages you’ve sent to others, may still be visible to them even after you delete your account.
It’s crucial to carefully consider your decision based on your specific circumstances. If you’re unsure whether you want to permanently remove your account, deactivating it may be a better temporary option.
Now that you understand the difference between deactivating and deleting, you can make an informed decision about what you want to do with your Facebook account.
Step 3: Deactivate Your Account
If you’ve decided to take a break from Facebook and temporarily deactivate your account, here’s how you can do it:
- Log into your Facebook account using a web browser.
- Click on the down arrow in the top right corner of the Facebook page and select “Settings & Privacy.”
- In the left-hand column, click on “Settings.”
- Scroll down to the bottom of the Settings page and click on “Your Facebook Information.”
- Click on “Deactivation and Deletion.”
- Select the option to “Deactivate Account” and follow the prompts.
- Provide a reason for deactivating your account, or simply choose “I don’t find Facebook useful anymore.”
- Choose whether you want to continue receiving email notifications from Facebook.
- Click on “Deactivate” to confirm your decision.
Once you’ve completed these steps, your Facebook account will be deactivated, and your profile will be temporarily hidden from others. However, keep in mind that some information, such as messages you’ve sent to others, may still be visible to them.
During the deactivation period, you can choose to reactivate your account at any time by logging back in with your credentials. Your profile and all your previous information will be restored just as you left it.
Deactivating your account is a great option if you’re unsure about permanently deleting your Facebook profile. It allows you to take a break from the platform without losing your data or connections.
Now that you know how to deactivate your account, you can take a step back from Facebook while keeping your options open for the future.
Step 4: Take a Break or Reactivate Your Account
Once you’ve deactivated your Facebook account, you have the freedom to take a break from the platform while keeping the option to reactivate in the future. This break can offer you the opportunity to evaluate your social media habits, focus on other activities, or simply take a breather from the online world.
During your break, keep in mind a few things:
- Your profile, photos, and posts are hidden from others, but some information, such as messages you’ve sent, may still be visible to recipients.
- Facebook will still store your data during the deactivation period, so if you choose to reactivate, your account can be restored with all your previous information intact.
- While your account is deactivated, your friends may not be able to tag you or invite you to events or groups. However, they may still see old messages or conversations with you.
If you decide to reactivate your account and return to Facebook, all you need to do is log back in using your previous credentials. Your profile, friends, and previous activities will be available just as they were before the deactivation.
However, if you’ve found that the break from Facebook has been beneficial or you’re ready to move on from the platform permanently, you can proceed to the next step: permanently deleting your account.
Remember, the choice is yours, and it’s important to take the time you need to make the best decision for yourself.
Now that you understand how you can take a break or reactivate your account, you have the flexibility to step away from Facebook without losing your connections or data.
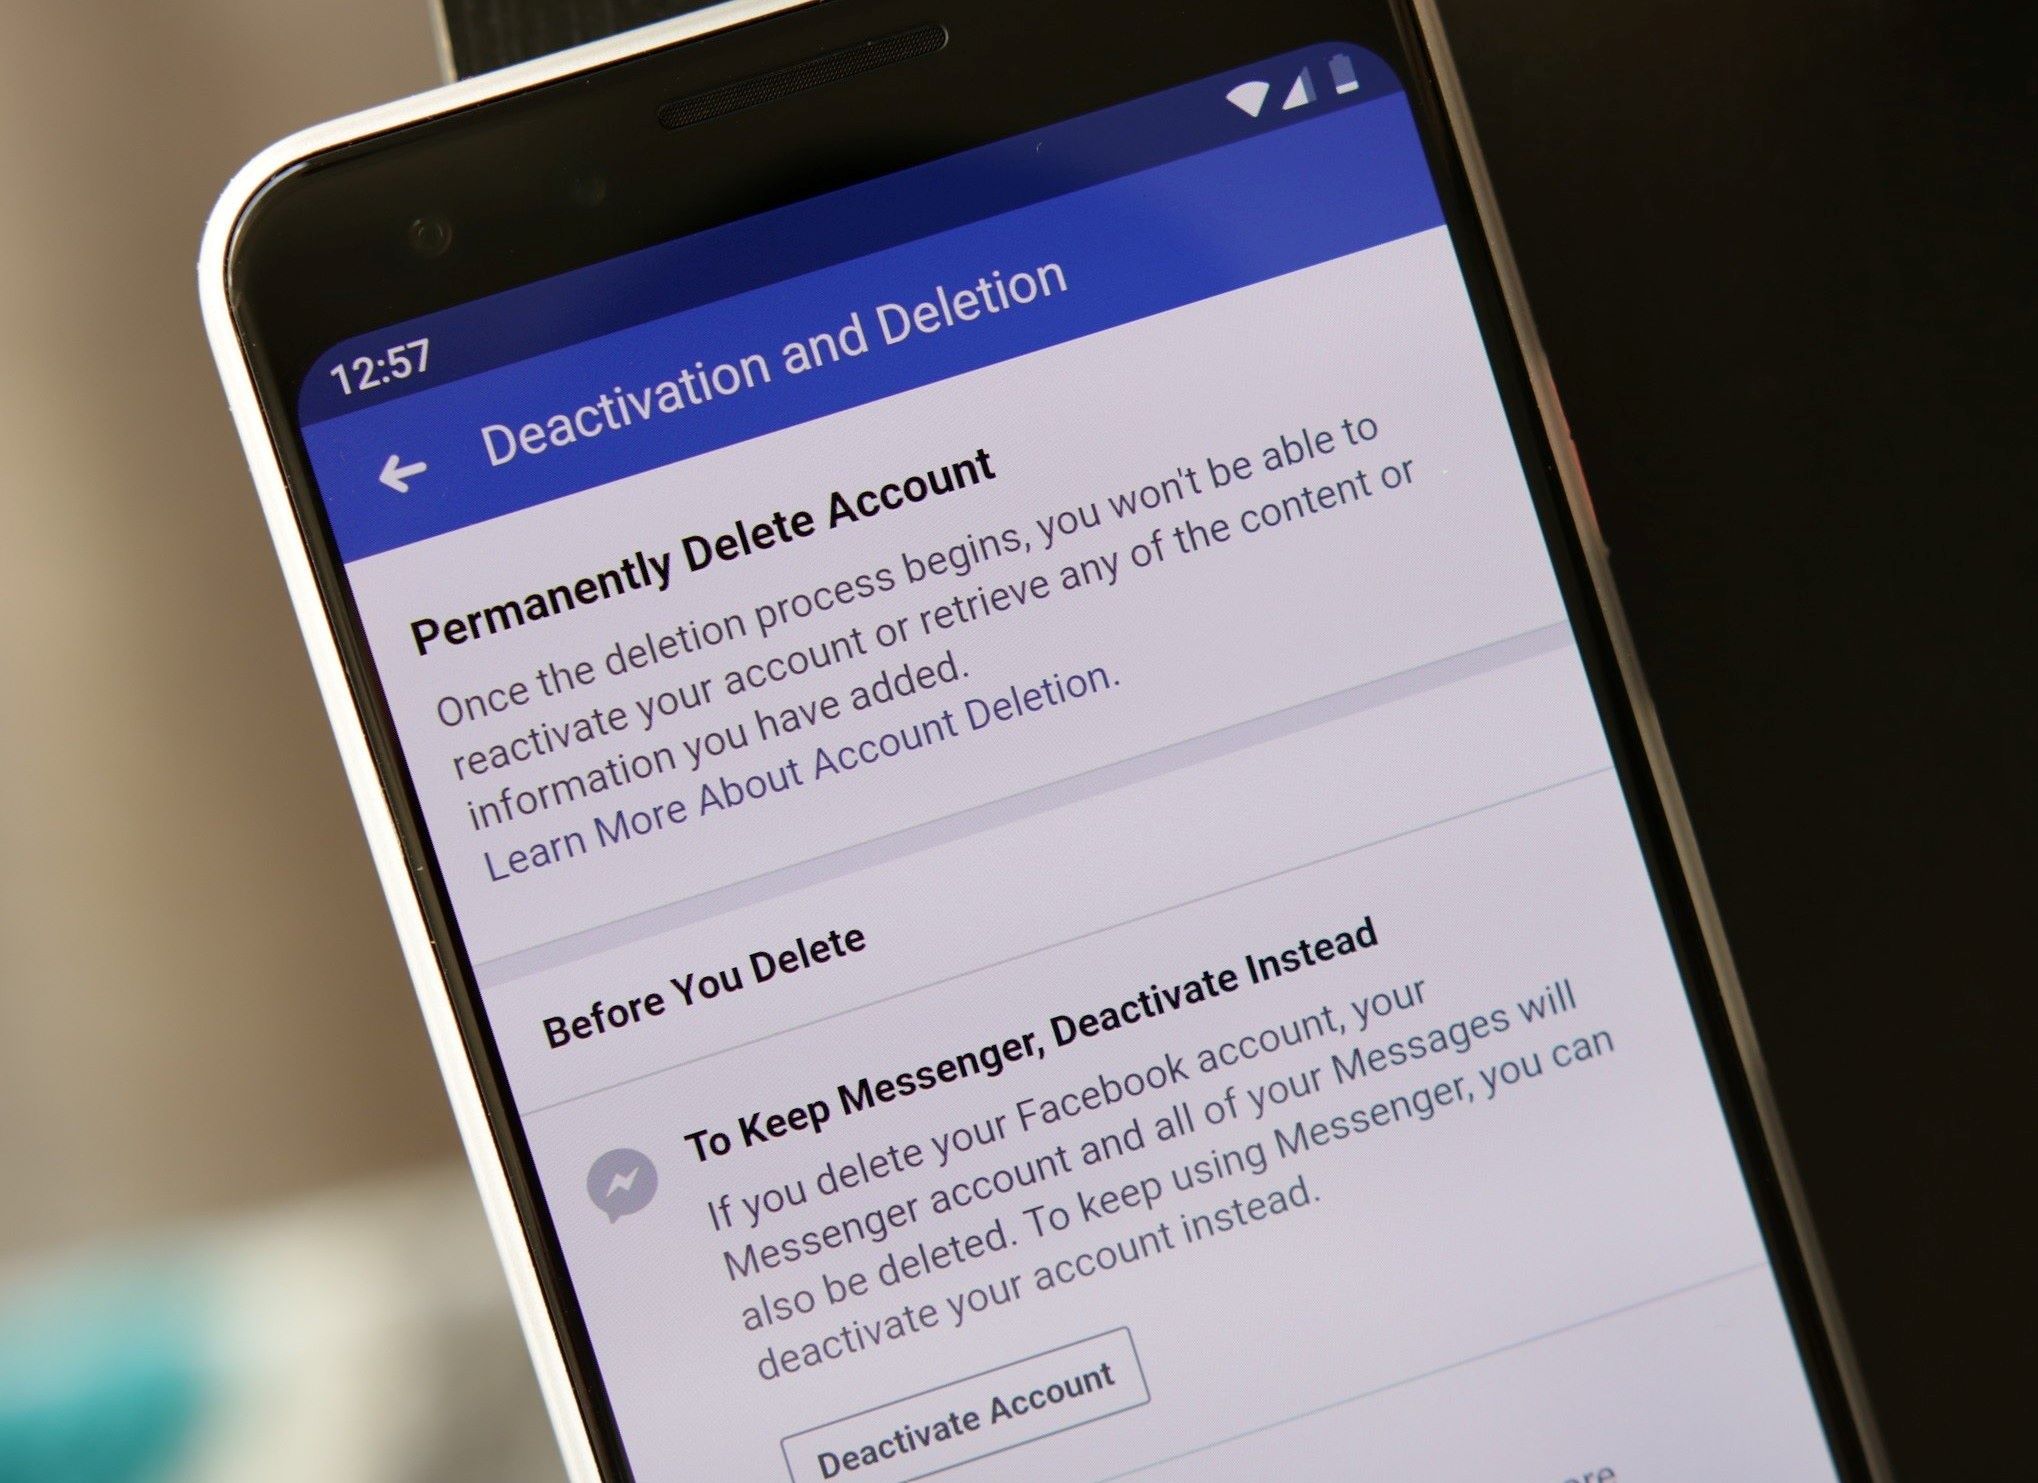
Step 5: Delete Your Account Permanently
If you’ve decided that deleting your Facebook account is the right choice for you, it’s important to understand the steps involved in permanently removing your profile from the platform:
- Log into your Facebook account using a web browser.
- Click on the down arrow in the top right corner of the Facebook page and select “Settings & Privacy.”
- In the left-hand column, click on “Settings.”
- Scroll down to the bottom of the Settings page and click on “Your Facebook Information.”
- Click on “Deactivation and Deletion.”
- Select the option to “Permanently Delete Account” and follow the prompts.
- Review the important information that Facebook provides regarding deleting your account, such as the fact that you won’t be able to retrieve your data once the account is deleted.
- Click on “Delete Account” to confirm your decision.
Once you’ve completed these steps, your Facebook account will be marked for deletion. Keep in mind that it may take up to 90 days for Facebook to fully remove all your data from their servers.
During this time, your account will be inaccessible to others, and your profile, photos, posts, and other information will be permanently deleted. It’s important to note that some information, such as messages you’ve sent to others, may still be visible to them even after your account is deleted.
Please be aware that once you delete your account, there is no way to recover your data or reactivate your profile. Therefore, it’s crucial to back up any important information before proceeding with the account deletion process.
Now that you know how to delete your Facebook account permanently, you can take the necessary steps to remove your presence from the platform for good.
Step 6: Confirm Your Decision
Before you proceed with deleting your Facebook account permanently, it’s essential to take a moment to reflect on your decision and confirm that it aligns with your intentions.
Deleting your account is a significant step that will result in the permanent removal of your profile, photos, posts, and other information. It’s important to be certain about your decision before proceeding. Here are a few things to consider:
- Think about why you want to delete your account. Are you concerned about privacy? Do you feel overwhelmed by the time spent on the platform? Understanding your motivations can help you confirm whether deleting your account is the right choice for you.
- Consider alternative options. If privacy is a concern, review your Facebook privacy settings and make adjustments to limit the visibility of your information. If you feel overwhelmed by the platform, consider taking a break or using Facebook in a more controlled manner.
- Weigh the pros and cons. Reflect on the potential drawbacks and benefits of deleting your account permanently. Consider the impact on your social connections, online presence, and access to features and services.
- Backup your data. Ensure that you have downloaded a copy of your Facebook data and have saved any important information or media before proceeding with the deletion process.
By taking the time to confirm your decision, you can eliminate any doubts or regrets that may arise after deleting your Facebook account.
Remember, once you confirm and proceed with the deletion, your account cannot be recovered, and all your data will be permanently erased.
If you are confident in your decision and ready to move forward, proceed to the next step where you will finalize the deletion process.
Now that you have confirmed your decision, you can proceed with the permanent deletion of your Facebook account, knowing that you have carefully considered your choice.
Step 7: Understand the Consequences of Deleting Your Account
Deleting your Facebook account has both immediate and long-term consequences that you should be aware of before finalizing your decision. Here are some key points to understand:
- Loss of Data: Deleting your account means that all your profile information, including photos, posts, and messages, will be permanently erased. Make sure you have backed up any important data before proceeding.
- Social Connections: Deleting your account will result in the loss of your connections with friends, family, and other Facebook users. You won’t be able to access their profiles, and they won’t be able to find or interact with your account.
- No Access to Apps or Services: If you’ve used your Facebook account to log in to various apps, websites, or services, deleting your account will result in the loss of access to those platforms. Make sure to create alternative login methods if necessary.
- Impact on Other Platforms: If you’ve used Facebook to log in to other social media platforms, deleting your account can impact your ability to access and interact with those platforms. Make sure to review and update your login details for other social media accounts.
- Permanent Deletion: Once you confirm your account deletion, it cannot be reversed or recovered. Make sure you have carefully considered your decision and are willing to accept the irreversible consequences.
Understanding these consequences will help you make an informed decision that aligns with your goals and priorities. As with any major decision, it’s important to weigh the advantages and disadvantages and consider how deleting your Facebook account will impact your online presence, privacy, and social connections.
If you have thoroughly considered these consequences and still wish to delete your account, you can proceed to the next step where you will finalize the deletion process.
Now that you understand the consequences, you can make an informed decision regarding the permanent deletion of your Facebook account.
Step 8: Delete Facebook from Your Other Devices
Deleting your Facebook account from one device may not be enough to completely remove your presence from the platform. If you have the Facebook app installed on your mobile devices or have logged in on other devices, it’s important to take the necessary steps to remove Facebook from those devices as well.
Here’s how you can delete Facebook from commonly used devices:
- Mobile Devices (Smartphone or Tablet):
- iOS: Press and hold the Facebook app icon until it starts wiggling, then tap the “X” in the corner to delete it. Confirm the deletion.
- Android: Go to “Settings” > “Apps” > “Facebook” and tap on “Uninstall.” Confirm the uninstallation.
- Desktop or Laptop Computers:
- Windows: Go to “Control Panel” > “Programs” > “Uninstall a program.” Find Facebook in the list of installed programs and select it. Click on “Uninstall” and follow the prompts to remove it.
- Mac: Open Finder and go to the “Applications” folder. Find Facebook in the list of applications, drag it to the Trash, and empty the Trash to remove it.
In addition to removing the Facebook app from your devices, consider logging out of any web browsers you have used to access Facebook. This ensures that you are fully logged out and prevents automatic logins in the future.
By taking the steps to delete Facebook from your other devices, you reduce the chances of unintentionally accessing or reactivating your account after you have deleted it.
Now that you have removed Facebook from all your devices, you can move forward with confidence, knowing that your account is no longer accessible from any device in your possession.
Step 9: Secure Your Privacy on Other Social Media Platforms
When deleting your Facebook account, it’s important to also consider the privacy and security settings on other social media platforms you may be using. Here are some steps you can take to enhance your privacy on these platforms:
- Review Privacy Settings: Take the time to review and update the privacy settings on each platform you use. Customize who can see your posts, photos, and personal information. Limit the visibility of your profile to friends or specific groups.
- Manage Third-Party Apps: Check if you’ve granted access to any third-party apps through your social media accounts. Revoke access to apps that you no longer use or trust to protect your data.
- Control Data Sharing: Be cautious about sharing personal information, especially sensitive data, on social media platforms. Make sure you understand how your data is being used and shared by the platforms and adjust your settings accordingly.
- Enable Two-Factor Authentication: Enable two-factor authentication on your other social media accounts. This adds an extra layer of security by requiring a verification code in addition to your password when logging in.
- Regularly Update Passwords: Change your passwords regularly and use strong, unique passwords for each platform. Consider using a password manager to securely store and generate passwords.
- Be Mindful of Sharing: Think twice before sharing personal information, location, or photos that could compromise your privacy or security. Be aware of the potential risks associated with sharing sensitive or private information online.
- Periodically Audit Your Accounts: Perform regular audits of the social media accounts you use. Remove any old or unused accounts to minimize your online presence.
By taking these steps, you can enhance the privacy and security of your information on other social media platforms, reducing the potential risks associated with sharing personal data online.
Now that you have secured your privacy on other social media platforms, you can enjoy a greater peace of mind about your online presence beyond Facebook.
Step 10: Inform Your Friends and Family
As you take the final step of deleting your Facebook account, it’s important to inform your friends and family about your decision. By doing so, you can maintain open lines of communication and ensure they are aware of your absence from the platform. Here are some suggestions on how to inform your loved ones:
- Send a Message: Reach out to your closest friends and family members by sending them a message explaining your decision to delete your Facebook account. Let them know that they can still contact you through other means, such as phone calls, email, or other social media platforms.
- Create a Post: Consider creating a farewell post on your Facebook account before deleting it. Express your gratitude and explain your reason for leaving the platform. Provide alternative ways to stay connected and ask your friends to share their contact information if needed.
- Update Your Contact Information: Make sure your friends and family have your updated contact information, such as your phone number or email address. This will allow them to reach out to you directly without relying on Facebook.
- Use Other Social Media Platforms: If you are active on other social media platforms, let your friends and family know where they can find you. Provide them with the usernames or handles of the platforms you use, ensuring that they can easily keep in touch.
- Schedule Meet-ups: Plan offline meet-ups or gatherings with your close friends and family members to stay connected in person. Strengthening these face-to-face relationships can help bridge the gap created by your absence on Facebook.
By informing your friends and family about your decision to delete your Facebook account, you can maintain meaningful connections and ensure you don’t fall out of touch.
Now that you have taken the necessary steps to inform your loved ones, you can confidently proceed with deleting your Facebook account, knowing that you have established alternative channels of communication.