
Step 1: Open the Facebook App
Deleting your Facebook account on an Android device is a straightforward process that can be done right from the Facebook app. Follow the steps below to get started:
1. Unlock your Android device and locate the Facebook app on your home screen or app drawer. The Facebook app has the iconic blue logo with a white letter “f”.
2. Tap on the Facebook app to open it. If you are not already logged in, enter your username (email or phone number) and password to access your account.
3. Once you’re logged in, you’ll be brought to your Facebook News Feed, where you can view posts from your friends and followed pages. You will need to navigate to the settings menu to proceed with deleting your account.
4. Look for the three horizontal lines, also known as the “hamburger menu”, usually located at the top-right or bottom-right corner of the app screen. Tap on it to open the Facebook menu.
5. In the Facebook menu, scroll down until you find the “Settings & Privacy” option. Tap on it to expand the submenu.
6. From the expanded submenu, tap on the “Settings” option. This will take you to the Facebook Settings page, where you can make adjustments to your account settings.
7. Congratulations! You’ve successfully opened the Facebook app and accessed the settings menu. Now, it’s time to navigate to the section specifically related to deleting your Facebook account.
In the next step, we will explore how to access the necessary settings menu to proceed with deleting your Facebook account on your Android device.
Step 2: Access the Settings Menu
After opening the Facebook app on your Android device, you’ll need to access the settings menu to begin the process of deleting your account. Follow the steps below:
1. In the Facebook app, locate the three horizontal lines at the top-right or bottom-right corner of the screen, often referred to as the “hamburger menu”. Tap on it to open the menu.
2. Scroll down until you find the “Settings & Privacy” option. Tap on it to expand the submenu.
3. From the expanded submenu, tap on the “Settings” option. This will take you to the Facebook Settings page, where you can customize various aspects of your account.
4. On the Settings page, you’ll see a list of different categories and settings. Scroll down until you find the “Your Facebook Information” section.
5. Tap on “Your Facebook Information” to access the submenu related to your account data and privacy.
By reaching this step, you have successfully accessed the settings menu on the Facebook app. In the next step, we will explore how to navigate to the specific section that allows you to deactivate or delete your Facebook account.
Step 3: Navigate to Your Facebook Information
Once you’ve accessed the settings menu on the Facebook app, it’s time to navigate to the section that deals specifically with your account information. Follow these steps:
1. On the Facebook Settings page, scroll down until you find the “Your Facebook Information” section. Tap on it to proceed.
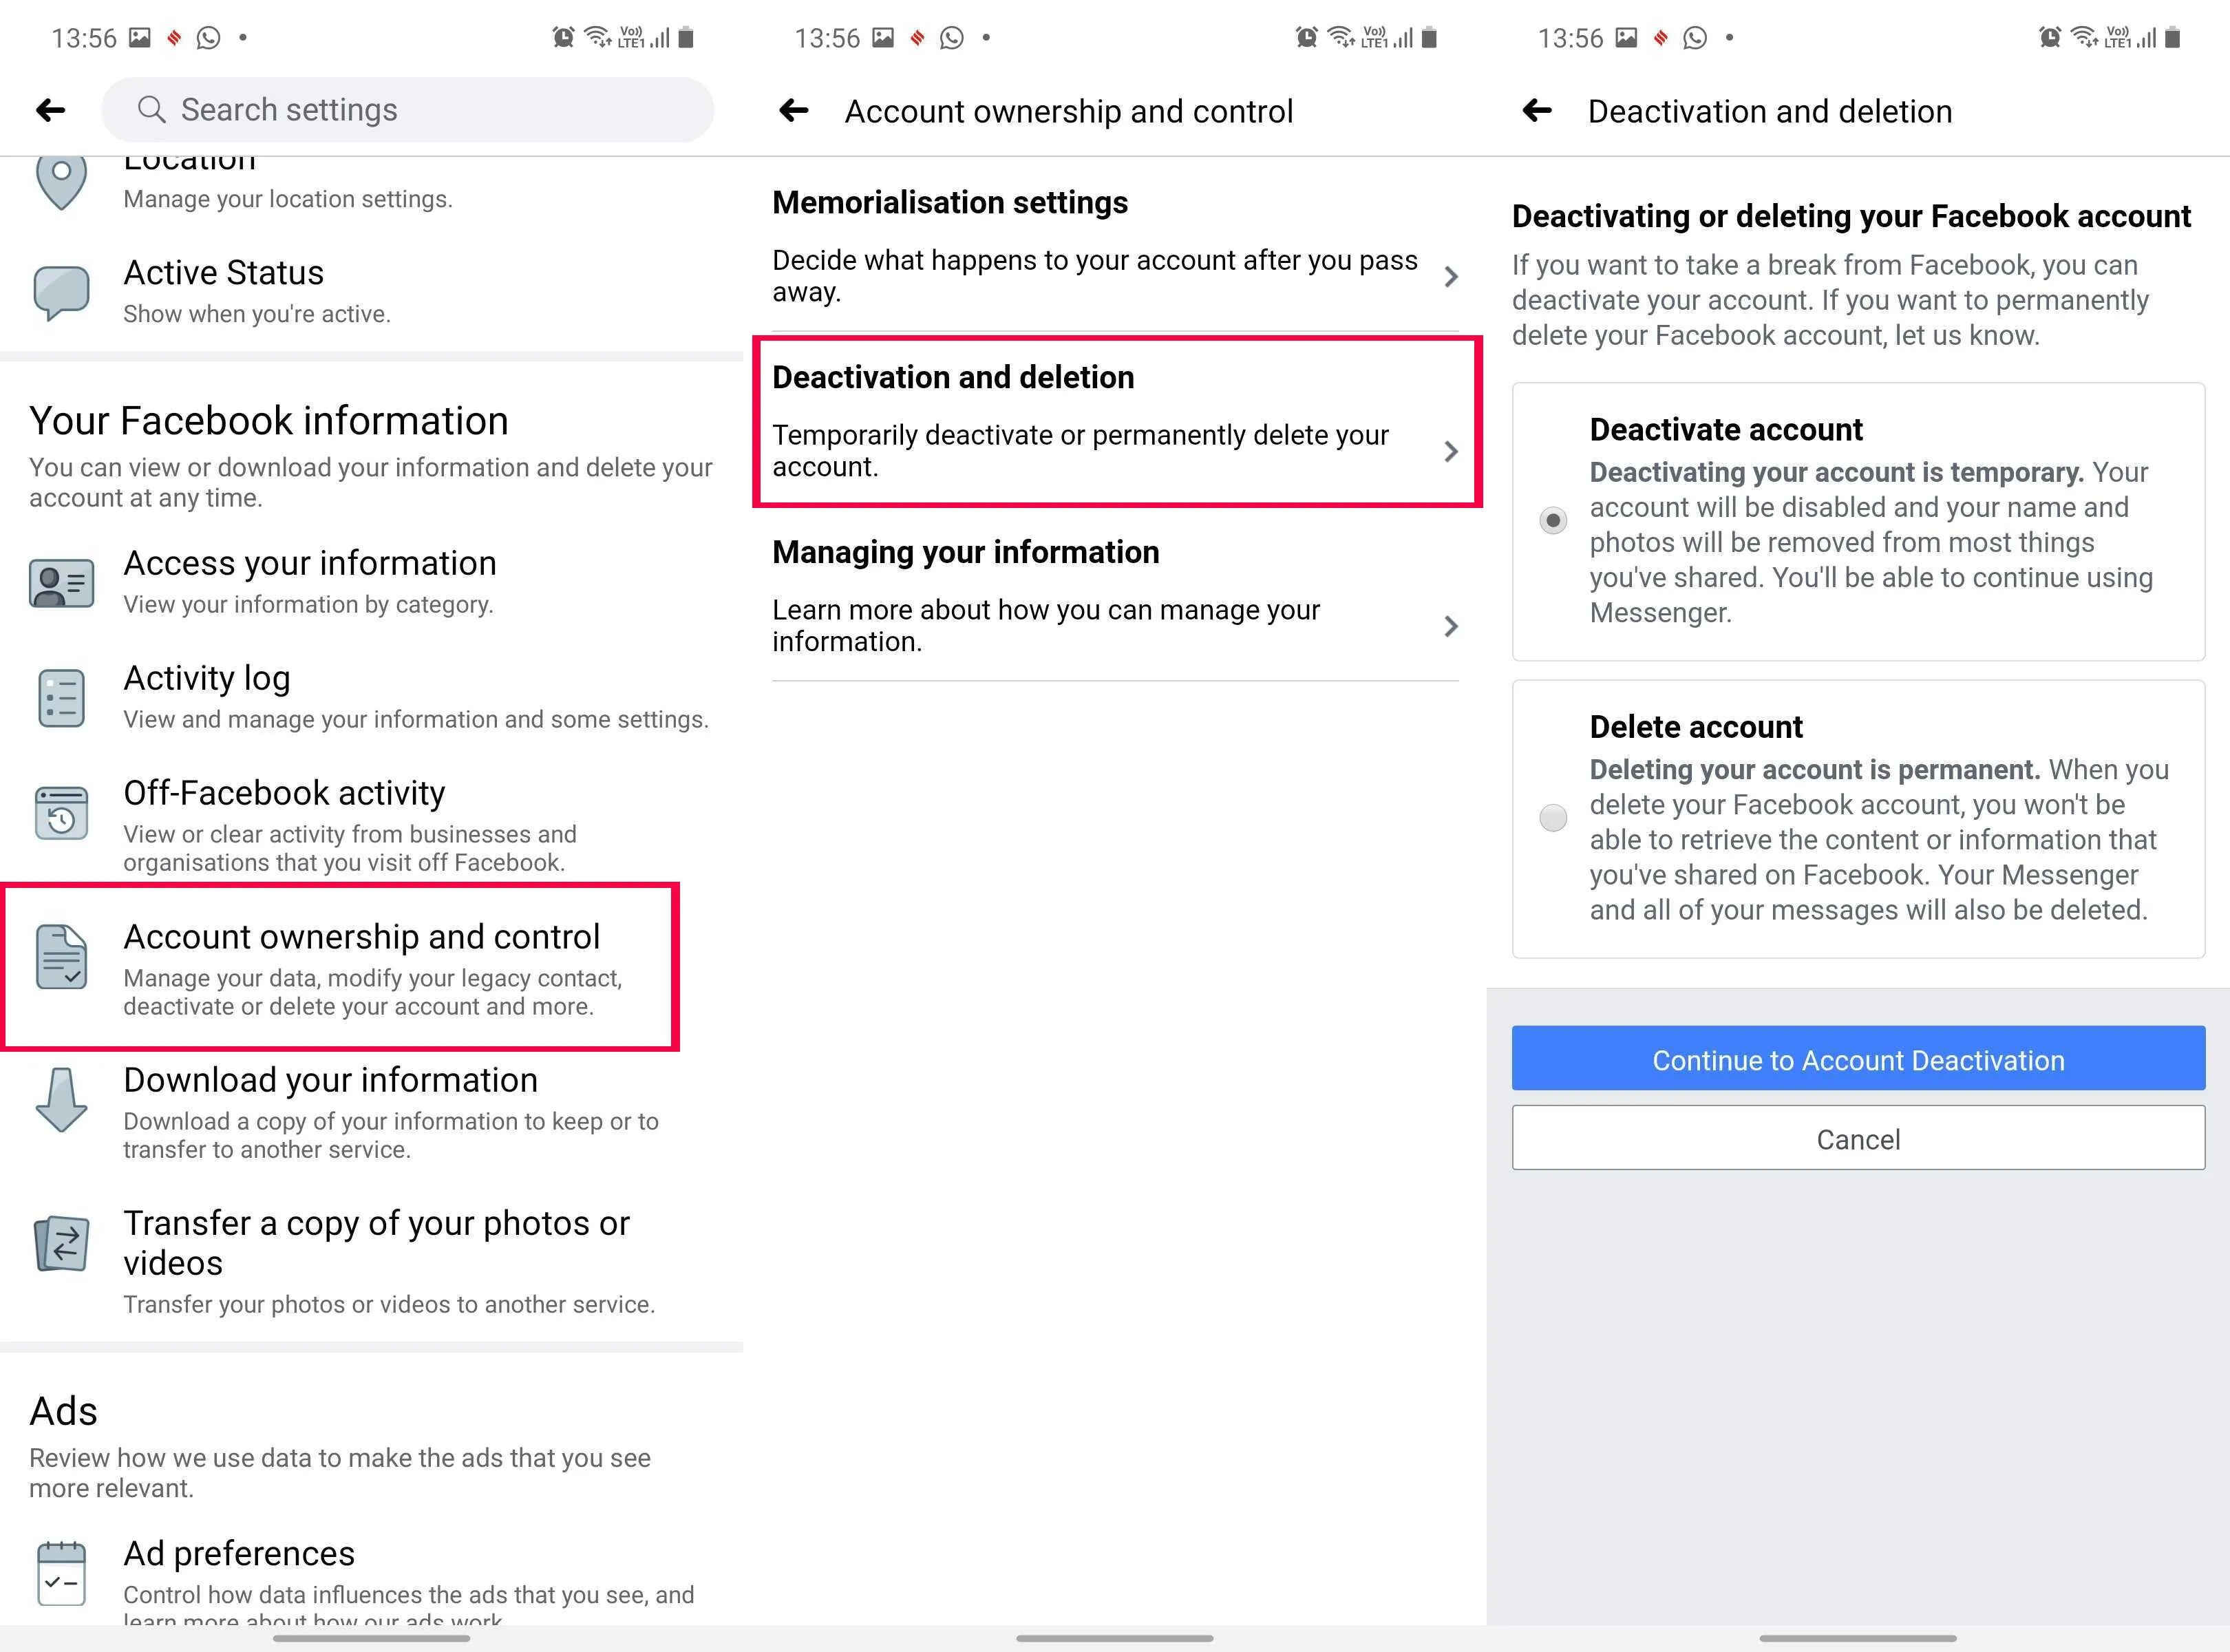
2. In the “Your Facebook Information” section, you’ll find different options related to managing your account data and privacy. Look for the option that says “Account Ownership and Control” and tap on it.
3. After tapping on “Account Ownership and Control”, a new page will open with various options related to your Facebook account. One of the options will be “Deactivation and Deletion”. Tap on it to continue.
4. On the “Deactivation and Deletion” page, you’ll see two options: “Deactivate Account” and “Delete Account”. These options provide different approaches to managing your Facebook account. To permanently delete your account, choose the “Delete Account” option.
By reaching this step, you have successfully navigated to the section of the Facebook app that allows you to manage your account information. In the next step, we will explore how to proceed with either deactivating or deleting your Facebook account.
Step 4: Deactivate or Delete Your Account
After navigating to the “Deactivation and Deletion” section of the Facebook app, you’ll be presented with the options to either deactivate or delete your account. Read on to learn more about each option:
1. Deactivate Account: If you choose to deactivate your Facebook account, it will temporarily disable your profile and remove your name and photos from most things you’ve shared on Facebook. However, your information will still be stored on Facebook’s servers, and you can reactivate your account at any time by logging back in. To proceed with deactivation, tap on the “Deactivate Account” option.
2. Delete Account: If you’re certain that you want to permanently delete your Facebook account, choose the “Delete Account” option. Selecting this option will initiate the process of permanently removing your account and all associated data. It’s important to note that once your account is deleted, it cannot be undone.
Take your time to carefully consider the consequences of each choice. If you’re unsure about permanently deleting your account, deactivation might be a better option for you. Remember, if you choose to delete your account, you will lose access to all the information, posts, and connections associated with it.
By reaching this step, you now have a clear understanding of the options available to you in terms of managing your Facebook account. In the next step, we will guide you through the process of confirming your decision and establishing the permanency of your account deletion.
Step 5: Confirm Your Decision
After deciding whether to deactivate or delete your Facebook account, it’s important to confirm your choice to ensure that your account is treated accordingly. Follow the steps below to confirm your decision:
1. If you’ve chosen to deactivate your account, you will need to confirm the deactivation. On the “Deactivate Account” page, you may be prompted to provide a reason for deactivation. Select the appropriate reason from the list or choose “Other” if none of the given options apply. Then, tap on the “Continue” or “Deactivate” button to proceed.
2. If you’ve decided to permanently delete your account, you will also need to confirm this choice. On the “Delete Account” page, Facebook will inform you about the process and the ramifications of deleting your account. Take the time to read through the information provided. Then, tap on the “Delete Account” or “Continue to Account Deletion” button to proceed.
3. For both deactivation and deletion, you may be asked to enter your Facebook password. This is an additional security measure to ensure that only the account owner can make changes to the account. Enter your password as requested and tap on the “Continue” or “Confirm” button to finalize your decision.
By reaching this step, you have successfully confirmed your decision to either deactivate or permanently delete your Facebook account. However, please note that for account deletion, the process may not be immediate. Facebook typically allows a grace period of a few days in case you change your mind. If you log back into your account within the specified time, the deletion request will be canceled.
In the next step, we will explore some additional options and factors to consider before you proceed with permanent account deletion.
Step 6: Review Different Options
Before finalizing the deletion of your Facebook account, it’s essential to review some additional options and factors to ensure that you’re making an informed decision. Consider the following:
1. Download Your Information: Facebook allows you to download a copy of your data before deleting your account. This includes posts, photos, videos, and other content you’ve shared on the platform. To access this feature, go to the “Settings” menu, click on “Your Facebook Information,” and select the “Download Your Information” option. This can be useful if you want to keep a backup of your data or retrieve specific content in the future.
2. Inform Contacts and Connections: If you decide to permanently delete your Facebook account, it’s a good idea to inform your contacts and connections in advance. This way, they can reach out to you through alternative means if necessary. Consider sending a final message or creating a post to inform people about your decision and provide alternative contact information if desired.
3. Update Linked Apps and Services: Take the time to review the apps and services you have linked to your Facebook account. Some apps may require your Facebook account for authentication or data access. If you decide to delete your account, ensure that you’ve updated these apps with alternative login methods or migrated your data to other platforms as needed.
4. Consider Privacy Settings: While deactivating or deleting your account will impact your privacy, it’s important to review your privacy settings before the process. You may want to adjust the visibility of specific posts or clear any saved information on the platform. This can help protect your data and privacy to a certain extent before taking further action.
By reaching this step, you have considered some additional options and factors to keep in mind when deleting your Facebook account. These steps help ensure that you have a comprehensive understanding of the process and its implications. In the next step, we will guide you through the final steps to permanently delete your Facebook account.
Step 7: Select Permanent Account Deletion
If you’ve carefully reviewed your options and made the decision to proceed with permanently deleting your Facebook account, follow these steps:
1. On the “Deactivation and Deletion” page, tap on the “Delete Account” option. This will initiate the process of permanently deleting your Facebook account. Ensure that you are certain about this decision, as it cannot be undone.
2. A pop-up window may appear, providing you with additional information about the permanent deletion process. Read through the information provided to understand the consequences of deleting your account.
3. If you still wish to proceed, tap on the “Delete Account” or “Continue to Account Deletion” button to confirm your choice. Please note that once you confirm the deletion, your account and all associated data will be permanently removed from Facebook’s servers.
4. You may be asked to enter your Facebook password once again for security purposes. This step ensures that only the account owner can delete the account. Enter your password in the designated field and tap on the “Continue” or “Confirm” button.
5. After confirming your password, the final step involves solving a CAPTCHA verification. This is a security measure to ensure that the account deletion request is not automated. Enter the characters you see in the CAPTCHA image or complete any other verification process as prompted.
By reaching this step, you have selected the permanent account deletion option. In the next step, we will discuss how to submit your request and complete the process of deleting your Facebook account.
Step 8: Enter Your Password and Submit
In the final step of deleting your Facebook account, you’ll need to enter your password and submit the account deletion request. Follow these steps to complete the process:
1. On the account deletion page, you will be prompted to enter your Facebook password for security verification. This step ensures that only the account owner can initiate the deletion process.
2. Carefully enter your password in the designated field. Ensure that you enter the correct password to proceed. Take your time to double-check for any typos or mistakes.
3. After entering your password, review the summary or confirmation message provided on the page. It may remind you of the consequences of deleting your account and remind you that the process is irreversible.
4. Once you’ve reviewed the information and verified your password, it’s time to submit your account deletion request. Look for the “Submit” or “Delete Account” button, and tap on it to finalize the process.
5. After submitting your account deletion request, Facebook may display a confirmation message to indicate that your request has been received. It may also provide additional information about the timeline for deleting your account. Be sure to read this information to understand what to expect.
6. The actual deletion of your account may take some time. Facebook typically allows a grace period of a few days in case you change your mind. During this time, if you log back into your account or cancel the deletion request, the process will be halted, and your account will remain active.
By completing this step, you have successfully entered your password and submitted your account deletion request. Congratulations! In the next few days, your Facebook account and all associated data will be permanently deleted from the platform.
Remember, once the account deletion process is complete, you will lose access to your account, and all your information, posts, photos, and connections will be irretrievable. If you have any important data or content on your Facebook account, be sure to back it up or download it before proceeding with the deletion process.