
Why Should You Back Up Your Facebook Data?
Facebook has become an essential part of our lives, connecting us with friends, family, and even businesses. Over time, we accumulate a wealth of memories, conversations, and personal information on the platform. However, despite Facebook’s security measures, there is always a potential risk of data loss, hacking, or accidental deletion. This is why it is crucial to regularly back up your Facebook data. Here are a few reasons why:
- Preserving Precious Memories: Facebook serves as a digital journal of our lives, capturing cherished moments, milestones, and experiences. By backing up your data, you ensure that photos, videos, and posts that hold sentimental value are safeguarded. If you ever accidentally delete a post or lose access to your account, having a backup allows you to retrieve these precious memories.
- Protecting Against Account Hacks: Despite Facebook’s security measures, it’s not uncommon for accounts to be compromised. If your account is hacked or compromised, there is a risk of losing access to your data or having it tampered with. By regularly backing up your data, you can mitigate the impact of a potential security breach and restore your account to its previous state.
- Ensuring Privacy and Control: Facebook’s privacy policies and settings can be complex, and there’s always a chance that your data may be accessed by unauthorized individuals or companies. By having a local backup of your information, you have better control over who has access to your data and can minimize the risk of your information being shared without your consent.
- Planning for Account Closure: There may come a time when you decide to deactivate or delete your Facebook account. By backing up your data, you have a copy of your information, ensuring that you don’t lose valuable content while taking this step.
- Preventing Data Loss: Accidents happen, and it’s possible to accidentally delete a post, lose access to your account, or encounter technical issues that result in data loss. By regularly backing up your Facebook data, you can minimize the chances of permanent loss and easily restore your information in such situations.
Backing up your Facebook data is a proactive measure that ensures the safety, privacy, and longevity of your digital footprint. By following the steps outlined in this guide, you can have peace of mind knowing that your memories, conversations, and personal information will always be in your control and accessible when you need them.
Step 1: Accessing Your Facebook Settings
Before you can start backing up your Facebook data, you need to access your account settings. Here’s how you can do it:
- Open the Facebook app or open your preferred web browser and go to the Facebook website.
- Log in to your Facebook account using your credentials.
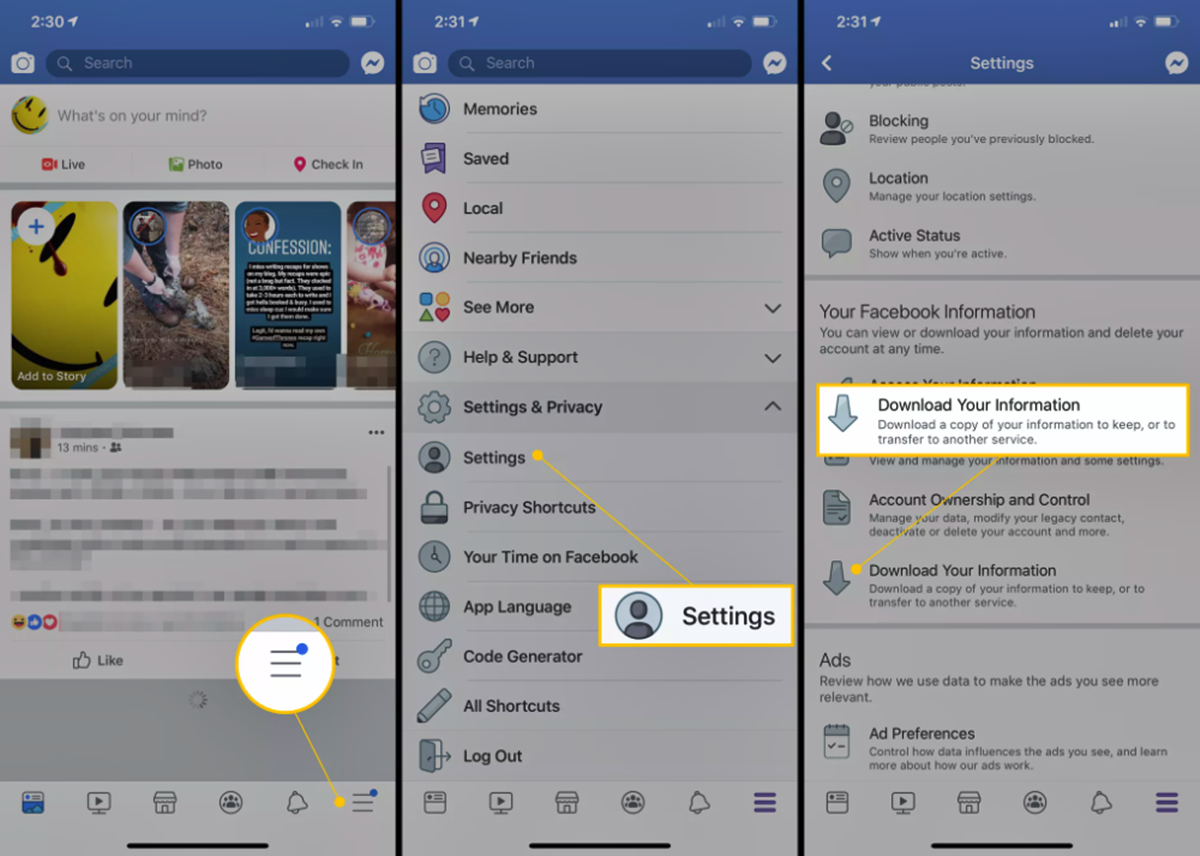
- Once logged in, click on the downward-facing arrow in the top right corner of the screen. This will open a drop-down menu.
- From the drop-down menu, select “Settings & Privacy” and then choose “Settings.”
- You’ll now be on the “Settings” page, which comprises various sections related to your Facebook account.
By accessing your Facebook settings, you gain control over different aspects of your account, including privacy, security, and data management. It is essential to familiarize yourself with these settings to ensure that your data is protected and backed up properly.
Next, let’s move on to the next step: requesting your Facebook archive, which will allow you to download a copy of all the information you have shared on the platform.
Step 2: Requesting Your Facebook Archive
Once you have accessed your Facebook settings, the next step is to request your Facebook archive. This archive contains a comprehensive copy of all the data you have shared on Facebook. Here’s how you can request your Facebook archive:
- From the “Settings” page, click on the “Your Facebook Information” tab located on the left sidebar.
- On the “Your Facebook Information” page, you will find various options related to managing your data. Look for the “Download Your Information” section and click on the “View” link next to it.
- This will take you to the “Download Your Information” page, where you can customize your archive request.
- Start by selecting the date range for the information you want to include in your archive. You can choose to download all of your data or specify a specific range.
- Next, choose the format of your archive. The default format is HTML, which is suitable for most users. However, if you have a specific need, you can select JSON.
- Under “Media Quality,” you can choose whether to include high-quality photos and videos in your archive. Select this option if preserving the original quality of your media is important to you, although keep in mind that it may result in a larger file size.
- Finally, scroll down and click on the “Create File” button to proceed with your archive request. Facebook will now start preparing your archive.
Once you have requested your Facebook archive, you will receive a notification when it is ready for download. The time it takes for the archive to be prepared may vary depending on the amount of data you have shared on Facebook.
In the next step, we will discuss how to download your Facebook archive and explore its contents.
Step 3: Downloading Your Facebook Archive
After you have requested your Facebook archive, the next step is to download it. Here’s how you can download your Facebook archive:
- Once your Facebook archive is ready for download, you will receive a notification through email or a Facebook notification. Depending on your settings, you may also find a notification within your Facebook account.
- Click on the notification or go to the “Download Your Information” page within your Facebook settings.
- On the “Download Your Information” page, you will see the option to “Download Archive.” Click on this button to start the process.
- Facebook will prompt you to enter your password for security verification.
- After entering your password, click on the “Continue” button to proceed with the download.
- A pop-up window will appear, asking you to choose the storage location on your device where you want to save the archive file. Select a suitable directory or folder and click on “Save.”
- Facebook will then begin downloading your archive. The time it takes to download the file will depend on the size of your archive and your internet connection speed.
Once the download is complete, you will have successfully obtained a copy of your Facebook archive on your device. The archive will be in a compressed zip format, so you will need to extract the contents to access your data.
In the next step, we will discuss how to extract and view your Facebook archive to explore the information it contains.
Step 4: Extracting and Viewing Your Facebook Archive
Once you have downloaded your Facebook archive, the next step is to extract the contents and view your data. Here’s how you can do it:
- Locate the downloaded archive file on your device. It will be in a compressed zip format.
- Right-click on the zip file and select “Extract” or “Extract All” from the context menu. Choose a suitable location on your device where you want to extract the files.
- After extraction, you will have a folder containing multiple files and folders. Look for the file named “index.html” or “index.htm” and double-click on it to open it in your default web browser.
- This will open the main page of your Facebook archive, which serves as a navigation hub for accessing various aspects of your data.
- From the main page, you can explore different sections such as posts, photos, videos, messages, friends, and more.
- Navigate through the sections to view your data. If you click on a section, you will be redirected to a page displaying the relevant information.
The extracted contents of your Facebook archive allow you to view your posts, photos, videos, comments, likes, and other data in a self-contained offline format. This gives you the flexibility to browse through your information at your own pace and without relying on an internet connection.
In the next step, we will discuss how to understand the contents of your Facebook archive and make the most of the information it provides.
Step 5: Understanding Your Facebook Archive
Once you have extracted and viewed your Facebook archive, it’s important to understand the different components and information it contains. Here’s how you can make sense of your Facebook archive:
- Posts: The “Posts” section of your Facebook archive includes all the posts you have made on your timeline, as well as posts you have been tagged in. You can browse through your status updates, photos, videos, and shared links.
- Photos and Videos: In the “Photos” and “Videos” sections, you will find a collection of all the photos and videos you have uploaded or shared on Facebook. You can relive memories, view albums, and download individual media files for offline access.
- Messages: The “Messages” section contains all your conversations and chats on Facebook Messenger. You can revisit past conversations, search for specific messages, and relive interactions with friends and family.
- Friends: In the “Friends” section, you can find a list of all your Facebook friends. You can explore their profiles, see the date you became friends, and access any mutual friends you share.
- Active Sessions and Login History: Your Facebook archive also includes information about your active sessions and login history. You can review the devices and locations from which you have accessed your Facebook account.
- Settings and Preferences: Depending on the version of the Facebook archive, you might find a section dedicated to your account settings and preferences. This helps you understand your privacy settings and other configurations you have made on Facebook.
By exploring and understanding the contents of your Facebook archive, you gain insights into your social media activity, memories, and interactions. It gives you the opportunity to reflect on your digital journey, retrieve lost information, and better understand your online presence.
In the next step, we will discuss how to save your Facebook archive to an external drive for safekeeping.
Step 6: Saving Your Facebook Archive to an External Drive
Once you have explored and understood the contents of your Facebook archive, it is a good idea to save it to an external drive or storage device for safekeeping. Here’s how you can save your Facebook archive to an external drive:
- Connect your external drive or storage device to your computer. Ensure that it is recognized and accessible.
- Open the folder where you extracted your Facebook archive and locate the main folder containing all the files and folders.
- Copy the entire main folder by right-clicking on it and selecting “Copy” from the context menu.
- Navigate to your connected external drive and open the desired location where you want to save your Facebook archive.
- Right-click on the empty space in the external drive location and select “Paste” from the context menu. This will copy the entire main folder to your external drive.
- Wait for the copying process to complete. The time it takes will depend on the size of your Facebook archive and the speed of your external drive.
Once the copying is finished, your Facebook archive will be saved on the external drive. This ensures that you have an additional copy separate from your computer’s storage, minimizing the risk of accidental deletion or loss.
Remember to keep your external drive in a safe place and consider making multiple copies or backups, such as storing the archive on cloud storage platforms or additional external drives, to further safeguard your data.
In the next step, we will discuss the importance of regularly updating your Facebook archive to ensure you have the most recent data.
Step 7: Regularly Updating Your Facebook Archive
Once you have saved your Facebook archive to an external drive, it’s important to prioritize the regular updating of your archive to ensure it reflects the most recent data. Here’s why and how you should update your Facebook archive:
Why is it important?
Facebook is dynamic, with new posts, photos, messages, and interactions being added regularly. By updating your Facebook archive, you capture and preserve the latest information on your account. This ensures that your archive remains up to date and accurate, providing a comprehensive record of your Facebook activity.
How to update your archive:
- Follow steps 1 and 2 mentioned earlier in this guide to access your Facebook settings and request a new archive.
- On the “Download Your Information” page, review and adjust the settings for your new archive request, such as the date range and media quality.
- Click on the “Create File” or similar button, depending on the interface, to initiate the creation of your updated archive.
- Once your updated archive is ready for download, follow step 3 to download and save it to your external drive.
- Replace the older version of your Facebook archive on your external drive with the updated version by copying and pasting the new main folder.
By regularly updating your Facebook archive, you ensure that you have the most recent snapshot of your account. This becomes especially important if you use Facebook regularly, make frequent posts, or engage in active conversations on the platform.
Remember to schedule regular updates for your Facebook archive to maintain an accurate record of your digital journey, memories, and interactions on the platform.
Congratulations! You have completed all the steps to back up your Facebook data by downloading and updating your Facebook archive. By following these steps, you have taken an important step towards safeguarding your valuable memories and personal information on Facebook.