
Why You May Want to Delete Facebook Posts
Facebook has become an integral part of our lives, allowing us to connect with friends, share photos and memories, and express ourselves. However, as time goes on, we may find ourselves wanting to delete certain posts for a variety of reasons. Here are some common reasons why you may want to delete your Facebook posts:
- Privacy concerns: Over the years, Facebook has faced several privacy controversies, raising concerns about the security of personal information. Deleting old Facebook posts can help protect your privacy by removing any potentially sensitive or compromising content.
- Career considerations: Your social media presence can have an impact on your professional life. Employers often check social media profiles when considering job applicants, and inappropriate or unprofessional posts can harm your chances of landing a job. Deleting old posts can help you maintain a positive online image.
- Cleansing your feed: As we grow and change, our interests and opinions may evolve as well. Deleting old Facebook posts allows you to curate your online persona, ensuring that your current interests and views are accurately represented to your friends and followers.
- Moving on from past relationships: Facebook is often a repository of memories, including those from previous relationships. Deleting posts associated with past relationships can help you move forward and provide closure, enabling you to focus on the present and future.
- Removing outdated or irrelevant content: Over time, posts can become outdated or lose their relevance. Deleting old posts helps declutter your profile, making it easier for friends and followers to find the content that truly matters.
Deleting Facebook posts can provide a sense of control and enable you to curate your online presence. However, it is important to be mindful of the repercussions of deleting posts, as it can impact your social connections and memories. Before you embark on a mass deletion spree, it is essential to consider how it may affect your relationships and shared experiences.
How to Check and Review Your Facebook Posts
Before you start deleting your Facebook posts, it’s important to take stock of what is currently on your profile. Here are some steps to help you check and review your Facebook posts:
- Access your Activity Log: Log in to your Facebook account and navigate to your profile. Click on the three horizontal dots next to “View Activity Log” and select it from the dropdown menu. This will take you to your Activity Log, where you can review your entire posting history.
- Filter your posts: On the left-hand side of the Activity Log page, you will find different options to filter your posts. You can filter by post type, such as photos, videos, or status updates, or by the year in which the posts were made. Use these filters to narrow down your search and focus on specific types or time periods of posts.
- Scroll through your posts: Scroll through your Activity Log to see all your past posts. Take your time to review each post and evaluate if it aligns with your current preferences, values, and privacy concerns.
- Pay attention to audience settings: When reviewing your posts, pay close attention to the audience settings for each post. You can find this information below each post in your Activity Log. Ensure that the posts are shared with the intended audience and adjust the settings if necessary.
- Consider third-party posts: Apart from your own posts, you should also consider any posts that you are tagged in or that others have posted on your timeline. These posts may also require your attention and review. To access these posts, click on the “Posts You’re Tagged In” option on the left-hand side of the Activity Log page.
By thoroughly reviewing your Facebook posts, you can decide which ones to keep, delete, or adjust the privacy settings for. Remember, you have complete control over your own posts, and it’s important to ensure that your online presence accurately reflects who you are today and that you are comfortable with the content you are sharing.
Deleting a Single Facebook Post
If you have come across a specific Facebook post that you would like to delete, follow these simple steps to remove it from your profile:
- Locate the post: Visit your Facebook profile and navigate to the post you wish to delete. You can find your posts on your timeline or in the Activity Log.
- Access the post options: Hover your cursor over the post, and you will see a small menu icon (usually represented by three dots) appear in the top right corner of the post. Click on the icon to open a dropdown menu with several options.
- Select “Delete post”: From the dropdown menu, click on the “Delete post” option. Facebook will prompt you to confirm the deletion.
- Confirm the deletion: In the confirmation dialogue box, Facebook will ask you if you are sure you want to delete the post. Review the post to ensure it is the correct one, and if you are certain, click “Delete” to permanently remove the post from your profile.
Once deleted, the post will no longer be visible on your timeline or in your friends’ news feeds. However, keep in mind that it may still be accessible through other sources, such as screenshots taken by other users or if someone has shared it elsewhere on Facebook.
Deleting a single Facebook post is a straightforward process, and it allows you to remove content that you no longer wish to be associated with or that no longer represents who you are. However, if you have multiple posts that you want to delete, manually deleting them one by one can be time-consuming. In such cases, there are other methods available for deleting multiple Facebook posts at once, which we will explore in the following sections.
Deleting Multiple Facebook Posts Manually
If you have a bulk of Facebook posts that you want to delete, you can do so manually by following these steps:
- Access your Activity Log: Log in to your Facebook account and go to your profile. Click on the three horizontal dots next to “View Activity Log” and select it from the dropdown menu. This will take you to your Activity Log, where you can view all your Facebook posts.
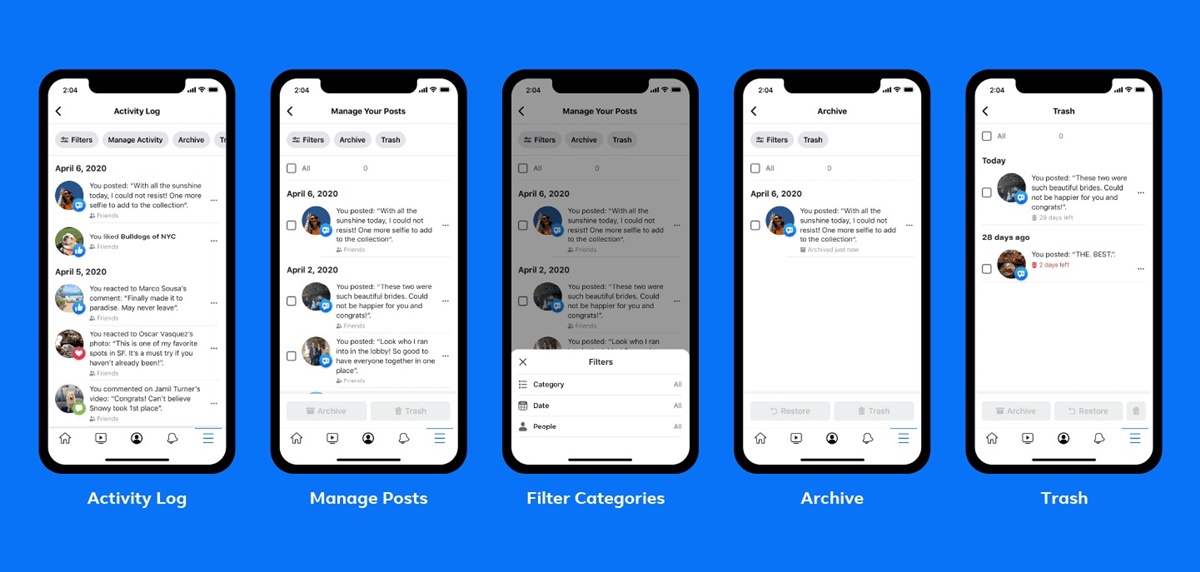
- Navigate to “Manage Activity”: On the left-hand side of the Activity Log page, you will find the option “Manage Activity.” Click on it to proceed.
- Choose the posts to delete: On the “Manage Activity” page, you will see a list of your posts. You can use the filters at the top to narrow down the posts by date, category, or other criteria. Select the posts you want to delete by clicking on the checkmark icon on the top right corner of each post.
- Click on “Trash”: Once you have selected the posts, click on the “Trash” option that appears at the top. Facebook will ask you to confirm the deletion.
- Confirm the deletion: In the confirmation dialog box, review the posts to ensure you’ve selected the correct ones for deletion. If you’re satisfied, click on “Trash Posts” to permanently delete them from your profile.
It’s important to note that manually deleting multiple Facebook posts can be time-consuming, especially if you have a large number of posts to delete. It requires going through your Activity Log and selecting each post individually. Consider this method if you have a manageable number of posts to delete or if you prefer more control over the deletion process.
If you have a significant number of posts to delete and want a more efficient way to accomplish this task, there are third-party tools and browser extensions available that can simplify the process. In the next section, we will explore one such method using a Chrome extension to delete Facebook posts.
Using a Chrome Extension to Delete Facebook Posts
If manually deleting multiple Facebook posts seems too time-consuming, you can use a Chrome extension to streamline the process. Follow these steps to delete Facebook posts using a Chrome extension:
- Install a Chrome extension: Search for a reliable Facebook post deletion extension in the Chrome Web Store. There are several options available, and popular choices include “Social Book Post Manager” or “Toolkit for FB”. Install the extension of your choice by clicking on the “Add to Chrome” button.
- Visit your Facebook profile: After installing the extension, open Facebook in the Chrome browser and visit your profile page. Make sure you are logged in to your Facebook account.
- Access the Chrome extension: Look for the newly installed extension in the Chrome toolbar. Click on its icon to open the extension interface or access it through the Chrome menu, usually located in the top-right corner of the browser window.
- Configure the extension: Depending on the extension you chose, there may be different customization options available. For example, you may be able to select the types of posts you want to delete or specify a date range for deletion. Adjust the settings according to your preferences.
- Start deleting: Once you have configured the extension, click on the “Start” or “Delete” button. The extension will automatically begin deleting the selected posts based on the specified criteria. The process may take some time, depending on the number of posts and the speed of your internet connection.
Using a Chrome extension to delete Facebook posts can save a significant amount of time, especially if you have a large number of posts to delete. However, it is essential to exercise caution when using third-party extensions and ensure that you choose a reputable and trustworthy one. Always review the permissions and reviews of the extension before installation to protect your privacy and security.
Keep in mind that using a Chrome extension may not be a foolproof method, as Facebook’s platform and privacy settings may change over time, affecting the functionality of the extension. It’s always a good idea to backup important posts or content before using any deletion method.
Automating the Deletion Process with a Script
If you have a significant number of Facebook posts to delete and you’re comfortable with coding, you can automate the deletion process using a script. Automating the process saves time and effort by allowing you to delete multiple posts at once. Here’s how you can utilize a script to delete Facebook posts:
- Access the Facebook Graph API: To interact with Facebook programmatically, you’ll need to obtain an access token from the Facebook Graph API. Visit the Facebook Developers website and create a new app to get your access token.
- Choose a programming language: Select a programming language that you’re familiar with and that offers support for the Facebook Graph API. Popular choices include Python, JavaScript, and PHP.
- Install relevant libraries: Depending on the programming language you choose, you may need to install specific libraries or SDKs that facilitate interaction with the Facebook Graph API. Follow the documentation for your chosen language to install the necessary dependencies.
- Write the script: Now, you can begin writing the script that will delete your Facebook posts. The script needs to authenticate you using the access token, retrieve your posts data, and implement the deletion logic based on your requirements.
- Test and execute the script: Before running the script, double-check that it is working as intended. Test it with a small subset of posts to ensure that it functions correctly. Once you’re confident, execute the script to initiate the deletion process.
Automating the deletion process with a script requires coding knowledge and understanding of API integration. It gives you more control and efficiency in deleting multiple Facebook posts, but it also carries some risks. Carefully review the script and test it thoroughly to avoid unintended consequences, such as deleting posts you want to keep or encountering unexpected errors during the process.
Additionally, be aware that Facebook’s APIs and policies can change over time, which may affect the functionality and availability of certain features. Stay updated with the latest documentation and announcements to ensure the longevity of your script.
If you’re not familiar with programming or prefer a more user-friendly approach, using a Chrome extension or third-party tool may be a more suitable option for deleting multiple Facebook posts.
Things to Consider Before Deleting Facebook Posts in Bulk
Before embarking on a bulk deletion of your Facebook posts, there are several important factors to consider:
- Backup your posts: Before deleting any posts, consider making a backup of your Facebook data. This will ensure that you have a copy of your posts, photos, and other content in case you change your mind or want to refer back to them in the future. Facebook provides an option to download a copy of your data in your account settings.
- Consider the impact on your memories: Deleting old posts can result in losing memories and shared experiences. Think about the value of these past posts and whether they hold sentimental significance. You may want to save or archive certain posts that carry special memories before proceeding with the deletion.
- Review privacy settings: Take time to review your current privacy settings and ensure they align with your preferences. Understand who can see your posts and make adjustments if needed. Consider using more restrictive privacy settings for future posts to avoid unwanted visibility.
- Consider the impact on relationships: Deleting posts, especially those involving friends or family, may affect the memories you share with others. Communicate your intention to delete posts to avoid any misunderstandings or hurt feelings. More importantly, consider the impact on relationships and decide if the removal of certain posts is worth potential tension or disagreements.
- Assess the impact on your online presence: Deleting bulk posts can significantly change your Facebook profile and online persona. Consider how this might affect how others perceive you or how it aligns with your personal or professional goals. Take a comprehensive look at your profile and ensure that the remaining content accurately represents your interests, values, and current identity.
- Understand permanent deletion: When you delete posts, keep in mind that this action is generally permanent. Once deleted, you may not be able to retrieve the content. Take care to verify the posts you want to delete before proceeding, as there will typically be no way to recover them.
By considering these aspects before deleting Facebook posts in bulk, you can make an informed decision about what to delete and how it may impact your digital footprint and relationships. It’s essential to strike a balance between decluttering your profile and preserving meaningful connections and memories.
Final Thoughts
Deleting Facebook posts, whether individually or in bulk, is a personal choice that depends on your privacy concerns, digital footprint, and evolving online presence. It’s important to approach the process with careful consideration and evaluate the potential impact on your relationships, memories, and overall online image.
Before deleting any posts, take the time to review and assess your Facebook activity, utilizing tools such as the Activity Log to ensure you have a clear understanding of what you’re deleting. Consider using privacy settings to control who can access your content moving forward.
If you have a few specific posts you want to remove, deleting them individually using the built-in Facebook options is a straightforward approach. However, if you have numerous posts to delete, using a Chrome extension or creating an automated script can streamline the process.
Remember that deleting posts can result in the permanent loss of content, so it’s important to backup your data if desired. Additionally, keep in mind that deleted posts can still exist outside of your control, such as in the form of screenshots or if others have shared the posts.
As you embark on the journey of deleting Facebook posts, strike a balance between decluttering your profile and maintaining meaningful connections and memories. Continuously reassess your online presence, privacy settings, and content to ensure they align with your evolving personal and professional goals.
A thoughtful and mindful approach to deleting Facebook posts can help you curate a digital footprint that accurately reflects who you are while safeguarding your privacy and maintaining valuable connections.