
What is Secure Boot?
Secure Boot is a security feature found in modern computer systems that helps protect against unauthorized operating systems and malware during the boot process. It was first introduced by Microsoft as part of the UEFI (Unified Extensible Firmware Interface) specification and has since become a standard feature on most computers.
The main purpose of Secure Boot is to ensure that only validated and properly signed software, including operating systems, firmware, and device drivers, are allowed to run during startup. It uses cryptographic signatures to verify the integrity and authenticity of each component before it is executed, preventing the loading of unauthorized or modified code.
This feature is particularly important in preventing the execution of malicious software or bootkits, which are designed to bypass traditional security measures and gain control of the system at a low level. By only allowing properly signed and trusted software to run, Secure Boot helps to protect the system from potential security threats.
Secure Boot works by using a public key infrastructure (PKI). The system firmware contains a trusted root certificate that is used to verify the authenticity and integrity of the bootloader and the subsequent components in the boot process. When the system starts up, the firmware checks the digital signatures of each component against the trusted root certificate to ensure that they haven’t been tampered with or modified.
While Secure Boot provides an added layer of security, it also poses limitations, as it may prevent the installation of certain operating systems or unsigned drivers that are not explicitly supported by the manufacturer. This can be a concern for advanced users or those who prefer to run custom operating systems or alternative software.
Understanding what Secure Boot is and how it functions is essential when considering whether to disable it. The next section will discuss the reasons why one might want to disable Secure Boot and the implications it may have on the system.
Why Disable Secure Boot?
While Secure Boot provides valuable security protection, there are several reasons why one might consider disabling it. It’s important to note that disabling Secure Boot should only be done after careful consideration of the potential risks and implications.
One of the primary reasons to disable Secure Boot is to install or run alternative operating systems that are not signed or supported by the manufacturer. Some users prefer to experiment with different operating systems, such as Linux distributions or older versions of Windows, that may not have the necessary digital signatures to pass Secure Boot verification.
Another reason to disable Secure Boot is to use hardware or drivers that are not digitally signed. Certain hardware peripherals or custom-designed components may not have the appropriate signatures, making them incompatible with Secure Boot. Disabling Secure Boot allows the system to load these drivers and use the hardware effectively.
Additionally, disabling Secure Boot can be necessary for certain troubleshooting or repair processes. In some cases, software or firmware updates might conflict with Secure Boot, resulting in boot failures or instability. By temporarily disabling Secure Boot, users can resolve these issues and restore system functionality.
It’s important to note that disabling Secure Boot does come with potential drawbacks. By bypassing the security measures put in place by Secure Boot, there is an increased risk of malware or unauthorized software gaining access to the system. This risk is especially pronounced when downloading and installing software from untrusted or unreliable sources. Users who choose to disable Secure Boot should exercise caution and ensure that they are installing reputable and secure software.
Disabling Secure Boot can also void certain warranties or support agreements, as it involves modifying the firmware settings of the system. Users should check the manufacturer’s documentation or contact customer support to understand the potential implications before disabling Secure Boot.
Ultimately, the decision to disable Secure Boot should be made based on the specific needs and requirements of the user. If running alternative operating systems, using incompatible hardware, or troubleshooting system issues outweigh the security benefits provided by Secure Boot, then disabling it may be a viable option. In the next section, we will discuss how to verify the firmware compatibility before proceeding with disabling Secure Boot.
Verify Firmware Compatibility
Before proceeding with disabling Secure Boot, it is important to verify the compatibility of your system’s firmware. This step ensures that the necessary options and settings are available in the BIOS or UEFI setup.
First, check the manufacturer’s documentation or support website to confirm whether your system supports disabling Secure Boot. Different manufacturers may have varying implementations or names for this feature. Look for information on disabling Secure Boot or modifying firmware security settings.
If the documentation is not readily available, you can access the BIOS or UEFI setup by restarting your computer and pressing the appropriate key during the boot process. Common keys to access the BIOS or UEFI setup include F2, DEL, ESC, or F10. Refer to your computer’s manual or search online for the specific key for your system.
Once you have entered the BIOS or UEFI setup, navigate to the “Security” or “Boot” section, or a similar category where firmware security settings are located. Look for an option related to Secure Boot, such as “Secure Boot Control” or “UEFI Boot.” If you find such an option, it indicates that your system supports Secure Boot and provides the ability to disable or modify it.
If you are unable to locate any Secure Boot-related options in the firmware settings, it is possible that your system does not have support for Secure Boot or that the option is hidden or restricted. In such cases, you may not be able to disable Secure Boot.
It is essential to note that modifying firmware settings carries certain risks. Incorrectly changing settings in the BIOS or UEFI setup can lead to system instability or even render the computer inoperable. To mitigate these risks, it is recommended to proceed with caution and follow the manufacturer’s instructions or guidelines.
Once you have verified the firmware compatibility and ensured that the necessary options are available, you can proceed with disabling Secure Boot. The next section will guide you through the steps required to disable Secure Boot in the BIOS or UEFI setup.
Enter BIOS/UEFI Setup
To disable Secure Boot, you need to access the BIOS (Basic Input/Output System) or UEFI (Unified Extensible Firmware Interface) setup on your computer. This setup allows you to configure various settings related to hardware, security, and boot options.
The process of entering the BIOS/UEFI setup can vary depending on your computer’s manufacturer and model. Generally, you will need to restart your computer and press a specific key during the boot process to access the setup.
Common keys used to enter the BIOS/UEFI setup include F2, DEL, ESC, or F10. You can refer to your computer’s manual or perform a quick online search to find the correct key for your system.
Once you have determined the correct key, restart your computer and press it repeatedly until the BIOS or UEFI setup screen appears. Timing is critical, so make sure to press the key at the right moment.
On some computers, you may see a quick prompt on the screen indicating which key to press to enter the setup. This prompt may only appear for a few seconds, so be attentive.
If you are using a UEFI-based system, the BIOS setup screen might look different, with a more graphical interface and advanced options. However, the process of accessing the setup is generally the same.
In some cases, particularly with newer systems or laptops, you may need to first disable Fast Boot or Quick Boot options in your system’s firmware settings. This step allows for a longer startup time, which gives you enough time to access the BIOS/UEFI setup.
Remember, modifying settings in the BIOS or UEFI setup can have significant impacts on your system’s functionality. Be cautious and follow the manufacturer’s instructions or guidelines to ensure you do not accidentally change any critical settings.
Once you have successfully entered the BIOS/UEFI setup, you are ready to find the Secure Boot settings and proceed with disabling it. The following section will guide you through locating the Secure Boot settings in the setup.
Find Secure Boot Settings
After entering the BIOS/UEFI setup, the next step is to locate the Secure Boot settings. The exact location and naming of these settings can vary depending on your computer’s manufacturer and firmware version.
In the BIOS/UEFI setup, navigate through the different sections or tabs to find the options related to security, boot, or firmware settings. Look for terms such as “Secure Boot,” “Firmware Security,” or “UEFI Boot Options.”
It’s important to note that the BIOS/UEFI setup interface can be different for each manufacturer. Some may offer a search function or provide a list of available options, while others may require manual scanning through menus and submenus.
If you are having trouble finding the Secure Boot settings, refer to the manufacturer’s documentation or support website for specific instructions or screenshots related to your system’s setup.
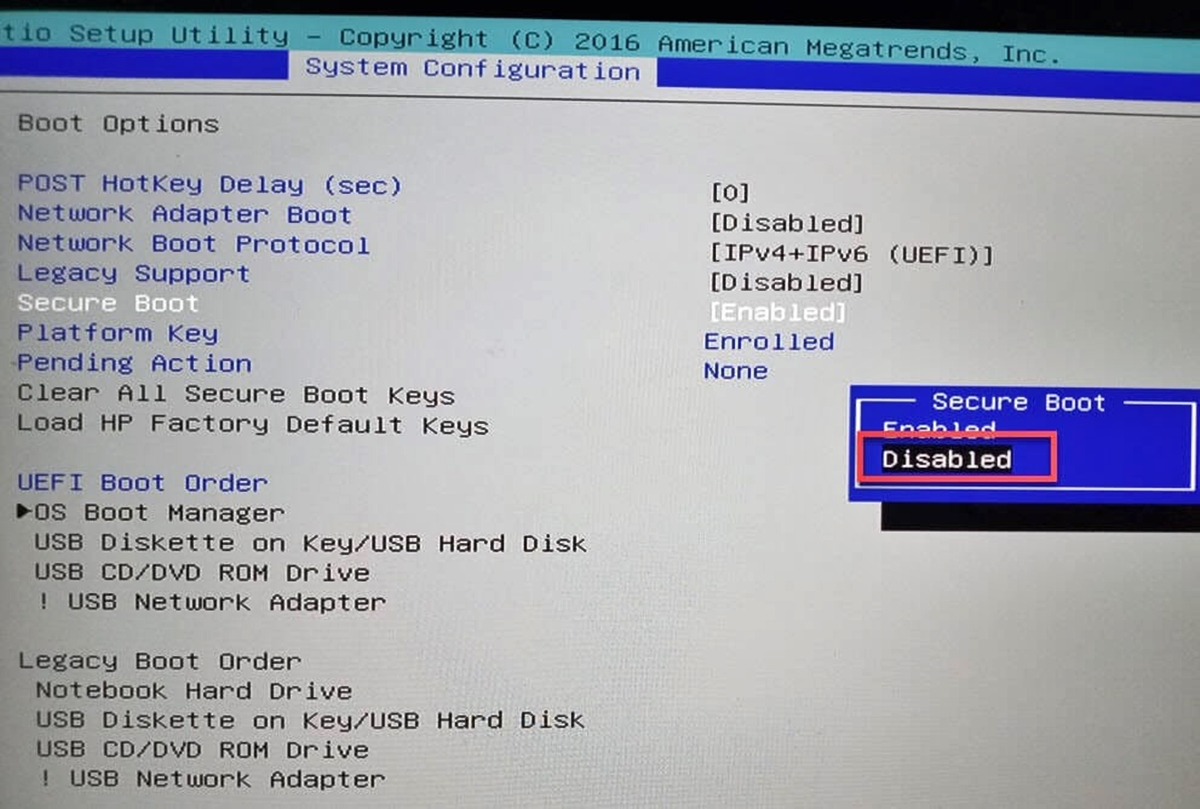
Once you have located the Secure Boot settings, you will typically find options to enable or disable Secure Boot. In some cases, there may be additional options related to Secure Boot, such as customizing the Secure Boot keys or managing the trusted certificate authorities.
Select the option to disable Secure Boot. Keep in mind that the specific steps to disable Secure Boot may vary depending on your system. Some setups may require you to first enter a password or confirm your action before disabling Secure Boot.
Make sure to save any changes made in the BIOS/UEFI setup before exiting. Typically, you can save changes by pressing a designated key, such as F10, or selecting the “Save and Exit” option.
Now that you have successfully found and modified the Secure Boot settings, the next step is to save the changes and exit the BIOS/UEFI setup. We will discuss this process in detail in the following section.
Disable Secure Boot
Now that you have successfully located the Secure Boot settings in the BIOS/UEFI setup, the next step is to disable Secure Boot. Disabling Secure Boot allows you to install and run alternative operating systems or use hardware that may not have the necessary digital signatures.
Select the option to disable Secure Boot. The exact method will vary depending on your system, but it often involves selecting an option such as “Disable,” “Turn Off,” or “Legacy Mode.” Some setups may require you to first enter a password or confirm your action before disabling Secure Boot.
Take note that disabling Secure Boot comes with potential risks, such as an increased vulnerability to unauthorized software or malware. Ensure that you trust the sources of any software you install and regularly update your security software to mitigate these risks.
Once you have disabled Secure Boot, make sure to save any changes made in the BIOS/UEFI setup. Typically, you can save changes by pressing a designated key, such as F10, or selecting the “Save and Exit” option. The setup may prompt you to confirm your changes before saving.
After saving the changes, the BIOS/UEFI setup will exit, and your computer will automatically reboot. During the reboot process, the changes you made to disable Secure Boot will take effect.
It’s important to note that disabling Secure Boot may have an impact on the system’s security and compatibility. Be aware that certain software, drivers, or operating systems may not work properly without Secure Boot enabled. It is recommended to proceed with caution and evaluate the compatibility of your desired software and hardware before disabling Secure Boot.
Once your computer has rebooted, you can proceed to install and run alternative operating systems or use hardware that may not have been previously compatible with Secure Boot. Remember to follow the manufacturer’s guidelines and instructions for installing and configuring any software or hardware.
Now that you have successfully disabled Secure Boot, you can move on to the next section to learn how to verify if Secure Boot is indeed disabled and ensure that your system is functioning correctly.
Save Changes and Exit BIOS/UEFI Setup
After disabling Secure Boot in the BIOS/UEFI setup, it’s important to save any changes you made and exit the setup. Saving the changes ensures that the modifications you made to the firmware settings take effect.
The process of saving changes and exiting the BIOS/UEFI setup may vary slightly depending on your system. However, the basic steps are typically the same.
Look for an option that allows you to save changes and exit, such as “Save and Exit,” “Save Changes and Restart,” or a similar option. This option is usually located in the main menu or submenu of the BIOS/UEFI setup.
Press the designated key that corresponds with the save and exit option. Common keys include F10, ESC, or a specific function key indicated on the screen.
If prompted, confirm your decision to save changes. The setup may display a message asking if you want to save changes and exit. Use the arrow keys to highlight the “Yes” or “OK” option and press Enter to confirm.
After saving changes and exiting the BIOS/UEFI setup, your computer will automatically reboot. During the reboot process, the modifications you made to disable Secure Boot will take effect.
It’s important to let the computer restart without interruption to ensure that the changes are properly implemented. Avoid pressing any keys or interrupting the boot process.
After the computer has finished rebooting, you can proceed to the next step, which involves booting into your preferred operating system. This step will allow you to verify that Secure Boot is indeed disabled and confirm that your system is functioning correctly.
Now that you have successfully saved changes and exited the BIOS/UEFI setup, you’re ready to boot into your operating system. The following section will guide you through the process of booting into your preferred operating system.
Boot into Operating System
After saving changes and exiting the BIOS/UEFI setup, the next step is to boot into your operating system. This process will allow you to verify whether Secure Boot is disabled and ensure that your system is functioning correctly.
Restart your computer if it hasn’t already done so automatically after saving the changes. As the system boots up, pay attention to any messages or logos displayed on the screen.
If your system is set to boot from the hard drive by default, it will automatically proceed to the operating system without any additional input required. In this case, continue to the next step to verify Secure Boot status.
If your system doesn’t automatically boot into the operating system or if you want to boot into a different operating system, press the appropriate key during the boot process to access the boot menu. Common keys for accessing the boot menu are F12, F8, or ESC. Refer to your computer’s manual or perform an online search for the specific key for your system.
Once in the boot menu, use the arrow keys to highlight the desired operating system from the available options. Press Enter to select it. If you have multiple operating systems installed, you may see a menu allowing you to choose which one to boot into.
Allow the system to complete the boot process into the selected operating system. Once the operating system is fully loaded, you can proceed to verify the status of Secure Boot.
To check if Secure Boot is disabled, you can use various methods depending on your operating system. One common method is to access the system settings or control panel and look for a security or boot-related section. Look for an option or description that indicates the status of Secure Boot. If it shows as “Disabled,” then you have successfully disabled Secure Boot.
It’s important to note that the specific steps to verify Secure Boot status may vary depending on the operating system you are using. Refer to the documentation or support resources for your specific operating system if you have trouble locating the Secure Boot status.
Once you have confirmed that Secure Boot is disabled and your system is functioning correctly, you can begin using your preferred operating system with the necessary flexibility and compatibility provided by disabling Secure Boot.
Now that you have successfully booted into your operating system and verified Secure Boot status, you can proceed to the final section to ensure that Secure Boot remains disabled in your system.
Verify Secure Boot is Disabled
After disabling Secure Boot and booting into your operating system, it’s important to verify that Secure Boot is indeed disabled. This step ensures that your system is running without the Secure Boot restrictions and allows you to confirm the changes made in the BIOS/UEFI setup.
To verify Secure Boot status, you can use different methods depending on the operating system you are using. One common method is to access the system settings or control panel and look for a security or boot-related section.
In Windows, go to the Settings menu and select “Update & Security.” From there, choose “Recovery” and click on the “Restart now” button under “Advanced Startup.” This will restart your computer into the Advanced Startup options. Choose “Troubleshoot,” then “Advanced options,” and finally “UEFI Firmware Settings.” This will take you back to the BIOS/UEFI setup, where you can confirm that Secure Boot is disabled.
In Linux, you can open a terminal and enter the command “mokutil –sb-state” to check the Secure Boot status. If it returns “SecureBoot disabled,” then Secure Boot is correctly disabled on your system.
Another way to check Secure Boot status is to consult your operating system’s documentation or support resources. They may have specific instructions or utilities that allow you to verify the status of Secure Boot.
It’s important to note that if Secure Boot is still enabled or there are indications of it being enabled, you may need to revisit the BIOS/UEFI setup and ensure that the changes to disable Secure Boot were saved successfully.
If you encounter difficulties verifying the Secure Boot status or suspect that it is still enabled, consult the manufacturer’s documentation or support for guidance on properly disabling Secure Boot on your specific system.
Once you have confirmed that Secure Boot is disabled, you can continue using your system with the added flexibility and compatibility that comes with disabling this security feature.
Remember that disabling Secure Boot can potentially expose your system to certain risks, such as unauthorized software or malware. Exercise caution when installing and running software from untrusted sources, and regularly update your security software to mitigate these risks.
Now that you have verified the status of Secure Boot, you can proceed to enjoy the benefits of a system with Secure Boot disabled.