
Why Use Safe Boot?
Safe Boot is a valuable troubleshooting option available on Mac computers that can help you resolve various issues that may be affecting your system’s startup. When you enable Safe Boot, your Mac starts up with only essential system components and disables unnecessary processes and third-party extensions.
There are several reasons why you should consider using Safe Boot when encountering problems with your Mac:
- Troubleshoot Startup Issues: Safe Boot is particularly useful if your Mac is experiencing difficulties starting up. It allows you to isolate and identify any problematic software or extensions that may be causing the issue. By starting up with a minimalist set of resources, you can determine whether the problem lies with your Mac’s hardware or software.
- Reset NVRAM or PRAM: Safe Boot provides a convenient way to reset your Mac’s NVRAM (Non-Volatile Random Access Memory) or PRAM (Parameter Random Access Memory). These memory components store various settings related to your Mac’s startup and performance. By booting into Safe Boot, you can clear and refresh these memory components, potentially resolving issues related to startup, display, and sound settings.
- Repair Disk Permissions: If your Mac is exhibiting unusual behavior or experiencing software-related issues, Safe Boot allows you to repair disk permissions. Disk permissions help ensure that your Mac’s files and folders have the correct read and write access settings. By repairing disk permissions in Safe Boot, you can resolve permission-related problems and improve overall system stability.
- Uninstall Recently Installed Software: If you recently installed new software on your Mac and it’s causing compatibility or stability issues, Safe Boot allows you to uninstall it easily. By entering Safe Boot, you can remove problematic applications and extensions, effectively eliminating any conflicts they may have been causing.
- Run Disk Utility: Safe Boot provides a secure environment to run Disk Utility, a built-in macOS tool that allows you to detect and repair issues with your Mac’s hard drive. By starting up in Safe Boot and running Disk Utility, you can identify and resolve disk errors, ensuring the optimal performance of your Mac.
- Disable Login Items: Safe Boot enables you to disable certain login items, which are applications or processes that automatically launch when you log in to your Mac. If a problematic login item is causing your Mac to freeze or slow down during startup, Safe Boot can help pinpoint and disable it, allowing for a smoother and quicker startup process.
- Identify Hardware Issues: Safe Boot can also be a valuable tool in diagnosing potential hardware issues. By starting up with minimal resources, you can determine if a problem is software or hardware related. If your Mac starts up smoothly in Safe Boot but encounters issues in normal mode, it may indicate a hardware problem that requires further investigation or professional assistance.
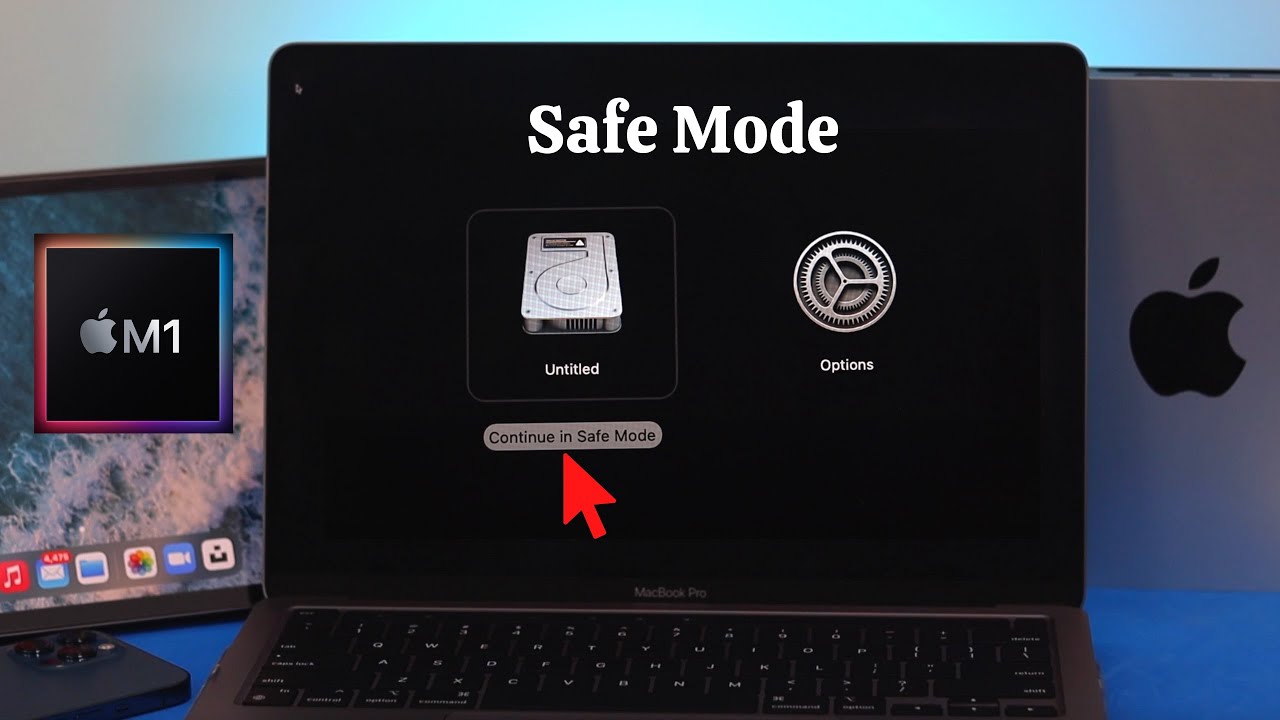
How to Access Safe Boot
Accessing Safe Boot on your Mac is a straightforward process that can be done by following these steps:
- Shut down your Mac completely by selecting “Shut Down” from the Apple menu.
- Once your Mac is powered off, press the power button to turn it back on.
- As soon as you hear the startup sound, press and hold the Shift key on your keyboard.
- Continue holding the Shift key until you see the Apple logo or a progress bar on the screen. This indicates that your Mac is starting up in Safe Boot mode.
- Release the Shift key once the Apple logo or progress bar appears.
Your Mac will now start up in Safe Boot, with only essential system components enabled. You may notice that the startup process takes longer than usual, as your Mac performs various diagnostic and troubleshooting tasks during this mode.
To confirm that you have successfully entered Safe Boot, you can check the login window or the menu bar. In Safe Boot, the words “Safe Boot” may appear in red in the login window or in the top-right corner of the menu bar.
It’s important to note that in Safe Boot, certain features and functionalities may be temporarily disabled or limited. However, this is necessary to create a clean and stable environment for troubleshooting purposes.
When you are finished troubleshooting in Safe Boot mode, you can restart your Mac to exit this mode and return to normal operation. Simply choose “Restart” from the Apple menu, and your Mac will start up in its standard configuration.
While Safe Boot can be incredibly useful for resolving various startup and software-related issues, it’s always a good idea to consult Apple support or professional technicians for more complex or persistent problems that you may encounter with your Mac.
Troubleshooting Startup Issues in Safe Boot
If you’re experiencing startup issues on your Mac, Safe Boot can be an effective troubleshooting method to identify and resolve the underlying problem. Here are some steps to help you troubleshoot startup issues in Safe Boot:
- Observe the Startup Process: Pay close attention to any error messages, unusual behavior, or delays during the startup process. This information can provide valuable clues about the cause of the issue.
- Identify Problematic Software: Start by uninstalling or disabling any recently installed applications or extensions that may be causing conflicts. You can do this by accessing the Applications or Extensions folder and moving the relevant items to the trash or disabling them in System Preferences.
- Repair Disk Permissions: Start up in Safe Boot and use Disk Utility to repair disk permissions. Navigate to Applications > Utilities > Disk Utility, select your startup disk, and choose “Repair Disk Permissions.” This process can help resolve any permission-related issues that might be impacting the startup.
- Reset NVRAM or PRAM: In Safe Boot, you can reset the NVRAM or PRAM to clear any stored settings that could be causing conflicts during startup. Restart your Mac in Safe Boot and hold down the Command + Option + P + R keys until you hear the startup chime for the second time. This will reset the NVRAM or PRAM.
- Check for Hardware Issues: Safe Boot can help determine whether a hardware issue is causing the startup problem. If your Mac starts up smoothly in Safe Boot but encounters issues in normal mode, it’s a good indication that a hardware component or peripheral may be causing the problem. Consider disconnecting external devices and testing the startup process.
- Run Disk Utility: In Safe Boot, you can run Disk Utility to check and repair any errors on your Mac’s hard drive. Launch Disk Utility from the Applications > Utilities folder, select your startup disk, and click on “First Aid.” This will scan and fix any disk-related issues that may be affecting the startup.
- Disable Login Items: Login items are applications or processes that automatically launch during startup. To troubleshoot startup issues, disable all unnecessary login items by going to System Preferences > Users & Groups > Login Items. Remove any items that are not essential and restart your Mac to see if the problem persists.
By going through these troubleshooting steps in Safe Boot mode, you can often identify and resolve the underlying cause of startup issues on your Mac. However, if the problem persists or if you’re unsure about performing these steps, it’s always recommended to seek assistance from Apple support or professional technicians.
Resetting NVRAM or PRAM in Safe Boot
If you’re encountering issues with your Mac’s startup or experiencing unusual system behavior, resetting the NVRAM (Non-Volatile Random Access Memory) or PRAM (Parameter Random Access Memory) can often help. In Safe Boot mode, you can easily perform a reset of these memory components to potentially resolve the problem. Here’s how:
- Start up your Mac in Safe Boot mode: Refer to the previous section for instructions on how to access Safe Boot mode on your Mac.
- Once you’re in Safe Boot mode, restart your Mac: From the Apple menu, choose the “Restart” option to initiate the restart process.
- As your Mac begins to restart, press and hold the following keys:
- Command + Option + P + R: Simultaneously press and hold the Command, Option, P, and R keys on your keyboard.
- Continue holding the keys: Keep holding the keys until you hear the startup chime for the second time or see the Apple logo appear and disappear for a second time. This indicates that the NVRAM or PRAM has been reset.
- Release the keys: Once you’ve heard the startup chime or seen the Apple logo appear and disappear for the second time, you can release the keys. Your Mac will continue starting up normally.
Resetting the NVRAM or PRAM can clear stored settings related to the startup process, display, sound, and other parameters. It’s a safe and straightforward procedure that can often resolve issues caused by corrupted or conflicting settings.
After resetting the NVRAM or PRAM, it’s a good idea to check if the problem you were experiencing has been resolved. If the issue persists, you may need to consider further troubleshooting steps or consult Apple support or professional technicians for assistance.
Remember, resetting the NVRAM or PRAM in Safe Boot mode is just one of many troubleshooting options available to address startup issues on your Mac. If you’re unsure about performing this procedure or need additional help, don’t hesitate to reach out for support.
Repairing Disk Permissions in Safe Boot
Repairing disk permissions is a helpful troubleshooting step that can resolve various software-related issues on your Mac. Safe Boot mode provides a secure environment to perform this task and ensure the stability of your system. Here’s how you can repair disk permissions in Safe Boot:
- Start your Mac in Safe Boot mode: Follow the instructions provided earlier in this article to access Safe Boot mode on your Mac.
- Once in Safe Boot mode, open Disk Utility: Go to the Applications folder, then navigate to the Utilities folder. Locate and open Disk Utility.
- Select your startup disk: In Disk Utility, you’ll see a list of available drives and volumes. Select your startup disk from the list.
- Click on the “First Aid” tab: This tab contains options to verify and repair disk-related issues. Click on “First Aid” to proceed.
- Click on “Repair Disk Permissions”: In the First Aid tab, you’ll find an option to repair disk permissions. Click on this option to initiate the repair process.
- Wait for the repair process to complete: Disk Utility will scan your disk and fix any permission-related issues it finds. The time it takes to complete the repair process can vary depending on the size of your disk and the number of files it contains. Be patient and allow Disk Utility to finish.
- Review the repair results: Once the repair process is complete, Disk Utility will display a summary of the repairs performed. Take note of any specific items that were repaired or modified.
- Restart your Mac: After repairing disk permissions in Safe Boot mode, you can restart your Mac to exit Safe Boot and resume normal operation. Choose the “Restart” option from the Apple menu.
Repairing disk permissions in Safe Boot mode helps ensure that your Mac’s files and folders have the correct read and write access settings. This can improve overall system stability and resolve various software-related issues that may be affecting your Mac’s performance.
However, it’s important to note that starting up in Safe Boot mode and repairing disk permissions should not be seen as a routine maintenance step. In modern versions of macOS, the need for repairing disk permissions has significantly diminished due to advancements in the operating system.
If you continue to experience issues after repairing disk permissions in Safe Boot mode, it’s recommended to explore other troubleshooting steps or seek assistance from Apple support or professional technicians.
Uninstalling Recently Installed Software in Safe Boot
If you have recently installed software on your Mac and it’s causing compatibility or stability issues, Safe Boot mode provides an effective way to uninstall the problematic application or extension. Uninstalling the software in Safe Boot mode can help resolve conflicts and restore your Mac’s normal functionality. Here’s how you can uninstall recently installed software in Safe Boot:
- Start your Mac in Safe Boot mode: Refer to the earlier section for instructions on accessing Safe Boot mode on your Mac.
- Once in Safe Boot mode, open the Applications folder: Go to the Finder and click on “Applications” in the sidebar. This will open the Applications folder, where all your installed applications are located.
- Locate the recently installed software: Look for the application or extension that you suspect is causing the issues. It may be helpful to sort the applications by “Date Modified” to identify recently installed software more easily.
- Remove the software: To uninstall the software, simply drag its icon from the Applications folder to the Trash. Alternatively, you can right-click on the application and select “Move to Trash” from the drop-down menu. You may need to enter your admin password to authorize the removal.
- Empty the Trash: After moving the software to the Trash, right-click on the Trash icon in the dock and choose “Empty Trash.” Confirm the action when prompted. This will permanently delete the software from your Mac.
- Restart your Mac: After uninstalling the problematic software in Safe Boot mode, you can restart your Mac to exit Safe Boot and resume normal operation. Choose the “Restart” option from the Apple menu.
Uninstalling recently installed software in Safe Boot mode allows you to remove applications or extensions that may be causing conflicts or instability on your Mac. By doing so, you can eliminate potential sources of the problem and restore your Mac’s performance.
If you continue to experience issues even after uninstalling the software in Safe Boot mode, it’s advisable to explore additional troubleshooting steps or seek assistance from Apple support or professional technicians.
Running Disk Utility in Safe Boot
Disk Utility is a powerful built-in tool on macOS that allows you to diagnose and repair issues with your Mac’s hard drive. Running Disk Utility in Safe Boot mode provides a secure environment to perform disk checks and maintenance tasks without interference from third-party applications or processes. Here’s how you can run Disk Utility in Safe Boot:
- Start up your Mac in Safe Boot mode: If you’re unsure how to access Safe Boot mode, refer to the earlier section for instructions.
- Open Disk Utility: Go to the Finder and navigate to the Applications folder. From there, open the Utilities folder and locate Disk Utility.
- Select your startup disk: In Disk Utility, you’ll see a list of available drives and volumes. Select your startup disk from the list.
- Click on the “First Aid” tab: This tab contains options to verify and repair disk-related issues. Click on “First Aid” to proceed.
- Click on “Run” or “Verify Disk”: Depending on your macOS version, you may see either a “Run” or “Verify Disk” button. Click on this button to initiate a disk check. Disk Utility will scan your disk for errors and provide a report on its status.
- Review the disk check results: After the disk check completes, Disk Utility will display a summary of the scan results. It will notify you if any issues were found and provide options for repair if necessary.
- Perform necessary repairs: If Disk Utility detects any issues with your disk, click on the “Repair Disk” button to attempt repairs. Disk Utility will attempt to fix any errors it finds on the disk.
- Restart your Mac: After running Disk Utility in Safe Boot, you can restart your Mac to exit Safe Boot mode and resume normal operation. Choose the “Restart” option from the Apple menu.
Running Disk Utility in Safe Boot mode allows you to perform thorough disk checks and make necessary repairs without the interference of third-party software or background processes. It can help resolve disk-related issues and ensure the optimal performance of your Mac.
If you encounter persistent disk errors or if Disk Utility fails to repair the disk in Safe Boot mode, it’s advisable to seek further assistance from Apple support or professional technicians.
Disabling Login Items in Safe Boot
Login items are applications or processes that automatically launch when you log in to your Mac. Sometimes, problematic login items can cause issues during startup, such as slowing down the process or freezing your system. Disabling login items in Safe Boot mode allows you to troubleshoot these issues by preventing them from launching during startup. Here’s how you can disable login items in Safe Boot:
- Start up your Mac in Safe Boot mode: If you’re unsure how to access Safe Boot mode, refer to the earlier section for instructions.
- Open System Preferences: From the Apple menu, select “System Preferences” to open the System Preferences window.
- Go to “Users & Groups”: In the System Preferences window, click on the “Users & Groups” icon. This will open the Users & Groups preferences pane.
- Unlock the preferences pane: If the preferences pane is locked, click on the lock icon in the bottom-left corner of the window and enter your admin password to unlock it.
- Select your user account: In the left sidebar of the Users & Groups preferences pane, select your user account.
- Go to the “Login Items” tab: In the main window, click on the “Login Items” tab. This tab displays the list of applications and processes that launch during startup.
- Select the login items you want to disable: Review the list of login items and uncheck the box next to each item you want to disable during startup. This prevents them from launching automatically.
- Restart your Mac: After disabling the login items in Safe Boot mode, you can restart your Mac to exit Safe Boot mode and resume normal operation. Choose the “Restart” option from the Apple menu.
By disabling login items in Safe Boot mode, you can troubleshoot startup issues caused by problematic applications or processes. This allows you to pinpoint the specific login items that may be causing conflicts during startup.
If disabling login items in Safe Boot mode resolves the startup issues, you can selectively re-enable them one by one to determine which login item is causing the problem. This helps identify the problematic software and decide whether to keep it disabled or seek further troubleshooting or updates for that particular application or process.
If you continue to experience startup issues even after disabling login items in Safe Boot mode, it’s recommended to explore additional troubleshooting steps or consult Apple support or professional technicians for further assistance.
Using Safe Boot to Identify Hardware Issues
If you suspect that your Mac is experiencing hardware issues, Safe Boot mode can be a valuable tool in diagnosing and identifying the underlying problem. By starting up in Safe Boot mode, you can determine whether the issue is software-related or if it is caused by a hardware component. Here’s how you can use Safe Boot mode to identify hardware issues:
- Start up your Mac in Safe Boot mode: Refer to the earlier section for instructions on how to access Safe Boot mode on your Mac.
- Observe the startup process: Pay close attention to any error messages, unusual behavior, or delays during the startup process. This information can provide valuable clues about the nature of the issue.
- Note any improvements or differences: As your Mac starts up in Safe Boot mode, take note of any improvements or differences in performance compared to normal mode. If your Mac functions smoothly in Safe Boot mode but encounters issues in normal mode, it suggests a potential hardware problem.
- Disconnect external devices: If you have any external devices connected to your Mac, try disconnecting them while in Safe Boot mode. Faulty or incompatible external hardware can sometimes cause startup problems or affect system performance.
- Test system functionality: While in Safe Boot mode, test the functionality of various hardware components, such as the keyboard, mouse, display, and audio. Check for any abnormalities or inconsistencies that may indicate a hardware issue.
- Examine performance in normal mode: After the initial testing in Safe Boot mode, restart your Mac and observe its performance in normal mode. If the same issues persist, it is likely a hardware problem that requires further investigation or professional assistance.
Using Safe Boot mode to identify hardware issues can help narrow down the source of the problem. If your Mac functions properly in Safe Boot mode but encounters issues in normal mode, it suggests that the problem is likely related to hardware rather than software.
However, it’s important to note that Safe Boot mode is not a definitive hardware diagnostic tool. It can only provide indications and clues about potential hardware issues. If you suspect a hardware problem on your Mac, it is recommended to consult Apple support or professional technicians who can conduct more comprehensive hardware diagnostics and repairs.
Exiting Safe Boot and Restarting Normally
Once you have finished troubleshooting or performing necessary tasks in Safe Boot mode, you’ll want to exit Safe Boot and return your Mac to its normal operating mode. Here’s how you can exit Safe Boot and restart your Mac normally:
- Save your work and close any open applications: It’s always a good practice to save your work and close any applications you have open before proceeding.
- Click on the Apple menu: Located in the top-left corner of the screen, click on the Apple menu to reveal a drop-down menu.
- Select the “Restart” option: From the drop-down menu, choose the “Restart” option. This will initiate the restart process for your Mac.
- Wait for your Mac to shut down and start up again: Your Mac will shut down and then start up again in its normal operating mode. The process may take a little longer than usual as your Mac goes through its regular startup routine.
After restarting your Mac, it should return to its normal state with all of its original settings and configurations intact. The changes made during Safe Boot mode, including any repairs or adjustments, will be applied to your Mac’s startup process.
If you were troubleshooting an issue, monitor your Mac’s performance after restarting to see if the problem has been resolved. If the issue persists, you may need to explore additional troubleshooting steps or seek assistance from Apple support or professional technicians.
Remember, Safe Boot mode is a powerful tool for diagnosing and resolving software-related issues, but it may not always be a definitive solution. If you encounter persistent problems or suspect a hardware issue, it’s always a good idea to consult with experts who can provide the necessary guidance and support.