
What is Error Reporting in Windows
Error Reporting is a feature in Windows that automatically collects and sends error reports to Microsoft when a program or system error occurs. This allows Microsoft to analyze and diagnose the error, and provide potential solutions or updates to fix them. Error Reporting helps improve the stability and reliability of the Windows operating system by highlighting common errors and allowing developers to address them.
When an error occurs, Windows collects information about the error, such as the type of error, the program or system component involved, and the actions that were being performed at the time of the error. This information is then sent to Microsoft, where it is analyzed to determine the cause of the error and find ways to prevent similar errors in the future.
Error Reporting is enabled by default in Windows to ensure that Microsoft receives valuable feedback on system errors and can provide necessary updates or patches. However, some users may prefer to disable Error Reporting for various reasons. This could be due to privacy concerns, a desire to minimize system resource usage, or simply a preference for not sharing error information with Microsoft.
Disabling Error Reporting does not affect the performance or functionality of Windows itself. It simply stops sending error reports to Microsoft. However, it’s worth noting that disabling Error Reporting may prevent you from receiving important updates or fixes for known issues.
In the next sections, we will explore different methods to disable Error Reporting in Windows, including using the Control Panel, Registry Editor, and specific applications. It’s important to note that altering system settings carries some level of risk, so proceed with caution and make sure to create backups or restore points before making any changes.
Why Disable Error Reporting
While Error Reporting in Windows can be beneficial for Microsoft to gather information and improve the overall stability of the operating system, there are several reasons why some users may choose to disable it:
- Privacy: Disabling Error Reporting ensures that no error information is sent to Microsoft. This can be important for users who are concerned about their privacy and do not want to share any data with external parties.
- Resource Usage: Error Reporting requires system resources to collect and transmit error reports. By disabling it, you can free up some system resources, resulting in potentially improved system performance.
- Customization: Some users prefer to have complete control over their system and may find it unnecessary to send error reports to Microsoft. Disabling Error Reporting allows them to customize their user experience according to their preferences.
- Personalized Solutions: Disabling Error Reporting may encourage users to actively seek and implement their own solutions to errors. This hands-on approach can provide a deeper understanding of the problem and the opportunity to find tailored solutions instead of relying on generic updates or patches from Microsoft.
- Reducing Distractions: The constant appearance of error messages or prompts to send error reports can be distracting and interrupt workflow. By disabling Error Reporting, users can eliminate these interruptions and focus on their tasks without unnecessary interruptions.
It’s important to note that while disabling Error Reporting can have its advantages, it also has its drawbacks. Without error reports, Microsoft may have less information to analyze and diagnose system errors, potentially leading to delayed fixes or updates for certain issues. Therefore, it’s recommended to carefully consider the pros and cons before deciding to disable Error Reporting.
How to Disable Error Reporting using the Control Panel
Disabling Error Reporting in Windows can be done using the Control Panel. Follow these steps to disable Error Reporting:
- Open the Control Panel by searching for it in the Start menu or right-clicking the Start button and selecting Control Panel.
- In the Control Panel, navigate to the “System and Security” category and click on “Action Center” or “Security and Maintenance”.
- On the left side of the window, click on “Change Action Center settings” or “Change Security and Maintenance settings” to access the Action Center settings.
- Scroll down and locate the “Maintenance” section. Here, you will find an option related to “Problem Reporting Settings”. Click on it.
- A new window will appear. In this window, you will see options to customize error reporting settings. To disable Error Reporting, select the option that says “Never check for solutions” and click “OK”.
- Once you have made this change, Error Reporting will be disabled on your Windows system. You will no longer receive prompts to send error reports to Microsoft.
It’s important to remember that disabling Error Reporting through the Control Panel will only affect the current user account. If you have multiple user accounts on your computer, you may need to repeat these steps for each account if you want to disable Error Reporting system-wide.
Additionally, it’s worth noting that the steps may vary slightly depending on the version of Windows you are using. However, the general process of accessing the Control Panel and navigating to the Action Center or Security and Maintenance settings remains the same.
How to Disable Error Reporting using the Registry Editor
If you prefer a more advanced method to disable Error Reporting in Windows, you can utilize the Registry Editor. Here are the steps to disable Error Reporting using the Registry Editor:
- Press the Windows key + R on your keyboard to open the Run dialog box.
- Type “regedit” in the Run dialog box and press Enter. This will open the Registry Editor.
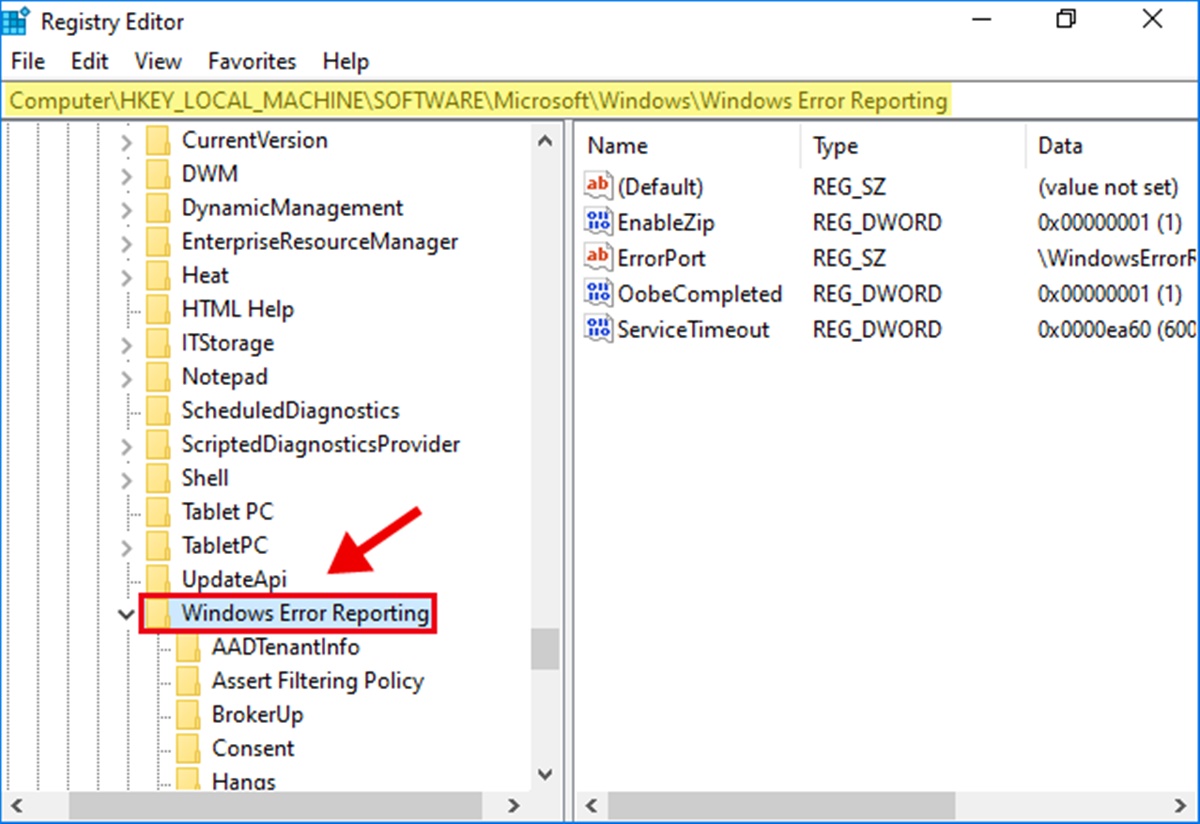
- In the Registry Editor, navigate to the following location:
HKEY_LOCAL_MACHINE\SOFTWARE\Microsoft\Windows\Windows Error Reporting. You can do this by expanding the folders in the left-hand pane. - Within the
Windows Error Reportingfolder, you will find a key calledDisabled. If this key does not exist, you will need to create it.
To create theDisabledkey, right-click on theWindows Error Reportingfolder, select New, and then click on “DWORD (32-bit) Value”. Name the new value asDisabled. - Double-click on the
Disabledkey and set its value data to1. This will disable Error Reporting. - Click on “OK” to save the changes.
- You can now close the Registry Editor. The changes will take effect immediately, and Error Reporting will be disabled on your Windows system.
As a precautionary measure, it is highly recommended to back up your registry before making any changes to it. This will allow you to restore the registry in case any issues arise.
Please note that modifying the registry can have serious consequences if not done correctly. Proceed with caution and follow the steps accurately to avoid any unforeseen problems.
How to Disable Error Reporting for Specific Programs
If you want to disable Error Reporting for specific programs on your Windows system, you can make use of the Problem Reports and Solutions feature. Here’s how to do it:
- Open the Control Panel by searching for it in the Start menu or right-clicking the Start button and selecting Control Panel.
- In the Control Panel, navigate to the “System and Security” category and click on “Action Center” or “Security and Maintenance”.
- On the left side of the window, click on “Change Action Center settings” or “Change Security and Maintenance settings” to access the Action Center settings.
- Scroll down and locate the “Maintenance” section. Here, you will find an option related to “Problem Reporting Settings”. Click on it.
- A new window will appear. In this window, click on “Change report settings for all problems”.
- In the list of programs, locate the specific program for which you want to disable Error Reporting. Uncheck the box next to the program name to disable Error Reporting for that program.
- Click on “OK” to save the changes.
By following these steps, you can selectively disable Error Reporting for specific programs on your Windows system. This allows you to control which programs send error reports to Microsoft and which ones do not.
Please note that this method only applies to the Problem Reports and Solutions feature and may not apply to all programs. Some programs may have their own built-in error reporting mechanisms, and you may need to consult their documentation or settings to disable error reporting within the program itself.
How to Disable Error Reporting for Windows Store Apps
If you want to disable Error Reporting specifically for Windows Store apps on your Windows system, you can make use of the Windows Error Reporting service settings. Here’s how to do it:
- Press the Windows key + R on your keyboard to open the Run dialog box.
- Type “services.msc” in the Run dialog box and press Enter. This will open the Services window.
- In the Services window, scroll down and locate the “Windows Error Reporting Service”.
- Right-click on the “Windows Error Reporting Service” and select “Properties”.
- In the Properties window, under the “General” tab, locate the “Startup type” section.
- From the dropdown menu, select “Disabled” to disable the Windows Error Reporting Service for Windows Store apps.
- Click on “Apply” and then “OK” to save the changes.
By following these steps, you can disable the Windows Error Reporting Service specifically for Windows Store apps on your Windows system. This will prevent error reports from being sent for the Windows Store apps installed on your computer.
Please note that disabling the Windows Error Reporting Service for Windows Store apps may limit the ability to receive updates or fixes specifically targeted at Windows Store apps. It’s recommended to weigh the advantages and disadvantages before making this change.
It’s worth noting that the steps outlined above only apply to Windows Store apps. If you want to disable Error Reporting for other programs or components, you may need to explore different methods specific to those programs or components.
How to Disable Error Reporting for Microsoft Office Applications
If you want to disable Error Reporting specifically for Microsoft Office applications on your Windows system, you can make use of the Error Reporting settings within the Office applications themselves. Here’s how to do it:
- Open any Microsoft Office application, such as Word, Excel, or PowerPoint.
- Click on the “File” tab in the top-left corner of the application window.
- From the left-hand side menu, click on “Options”.
- In the Options window, navigate to the “Trust Center” category.
- Click on the “Trust Center Settings” button.
- In the Trust Center window, click on “Privacy Options”.
- Under the “Error Reporting” section, uncheck the box that says “Enable Error Reporting”.
- Click on “OK” to save the changes.
By following these steps, you can disable Error Reporting specifically for Microsoft Office applications. This will prevent error reports from being sent for any Microsoft Office application on your Windows system, such as Word, Excel, PowerPoint, and Outlook.
Please note that disabling Error Reporting for Microsoft Office applications may limit the ability to receive updates or fixes specifically targeted at Office applications. It’s recommended to weigh the advantages and disadvantages before making this change.
It’s worth noting that the steps outlined above are specific to Microsoft Office applications. If you want to disable Error Reporting for other programs or components, you may need to explore different methods specific to those programs or components.
How to Disable Error Reporting for Windows Updates
If you want to disable Error Reporting specifically for Windows Updates on your Windows system, you can make use of the Windows Update settings. Here’s how to do it:
- Open the Control Panel by searching for it in the Start menu or right-clicking the Start button and selecting Control Panel.
- In the Control Panel, navigate to the “System and Security” category and click on “Windows Update”.
- In the Windows Update window, click on “Change settings” in the left-hand side menu.
- Under the “Important Updates” section, click on the dropdown menu and select “Never check for updates”.
- Scroll down to the bottom of the window and uncheck the box that says “Give me updates for other Microsoft products…”.
- Click on “OK” to save the changes.
By following these steps, you can disable Error Reporting specifically for Windows Updates. This will prevent error reports from being sent for Windows Updates on your Windows system.
It’s important to note that disabling Error Reporting for Windows Updates may prevent you from receiving important updates or fixes for known issues. It’s recommended to regularly check for updates manually or re-enable automatic updates after a specific period to ensure your system stays up to date.
It’s worth noting that the steps outlined above specifically apply to Windows Updates. If you want to disable Error Reporting for other programs or components, you may need to explore different methods specific to those programs or components.
How to Disable Error Reporting for Windows Hardware Errors
If you want to disable Error Reporting specifically for Windows hardware errors on your Windows system, you can make use of the Advanced System Settings. Here’s how to do it:
- Press the Windows key + Pause/Break key on your keyboard. This will open the System window.
- On the left-hand side of the window, click on “Advanced system settings”.
- In the System Properties window, navigate to the “Advanced” tab.
- Under the “Startup and Recovery” section, click on the “Settings” button.
- In the Startup and Recovery window, under the “System failure” section, you will find options related to debugging and error reporting.
- Uncheck the box that says “Automatically restart” to prevent automatic restart after a hardware error.
- Additionally, you can uncheck the box that says “Write debugging information” to disable the creation of memory dump files.
- Click on “OK” to save the changes.
By following these steps, you can disable Error Reporting specifically for Windows hardware errors. This will prevent the automatic restart of your system and the creation of memory dump files in the event of a hardware error.
Disabling Error Reporting for hardware errors can be helpful when troubleshooting hardware-related issues. It allows you to manually handle the system restart and gather any necessary information for further analysis.
It’s worth noting that the steps outlined above apply to the System Properties of Windows. If you want to disable Error Reporting for other specific hardware components or drivers, you may need to explore different methods specific to those components.
How to Disable Error Reporting for Windows Kernel Errors
If you want to disable Error Reporting specifically for Windows kernel errors on your Windows system, you can make changes to the Group Policy settings. Here’s how to do it:
- Press the Windows key + R on your keyboard to open the Run dialog box.
- Type “gpedit.msc” in the Run dialog box and press Enter. This will open the Local Group Policy Editor.
- In the Local Group Policy Editor, navigate to the following path:
- In the right-hand pane, double-click on the policy named “Turn off Windows Error Reporting”.
- Select the “Enabled” option to turn off the Windows Error Reporting feature.
- Click on “OK” to save the changes.
Computer Configuration > Administrative Templates > System > Internet Communication Management > Internet Communication Settings
By following these steps, you can disable Error Reporting specifically for Windows kernel errors. This will prevent Windows from sending error reports related to kernel errors to Microsoft.
Disabling Error Reporting for kernel errors can be helpful when dealing with kernel-related issues. It allows you to handle errors locally and gather necessary information for further analysis or troubleshooting.
It’s important to note that the Local Group Policy Editor is only available in Windows Pro, Enterprise, and Education editions. If you have a different edition of Windows, you may need to explore alternative methods specific to your edition to disable Error Reporting for kernel errors.
How to Disable Error Reporting for Windows User Interface Errors
If you want to disable Error Reporting specifically for Windows user interface errors on your Windows system, you can make changes to the Group Policy settings. Here’s how to do it:
- Press the Windows key + R on your keyboard to open the Run dialog box.
- Type “gpedit.msc” in the Run dialog box and press Enter. This will open the Local Group Policy Editor.
- In the Local Group Policy Editor, navigate to the following path:
- In the right-hand pane, double-click on the policy named “Turn off Windows Error Reporting”.
- Select the “Enabled” option to turn off the Windows Error Reporting feature.
- Click on “OK” to save the changes.
Computer Configuration > Administrative Templates > System > Internet Communication Management > Internet Communication Settings
By following these steps, you can disable Error Reporting specifically for Windows user interface errors. This will prevent Windows from sending error reports related to user interface errors to Microsoft.
Disabling Error Reporting for user interface errors can be helpful when dealing with issues related to the visual components and interaction of the Windows operating system. It allows you to handle errors locally and gather necessary information for further analysis or troubleshooting.
It’s worth noting that the Local Group Policy Editor is only available in Windows Pro, Enterprise, and Education editions. If you have a different edition of Windows, you may need to explore alternative methods specific to your edition to disable Error Reporting for user interface errors.
How to Disable Error Reporting for Internet Explorer Errors
If you want to disable Error Reporting specifically for Internet Explorer errors on your Windows system, you can make changes to the Internet Options. Here’s how to do it:
- Open Internet Explorer on your Windows system.
- Click on the gear icon in the top-right corner of the browser window to open the Tools menu.
- From the Tools menu, select “Internet Options”.
- In the Internet Options window, navigate to the “Advanced” tab.
- Scroll down until you find the “Browsing” section.
- Uncheck the box that says “Disable script debugging (Internet Explorer)” and “Disable script debugging (Other)” to prevent script error reporting in Internet Explorer.
- Also, uncheck the box that says “Display a notification about every script error” to disable the display of script error notifications.
- Click on “Apply” and then “OK” to save the changes.
By following these steps, you can disable Error Reporting specifically for Internet Explorer errors. This will prevent script errors and related error reports from being sent to Microsoft.
Disabling Error Reporting for Internet Explorer errors can be helpful when dealing with issues related to scripts or web pages that cause errors in the browser. It allows you to handle errors locally and prevents annoying script error notifications from appearing.
Please note that these settings are specific to Internet Explorer and may not apply to other web browsers. If you use a different browser, you may need to explore the settings or options specific to that browser to disable Error Reporting for browser errors.
How to Disable Error Reporting for Windows Media Player Errors
If you want to disable Error Reporting specifically for Windows Media Player errors on your Windows system, you can modify the error reporting settings within Windows Media Player itself. Here’s how to do it:
- Open Windows Media Player on your Windows system.
- Click on the “Organize” button in the top-left corner of the application window.
- From the drop-down menu, select “Options”.
- In the Options window, click on the “Player” tab.
- Scroll down to the “Privacy” section.
- Uncheck the box that says “Send unique Player IDs to content providers” to prevent error reports related to Player IDs.
- Uncheck the box that says “Download usage rights automatically when I play or sync a file” if you don’t want automatic error reporting when playing or syncing files.
- Click on “Apply” and then “OK” to save the changes.
By following these steps, you can disable Error Reporting specifically for Windows Media Player errors. This will prevent error reports related to Player IDs and the automatic downloading of usage rights from being sent to Microsoft.
Disabling Error Reporting for Windows Media Player errors can be helpful when dealing with issues related to the player’s functionality or when you prefer to control the information shared with Microsoft.
Please note that these settings are specific to Windows Media Player, and may not apply to other media players installed on your system. If you use a different media player, you may need to explore the settings or options specific to that player to disable Error Reporting for its errors.
How to Disable Error Reporting for Windows Firewall Errors
If you want to disable Error Reporting specifically for Windows Firewall errors on your Windows system, you can make changes to the Windows Error Reporting settings. Here’s how to do it:
- Open the Control Panel by searching for it in the Start menu or right-clicking the Start button and selecting Control Panel.
- In the Control Panel, navigate to the “System and Security” category and click on “Action Center” or “Security and Maintenance”.
- On the left side of the window, click on “Change Action Center settings” or “Change Security and Maintenance settings” to access the Action Center settings.
- Scroll down and locate the “Maintenance” section. Here, you will find an option related to “Problem Reporting Settings”. Click on it.
- A new window will appear. In this window, click on “Change report settings for all problems”.
- In the list of programs, locate “Windows Firewall” and select the option that says “Never check for solutions”.
- Click on “OK” to save the changes.
By following these steps, you can disable Error Reporting specifically for Windows Firewall errors. This will prevent error reports related to Windows Firewall from being sent to Microsoft.
Disabling Error Reporting for Windows Firewall errors can be helpful when dealing with issues related to the firewall’s functionality or when you prefer to handle errors locally instead of reporting them to Microsoft.
It’s important to note that these settings will only disable Error Reporting for Windows Firewall errors and not affect other error reports from different applications or components.
How to Disable Error Reporting for Windows Security Center Errors
If you want to disable Error Reporting specifically for Windows Security Center errors on your Windows system, you can make changes to the Windows Error Reporting settings. Here’s how to do it:
- Open the Control Panel by searching for it in the Start menu or right-clicking the Start button and selecting Control Panel.
- In the Control Panel, navigate to the “System and Security” category and click on “Action Center” or “Security and Maintenance”.
- On the left side of the window, click on “Change Action Center settings” or “Change Security and Maintenance settings” to access the Action Center settings.
- Scroll down and locate the “Maintenance” section. Here, you will find an option related to “Problem Reporting Settings”. Click on it.
- A new window will appear. In this window, click on “Change report settings for all problems”.
- In the list of programs, locate “Security Center” and select the option that says “Never check for solutions”.
- Click on “OK” to save the changes.
By following these steps, you can disable Error Reporting specifically for Windows Security Center errors. This will prevent error reports related to Windows Security Center from being sent to Microsoft.
Disabling Error Reporting for Windows Security Center errors can be helpful when dealing with issues related to the Security Center’s functionality or when you prefer to handle errors locally instead of reporting them to Microsoft.
It’s important to note that these settings will only disable Error Reporting for Windows Security Center errors and not affect other error reports from different applications or components.
How to Disable Error Reporting for Windows Defender Errors
If you want to disable Error Reporting specifically for Windows Defender errors on your Windows system, you can make changes to the Windows Error Reporting settings. Here’s how to do it:
- Open the Control Panel by searching for it in the Start menu or right-clicking the Start button and selecting Control Panel.
- In the Control Panel, navigate to the “System and Security” category and click on “Action Center” or “Security and Maintenance”.
- On the left side of the window, click on “Change Action Center settings” or “Change Security and Maintenance settings” to access the Action Center settings.
- Scroll down and locate the “Maintenance” section. Here, you will find an option related to “Problem Reporting Settings”. Click on it.
- A new window will appear. In this window, click on “Change report settings for all problems”.
- In the list of programs, locate “Windows Defender” and select the option that says “Never check for solutions”.
- Click on “OK” to save the changes.
By following these steps, you can disable Error Reporting specifically for Windows Defender errors. This will prevent error reports related to Windows Defender from being sent to Microsoft.
Disabling Error Reporting for Windows Defender errors can be helpful when dealing with issues related to Windows Defender’s functionality or when you prefer to handle errors locally instead of reporting them to Microsoft.
It’s important to note that these settings will only disable Error Reporting for Windows Defender errors and not affect other error reports from different applications or components.
How to Disable Error Reporting for Windows Search Errors
If you want to disable Error Reporting specifically for Windows Search errors on your Windows system, you can make changes to the Windows Error Reporting settings. Here’s how to do it:
- Open the Control Panel by searching for it in the Start menu or right-clicking the Start button and selecting Control Panel.
- In the Control Panel, navigate to the “System and Security” category and click on “Action Center” or “Security and Maintenance”.
- On the left side of the window, click on “Change Action Center settings” or “Change Security and Maintenance settings” to access the Action Center settings.
- Scroll down and locate the “Maintenance” section. Here, you will find an option related to “Problem Reporting Settings”. Click on it.
- A new window will appear. In this window, click on “Change report settings for all problems”.
- In the list of programs, locate “Windows Search” and select the option that says “Never check for solutions”.
- Click on “OK” to save the changes.
By following these steps, you can disable Error Reporting specifically for Windows Search errors. This will prevent error reports related to Windows Search from being sent to Microsoft.
Disabling Error Reporting for Windows Search errors can be helpful when dealing with issues related to the search functionality of Windows or when you prefer to handle errors locally instead of reporting them to Microsoft.
It’s important to note that these settings will only disable Error Reporting for Windows Search errors and not affect other error reports from different applications or components.
How to Disable Error Reporting for Windows Networking Errors
If you want to disable Error Reporting specifically for Windows networking errors on your Windows system, you can make changes to the Windows Error Reporting settings. Here’s how to do it:
- Open the Control Panel by searching for it in the Start menu or right-clicking the Start button and selecting Control Panel.
- In the Control Panel, navigate to the “System and Security” category and click on “Action Center” or “Security and Maintenance”.
- On the left side of the window, click on “Change Action Center settings” or “Change Security and Maintenance settings” to access the Action Center settings.
- Scroll down and locate the “Maintenance” section. Here, you will find an option related to “Problem Reporting Settings”. Click on it.
- A new window will appear. In this window, click on “Change report settings for all problems”.
- In the list of programs, locate “Windows Networking” and select the option that says “Never check for solutions”.
- Click on “OK” to save the changes.
By following these steps, you can disable Error Reporting specifically for Windows networking errors. This will prevent error reports related to networking issues from being sent to Microsoft.
Disabling Error Reporting for Windows networking errors can be helpful when dealing with networking-related problems or when you prefer to handle errors locally instead of reporting them to Microsoft.
It’s important to note that these settings will only disable Error Reporting for Windows networking errors and not affect other error reports from different applications or components.