
What is Fragmentation?
Fragmentation is a common issue that occurs on computers, particularly on hard disk drives (HDDs). It happens when files are divided into smaller fragments and scattered across different portions of the hard drive. As a result, the data becomes fragmented, and the system has to work harder to access and retrieve it.
When files are saved or deleted on a computer, the operating system tries to find contiguous space on the hard drive to store the data. However, over time, as files are created, modified, and deleted, the free space on the hard drive becomes fragmented by small chunks of data. This can lead to slower performance and longer load times for applications and files.
There are two types of fragmentation: file fragmentation and free space fragmentation. File fragmentation occurs when a single file is split into multiple fragments and stored in non-contiguous sectors of the hard drive. On the other hand, free space fragmentation refers to the scattering of free space across the hard drive, making it difficult to allocate contiguous space for new files.
Fragmentation can significantly impact the performance of a computer. When files are fragmented, the read/write heads of the hard drive need to access different areas of the disk to retrieve all the fragments of a file. This leads to increased seek times and slower data access, resulting in decreased overall system speed.
Furthermore, the more fragmented a hard drive becomes, the more space is wasted. Fragmentation can cause the system to allocate larger amounts of disk space to store fragmented files, reducing the amount of available space for new files. This can lead to decreased storage capacity and a need for frequent disk cleanups.
Overall, fragmentation is a natural occurrence that happens as files are created, modified, and deleted on a computer. However, it is essential to address fragmentation and perform defragmentation regularly to maintain optimal system performance and efficiency.
Why is Defragmentation Important?
Defragmentation is the process of reorganizing the fragmented data on a hard drive to improve system performance. It plays a crucial role in maintaining the efficiency and longevity of a computer. Here are several reasons why defragmentation is important:
1. Improved Speed and Performance: When files are fragmented, the system takes longer to access and retrieve data. Defragmenting the hard drive rearranges the fragmented files, allowing the system to retrieve them more efficiently. This leads to faster load times for applications, quicker file transfers, and overall improved system performance.
2. Extended Lifespan of the Hard Drive: Fragmentation can cause excessive wear and tear on the hard drive. The constant movement of the read/write heads to access fragmented files can lead to mechanical stress, increasing the risk of disk failure. By regularly defragmenting the hard drive, you can reduce the strain on the drive and extend its lifespan.
3. Increased Storage Space: Fragmentation can cause unnecessary wastage of disk space. When files are fragmented, small gaps between fragments are left, resulting in more space being used than necessary. Defragmenting the hard drive consolidates the fragmented files and frees up additional disk space, allowing you to store more data.
4. Enhanced System Stability: Fragmentation can lead to system instability and crashes. When files are scattered across different parts of the hard drive, the system may encounter difficulty retrieving them, resulting in errors and instability. Defragmenting the hard drive can help eliminate these issues, providing a more stable and reliable computing experience.
5. Improved Boot Times: Fragmentation can significantly impact the booting process. When the operating system has to search for fragmented files during startup, it can cause delays and slow down the boot time. Defragmenting the hard drive ensures that the necessary system files are stored contiguously, reducing the time it takes for the system to start up.
6. Optimal File Organization: Defragmentation not only rearranges fragmented files but also organizes them in a more logical and efficient manner. This allows for faster file searching and retrieval, making it easier to locate and access specific files when needed.
How Does Defragmentation Work?
Defragmentation is the process of rearranging fragmented files on a hard drive to improve system performance. It works by locating and consolidating the scattered fragments of files, allowing the system to access them more efficiently. Here’s a step-by-step explanation of how defragmentation works:
1. Analysis: The defragmentation process begins with an analysis of the hard drive. The defragmentation tool scans the disk, identifies fragmented files, and determines the degree of fragmentation. This analysis helps to assess the level of fragmentation and estimate the time required for defragmentation.
2. File Relocation: Once the analysis is complete, the defragmentation tool starts relocating the fragments of files. It moves the fragments closer together, aligning them in a contiguous manner on the hard drive. By reorganizing the fragments, the tool ensures that related data blocks of a file are stored in adjacent sectors, reducing the seek times required to access the data.
3. Free Space Consolidation: In addition to relocating fragmented files, defragmentation also consolidates free space on the hard drive. The tool moves all the scattered free space chunks into one contiguous block, creating more space for storing new files without fragmentation. This process helps optimize the available disk space.
4. Optimization: Most modern defragmentation tools incorporate optimization techniques to ensure effective defragmentation. These techniques consider factors like file size, access frequency, and strategic placement of highly accessed files on faster areas of the hard drive. By optimizing file placement during defragmentation, these tools further enhance system performance.
5. Progress Monitoring: During the defragmentation process, progress is monitored. This allows users to see the real-time status of the defragmentation, including the percentage completed and estimated time remaining. Monitoring the progress helps users plan their activities and ensures they have an idea of when the defragmentation will be completed.
6. Completion and Results: Once the defragmentation process is complete, a summary report is generated. This report provides information about the extent of fragmentation before and after defragmentation, the total number of files defragmented, and the amount of free space consolidated. The results of defragmentation can vary depending on the degree of fragmentation and the efficiency of the defragmentation tool used.
7. Regular Maintenance: Defragmentation is not a one-time fix; it is an ongoing maintenance task. To maintain optimal system performance, it is important to regularly perform defragmentation. The frequency of defragmentation depends on various factors including the usage patterns, file activity, and the size of the hard drive.
Overall, defragmentation works by reorganizing fragmented files and consolidating free space on the hard drive, resulting in improved system performance, faster access times, and more efficient file storage.
Step 1: Check Your Hard Drive for Fragmentation
The first step in the defragmentation process is to check the hard drive for fragmentation. This allows you to determine the level of fragmentation on your computer and decide whether defragmentation is necessary. Here’s how you can check your hard drive for fragmentation:
1. Open the Disk Defragmenter: On Windows operating systems, you can access the built-in Disk Defragmenter tool by typing “Disk Defragmenter” in the search bar and selecting the tool from the search results. Alternatively, you can navigate to the Control Panel, choose “System and Security,” and then click on “Defragment your hard drive.”
2. Select the Drive: Once the Disk Defragmenter window is open, you will see a list of drives on your computer. Select the drive you want to check for fragmentation. In most cases, the C: drive is the system drive where the operating system is installed. However, if you have multiple drives, you can choose the one you want to analyze.
3. Analyze the Drive: After selecting the drive, click on the “Analyze” button. The Disk Defragmenter will start scanning the drive to determine the level of fragmentation. This analysis process may take a few minutes, depending on the size and usage of the drive.
4. Review the Fragmentation Percentages: Once the analysis is complete, the Disk Defragmenter will display the fragmentation percentages for the selected drive. There are usually two percentages shown: “Current Fragmentation” and “Average Fragmentation.” These percentages indicate the level of fragmentation on the drive.
5. Interpret the Fragmentation Results: If the fragmentation percentages are relatively low (e.g., below 10%), it indicates that the drive is not heavily fragmented. In such cases, defragmentation may not be required immediately. However, if the fragmentation percentages are high (e.g., above 10-15%), it indicates a significant level of fragmentation, and defragmentation is recommended.
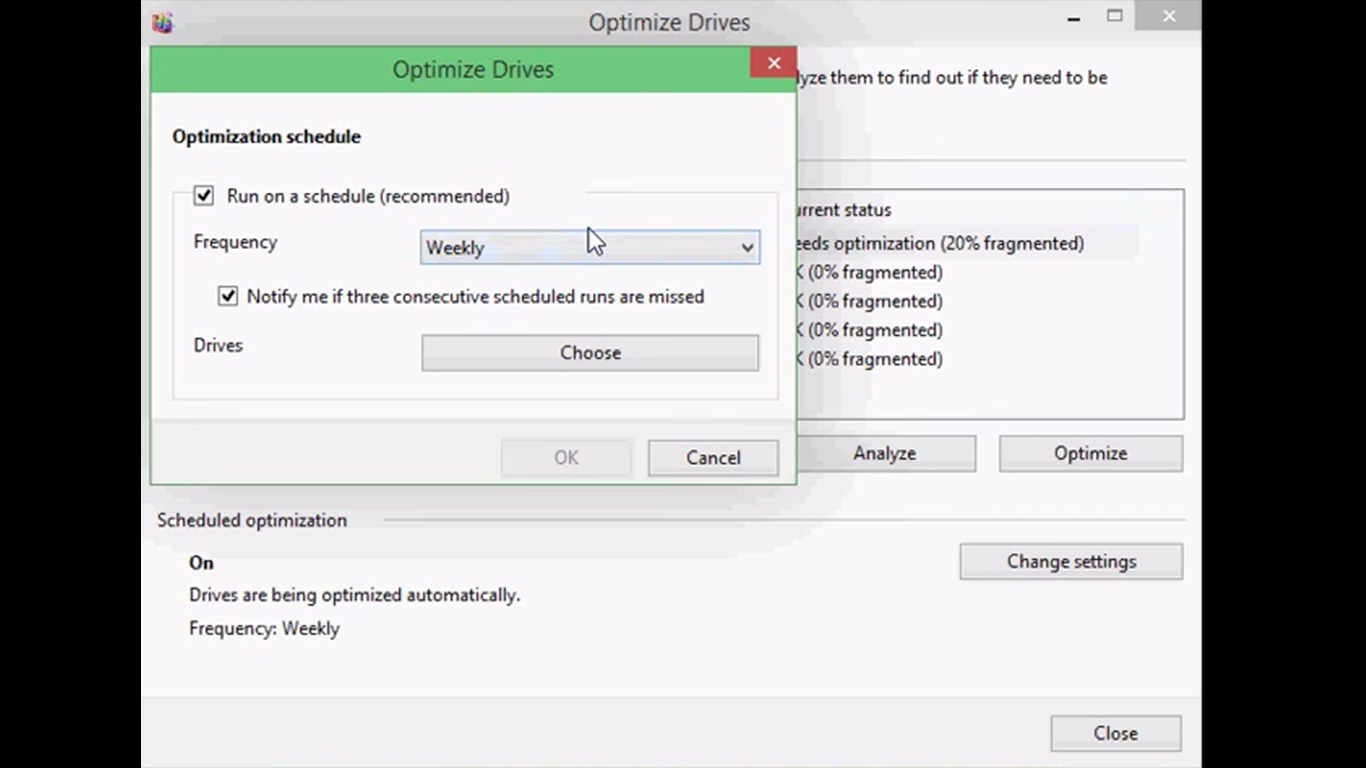
6. Schedule Defragmentation: If the drive shows a high level of fragmentation, you can choose to schedule the defragmentation process or initiate it immediately. The Disk Defragmenter provides options to schedule defragmentation on a regular basis, such as weekly or monthly, to automate the process and keep your drives optimized.
Note: It’s essential to have administrative rights to use the Disk Defragmenter tool. Additionally, if you are using a third-party defragmentation tool, refer to the tool’s documentation for instructions on how to check for fragmentation.
By checking your hard drive for fragmentation, you can determine the need for defragmentation and take appropriate steps to optimize your computer’s performance.
Step 2: Backup Your Data
Before proceeding with the defragmentation process, it is crucial to back up your data. While defragmentation itself is a safe process, unforeseen events or system errors can potentially lead to data loss. Backing up your data ensures that you have a copy of your important files in case anything goes wrong. Here’s how you can backup your data before defragmentation:
1. Identify Important Files: Take some time to identify and prioritize the files that are critical to you. These may include personal documents, photos, videos, and any other data that you cannot afford to lose.
2. Choose a Backup Method: There are various backup methods available, depending on your preferences and available resources. You can choose from external hard drives, USB flash drives, cloud storage services, or even network-attached storage (NAS) devices. Select a backup method that suits your needs and ensure that you have the necessary storage capacity.
3. Copy Your Files: Once you have selected the backup method, begin the process of copying your important files. You can either manually copy and paste the files to the backup location or use backup software that automates the process for you. Make sure to follow best practices and organize your files in a structured manner for easier retrieval later.
4. Verify the Backup: After the backup is complete, it is essential to verify the integrity and accessibility of the copied files. Open a few files from the backup location to ensure they can be opened without any issues. This step confirms that the backup process was successful and that you have reliable copies of your important data.
5. Create a Backup Schedule: To ensure the safety of your data, it is recommended to establish a regular backup schedule. This ensures that you have up-to-date copies of your important files, even if a catastrophic event occurs. Depending on the frequency of changes to your files, you can set a daily, weekly, or monthly backup schedule.
6. Store the Backup Safely: Once you have created a backup, store it in a safe and secure location. For physical backups like external hard drives or USB drives, consider keeping them in a different physical location to protect against theft, fire, or other unforeseen disasters. If you are using cloud storage services, ensure that you choose a reputable and secure provider to safeguard your data.
Step 3: Close Unnecessary Programs
Before starting the defragmentation process, it is important to close unnecessary programs running on your computer. Having multiple programs running in the background can consume system resources and interfere with the defragmentation process. By closing these programs, you can ensure that the defragmentation process runs smoothly and efficiently. Follow these steps to close unnecessary programs:
1. Identify Background Programs: Take a moment to identify programs that may be running in the background or system tray. These programs can include instant messengers, media players, file-sharing programs, system utilities, and any other applications that are not essential for the defragmentation process.
2. Check the System Tray: Look for icons representing running programs in the system tray, located in the bottom right corner of the screen. Right-click on each program icon and choose “Exit,” “Close,” or “Exit Program” to close the unnecessary programs.
3. Use Task Manager: Press Ctrl+Shift+Esc or right-click on the taskbar and select “Task Manager” to open the Task Manager window. Go to the “Processes” or “Details” tab (depending on your operating system) and identify any resource-intensive processes that are not required during defragmentation.
4. End Unnecessary Processes: Right-click on the processes you want to close and select “End Task” or “End Process.” Exercise caution when ending processes, as some may be critical for the functioning of your operating system. Make sure to close only non-essential processes.
5. Disable Startup Programs: Some programs automatically start when you boot your computer, even if you don’t use them actively. These startup programs can consume system resources and interfere with the defragmentation process. Disable unnecessary startup programs using the System Configuration tool (msconfig) for Windows or the Login Items settings for Mac. Uncheck the boxes next to the programs you want to disable and save the changes.
6. Restart Your Computer: Once you have closed unnecessary programs and disabled startup programs, it is a good practice to restart your computer. Restarting helps clear system resources and ensures that all unnecessary programs are completely closed before the defragmentation process begins.
By closing unnecessary programs, you can free up system resources and ensure that the defragmentation process runs smoothly and efficiently. This allows the defragmentation tool to have full access to the hard drive and maximize the effectiveness of the defragmentation process.
Step 4: Disable Scheduled Tasks
Before initiating the defragmentation process, it’s crucial to disable any scheduled tasks that may interfere with the process. Scheduled tasks, such as system backups, antivirus scans, or software updates, can consume system resources and impact the efficiency of defragmentation. By temporarily disabling these tasks, you can ensure uninterrupted and smooth defragmentation. Follow these steps to disable scheduled tasks:
1. Open Task Scheduler: On Windows operating systems, open the Task Scheduler by typing “Task Scheduler” in the search bar and selecting the tool from the search results. Alternatively, you can navigate to the Control Panel, choose “System and Security,” and then click on “Administrative Tools” to access the Task Scheduler.
2. Review Active Tasks: Once the Task Scheduler is open, review the list of active scheduled tasks. Look for tasks that are likely to consume system resources during the defragmentation process, such as antivirus scans, system backups, or software updates.
3. Disable Selected Tasks: To disable a scheduled task, right-click on the task and select “Disable” from the context menu. Alternatively, you can double-click on the task to open its properties and then uncheck the “Enabled” option. Repeat this process for all selected tasks that need to be disabled during defragmentation.
4. Confirm Disabled Status: Ensure that the tasks you have disabled are marked as “Disabled” in the Task Scheduler. This verifies that the tasks will not run during the defragmentation process.
5. Re-enable Tasks After Defragmentation: After completing the defragmentation process, it’s important to re-enable the disabled tasks, especially critical ones like antivirus scans and system backups. This ensures that your system remains protected and your important data is backed up regularly. Use the same steps to open the Task Scheduler and enable the previously disabled tasks.
6. Consider Task Scheduling: If you frequently perform defragmentation or want to automate the process, consider scheduling defragmentation as a task in the Task Scheduler. This allows you to set a specific time and frequency for defragmentation to avoid conflicts with other scheduled tasks.
By disabling scheduled tasks during the defragmentation process, you can allocate maximum system resources for defragmentation, resulting in a more efficient and effective optimization of your hard drive.
Step 5: Run Disk Cleanup
Before proceeding with the defragmentation process, it’s recommended to run Disk Cleanup to remove unnecessary files and optimize your computer’s performance. Disk Cleanup helps free up disk space by deleting temporary files, system files, and other unnecessary data that accumulate over time. By running Disk Cleanup, you can create a cleaner and more efficient environment for the defragmentation process. Follow these steps to run Disk Cleanup:
1. Open Disk Cleanup: On Windows operating systems, you can access Disk Cleanup by typing “Disk Cleanup” in the search bar and selecting the tool from the search results. Alternatively, you can navigate to the Control Panel, choose “System and Security,” and then click on “Free up disk space.”
2. Select the Drive: Once Disk Cleanup is open, it will prompt you to select the drive you want to clean up. Choose the drive where the operating system is installed (usually the C: drive), or select another drive where you have accumulated unnecessary files.
3. Analyze the Drive: After selecting the drive, click on the “OK” button. Disk Cleanup will perform an analysis to determine the amount of disk space that can be freed up by deleting unnecessary files. This analysis may take a few moments to complete.
4. Select File Categories: Once the analysis is complete, Disk Cleanup will present a list of file categories that can be removed. These categories include temporary files, system files, downloaded program files, recycle bin, and more. Review the list and select the categories you want to clean up by checking the corresponding checkboxes.
5. Start the Cleanup Process: After selecting the file categories, click on the “OK” button again to start the cleanup process. Disk Cleanup will delete the selected files, freeing up disk space on your computer. Be patient as the cleanup process may take some time, depending on the amount of data to be cleaned.
6. Confirm Deletion: Disk Cleanup may prompt you to confirm the deletion of certain files or the removal of system files. Carefully review the prompts and select the appropriate options to proceed with the cleanup process.
7. Completion and Results: Once the cleanup process is complete, Disk Cleanup will provide a summary of the disk space that has been freed up. The summary will show the total amount of space reclaimed and the details of the file categories that were cleaned up. This information gives you an overview of the impact of the cleanup process.
Running Disk Cleanup before defragmentation ensures that unnecessary files are removed, allowing the defragmentation process to work more effectively. By freeing up disk space, you create a more optimized environment for the defragmentation process and improve overall system performance.
Step 6: Disable System Restore
Disabling System Restore is an optional step to consider before defragmenting your hard drive. System Restore is a feature in Windows that allows you to restore your computer to a previous stable state if system errors or issues occur. While System Restore can be beneficial, it can also interfere with the defragmentation process by creating additional file movements. By temporarily disabling System Restore, you can optimize the defragmentation process. Here’s how to disable System Restore:
1. Open the System Properties: Right-click on the “This PC” or “My Computer” icon on your desktop or in the File Explorer and select “Properties” from the context menu. Alternatively, you can press the Windows Key + R, type “sysdm.cpl” in the Run dialog box, and press Enter.
2. Access the System Protection Settings: In the System Properties window, click on the “System Protection” tab at the top. This tab contains the settings for System Restore.
3. Select the Drive: In the System Protection tab, you will see a list of drives on your computer. Select the drive where System Restore is enabled. In most cases, this will be the drive where the operating system is installed (usually the C: drive).
4. Disable System Restore: Once you have selected the drive, click on the “Configure” button. In the System Protection Settings window, select the “Disable system protection” option, and click on the “Apply” or “OK” button. This will turn off System Restore for the selected drive.
5. Confirm the Changes: Windows will prompt you to confirm the changes. Read the prompt carefully and click on “Yes” or “OK.” This will disable System Restore for the selected drive.
6. Repeat for Additional Drives: If you have multiple drives with System Restore enabled, repeat steps 3-5 for each drive. Remember to disable System Restore for all relevant drives to ensure optimal defragmentation.
7. Re-enable System Restore: After completing the defragmentation process, it’s important to re-enable System Restore to ensure system stability and the ability to revert to a previous stable state if needed. Follow the same steps, but select the “Enable system protection” option in the System Protection Settings window.
Disabling System Restore before defragmentation can help reduce unnecessary file movements and optimize the defragmentation process. However, it’s important to remember to re-enable System Restore after completing the defragmentation process to maintain system protection and stability.
Step 7: Run a Full System Scan for Malware
Performing a full system scan for malware is an essential step before defragmenting your hard drive. Malware, such as viruses, spyware, or ransomware, can affect system performance and interfere with the defragmentation process. Running a comprehensive scan helps to identify and remove any malicious software present on your computer. Follow these steps to run a full system scan for malware:
1. Update Your Antivirus Software: Ensure that your antivirus software is up to date with the latest virus definitions. This ensures that the scan can effectively detect and remove the latest threats.
2. Open Your Antivirus Software: Locate your antivirus software program either in the system tray or on your desktop. Open the antivirus program to access its main dashboard.
3. Select a Full System Scan: Look for the option to perform a full system scan within the antivirus program’s interface. This option is generally found under the “Scan,” “Security,” or “Protection” tab. Choose the full system scan option to initiate the comprehensive scan.
4. Start the Scan: Click on the “Start” or “Scan” button to begin the full system scan. The antivirus program will scan your entire computer, including all files, folders, and system areas, for any potential malware threats.
5. Monitor the Scan Progress: During the scan, monitor the progress of the scan. The duration of the scan can vary depending on the size of your hard drive and the number of files being scanned.
6. Take Action on Detected Threats: If any malware threats are detected during the scan, your antivirus program will notify you. Follow the prompts provided by the antivirus software to quarantine, delete, or repair any identified threats. It is recommended to follow the suggested actions to ensure your system’s security.
7. Restart if Necessary: After the scan is complete and any detected threats have been resolved, consider restarting your computer. This can help ensure that any lingering malware processes or system changes are fully eliminated.
Note: If you do not have an antivirus program installed, it is highly recommended to install one from a reputable vendor before running the full system scan. There are many reliable antivirus options available, both paid and free, that can provide comprehensive protection against malware.
Running a full system scan for malware before defragmentation helps to safeguard your computer against potential threats and ensures a clean and secure environment for the defragmentation process.
Step 8: Disable Indexing
Disabling indexing is an optional but recommended step before starting the defragmentation process. Indexing is a feature in Windows that helps speed up file searches by creating an index of files on your hard drive. However, indexing can consume system resources during the defragmentation process and may interfere with the optimization of your hard drive. By temporarily disabling indexing, you can ensure a smoother and more efficient defragmentation process. Here’s how you can disable indexing:
1. Open Indexing Options: Press the Windows key + R on your keyboard to open the Run dialog box. Type “control” and hit Enter to open the Control Panel. In the Control Panel, search for “Indexing Options” and select it.
2. Modify Indexing Settings: In the Indexing Options window, click on the “Modify” or “Advanced” button. This will open the Indexing Options settings.
3. Disable Indexing for Selected Drives: In the Indexing Options settings, you will see a list of drives on your computer. By default, the system drive (usually the C: drive) is indexed. Uncheck the box next to the system drive and any other drives where you want to disable indexing.
4. Apply Changes: Once you have unchecked the drives for indexing, click on the “OK” button to save the changes. Windows will prompt you to confirm the action. Click on “OK” or “Yes” to proceed.
5. Wait for Indexing to Stop: After disabling indexing, it may take some time for the indexing process to stop completely. The status in the Indexing Options window should eventually show “Indexing Complete” or “Indexing Paused.” You can monitor the status to ensure indexing is no longer active.
6. Re-enable Indexing After Defragmentation: Once you have completed the defragmentation process, it’s important to re-enable indexing for optimal file search performance. Follow the same steps to access the Indexing Options settings and check the boxes next to the drives you want to index.
Note: Disabling indexing may temporarily impact the speed of file searches on your computer. However, once indexing is re-enabled, Windows will rebuild the index, and file search performance will return to normal.
By disabling indexing before defragmentation, you can free up system resources and ensure a more focused and efficient optimization of your hard drive.
Step 9: Start the Defragmentation Process
Once you have prepared your computer for defragmentation, it’s time to start the defragmentation process. Defragmentation rearranges fragmented files on your hard drive, optimizing storage and improving system performance. Follow these steps to initiate the defragmentation process:
1. Open the Disk Defragmenter: On Windows operating systems, open the Disk Defragmenter tool. You can do this by typing “Disk Defragmenter” in the search bar and selecting the tool from the search results. Alternatively, you can navigate to the Control Panel, choose “System and Security,” and then click on “Defragment your hard drive.”
2. Select the Drive: Once the Disk Defragmenter window is open, you will see a list of available drives on your computer. Select the drive you want to defragment. In most cases, this is the C: drive, which is the default system drive.
3. Analyze the Drive: Before starting the defragmentation process, it is recommended to click on the “Analyze” button. This analyzes the fragmentation level of the selected drive and provides insights into the current state of fragmentation. The analysis helps you decide whether defragmentation is necessary.
4. Start the Defragmentation: If the analysis shows a significant level of fragmentation, proceed by clicking on the “Optimize” or “Defragment” button. This will start the defragmentation process for the selected drive.
5. Monitor the Progress: During the defragmentation process, you can monitor the progress in the Disk Defragmenter window. The progress bar will show the current status, and you can see which files are being defragmented at any given moment. You may also see the estimated time remaining for the defragmentation to complete.
6. Allow Defragmentation to Complete: It’s important to let the defragmentation process run to completion without interruption. Avoid using your computer for other resource-intensive tasks during this time, as it may impact the effectiveness and efficiency of the defragmentation process.
7. Check Completion Status: Once the defragmentation process is complete, the Disk Defragmenter will display a summary of the results. This summary will indicate the extent of fragmentation before and after defragmentation. It will also show the total number of files processed and any other relevant information.
8. Close the Disk Defragmenter: After reviewing the defragmentation results, you can close the Disk Defragmenter tool. It’s important to note that regular defragmentation is recommended to maintain optimal system performance. Consider scheduling regular automated defragmentation to keep your hard drive optimized.
The defragmentation process rearranges fragmented files, improves access times, and enhances overall system performance. By following these steps, you can effectively start the defragmentation process and optimize your hard drive for better efficiency.
Step 10: Monitor the Progress
While the defragmentation process is underway, it’s essential to monitor the progress to ensure that it is running smoothly and efficiently. Monitoring the progress allows you to track the status of defragmentation and make any necessary adjustments if needed. Here are some important points to consider when monitoring the defragmentation progress:
1. Use the Defragmentation Tool: Depending on the defragmentation software or built-in tool you’re using, there may be a progress indicator that shows the status of the defragmentation process. This progress indicator usually displays the current progress, the number of files processed, and an estimated time remaining.
2. Be Patient: Defragmentation can take some time, depending on the size of your hard drive, the level of fragmentation, and the system resources available. It’s important to allow the process to complete without interruption. Avoid using resource-intensive applications or performing activities that can slow down the defragmentation process.
3. Avoid Interruptions: It’s crucial to avoid interrupting the defragmentation process once it has started. Interrupting the process by shutting down your computer or stopping the defragmentation tool prematurely can result in incomplete or ineffective defragmentation. Let the process run its course without any interruptions until it reaches completion.
4. Plan According to Your Schedule: Since defragmentation can take a significant amount of time, plan the defragmentation process when you can afford to have your computer dedicated to this task. For instance, start defragmentation before going to bed or when you know you won’t need to use your computer for an extended period, such as during weekends or non-working hours.
5. Adjust Resources if Necessary: If, during the defragmentation process, you notice that your computer is running sluggishly or other tasks are taking longer than usual to complete, you may need to adjust system resources. Close any unnecessary applications or background processes that might be consuming excessive CPU or disk resources. This can help optimize the efficiency of the defragmentation process.
6. Take Note of Errors or Issues: While monitoring the progress, be on the lookout for any errors or issues that might arise. If you encounter any error messages, unexpected behavior, or system instability during the defragmentation process, it may indicate a problem that requires attention. Note down any error messages or take screenshots for reference if needed.
7. Seek Professional Help for Complex Issues: If you encounter complex errors, system crashes, or any issues that you are unable to resolve, it might be beneficial to seek assistance from a professional technician or software support service. They can help diagnose and resolve any advanced issues that may arise during the defragmentation process.
Monitoring the progress of the defragmentation process ensures that it is running smoothly and helps identify any issues that may arise. By being attentive and proactive, you can optimize the defragmentation process and improve the efficiency of your hard drive.
Step 11: Analyze the Results
After the defragmentation process is complete, it’s important to analyze the results to determine the effectiveness of the optimization and the overall impact on your computer’s performance. Analyzing the results allows you to evaluate the level of fragmentation improvement and understand how the defragmentation process has benefited your hard drive. Here are some key points to consider when analyzing the results:
1. Review the Summary Report: Most defragmentation tools provide a summary report that displays essential information about the defragmentation process. This report typically includes the fragmentation level before and after defragmentation, the number of files processed, the total time taken for defragmentation, and any errors or warnings that occurred during the process.
2. Assess the Level of Fragmentation Improvement: Compare the fragmentation levels before and after defragmentation to assess the level of improvement. Ideally, you should see a significant reduction in the level of fragmentation, with files being more efficiently organized and contiguous. A lower fragmentation level indicates better file access performance and improved system responsiveness.
3. Evaluate System Performance: Once the defragmentation process is complete, evaluate the overall performance of your computer. Assess whether you notice any improvements in areas such as faster file access, quicker application startup times, reduced system lag, and smoother overall operation. Positive changes in these areas are indicative of the successful impact of defragmentation on system performance.
4. Consider Disk Space Optimization: The defragmentation process might also yield improved disk space utilization. Analyze the free space on your hard drive to see if there has been any consolidation of free space. If you observe that the defragmentation has freed up significant disk space, your available storage capacity will increase, allowing for better organization and more efficient file storage.
5. Note Any Errors or Issues: During the analysis, take note of any errors or issues that may have occurred during the defragmentation process. If you encountered any error messages, crashes, or unexpected system behavior, documenting these details will be helpful if further troubleshooting or assistance is needed.
6. Consider Repeating the Process: Depending on the level of fragmentation and the degree of improvement achieved, you might consider repeating the defragmentation process periodically. Doing so helps maintain optimized storage, as file fragmentation can occur over time with regular system use. Scheduling regular defragmentation sessions will help ensure long-term performance benefits.
By carefully analyzing the results of the defragmentation process, you can understand the impact on system performance, storage optimization, and fragmentation reduction. This analysis will help inform future maintenance decisions and ensure that your hard drive consistently operates at its best.
Step 12: Re-enable System Restore
After completing the defragmentation process, it’s important to re-enable System Restore on your computer. System Restore is a valuable feature that allows you to restore your computer to a previous stable state if any issues or errors occur. By re-enabling System Restore, you ensure the availability of this important recovery option. Follow these steps to re-enable System Restore:
1. Open the System Properties: Right-click on the “This PC” or “My Computer” icon on your desktop or in the File Explorer and select “Properties” from the context menu. Alternatively, you can press the Windows key + R, type “sysdm.cpl” in the Run dialog box, and press Enter.
2. Access the System Protection Settings: In the System Properties window, click on the “System Protection” tab at the top. This tab contains the settings for System Restore.
3. Select the Drive: In the System Protection tab, you will see a list of drives on your computer. Select the drive for which you want to enable System Restore. Most often, this will be the drive where the operating system is installed (usually the C: drive).
4. Enable System Restore: Once you have selected the drive, click on the “Configure” button. In the System Protection Settings window, select the “Turn on system protection” option, and adjust the disk space usage slider according to your preference. This slider allows you to allocate disk space for System Restore points.
5. Apply Changes: Click on the “Apply” or “OK” button to save the changes. Windows may display a prompt warning you that enabling System Restore will delete any existing restore points. Read the prompt carefully and proceed accordingly.
6. Confirm the Re-enabling: Windows will prompt you to confirm the changes. Click on “OK” or “Yes” to re-enable System Restore for the selected drive.
7. Verification: After re-enabling System Restore, verify that it is activated by selecting the drive in the System Protection tab and clicking on the “Create” button. This will create a new restore point to ensure the feature is functioning as expected.
Re-enabling System Restore is an essential step to maintain system protection and the ability to revert to a previous stable state if needed. It ensures that you have a safety net in case any issues or errors occur on your computer after the defragmentation process.
Step 13: Re-enable Scheduled Tasks
After the completion of the defragmentation process, it is important to re-enable any scheduled tasks that were temporarily disabled. These tasks may include system backups, antivirus scans, disk cleanups, or any other tasks that were paused to avoid interference with the defragmentation. By re-enabling these tasks, you can ensure that your computer continues to perform essential maintenance activities. Follow these steps to re-enable scheduled tasks:
1. Open the Task Scheduler: On Windows operating systems, open the Task Scheduler by typing “Task Scheduler” in the search bar and selecting the tool from the search results. Alternatively, you can navigate to the Control Panel, choose “System and Security,” and then click on “Administrative Tools” to access the Task Scheduler.
2. Locate Disabled Tasks: In the Task Scheduler window, locate the tasks that were disabled before the defragmentation process. These tasks may be under folders related to backup, antivirus, or other system utilities, depending on the specific tasks you disabled.
3. Enable Tasks: Right-click on the disabled task and select “Enable” or “Enable Task” from the context menu. This will re-enable the task and allow it to run according to its schedule.
4. Confirm Task Status: After enabling the tasks, verify that their status changes to “Enabled” in the Task Scheduler. This ensures that the tasks will run according to their designated schedules and perform the necessary maintenance activities.
5. Review Task Schedule: Take the opportunity to review the schedules of the enabled tasks. Ensure that their frequency, time, and other settings align with your desired maintenance schedule. Modify the schedules as needed to suit your requirements.
6. Monitor Task Execution: After re-enabling the scheduled tasks, monitor their execution to ensure they run as expected. Pay attention to any error messages or unexpected behavior during task execution. If issues arise, troubleshoot or seek assistance to resolve them and ensure proper task functioning.
Note: Some tasks may have dependencies on other tasks or system conditions. Ensure that all prerequisites for proper task execution are met to avoid any performance issues or conflicts.
Re-enabling scheduled tasks after the defragmentation process allows your computer to resume essential maintenance activities, such as backups, scans, and cleanups. This ensures that your system remains protected, optimized, and regularly maintained.
Step 14: Re-enable Indexing
After completing the defragmentation process, it’s important to re-enable indexing on your computer. Indexing is a feature in Windows that helps speed up file searches by creating an index of files on your hard drive. By re-enabling indexing, you ensure fast and efficient file searches on your computer. Follow these steps to re-enable indexing:
1. Open Indexing Options: Press the Windows key + R on your keyboard to open the Run dialog box. Type “control” and hit Enter to open the Control Panel. In the Control Panel, search for “Indexing Options” and select it.
2. Modify Indexing Settings: In the Indexing Options window, click on the “Modify” or “Advanced” button. This will open the Indexing Options settings.
3. Enable Indexing for Selected Drives: In the Indexing Options settings, you will see a list of drives on your computer. Check the boxes next to the drives you want to enable for indexing. Select the system drive (usually the C: drive) to enable indexing for the entire computer.
4. Apply Changes: Once you have selected the drives for indexing, click on the “OK” button to save the changes. Windows will prompt you to confirm the action. Click on “OK” or “Yes” to proceed.
5. Wait for Indexing to Complete: After re-enabling indexing, it may take some time for the indexing process to complete. During this time, Windows will rebuild the index for the selected drives. The Indexing Options window will display the status of indexing, indicating whether it is in progress or complete.
6. Verify Indexing Status: Once indexing is complete, verify that it is activated by searching for a file on your computer. The search results should appear instantly, indicating that indexing is functioning as expected.
Note: Enabling indexing may temporarily impact system resources as the index is being rebuilt. During this time, you may experience slightly reduced performance. However, once the indexing process completes, system performance should return to normal.
Re-enabling indexing ensures that file searches on your computer are fast and efficient. By allowing Windows to rebuild the index, you can quickly locate files and information, enhancing productivity and ease of use.
Step 15: Regularly Perform Defragmentation
To maintain optimal system performance, it’s important to regularly perform defragmentation on your computer. Regular defragmentation helps keep your hard drive organized, ensuring efficient data access and improved overall system responsiveness. Follow these guidelines to ensure that you perform defragmentation on a regular basis:
1. Set a Defragmentation Schedule: Establish a schedule for defragmentation based on your usage patterns and the degree of fragmentation on your hard drive. It is generally recommended to perform defragmentation monthly or quarterly to keep your hard drive optimized.
2. Utilize Automated Defragmentation: Take advantage of the automated defragmentation options available in many operating systems or third-party defragmentation tools. These tools can be scheduled to run at specified intervals, ensuring that defragmentation happens automatically without manual intervention.
3. Consider SSD Optimization: If you have a solid-state drive (SSD), check whether your operating system supports TRIM or a similar optimization technology. TRIM helps maintain performance on SSDs by optimizing data placement automatically. Automated TRIM functionality eliminates the need for manual defragmentation on SSDs.
4. Defragment External Storage Devices: Remember to defragment external storage devices, such as external hard drives or USB flash drives, especially if you frequently write, modify, or remove files on these devices. External storage devices can also benefit from regular defragmentation to ensure efficient data access.
5. Monitor Fragmentation Level: Keep an eye on the fragmentation level of your hard drive by periodically checking it with the built-in tools or third-party defragmentation software. If you notice a significant increase in fragmentation or a decrease in system performance, consider performing unscheduled defragmentation to address these issues proactively.
6. Maintain Sufficient Free Space: Ensure that you have enough free space on your hard drive for the defragmentation process to work effectively. Aim to keep at least 10-15% of your total disk space free to facilitate proper file placement during defragmentation.
7. Consider Solid-State Drives (SSDs): Note that some modern operating systems and SSDs have built-in features, such as wear leveling and automatic data optimization. These features handle data placement on SSDs, eliminating the need for traditional defragmentation. Be sure to check the specific recommendations and guidelines for your SSD.
Incorporating regular defragmentation as part of your computer maintenance routine helps ensure optimal system performance and prolongs the lifespan of your hard drive. By keeping your hard drive organized, you can enjoy faster load times, improved file access, and an overall smooth computing experience.