
What are UpperFilters and LowerFilters values?
When it comes to troubleshooting certain hardware or driver issues on a Windows operating system, you might come across references to UpperFilters and LowerFilters values. But what exactly are these values, and how do they affect your system?
UpperFilters and LowerFilters are entries in the Windows Registry that are related to the functioning of CD and DVD drives. These values are used by the operating system to determine which drivers should be loaded for these devices. The UpperFilters value is associated with filters that operate on the input/output (I/O) process of CD/DVD drives, while the LowerFilters value is related to filters that operate on the storage stack.
Filters, in this context, are software components that intercept data between the hardware device (CD/DVD drive) and the operating system. They can modify or enhance the data being read from or written to the CD/DVD drive. Filters can be added to the system by various software applications, such as burning software or virtual drive tools, to enable additional features or provide compatibility with different formats.
However, there are instances where these UpperFilters and LowerFilters values can become corrupted or contain incorrect entries. This can lead to problems with CD/DVD drives, such as the drive not being recognized, or issues with reading or writing data. In such cases, it may be necessary to delete the UpperFilters and/or LowerFilters values to resolve the problem.
It is important to note that modifying or deleting values in the Windows Registry should be done with caution, as any incorrect changes can potentially cause system instability or other issues. It is always recommended to backup the Registry before making any changes and to follow the steps carefully.
How to access the Registry Editor
The Registry Editor is a built-in Windows tool that allows users to view and modify the contents of the Windows Registry. To access the Registry Editor, follow the steps outlined below:
- Press the Windows key + R on your keyboard to open the Run dialog box.
- Type “regedit” (without quotes) in the Run dialog box and hit Enter or click OK. This will open the Registry Editor.
Alternatively, you can also access the Registry Editor through the Windows search or by navigating through the Start menu. In the search bar or in the Run dialog box, type “regedit” and select the appropriate result to open the Registry Editor.
Please note that accessing the Registry Editor requires administrative privileges. If you are prompted for an administrator password or confirmation, provide the necessary credentials to proceed.
Once the Registry Editor is open, you will see a hierarchical structure with various folders, or keys, representing different aspects of the Windows operating system. It is important to exercise caution when making changes in the Registry Editor, as modifying or deleting the wrong values can have adverse effects on your system.
Before making any changes, it is highly recommended to create a backup of the Registry so that you can restore it in case something goes wrong. To create a backup, click on File in the Registry Editor menu and select Export. Choose a location to save the backup file and give it a descriptive name.
Now that you know how to access the Registry Editor and create a backup, let’s move on to locating the UpperFilters and LowerFilters values.
Locating the UpperFilters and LowerFilters values in the Registry Editor
After accessing the Registry Editor, you need to navigate to the specific location where the UpperFilters and LowerFilters values are stored. Follow the steps below to locate these values:
- In the Registry Editor window, navigate to the following path:
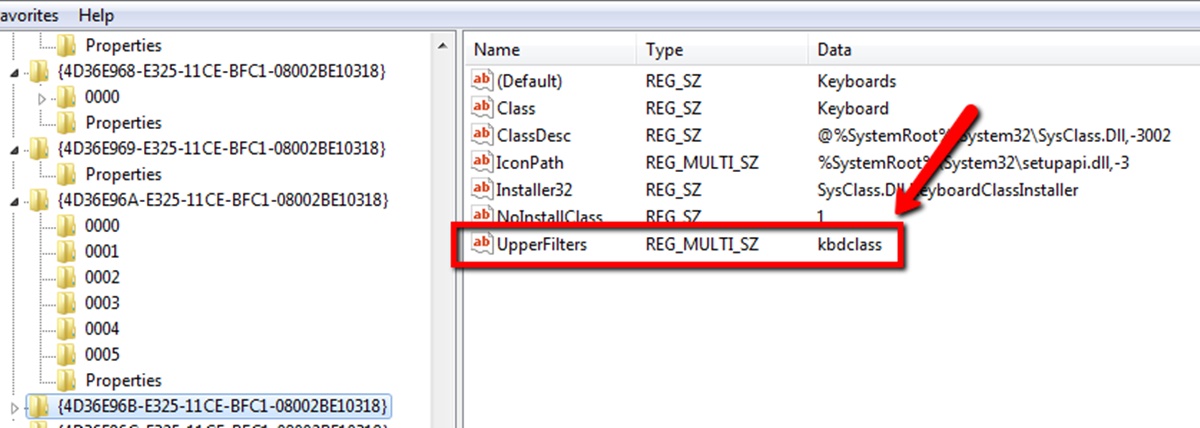
HKEY_LOCAL_MACHINE\SYSTEM\CurrentControlSet\Control\Class\{4D36E965-E325-11CE-BFC1-08002BE10318}- This path contains a series of numbered subkeys, each representing a different hardware device installed on your computer. Look for the subkey that corresponds to your CD or DVD drive.
- Within the chosen subkey, you will find two values: UpperFilters and LowerFilters.
Please note that depending on your system configuration, you may only have one of these values present. If either of the values is missing, it means that there are no UpperFilters or LowerFilters associated with your CD/DVD drive.
Once you have located the UpperFilters and LowerFilters values, you can proceed to the next steps to delete them and potentially resolve any issues you may be experiencing with your CD/DVD drive.
Remember to exercise caution when making changes in the Registry Editor. If you are unsure about any step or afraid of making a mistake, it is advisable to seek guidance from a knowledgeable professional or consult online resources.
Deleting the UpperFilters value
Once you have located the UpperFilters value in the Registry Editor, you can proceed with deleting it to potentially resolve issues related to your CD/DVD drive. Follow the steps below:
- Make sure you have selected the correct subkey for your CD/DVD drive in the Registry Editor.
- Right-click on the UpperFilters value and select Delete from the drop-down menu that appears.
- You will be prompted to confirm the deletion. Click Yes to proceed.
After deleting the UpperFilters value, it is recommended to double-check and make sure that it has been successfully removed from the Registry. If the value is still present, repeat the steps to delete it again.
Deleting the UpperFilters value removes any filters associated with the CD/DVD drive’s input/output process. This can help resolve issues such as the drive not being recognized or reading/writing problems.
However, keep in mind that deleting the UpperFilters value might also remove any filters that have been added by legitimate software applications or drivers. If you believe that certain filters are necessary for the proper functioning of your CD/DVD drive or software, it is advisable to consult the manufacturer’s documentation or seek assistance before proceeding with the deletion.
Next, let’s move on to deleting the LowerFilters value in the Registry Editor.
Deleting the LowerFilters value
Similar to the UpperFilters value, the LowerFilters value in the Registry Editor is associated with the storage stack filters for your CD/DVD drive. Follow the steps below to delete the LowerFilters value:
- Ensure that you are in the correct subkey for your CD/DVD drive in the Registry Editor.
- Right-click on the LowerFilters value and select Delete from the dropdown menu.
- A confirmation prompt will appear asking if you want to delete the value. Click Yes to proceed with the deletion.
Once you have deleted the LowerFilters value, it is essential to verify that it has been successfully removed from the Registry. If the value is still present, repeat the steps to delete it again.
Deleting the LowerFilters value helps to address issues related to storage stack filters for the CD/DVD drive. This can potentially resolve problems such as reading or writing difficulties or the drive not being recognized by the system.
However, please note that removing the LowerFilters value might remove any storage stack filters that have been added by legitimate software or drivers. If you are unsure about the impact of deleting the LowerFilters value on the functionality of your CD/DVD drive or associated software, it is recommended to consult the relevant documentation or seek professional assistance.
After deleting both the UpperFilters and LowerFilters values, you need to restart your computer for the changes to take effect. Simply close the Registry Editor and restart your system. Upon reboot, the CD/DVD drive should be reconfigured without the filters specified by these values.
Now, let’s proceed to the next section to verify whether the UpperFilters and LowerFilters values were successfully deleted.
Restarting the computer for changes to take effect
After deleting the UpperFilters and LowerFilters values in the Registry Editor, it is essential to restart your computer to allow the changes to take effect. Restarting the computer helps the system reconfigure the CD/DVD drive without the presence of the filters specified by these values.
To restart your computer, follow the steps below:
- Save any open files and close all running applications.
- Click on the Start button in the taskbar.
- Select the Power icon, which is typically represented as a circle with a vertical line inside.
- In the dropdown menu that appears, click on Restart.
The computer will now begin the restart process. It might take a few moments for the system to shut down completely and start back up.
Once the computer has restarted, allow it to fully boot into the operating system. After the restart, the changes made in the Registry Editor should take effect, and the CD/DVD drive should be configured without the UpperFilters and LowerFilters values.
If you continue to experience issues with your CD/DVD drive after the restart, it is recommended to perform additional troubleshooting steps or seek further assistance from technical support or online communities.
Now, let’s move on to the next section to verify whether the UpperFilters and LowerFilters values have been successfully deleted and resolved any related issues.
Verifying that the UpperFilters and LowerFilters values were successfully deleted
After deleting the UpperFilters and LowerFilters values in the Registry Editor and restarting your computer, it is important to verify if these values have been successfully removed. The verification process will help ensure that any issues related to these values have been resolved. Follow the steps below to verify the deletion:
- Access the Registry Editor by following the steps mentioned earlier.
- Navigate to the same subkey that contains the UpperFilters and LowerFilters values for your CD/DVD drive.
- Check if the UpperFilters and LowerFilters values are no longer present in the subkey.
If you do not see the UpperFilters and LowerFilters values in the subkey, that means they have been successfully deleted. This indicates that the CD/DVD drive is now configured without any associated filters specified by these values.
If, however, you find that either or both of the values are still present in the Registry Editor, double-check the steps followed to ensure proper deletion. Repeat the steps to delete the values again, making sure to confirm the deletion when prompted.
If you have successfully verified the deletion of the UpperFilters and LowerFilters values, you can close the Registry Editor. At this point, the changes should be in effect, and any issues related to the CD/DVD drive that were caused by these values should be resolved.
If you continue to experience problems with your CD/DVD drive even after confirming the deletion of the UpperFilters and LowerFilters values, it is advisable to seek further assistance. Professional technical support or online communities can provide the necessary guidance to diagnose and address the specific issues you are facing.
Now that you have successfully verified the deletion of the UpperFilters and LowerFilters values, you can continue using your CD/DVD drive without the interference of these filters.
Troubleshooting if deletion does not solve the issue
If deleting the UpperFilters and LowerFilters values in the Registry Editor did not resolve the issues you were experiencing with your CD/DVD drive, there may be other factors affecting its functionality. Here are some troubleshooting steps you can take:
- Check device connections: Ensure that the CD/DVD drive is properly connected to the computer. Make sure the cables are securely plugged in and that there are no loose connections.
- Update drivers: Visit the manufacturer’s website for your CD/DVD drive and check for any available driver updates. Download and install the latest drivers and firmware to ensure compatibility and optimal performance.
- Check for hardware conflicts: Open the Device Manager by right-clicking on the Start button and selecting Device Manager. Look for any yellow exclamation marks or error messages related to the CD/DVD drive under the DVD/CD-ROM drives category. If there are any conflicts, right-click on the device and choose “Update driver” or “Uninstall device” to resolve the issue.
- Perform a system restore: If the problems with your CD/DVD drive started after a recent change or installation, you can try performing a system restore to revert your computer’s settings to an earlier point in time when the device was functioning properly.
- Scan for malware: Run a scan using your preferred antivirus software to check for any malicious programs that could be causing issues with your CD/DVD drive. Remove any detected threats and perform a thorough scan to ensure your system is clean.
- Try the drive on another computer: If possible, test your CD/DVD drive on another computer to determine if the issue is specific to your system or the drive itself. If the drive works on another computer, it may indicate a problem with your computer’s hardware or software configuration that requires further investigation.
If none of these troubleshooting steps resolve the issue, it is recommended to seek assistance from technical support or consult online forums and communities where experts can provide tailored solutions based on your specific problem.
Remember that troubleshooting computer issues can be complex, and it’s essential to approach the process cautiously to avoid causing further damage to your system or data loss.
By following these troubleshooting steps, you can increase the chances of resolving any issues with your CD/DVD drive and getting it back to optimal functioning.