
Why delete an address from the Outlook Autocomplete list?
Deleting an address from the Outlook Autocomplete list can be necessary for various reasons. The Autocomplete list, also known as the Autocomplete cache, is a feature in Microsoft Outlook that stores email addresses you have previously used. When you start typing an email address in the “To” field, Outlook suggests matching addresses based on your past email history. While this feature can be helpful for quickly selecting frequently-used contacts, it can also become cluttered with outdated or incorrect addresses over time.
There are several reasons why you might want to delete an address from the Outlook Autocomplete list:
- Outdated Information: If a contact has changed their email address, deleting the old address from the Autocomplete list ensures that you don’t accidentally send emails to the wrong recipient.
- Privacy Concerns: If you’ve corresponded with someone in the past but no longer wish for their email address to appear as a suggestion, removing it from the Autocomplete list helps protect your privacy.
- Mistaken Entries: Sometimes, you may have inadvertently entered an incorrect or misspelled email address. Deleting it from the Autocomplete list prevents you from accidentally using the wrong address again in the future.
- Cleanliness and Organization: Clearing out unnecessary or outdated addresses from the Autocomplete list helps keep your email client clean and organized, making it easier to find and select the right contacts when composing emails.
By regularly managing your Outlook Autocomplete list, you can ensure that it remains accurate and reflects your current contact list. This can save you time and prevent potential communication errors or privacy concerns. Thankfully, deleting addresses from the Autocomplete list in Outlook is a straightforward process, whether you are using the Windows desktop application, the Mac version, or the Outlook Web App.
How to delete an address from the Outlook Autocomplete list on Windows
If you’re using the Outlook desktop application on a Windows computer, you can easily delete an address from the Autocomplete list by following these steps:
- Step 1: Open Outlook and click on the “File” tab located at the top left corner of the screen.
- Step 2: In the drop-down menu, select “Options” from the list on the left-hand side.
- Step 3: The Outlook Options window will appear. Click on “Mail” in the left-hand menu.
- Step 4: Scroll down to the “Send messages” section and look for the “Empty Auto-Complete List” button. Click on it.
- Step 5: A warning dialog box will pop up asking for confirmation. To proceed with deleting all the addresses from the Autocomplete list, click “Yes”.
By following these steps, all the addresses stored in the Autocomplete list will be removed, providing a clean slate for future email suggestions. Keep in mind that this action is irreversible, so make sure you have a backup of any addresses you still need.
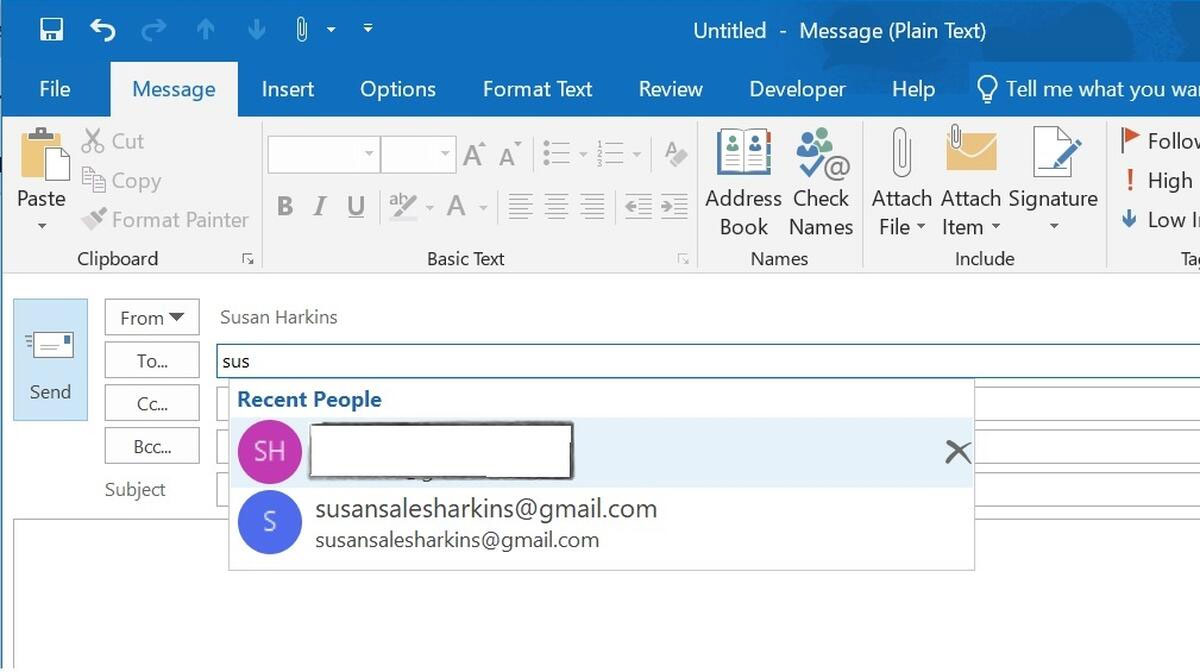
It’s important to note that this method deletes the entire Autocomplete list in Outlook, not just a specific address. If you only need to remove certain addresses, you may consider manually deleting them by typing the address in the “To” field, highlighting it with your mouse, and pressing the “Delete” key on your keyboard. This will remove the selected address from the suggestions without clearing the entire list.
Now that you know how to delete addresses from the Outlook Autocomplete list on Windows, you can effectively manage and customize your email suggestions according to your preferences and current contact list.
Step 1: Open Outlook and click on the “File” tab
The first step to deleting an address from the Outlook Autocomplete list on Windows is to open the Outlook application and locate the “File” tab. Follow the instructions below to complete this step:
- Launch Outlook on your Windows computer. You can do this by double-clicking the Outlook icon on your desktop or by searching for “Outlook” in the Windows Start menu.
- Once the Outlook application is open, look for the “File” tab located at the top left corner of the screen. The “File” tab is typically the first tab in the ribbon interface.
- Click on the “File” tab to access the drop-down menu, which provides various options and settings for managing and customizing your Outlook experience.
By clicking on the “File” tab, you are one step closer to deleting an address from the Outlook Autocomplete list. This tab serves as a gateway to many useful features and settings within the Outlook application.
It’s worth noting that the appearance of the Outlook interface may slightly differ depending on your version of Outlook and the layout preferences you have chosen. However, you can typically find the “File” tab in the same general location, regardless of the specific version you are using.
Now that you have successfully completed the first step, you are ready to proceed to the next step, which will bring you closer to deleting an address from the Outlook Autocomplete list on your Windows computer.
Step 2: Click on “Options” in the left-hand menu
After opening Outlook and clicking on the “File” tab, the next step to delete an address from the Outlook Autocomplete list on Windows is to access the “Options” menu. Follow the steps below to proceed:
- Once you have clicked on the “File” tab, a drop-down menu will appear. Look for and select the “Options” link from the list on the left-hand side.
- By clicking on “Options,” you will be directed to a new window that houses various settings and preferences for customizing your Outlook experience.
Accessing the “Options” menu provides you with the ability to customize different aspects of Outlook according to your preferences. From here, you can modify settings related to mail, calendar, contacts, and more.
It’s important to note that the location of the “Options” link may slightly vary depending on your version of Outlook. However, it is typically found in the left-hand menu of the drop-down menu that appears after clicking on the “File” tab.
Now that you have successfully completed the second step by clicking on “Options,” you are one step closer to deleting an address from the Outlook Autocomplete list on your Windows computer.
In the next step, we will navigate to the specific settings related to mail, where you can manage and delete addresses from the Autocomplete list.
Step 3: In the Outlook Options window, click on “Mail” on the left-hand side
After accessing the “Options” menu in Outlook, the next step to delete an address from the Outlook Autocomplete list on Windows is to navigate to the “Mail” settings. Follow the instructions below to complete this step:
- Once you have clicked on “Options,” the Outlook Options window will open. This window contains various settings and preferences for customizing your Outlook experience.
- In the left-hand menu of the Outlook Options window, locate and click on the “Mail” option. This selection will be under a specific category, typically represented by an icon resembling an envelope.
Clicking on “Mail” in the Outlook Options window will take you to a new section where you can manage different settings related to your email, including the Autocomplete list.
It’s important to note that the organization and layout of the Outlook Options window may slightly vary depending on your version of Outlook. However, you can typically find the “Mail” option in the left-hand menu, which is accessible from the Outlook Options window.
Now that you have successfully completed the third step by clicking on “Mail” in the Outlook Options window, you are one step closer to deleting an address from the Outlook Autocomplete list on your Windows computer.
In the next step, we will proceed to the specific settings within the “Mail” section to manage and delete addresses from the Autocomplete list.
Step 4: Scroll down to the “Send messages” section and click on “Empty Auto-Complete List”
After navigating to the “Mail” section in the Outlook Options window, the next step to delete an address from the Outlook Autocomplete list on Windows is to locate the “Send messages” section and empty the Auto-Complete list. Follow the instructions below to complete this step:
- In the “Mail” section of the Outlook Options window, scroll down until you find the “Send messages” heading. This section contains settings related to composing and sending emails.
- Within the “Send messages” section, look for the option that says “Empty Auto-Complete List.” This option is specifically designed to clear all the addresses stored in the Autocomplete list.
- Once you have located the “Empty Auto-Complete List” option, click on it. This action will initiate the process of deleting all the addresses from the Autocomplete list.
By clicking on “Empty Auto-Complete List,” you are instructing Outlook to remove all the stored addresses from the Autocomplete list. This ensures that no outdated or incorrect addresses are suggested when composing emails in the future.
It’s important to note that this action is irreversible, and all the addresses will be permanently deleted from the Autocomplete list. Therefore, make sure you have a backup or note of any addresses that you still need before proceeding.
Now that you have successfully completed the fourth step by emptying the Auto-Complete list, you have effectively deleted all the addresses from the Outlook Autocomplete list on your Windows computer.
In the next step, we will confirm the deletion and ensure that the unwanted addresses are removed from the Autocomplete list.
Step 5: Confirm the deletion by clicking “Yes”
After emptying the Auto-Complete list in the “Send messages” section of the Outlook Options window, the final step to delete an address from the Outlook Autocomplete list on Windows is to confirm the deletion. Follow the instructions below to complete this step:
- Once you have clicked on “Empty Auto-Complete List,” a warning dialog box will appear, asking for your confirmation to proceed with the deletion.
- Read the warning message carefully, as it informs you that all the addresses stored in the Autocomplete list will be permanently deleted. Make sure you have a backup or note of any addresses that you still need.
- To confirm the deletion and proceed with removing the addresses from the Autocomplete list, click on the “Yes” button in the dialog box.
By clicking “Yes,” you are affirming your choice to delete all the addresses from the Outlook Autocomplete list. Once confirmed, you will no longer see those addresses suggested when composing emails.
It’s important to note that this action cannot be undone. Therefore, it’s crucial to double-check and ensure that you have no further need for the addresses stored in the Autocomplete list.
Now that you have successfully completed the final step by confirming the deletion, you have effectively removed all the addresses from the Outlook Autocomplete list on your Windows computer.
Congratulations! You have successfully deleted an address from the Outlook Autocomplete list using the Windows desktop application. You can now enjoy a clean and organized Autocomplete list when composing emails in Outlook.
How to delete an address from the Outlook Autocomplete list on Mac
If you’re using the Outlook application on a Mac computer, you can delete an address from the Autocomplete list by following these steps:
- Step 1: Open Outlook on your Mac by clicking on the application icon in the Dock or by searching for “Outlook” in Spotlight.
- Step 2: In the top menu bar, click on “Outlook” and then select “Preferences” from the dropdown menu. This will open the Outlook Preferences window.
- Step 3: In the Preferences window, click on the “Composing” icon under the “Email” section. This will display the email composing settings.
- Step 4: Click on the “AutoComplete” tab. Here, you will find a list of addresses that are stored in the Autocomplete list.
- Step 5: Select the desired email address that you want to delete from the Autocomplete list. You can do this by clicking on the address to highlight it.
- Step 6: Once the email address is selected, click on the “Remove” button located at the bottom of the Preferences window. This will remove the selected address from the Autocomplete list.
By following these steps, you can easily delete an address from the Outlook Autocomplete list on your Mac. This helps you maintain a clean and up-to-date list of suggested email addresses when composing messages.
It’s important to note that the Autocomplete list in Outlook on Mac is specific to the account you are logged into. If you have multiple email accounts connected to Outlook, make sure you are deleting the address from the correct account’s Autocomplete list.
Now that you know how to delete an address from the Outlook Autocomplete list on your Mac, you can efficiently manage your email suggestions and ensure that outdated or incorrect addresses are removed.
Step 1: Open Outlook and click on “Preferences” in the “Outlook” menu
The first step to deleting an address from the Outlook Autocomplete list on a Mac is to open the Outlook application and access the “Preferences” menu. Follow the instructions below to complete this step:
- Launch the Outlook application on your Mac by clicking on the Outlook icon in your Dock or by searching for “Outlook” in Spotlight.
- In the top menu bar of your screen, look for the “Outlook” menu. Click on it to access a list of options related to Outlook.
- In the dropdown menu, locate and click on the “Preferences” option. This will open the Outlook Preferences window, where you can customize various settings.
By clicking on “Preferences” in the “Outlook” menu, you are indicating your intention to modify specific settings and preferences within the Outlook application. This menu serves as a gateway to a wide range of customization options for your Outlook experience.
It’s important to note that the location and appearance of the “Preferences” option may slightly vary depending on the version of Outlook you are using. However, it is typically found in the top menu bar under the “Outlook” menu.
Now that you have successfully completed the first step by clicking on “Preferences,” you are ready to proceed to the next step, which will bring you closer to deleting an address from the Outlook Autocomplete list on your Mac.
Step 2: In the Preferences window, click on “Composing” under the “Email” section
After opening the Outlook application on your Mac and accessing the “Preferences” menu, the next step to delete an address from the Outlook Autocomplete list is to navigate to the “Composing” settings under the “Email” section. Follow the instructions below to complete this step:
- Once the Outlook Preferences window is open, you will see a list of options and categories on the left-hand side.
- Locate and click on “Composing” under the “Email” section. This selection will bring up the composing settings for your emails.
Clicking on “Composing” allows you to customize various aspects of email composition, including the Autocomplete list, in Outlook on your Mac.
It’s important to note that the organization and layout of the Outlook Preferences window may slightly vary depending on the version of Outlook you are using. However, you can typically find the “Composing” option under the “Email” section.
Now that you have successfully completed the second step by clicking on “Composing” under the “Email” section, you are one step closer to deleting an address from the Outlook Autocomplete list on your Mac.
In the next step, we will navigate to the specific Autocomplete settings within the “Composing” section, where you can manage and delete addresses from the Autocomplete list.
Step 3: Click on the “AutoComplete” tab
After accessing the “Composing” settings under the “Email” section in the Outlook Preferences window on your Mac, the next step to delete an address from the Outlook Autocomplete list is to navigate to the “AutoComplete” tab. Follow the instructions below to complete this step:
- Once you are in the “Composing” section, look for and click on the “AutoComplete” tab. This tab contains the settings related to the Autocomplete list in Outlook.
Clicking on the “AutoComplete” tab allows you to manage and customize the Autocomplete list, including the ability to delete specific addresses that are suggested when composing emails.
It’s important to note that the location and naming of the “AutoComplete” tab may slightly vary depending on the version of Outlook you are using. However, it is typically labeled as “AutoComplete” or “Autocomplete” and can be found within the “Composing” section of the Outlook Preferences window.
Now that you have successfully completed the third step by clicking on the “AutoComplete” tab, you are one step closer to deleting an address from the Outlook Autocomplete list on your Mac.
In the next step, we will proceed to select and remove the desired email address from the Autocomplete list.
Step 4: Select the desired email address to delete from the Autocomplete list
Once you have accessed the “AutoComplete” tab within the “Composing” settings in Outlook Preferences on your Mac, the next step to delete an address from the Outlook Autocomplete list is to select the specific email address that you wish to remove. Follow the instructions below to complete this step:
- On the “AutoComplete” tab, you will see a list of email addresses that are stored in the Autocomplete list.
- Scan through the list and locate the email address that you want to delete from the Autocomplete list.
- Click on the desired email address to select it. The selected email address may appear highlighted or with a checkmark next to it, depending on the version of Outlook you are using.
By selecting the desired email address, you are indicating your intention to remove it from the Autocomplete list in Outlook. This action helps ensure that the address will no longer be suggested when composing emails.
It’s important to note that you can select and remove multiple email addresses if you wish to delete more than one from the Autocomplete list.
Now that you have successfully completed the fourth step by selecting the email address you want to delete, you are one step closer to removing it from the Outlook Autocomplete list on your Mac.
In the next step, we will proceed to delete the selected email address from the Autocomplete list.
Step 5: Click on the “Remove” button
After selecting the desired email address to delete from the Autocomplete list in Outlook on your Mac, the final step is to remove it from the list. Follow the instructions below to complete this step:
- On the “AutoComplete” tab, locate the “Remove” button at the bottom of the Outlook Preferences window.
- Once you have found the “Remove” button, click on it to initiate the removal of the selected email address from the Autocomplete list.
By clicking on the “Remove” button, you are confirming your decision to delete the selected email address from the Autocomplete list in Outlook on your Mac. Once removed, the email address will no longer appear as a suggestion when composing emails.
It’s important to note that the “Remove” button will only delete the selected email address from the Autocomplete list. Other email addresses in the list will remain unaffected. If you wish to delete multiple addresses, you will need to repeat the process for each address.
Now that you have successfully completed the final step by clicking on the “Remove” button, you have effectively deleted the selected email address from the Outlook Autocomplete list on your Mac.
Congratulations! You have successfully removed an address from the Outlook Autocomplete list using the Mac version of Outlook. You can now enjoy a streamlined and personalized Autocomplete list when composing emails in Outlook.
How to delete an address from the Outlook Autocomplete list using the Outlook Web App
If you’re using the Outlook Web App, you can easily delete an address from the Outlook Autocomplete list by following these steps:
- Step 1: Login to your Outlook account on the web by visiting the Outlook website and entering your credentials.
- Step 2: Once you are logged in, locate the “Settings” cog icon in the top-right corner of the Outlook interface and click on it. A dropdown menu will appear.
- Step 3: From the dropdown menu, select “Options”. This will open the Options pane, where you can manage various settings for your Outlook account.
- Step 4: In the Options pane, click on “General” in the left-hand menu.
- Step 5: Scroll down until you find the “My account” section and click on it.
- Step 6: Under “Account information,” you will see an option called “Delete cached addresses.” Click on this option.
By following these steps, you can delete cached addresses from the Outlook Autocomplete list using the Outlook Web App. This helps you maintain an up-to-date and relevant list of suggestions when composing emails.
It’s important to note that clearing cached addresses will remove all the addresses stored in the Autocomplete list. This action is not reversible, so make sure you save any addresses you still need elsewhere before proceeding.
Now that you know how to delete an address from the Outlook Autocomplete list using the Outlook Web App, you can easily manage and customize your email suggestions according to your preferences.
Step 1: Login to your Outlook account on the web
The first step to delete an address from the Outlook Autocomplete list using the Outlook Web App is to login to your Outlook account on the web. Follow the instructions below to complete this step:
- Open a web browser on your computer and visit the Outlook website.
- Enter your email address and password in the respective fields on the Outlook login page.
- Click on the “Sign In” or “Login” button to proceed.
By logging in to your Outlook account on the web, you gain access to all the features and settings available in the Outlook Web App, including the ability to manage the Autocomplete list.
It’s important to note that you will need to have the correct login credentials, which typically include your email address and password, to successfully login to your Outlook account on the web.
Now that you have successfully completed the first step by logging in to your Outlook account on the web, you are ready to proceed to the next step, which will bring you closer to deleting an address from the Outlook Autocomplete list using the Outlook Web App.
Step 2: Click on the “Settings” cog in the top-right corner and select “Options”
After logging in to your Outlook account on the web, the next step to delete an address from the Outlook Autocomplete list using the Outlook Web App is to access the settings and options. Follow the instructions below to complete this step:
- Once you are signed in, look for the “Settings” cog icon located in the top-right corner of the Outlook interface. It is represented by a gear or a cogwheel.
- Click on the “Settings” cog, and a dropdown menu will appear with various options.
- From the dropdown menu, select “Options” to proceed to the Options pane, where you can manage various settings for your Outlook account.
By clicking on the “Settings” cog and selecting “Options”, you are accessing the configuration settings for your Outlook account on the web. The Options pane allows you to modify and customize various aspects of your Outlook experience.
It’s important to note that the appearance and position of the “Settings” cog icon may vary slightly depending on the version of the Outlook Web App you are using. However, it is typically located in the top-right corner of the interface.
Now that you have successfully completed the second step by clicking on the “Settings” cog and selecting “Options”, you are one step closer to deleting an address from the Outlook Autocomplete list using the Outlook Web App.
In the next step, we will navigate to the specific settings related to the Autocomplete list within the Options pane.
Step 3: In the Options pane, click on “General” and then “My account”
After accessing the Options pane by clicking on the “Settings” cog and selecting “Options” in the Outlook Web App, the next step to delete an address from the Outlook Autocomplete list is to navigate to the “General” settings and then select “My account”. Follow the instructions below to complete this step:
- Once you are in the Options pane, look for the “General” section. This section generally contains basic account settings and preferences.
- Click on “General” to expand the options available within this section.
- Within the “General” section, locate and click on “My account”. This selection will bring up the settings related to your Outlook account.
Clicking on “My account” within the “General” section allows you to access and modify various account-specific settings in the Outlook Web App.
It’s important to note that the organization and layout of the Options pane in the Outlook Web App may slightly vary depending on the version and customization of your account. However, you can typically find the “General” section and the “My account” option within it.
Now that you have successfully completed the third step by clicking on “General” and then “My account” in the Options pane, you are one step closer to deleting an address from the Outlook Autocomplete list using the Outlook Web App.
In the next step, we will proceed to the specific settings within the “My account” section, where you can delete cached addresses from the Autocomplete list.
Step 4: Under “Account information”, click on “Delete cached addresses”
After navigating to the “My account” section within the Options pane in the Outlook Web App, the next step to delete an address from the Outlook Autocomplete list is to locate the “Delete cached addresses” option. Follow the instructions below to complete this step:
- Within the “My account” section, look for the category labeled “Account information”. This section typically contains various settings related to your Outlook account.
- Under “Account information”, you will find an option called “Delete cached addresses”. Click on this option to proceed.
By clicking on “Delete cached addresses” under the “Account information” category, you are indicating your intention to remove the cached addresses from the Autocomplete list in Outlook Web App.
It’s important to note that deleting cached addresses will permanently remove all the addresses stored in the Autocomplete list. This action cannot be reversed, so make sure you have a backup or note of any addresses you still need before proceeding.
Now that you have successfully completed the fourth step by clicking on “Delete cached addresses”, you are one step closer to removing addresses from the Outlook Autocomplete list using the Outlook Web App.
In the next step, we will confirm the deletion and ensure that the unwanted addresses are removed from the Autocomplete list.
Step 5: Confirm the deletion by clicking “Yes”
After clicking on “Delete cached addresses” under the “Account information” section in the Outlook Web App, the final step is to confirm the deletion of the cached addresses from the Outlook Autocomplete list. Follow the instructions below to complete this step:
- Once you have clicked on “Delete cached addresses,” a prompt window will appear, asking for your confirmation to proceed with the deletion.
- Read the prompt message carefully, as it informs you that all the cached addresses stored in the Autocomplete list will be permanently deleted.
- To confirm the deletion and proceed with removing the addresses from the Autocomplete list, click on the “Yes” button in the prompt window.
By clicking “Yes,” you are confirming your choice to delete the cached addresses from the Outlook Autocomplete list in the Outlook Web App. Once confirmed, the addresses will no longer be suggested when composing emails.
It’s important to note that this action cannot be undone. Therefore, it’s crucial to double-check and ensure that you have no further need for the addresses stored in the Autocomplete list.
Now that you have successfully completed the final step by confirming the deletion, the unwanted addresses are effectively removed from the Outlook Autocomplete list using the Outlook Web App.
Congratulations! You have successfully deleted an address from the Outlook Autocomplete list using the Outlook Web App. You can now enjoy a streamlined and updated suggestion list when composing emails in the Outlook Web App.