
Choosing the Right Ethernet Cable
When it comes to connecting your laptop to the internet using an Ethernet cable, choosing the right cable is essential. There are different types of Ethernet cables available, each designed for specific purposes. In this section, we’ll help you navigate through the options and select the right Ethernet cable for your laptop.
1. Check the Speed Requirements: Determine the internet speed you are subscribing to. Different Ethernet cables support different speeds. Cat5e cables support speeds up to 1 Gbps, Cat6 cables support speeds up to 10 Gbps, and Cat6a cables support speeds up to 10 Gbps over longer distances. Choose the cable that matches or exceeds the internet speed you require.
2. Consider Cable Length: Measure the distance between your laptop and the router or Ethernet port. Ethernet cables are available in various lengths, so make sure to choose one that is long enough to comfortably reach your laptop without tension or excessive slack. It’s better to have a slightly longer cable than one that is too short.
3. Cable Durability: Pay attention to the cable’s build quality. Look for cables with high-quality connectors that are well-made and durable. Shielded cables provide better protection against interference, making them suitable for areas with electromagnetic interference.
4. Cost Considerations: Ethernet cables come in different price ranges. While it’s tempting to opt for the cheapest option, consider investing in a higher-quality cable if you plan on using it frequently or for extended periods. A good-quality cable will provide better performance and longevity.
5. Compatibility: Ensure that the Ethernet cable you choose is compatible with your laptop’s Ethernet port. Most laptops have standard Ethernet ports, but some newer models may require adapters or dongles for connectivity. Check your laptop’s specifications or consult the manufacturer’s website for compatibility details.
By considering these factors, you can choose the right Ethernet cable for your laptop, ensuring reliable and high-speed internet connectivity. Take your time to research and make an informed decision based on your specific requirements. Once you have selected the suitable cable, you can proceed to the next steps to connect it to your laptop.
Checking for an Ethernet Port on Your Laptop
Before connecting an Ethernet cable to your laptop, you need to ensure that your laptop is equipped with an Ethernet port. An Ethernet port is a small opening on the side or back of your laptop that allows for a physical connection to a network using an Ethernet cable. Follow these steps to check if your laptop has an Ethernet port:
1. Examine the Laptop Exterior: Look around the sides and back of your laptop for any rectangular-shaped ports. An Ethernet port typically resembles a wider and slightly thicker port compared to other ports such as USB or HDMI. It may have a small, recognizable icon that looks like three arrows pointing upward or downward, indicating network connectivity.
2. Check Laptop Documentation: If you’re unsure whether your laptop has an Ethernet port, refer to the laptop’s user manual or check the manufacturer’s website. These resources will provide detailed specifications about your laptop’s hardware, including the presence of an Ethernet port.
3. Review Laptop Network Settings: Another way to check for an Ethernet port is to access your laptop’s network settings. On Windows laptops, navigate to the Control Panel or Settings, then click on Network and Internet or Network Connections. Look for an Ethernet or LAN connection option. On Mac laptops, go to System Preferences, then click on Network. You should see an Ethernet section if your laptop has an Ethernet port.
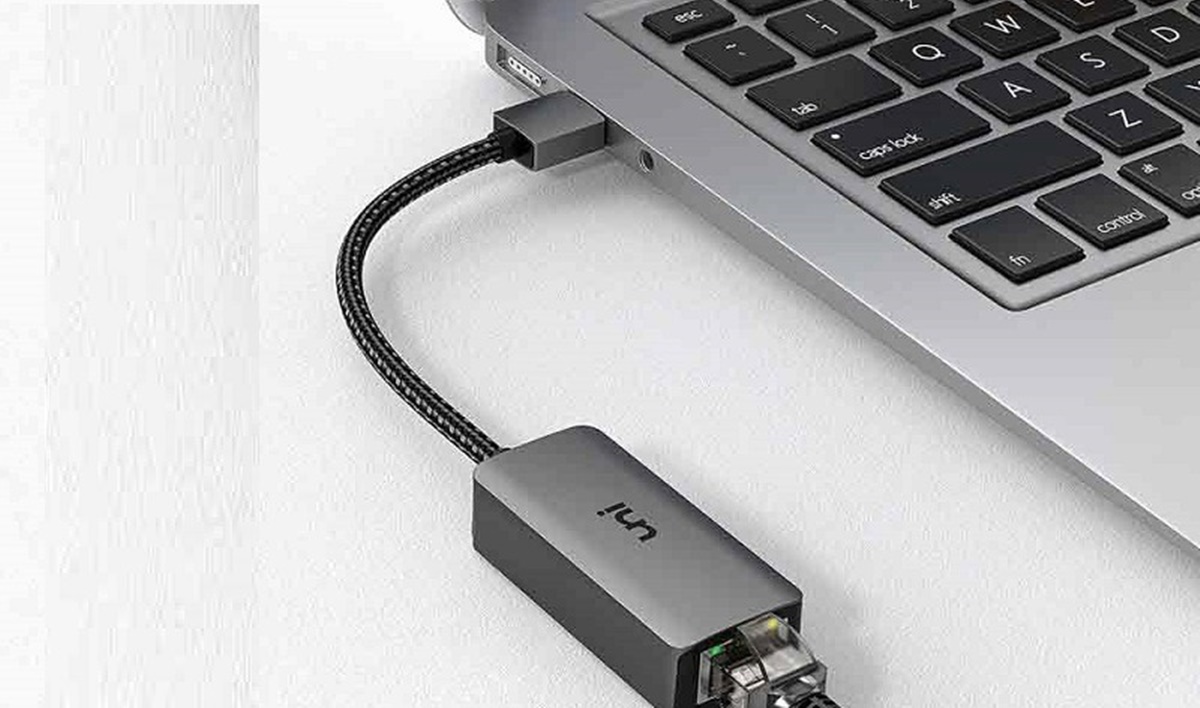
If you find that your laptop does have an Ethernet port, you’re ready to proceed with connecting the Ethernet cable. If your laptop doesn’t have an Ethernet port, don’t worry. You can still connect to a network using an Ethernet-to-USB adapter. This small device plugs into a USB port on your laptop and provides an Ethernet port for connectivity.
Now that you know whether your laptop has an Ethernet port or requires an adapter, you can move on to the next step of gathering the necessary equipment to connect the Ethernet cable to your laptop.
Gathering the Necessary Equipment
Once you’ve confirmed that your laptop has an Ethernet port or identified the need for an Ethernet-to-USB adapter, it’s time to gather the necessary equipment to connect your laptop to the internet using an Ethernet cable. Here’s what you’ll need:
1. Ethernet Cable: Select an Ethernet cable that matches your requirements, considering factors such as speed, length, and durability as discussed earlier. Make sure it is long enough to comfortably reach from your laptop to the router or Ethernet port.
2. Ethernet-to-USB Adapter: If your laptop doesn’t have an Ethernet port, you’ll need an Ethernet-to-USB adapter. This adapter allows you to connect the Ethernet cable to a USB port on your laptop, providing the necessary network connectivity.
3. Laptop Power Source: It’s a good idea to have your laptop connected to a power source during the process. This ensures that your laptop doesn’t run out of battery while you’re connected to the internet or performing any downloads or updates.
4. Internet Connection: Ensure that your router or the Ethernet port you’re connecting to has a stable internet connection. It’s best to have the router powered on and connected to the internet before starting the connection process.
5. Optional: Surge Protector: Although not essential, using a surge protector can help protect your laptop and other devices from power surges or electrical disturbances. It adds an extra layer of safety to your setup.
Before proceeding, double-check that you have all the necessary equipment on hand. Once you’ve gathered everything, you’re ready to turn off your laptop and move on to the next steps of connecting the Ethernet cable.
Turning Off Your Laptop
Before connecting an Ethernet cable to your laptop, it’s important to turn off your laptop to ensure a safe and smooth connection process. Follow these steps to turn off your laptop:
1. Save and Close Programs: Save any open documents or files and close all running programs. This prevents any data loss or interruptions during the shutdown process.
2. Disconnect External Devices: If you have any external devices such as USB drives, external hard drives, or headphones connected to your laptop, safely disconnect them. This prevents any potential data loss or damage to the devices when the laptop powers off.
3. Shut Down the Laptop: On a Windows laptop, click on the Start menu, then select the power icon (usually a power symbol) and choose “Shut down” from the options. On a Mac laptop, click on the Apple menu, then select “Shut Down”. Follow any additional prompts or confirmations to initiate the shutdown process.
4. Wait for Complete Shutdown: Allow your laptop to fully shut down before proceeding with the next steps. This ensures that all the processes are properly closed and the laptop is in a state ready for connection.
Turning off your laptop not only ensures a safe connection process but also allows for a proper reset of the network settings. Now that your laptop is turned off, you’re ready to locate the Ethernet port on your laptop and continue with connecting the Ethernet cable.
Locating the Ethernet Port on Your Laptop
Before connecting an Ethernet cable to your laptop, you need to locate the Ethernet port. The Ethernet port is the physical interface on your laptop that allows you to connect the cable for wired internet connectivity. Follow these steps to locate the Ethernet port on your laptop:
1. Examine the Laptop’s Exterior: Look around the sides and back of your laptop for any rectangular-shaped ports. The Ethernet port is usually wider and slightly thicker compared to other ports, such as USB or HDMI. It may have a small icon resembling three arrows pointing upward or downward, indicating network connectivity.
2. Check the Laptop’s User Manual or Manufacturer’s Website: If you’re having trouble locating the Ethernet port, refer to your laptop’s user manual or visit the manufacturer’s website for detailed specifications. These resources will provide you with visual guides or descriptions to help identify the Ethernet port on your specific laptop model.
3. Look for Network Symbols or Labels: Some laptops may have symbols or labels near the Ethernet port indicating its function. These symbols might include a globe, the letters “LAN” or “WAN,” or the word “Ethernet.” Pay close attention to any markings or labels that can help you locate the port accurately.
4. Review Network Settings: If you’re still unable to find the Ethernet port, you can access your laptop’s network settings. On Windows laptops, navigate to the Control Panel or Settings, then click on Network and Internet or Network Connections. Look for an Ethernet or LAN connection option. On Mac laptops, go to System Preferences, then click on Network. You should see an Ethernet section if your laptop has an Ethernet port.
If you’re using an Ethernet-to-USB adapter, connect the adapter to an available USB port on your laptop. Then, connect the Ethernet cable to the adapter. The adapter should have an Ethernet port where you can easily plug in the cable.
Now that you’ve located the Ethernet port on your laptop or connected the Ethernet-to-USB adapter, you’re ready to prepare the Ethernet cable for connection.
Preparing the Ethernet Cable
Before connecting the Ethernet cable to your laptop, it’s important to properly prepare the cable for a secure and reliable connection. Follow these steps to prepare the Ethernet cable:
1. Inspect the Cable: Check the Ethernet cable for any signs of damage, such as frayed wires or loose connectors. If you notice any damage, it’s best to replace the cable to ensure a stable connection.
2. Untangle the Cable: Ethernet cables can sometimes get tangled, which may affect the connection quality. Untangle the cable carefully to ensure it is free from knots or interference that could impede the signal.
3. Straighten the Cable: If the Ethernet cable is bent or curled, gently straighten it out. A straight cable allows for a more reliable connection and minimizes any signal loss or interruptions.
4. Verify the Connectors: Check that the connectors on each end of the cable are securely attached. Make sure they are firmly connected and free from any debris or obstructions that could interfere with the connection.
5. Clean the Connectors (if needed): If the connectors appear dirty or dusty, use a clean, dry cloth to gently wipe them. Cleaning the connectors can help ensure better contact and minimize signal interference.
6. Avoid Sharp Bends: Ensure that there are no sharp bends or kinks in the Ethernet cable, as this can strain the internal wires and affect the signal quality. Keep the cable as straight and smooth as possible during the connection process.
By properly preparing the Ethernet cable, you can help ensure a reliable and stable connection between your laptop and the network. Once the cable is ready, you can proceed to the next step of plugging the Ethernet cable into your laptop.
Plugging the Ethernet Cable into Your Laptop
Now that you have prepared the Ethernet cable, it’s time to plug it into your laptop. Follow these steps to securely connect the Ethernet cable to your laptop:
1. Locate the Ethernet Port: Refer back to the previous section to locate the Ethernet port on your laptop. It is typically a rectangular-shaped port that is wider and slightly thicker than other ports, such as USB or HDMI.
2. Align the Connector: Take one end of the Ethernet cable and align it with the Ethernet port on your laptop. The connector should smoothly fit into the port without much resistance. Make sure the connector is facing the correct way to avoid any damage.
3. Insert the Connector: Gently push the Ethernet cable connector into the Ethernet port until it clicks or feels securely connected. Avoid forcing the connector or applying excessive pressure, as this can lead to damage or a faulty connection.
4. Secure the Connection: Once the connector is inserted, give it a gentle tug to ensure it is firmly attached and won’t disconnect easily. It’s important to have a secure connection to maintain uninterrupted internet access.
If you’re using an Ethernet-to-USB adapter, connect the Ethernet cable into the Ethernet port on the adapter. Then, insert the USB end of the adapter into an available USB port on your laptop. Ensure that both connections are secure and snug.
Now that you have successfully connected the Ethernet cable to your laptop, you can proceed to power on your laptop and enjoy a fast and reliable wired internet connection. However, before powering on your laptop, it’s a good idea to review some troubleshooting tips in case you encounter any connectivity issues.
Powering On Your Laptop
With the Ethernet cable securely connected to your laptop, it’s time to power on your device and establish a connection to the network. Follow these steps to power on your laptop:
1. Connect to Power Source: Ensure that your laptop is connected to a power source. This can be done by plugging in the power adapter to an electrical outlet and connecting it to your laptop’s power port. Having a stable power source ensures uninterrupted usage and prevents your laptop from running out of battery during the internet connection process.
2. Press the Power Button: Locate the power button on your laptop. It is usually located on the top panel, near the keyboard, or on the side of the device. Press and hold the power button for a few seconds until you see signs of your laptop powering on, such as lights or the display turning on.
3. Wait for Startup: After pressing the power button, your laptop will take some time to start up. This process may involve displaying the brand logo, running system checks, and loading the operating system. Be patient and wait for your laptop to fully boot up.
4. Check Network Connection: Once your laptop has finished booting up, check if you are connected to the network. Look for the network icon in the system tray or menu bar, which typically resembles signal bars or a globe. If you see a network icon with bars or a connection symbol, it indicates a successful network connection.
If you don’t have an internet connection, ensure that the Ethernet cable is securely plugged in and that you have properly configured network settings. If the issue persists, refer to the troubleshooting tips in the next section for assistance.
Now that your laptop is powered on and connected to the network, you can enjoy fast and reliable internet access. In case you encounter any connectivity issues, refer to the troubleshooting tips to help resolve the problem.
Troubleshooting Tips
While connecting your laptop to the internet using an Ethernet cable is usually a straightforward process, you may encounter some common issues. Here are some troubleshooting tips to help resolve any connectivity problems you may face:
1. Check Cable Connection: Ensure that the Ethernet cable is securely plugged into both your laptop and the router or Ethernet port. Sometimes, a loose connection can cause intermittent or no internet access.
2. Restart the Router: Power cycle your router by unplugging it from the power source for about 30 seconds, then plugging it back in. This can help refresh the network connection and resolve any temporary issues.
3. Update Network Drivers: Check if your laptop’s network drivers are up to date. Outdated drivers can cause connectivity issues. Visit the manufacturer’s website or use third-party software to update the drivers to the latest version.
4. Disable/Enable Network Adapter: Temporarily disable and re-enable the network adapter on your laptop. This can help refresh the network settings and resolve any minor configuration issues. Right-click on the network icon in the system tray on Windows or use the Network preferences on Mac to disable and enable the adapter.
5. Restart Your Laptop: Sometimes, a simple restart of your laptop can fix connectivity problems. Close all programs and restart your device to reset the network settings and establish a fresh connection to the network.
6. Check Firewall and Security Settings: Ensure that your laptop’s firewall or security software is not blocking the network connection. Temporarily disable any firewall or security software and check if you can access the internet. If so, adjust the settings to allow the network connection.
7. Test with Different Cable/Port: If possible, try using a different Ethernet cable or connect to a different Ethernet port on your router or the Ethernet switch. This helps rule out any issues with the cable or port itself.
If you have gone through the troubleshooting steps and still cannot establish a network connection, it may be worth contacting your internet service provider (ISP) or seeking technical support for further assistance.
By following these troubleshooting tips, you can resolve common connectivity issues and ensure a smooth and reliable connection between your laptop and the network.