
Check the ports on your Mac and the projector
Before connecting your Mac to a projector, it’s essential to ensure that both devices have compatible ports. This will allow for a seamless and hassle-free connection. Here’s how you can check the ports on your Mac and the projector:
- Inspect the ports on your Mac: Macs usually come with a variety of ports, including HDMI, Thunderbolt/Mini DisplayPort, USB-C, and VGA. Take a moment to examine the ports on your Mac and identify which ones are available.
- Examine the ports on the projector: Projectors generally have VGA, HDMI, or both types of ports. Check the back or side of the projector to see which ports are available. It’s important to have a clear idea of the available ports on the projector to match them with the ports on your Mac.
If your Mac and the projector have matching ports, you’re good to go! However, if they don’t, don’t fret – you can still connect them using the appropriate adapters or cables. In the next section, we’ll discuss how to obtain the necessary cables or adapters to ensure compatibility between your Mac and the projector.
Obtain the necessary cables or adapters
To successfully connect your Mac to a projector, you may need to acquire specific cables or adapters based on the ports available on both devices. Here’s what you can do to obtain the necessary cables or adapters:
- Determine the required cable or adapter: Once you have identified the ports on your Mac and the projector, determine which type of cable or adapter is needed to establish a connection. For example, if your Mac has an HDMI port, but the projector only has a VGA port, you will need an HDMI to VGA adapter or cable.
- Research and purchase the cables or adapters: To find the appropriate cables or adapters, conduct some research online or visit a local electronics store. Make sure to choose reputable brands to ensure high-quality and reliable connections. It’s also helpful to read customer reviews and check compatibility with your specific Mac model.
- Consider universal adapters: If you frequently connect your Mac to various projectors with different ports, investing in a universal adapter might be a wise choice. These adapters often have multiple output options, allowing you to connect to different types of ports without the need for multiple cables or adapters.
- Ensure compatibility and quality: When purchasing cables or adapters, verify that they are compatible with your Mac model and the projector’s ports. It’s essential to choose cables or adapters that support the maximum resolution and refresh rates for optimal display quality. Poor-quality cables or adapters can result in signal loss or degraded image quality.
By obtaining the necessary cables or adapters, you’ll ensure a smooth and seamless connection between your Mac and the projector. Now that you have the required equipment, let’s move on to the next section to learn how to connect your Mac to the projector using different types of cables.
Connect the Mac to the projector using a VGA cable
If both your Mac and the projector have VGA ports, you can connect them using a VGA cable. Follow these simple steps to establish the connection:
- Power off your Mac and the projector: Before connecting any cables, ensure that both devices are turned off to avoid any potential damage.
- Locate the VGA ports: Identify the VGA port on your Mac and the corresponding VGA port on the projector. They are usually labeled or color-coded for easy identification.
- Connect one end of the VGA cable: Take one end of the VGA cable and insert it firmly into the VGA port on your Mac. Ensure it is securely attached and has a snug fit.
- Connect the other end of the VGA cable: Take the other end of the VGA cable and insert it into the VGA port on the projector. Like before, make sure the connection is secure.
- Power on your Mac and the projector: Once the cables are properly connected, turn on both your Mac and the projector.
- Adjust the display settings: On your Mac, go to the “System Preferences” and navigate to the “Displays” option. Here, you can adjust the resolution and select the projector as the primary display or enable mirroring, depending on your preferences.
Once the connection is established and the display settings are adjusted, your Mac’s screen should be mirrored or extended onto the projector. Now you can start showcasing your presentations, videos, or any other content on a larger screen.
Connect the Mac to the projector using an HDMI cable
If your Mac and the projector have HDMI ports, connecting them using an HDMI cable is a straightforward process. Here’s how you can do it:
- Power off your Mac and the projector: Before connecting the HDMI cable, ensure that both devices are turned off to avoid any potential damage.
- Identify the HDMI ports: Locate the HDMI port on your Mac and the corresponding HDMI port on the projector. These ports are usually labeled or color-coded for easy identification.
- Connect one end of the HDMI cable: Take one end of the HDMI cable and insert it firmly into the HDMI port on your Mac. Ensure it is securely attached and has a snug fit.
- Connect the other end of the HDMI cable: Take the other end of the HDMI cable and insert it into the HDMI port on the projector. Like before, make sure the connection is secure.
- Power on your Mac and the projector: Once the cables are properly connected, turn on both your Mac and the projector.
- Adjust the display settings: On your Mac, go to “System Preferences” and navigate to the “Displays” option. Here, you can adjust the resolution and select the projector as the primary display or enable mirroring, depending on your preferences.
After completing these steps, your Mac’s screen should be mirrored or extended onto the projector. The HDMI connection ensures high-quality audio and video transmission, allowing you to enjoy crisp visuals and immersive sound. Now you can effortlessly share your presentations, videos, and other content on a larger display.
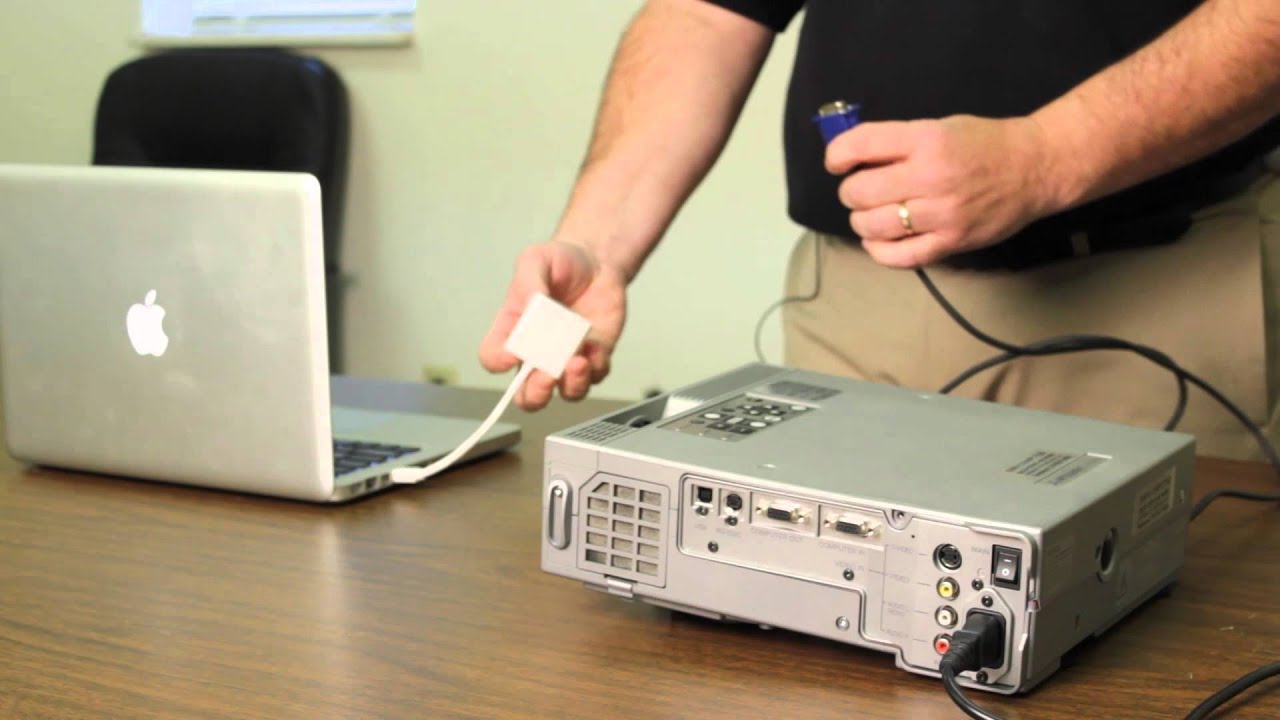
Connect the Mac to the projector using a Thunderbolt/Mini DisplayPort cable
If your Mac has a Thunderbolt or Mini DisplayPort, you can connect it to the projector using a compatible cable. Follow these steps to establish the connection:
- Power off your Mac and the projector: Before connecting any cables, ensure that both devices are turned off to avoid any potential damage.
- Identify the Thunderbolt/Mini DisplayPort: Locate the Thunderbolt or Mini DisplayPort on your Mac. It is usually identified by a symbol or label next to the port.
- Choose the correct cable: Depending on the ports available on your Mac and the projector, select the appropriate cable. Common options include Thunderbolt/Mini DisplayPort to HDMI, VGA, or DVI cables.
- Connect one end of the cable: Insert one end of the Thunderbolt/Mini DisplayPort cable firmly into the corresponding port on your Mac. Make sure it is securely attached and has a snug fit.
- Connect the other end of the cable: Take the other end of the cable and insert it into the corresponding port on the projector. Again, ensure that the connection is secure.
- Power on your Mac and the projector: Once the cables are properly connected, turn on both your Mac and the projector.
- Adjust the display settings: On your Mac, go to “System Preferences” and navigate to the “Displays” option. Here, you can adjust the resolution and select the projector as the primary display or enable mirroring, depending on your preferences.
Upon completing these steps, your Mac’s screen should appear on the projector. The Thunderbolt/Mini DisplayPort connection allows for high-quality audio and video transmission, ensuring a seamless and immersive viewing experience. Now you can easily share your presentations, videos, and other content on a larger screen.
Adjust the display settings on your Mac
Once you’ve connected your Mac to the projector, it’s important to adjust the display settings to ensure optimal performance and compatibility. Here’s how you can do it:
- Go to “System Preferences”: Click on the Apple menu in the top-left corner of your screen and select “System Preferences” from the dropdown menu.
- Select “Displays”: In the System Preferences window, click on the “Displays” icon. This will open the display settings menu.
- Adjust the resolution: In the Display settings menu, you can adjust the resolution to match the optimal settings for your projector. Choose a resolution that is supported by both your Mac and the projector for the best display quality.
- Choose the display arrangement: If you want to extend your desktop across both the Mac and the projector, make sure the “Arrangement” tab is selected. From there, you can drag the white menu bar to the projector screen to set it as your extended display.
- Mirror your display: If you prefer to have an identical display on both your Mac and the projector, click on the “Arrangement” tab and select the “Mirror Displays” option.
- Configure other settings: Depending on your specific needs, you may have additional options to configure, such as refresh rate, color profiles, or screen position. Explore the different tabs and settings to personalize your display setup.
By adjusting the display settings, you can optimize the visual output and ensure that your Mac and the projector are working together harmoniously. Take some time to experiment with the settings until you achieve the desired configuration.
Troubleshoot common connection issues
Sometimes, despite following the steps, you may encounter connection issues when connecting your Mac to a projector. Here are some common problems and troubleshooting steps to resolve them:
- No display on the projector: Double-check that the cables are securely connected to both your Mac and the projector. Ensure that the projector is turned on and set to the correct input source. Try restarting both devices and adjusting the display settings on your Mac.
- Poor display quality: If the projected image appears blurry or distorted, check the resolution settings on your Mac. Ensure that the resolution matches the recommended settings for both your Mac and the projector. Additionally, inspect the cables for any damage or try using a different cable.
- No sound: If you are connecting audio through the projector, make sure the volume is turned up and not muted on both your Mac and the projector. Check the audio settings on your Mac, ensuring the correct output source is selected. If using an adapter, ensure it supports audio transmission.
- Incompatible ports: If your Mac and the projector have different ports, verify that you are using the appropriate adapter or cable. Ensure that the adapter or cable is compatible with your Mac model and supports the necessary conversions between the ports.
- Update software and drivers: Make sure that your Mac’s operating system and projector’s firmware or drivers are up to date. Check for any available updates, as these can often resolve compatibility issues and improve connectivity.
- Try a different port or cable: If you are experiencing persistent issues, attempt connecting to a different port on your Mac or using a different cable. This will help determine if the problem lies with a faulty port or cable.
If you are still experiencing issues after troubleshooting, consult the user manuals or contact the support services for your Mac and the projector. They can provide further assistance and guidance specific to your devices.