
What is a ZIP Archive?
A ZIP archive, also known as a ZIP file, is a compressed folder that contains multiple files and folders. It is a widely used file format for compressing and archiving data in Windows operating systems. ZIP compression allows you to reduce the size of files and folders, making it easier to store, send, and share them. When you create a ZIP archive, the files and folders inside are compressed, which means they are compressed into a smaller size without losing any data.
The ZIP archive format was developed in the 1980s by Phil Katz and has since become one of the most popular compression methods. It uses a lossless compression algorithm, meaning that the original data can be completely restored when the ZIP file is uncompressed. This makes it ideal for transferring files over the internet or storing them in limited disk space.
ZIP archives have several advantages over keeping individual files and folders uncompressed. Firstly, they reduce the overall file size, allowing you to save storage space on your computer or external devices. Secondly, ZIP archives make it more convenient to email or upload multiple files as a single attachment or upload. Instead of sending multiple files separately, you can combine them into a single ZIP file, simplifying the transfer process. Additionally, ZIP archives are also useful for organizing and grouping related files together, making it easier to manage and locate specific data.
Why Use ZIP Compression?
ZIP compression offers numerous benefits that make it a preferred method for storing, sending, and managing files. Here are some of the key reasons why you should consider using ZIP compression:
- File Size Reduction: One of the main advantages of ZIP compression is its ability to significantly reduce the size of files and folders. By compressing data, ZIP files can shrink files by up to 50% or more, depending on the type of files being compressed. This not only saves valuable storage space on your computer or external devices but also makes it faster and more efficient to transfer files over the internet.
- Easier File Sharing: ZIP compression allows you to combine multiple files and folders into a single archive, making it easier to share them with others. Instead of sending or uploading multiple files separately, you can attach or upload a single ZIP archive, reducing the hassle and potential for file mix-ups. This is particularly useful when sending files through email or when uploading files to cloud storage services or online platforms.
- Preservation of File Integrity: Unlike other compression methods that may cause some loss of data quality, ZIP compression is a lossless compression algorithm. This means that the original files and folders can be fully restored without any loss of data or quality when the ZIP archive is uncompressed. Whether you are archiving important documents, images, or other files, ZIP compression ensures that your data remains intact.
- Organization and File Management: ZIP archives provide a convenient way to organize and manage files and folders. Instead of having numerous individual files scattered throughout your computer, you can group related files together in a ZIP archive. This allows for better organization and makes it easier to find and access specific files when needed.
- Improved File Security: ZIP compression also provides an added layer of security for your files. When you create a ZIP archive, you have the option to password protect it, preventing unauthorized access to the contents. This is especially beneficial when transferring sensitive or confidential information over the internet or when storing files on external devices.
In summary, ZIP compression offers file size reduction, easier file sharing, data integrity preservation, enhanced file organization, and improved file security. By utilizing ZIP compression, you can optimize your file management and improve efficiency in storing and transferring files, making it an essential tool in your digital workflow.
How to Create a ZIP Archive in Windows?
Creating a ZIP archive in Windows is a simple and straightforward process. Here is a step-by-step guide on how to create a ZIP archive using built-in functionality in Windows:
- Step 1: Selecting the Files and Folders to Include
Before you can create a ZIP archive, you need to decide which files and folders you want to include in the archive. To do this, navigate to the location where your files and folders are stored and select the ones you wish to compress. You can select multiple files and folders by holding down the Ctrl key while clicking on each item. Once you have made your selections, proceed to the next step. - Step 2: Right-Click and Choose “Send to” Option
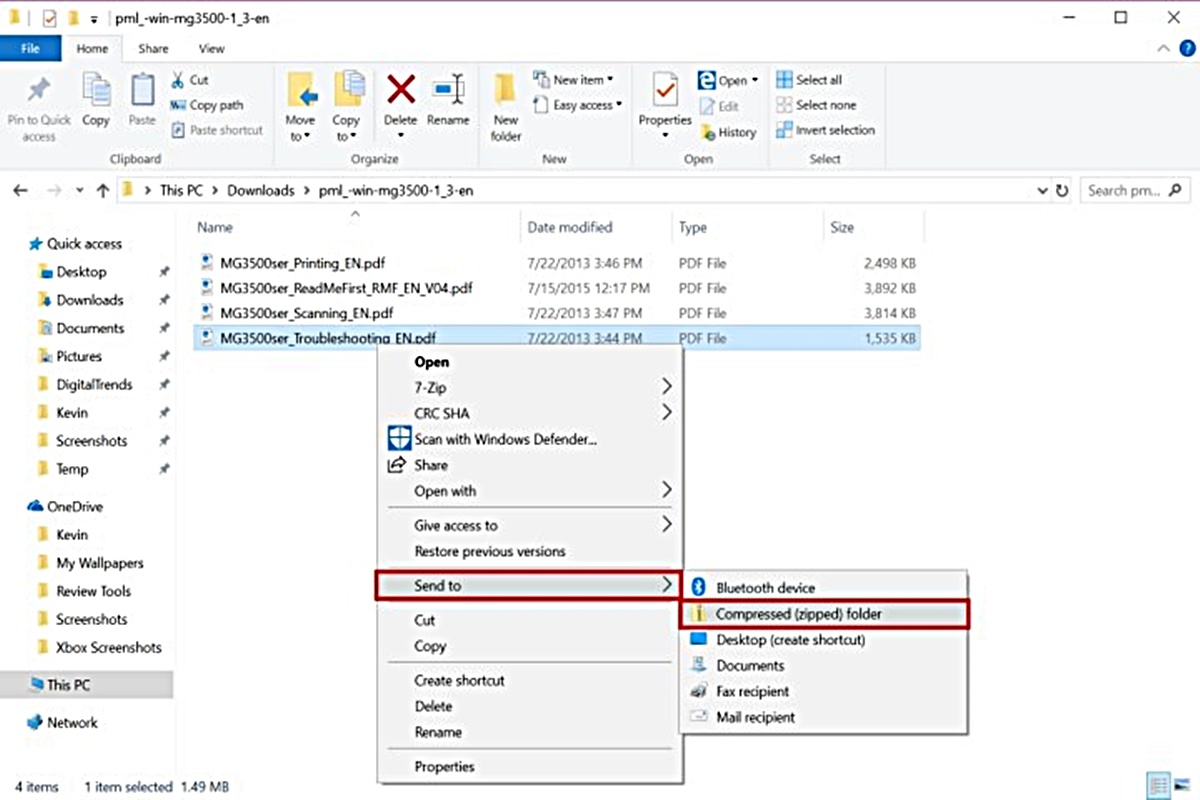
After selecting the files and folders, right-click on any of the selected items. A context menu will appear with various options. Hover your cursor over the “Send to” option. - Step 3: Select “Compressed (zipped) folder”
From the “Send to” submenu, select the “Compressed (zipped) folder” option. This action tells Windows to create a new ZIP archive and includes the selected files and folders in it. - Step 4: Renaming and Saving the ZIP Archive
Once you have selected the “Compressed (zipped) folder” option, Windows will create a new ZIP archive in the same location as the original files and folders. By default, the ZIP archive will have the same name as the first selected item, but you can rename it by right-clicking on the ZIP archive, selecting “Rename,” and entering a new name of your choice.
That’s it! You have successfully created a ZIP archive in Windows. The newly created ZIP archive will contain all the selected files and folders, compressed into a single file. You can now use this ZIP archive for storage, sharing, or any other purpose you require.
Step 1: Selecting the Files and Folders to Include
The first step in creating a ZIP archive in Windows is selecting the files and folders that you want to include in the archive. Here’s how you can do it:
1. Open File Explorer by clicking on the folder icon in the taskbar or by pressing the Windows key + E on your keyboard.
2. Navigate to the location where your files and folders are stored. You can do this by clicking on the different folders in the left pane of File Explorer or by typing the path in the address bar at the top of the window.
3. Once you’re in the desired location, select the files and folders that you want to include in the ZIP archive. To select multiple items, hold down the Ctrl key on your keyboard while clicking on each item. Alternatively, you can select a range of items by clicking on the first item, holding down the Shift key, and then clicking on the last item in the range.
4. After selecting the desired files and folders, you will notice that they are highlighted or have a different background color. Take a moment to review your selection and make sure that you have included all the necessary items.
5. If you realize that you have made a mistake and want to deselect an item, simply hold down the Ctrl key and click on the deselected item to remove it from the selection.
6. If you want to include all the items in a specific folder, you can select the folder itself instead of individual files and folders. Right-click on the folder and choose “Select all” from the context menu. This will automatically select all the items inside the folder.
7. Once you are satisfied with your selection, proceed to the next step of creating the ZIP archive in Windows.
In this step, it is important to be attentive and thoughtful with your selection. Take into consideration which files and folders are necessary for your intended purpose. Make sure not to include any sensitive or unnecessary files that could waste storage space or cause potential issues when sharing the ZIP archive.
By carefully selecting the files and folders to include, you can ensure that your ZIP archive is efficient, organized, and contains the necessary data for your specific needs.
Step 2: Right-Click and Choose “Send to” Option
After selecting the files and folders that you want to include in the ZIP archive, the next step is to right-click on any of the selected items and choose the “Send to” option. Here’s how you can do it:
1. With your selected files and folders still highlighted, right-click on any of the selected items. This will open a context menu with various options.
2. In the context menu, you will see a section with the label “Send to.” Hover your cursor over this section, and a submenu will appear.
3. From the “Send to” submenu, locate and click on the option that says “Compressed (zipped) folder.” This option tells Windows to create a new ZIP archive and include the selected files and folders in it.
4. After clicking on “Compressed (zipped) folder,” Windows will begin the process of creating the ZIP archive. The progress may be displayed in a small popup window, depending on your system settings and preferences. This process might take a few moments, depending on the number and size of the selected files and folders.
5. Once the creation process is complete, a new ZIP archive will be generated in the same location as the original files and folders. The ZIP archive will have a default name based on the first selected item, but you can easily rename it to something more descriptive and meaningful.
The “Send to” option in Windows is a convenient way to create a ZIP archive without the need for any additional software. It streamlines the process and allows you to quickly compress and organize your files and folders into a single, easily shareable ZIP archive.
By using the “Send to” option, you can efficiently create ZIP archives for various purposes, such as archiving files, sharing them with others, or simply decluttering your storage space. It’s a handy feature that saves time and simplifies the process of creating ZIP archives in Windows.
Step 3: Select “Compressed (zipped) folder”
Once you have right-clicked on your selected files and folders, the next step in creating a ZIP archive in Windows is to select the “Compressed (zipped) folder” option from the “Send to” submenu. Here’s how you can do it:
1. After right-clicking on any of the selected items, a context menu will appear. In this menu, you will see a section titled “Send to.”
2. Hover your cursor over the “Send to” section, and a submenu will pop up, displaying various options for sending the selected items to different destinations.
3. From the “Send to” submenu, locate and click on the option that says “Compressed (zipped) folder.” This option instructs Windows to create a new ZIP archive and include the selected files and folders in it.
4. After selecting “Compressed (zipped) folder,” Windows will initiate the process of creating the ZIP archive. The progress may be displayed in a small popup window or in the File Explorer window, depending on your system settings and preferences. During this process, Windows will compress the selected files and folders into a single ZIP archive file.
5. Once the creation process is complete, you will find a new ZIP archive in the same location as the original files and folders. By default, the ZIP archive will have the same name as the first selected item. However, you can easily rename the ZIP archive by right-clicking on it, selecting “Rename,” and entering a new name of your choice.
Selecting “Compressed (zipped) folder” allows Windows to efficiently compress and package your selected files and folders into a ZIP archive. This compression process reduces the overall file size, making it easier to store, send, and manage the archived data.
Creating a ZIP archive in Windows using the “Compressed (zipped) folder” option is a quick and convenient method that doesn’t require any additional software. It simplifies the process of compressing files and folders, enabling you to organize and share them efficiently.
By following this step, you have successfully created a ZIP archive in Windows, and you are now one step closer to managing your files effectively and optimizing your storage space.
Step 4: Renaming and Saving the ZIP Archive
After creating a ZIP archive in Windows, the final step is to rename and save the archive. Here’s how you can do it:
1. Locate the newly created ZIP archive in the same location as the original files and folders. By default, the ZIP archive will have the same name as the first selected item, making it easier to identify.
2. Right-click on the ZIP archive. A context menu will appear, presenting you with various options for managing the archive.
3. From the context menu, select “Rename.” Alternatively, you can also single-click on the ZIP archive to select it and press the F2 key on your keyboard to enter rename mode.
4. Once you are in rename mode, you can enter a new name for the ZIP archive. Choose a descriptive and meaningful name that accurately represents the contents of the archive. This can help you easily identify the archive later on.
5. After entering the new name, press Enter on your keyboard to save the new name and apply it to the ZIP archive. The ZIP archive will now be renamed accordingly.
It’s important to choose a concise yet descriptive name for the ZIP archive to ensure easy identification and organization of your files. Consider using clear naming conventions or including keywords related to the content or purpose of the archived files.
Saving the ZIP archive does not require any specific action as it is automatically saved once you apply the new name. However, if you want to move or copy the ZIP archive to a different location, simply right-click on it, select “Cut” or “Copy,” navigate to the desired location, and then right-click again and choose “Paste.”
By completing this step, you have successfully renamed and saved the ZIP archive. Your files and folders are now securely stored within the ZIP archive, ready for storage, sharing, or any other purpose you have in mind.
How to Extract Files from a ZIP Archive?
Extracting files from a ZIP archive is a simple process that allows you to access and use the archived data. Here’s a step-by-step guide on how to extract files from a ZIP archive in Windows:
- Step 1: Locating the ZIP Archive
Start by locating the ZIP archive on your computer. Navigate to the folder where the ZIP archive is saved. If necessary, use search or browse through your files and folders until you find the ZIP archive you want to extract. - Step 2: Double-Click on the ZIP Archive
Once you have located the ZIP archive, simply double-click on it. Alternatively, you can right-click on the ZIP archive and select “Open” from the context menu. This action will open the ZIP archive in File Explorer, displaying the contents of the archive. - Step 3: Extracting the Files and Folders
To extract the files and folders from the ZIP archive, select them by clicking on them while holding down the Ctrl key on your keyboard. You can select multiple items by continuing to hold down the Ctrl key and clicking on each file or folder that you want to extract. Alternatively, if you want to extract all the files and folders, you can press Ctrl + A to select everything in the ZIP archive. - Step 4: Choosing the Destination Folder
After selecting the files and folders that you want to extract, right-click on any of the selected items. In the context menu that appears, hover your cursor over the “Extract” or “Extract all” option. From the submenu, select a destination folder where you want to extract the files and folders to. You can choose an existing folder or create a new one by selecting the “New folder” option.
Once you have followed these steps, Windows will extract the selected files and folders from the ZIP archive into the chosen destination folder. The extraction process might take a few moments, depending on the size and number of files being extracted.
Extracting files from a ZIP archive allows you to access and utilize the archived data easily. Whether you need to retrieve specific files or work with the entire contents of the archive, the extraction process in Windows simplifies file management and retrieval, ensuring that you can efficiently use the files and folders stored within the ZIP archive.
Step 1: Locating the ZIP Archive
The first step in extracting files from a ZIP archive is to locate the archive on your computer. Here’s how you can do it:
1. Open File Explorer by clicking on the folder icon in the taskbar or by pressing the Windows key + E on your keyboard. This will open a window that allows you to navigate and browse through your files and folders.
2. Navigate to the location where the ZIP archive is saved. This could be on your local hard drive, an external storage device, or any other location where you have stored the ZIP archive. Use the left pane of the File Explorer window to browse through different folders or simply type the path of the folder in the address bar at the top of the window.
3. Once you have reached the folder where the ZIP archive is located, you will see a list of files and folders displayed in the right pane of the File Explorer window. Look for the ZIP archive file. It can be identified by its file extension “.zip” or by its distinct icon, which usually resembles a folder with a zipper on it.
4. If you are unsure about the name or exact location of the ZIP archive, you can use the search feature in File Explorer. In the top-right corner of the File Explorer window, there is a search bar. Simply type part or all of the name of the ZIP archive, and File Explorer will list the matching files and folders.
5. Take your time to locate the ZIP archive that you want to extract. Make sure to double-check the file name or use any additional information you have to confirm that you have found the correct archive.
By following this step, you can successfully locate the ZIP archive on your computer. This is an essential first step before proceeding with the extraction process. Being able to easily find the archive ensures that you can access and work with the desired files and folders stored within.
Step 2: Double-Click on the ZIP Archive
After locating the ZIP archive that you want to extract, the next step is to double-click on the archive to open it in File Explorer. Here’s how you can do it:
1. Once you have found the ZIP archive in File Explorer, ensure that it is selected by single-clicking on it. You will notice that the file is highlighted or has a different background color.
2. To open the ZIP archive, simply double-click on it. Alternatively, you can right-click on the ZIP archive and choose the “Open” option from the context menu. This action will initiate the opening process, and File Explorer will display the contents of the ZIP archive.
3. When the ZIP archive is opened in File Explorer, you will see a list of files and folders that are stored within the archive. You can explore and navigate through the contents of the archive in the same way as you would with any regular folder in File Explorer.
4. Take a moment to review the contents of the ZIP archive to ensure that it contains the files and folders you intend to extract. If necessary, you can close the ZIP archive without extracting any files by clicking the ‘X’ button on the top-right corner of the File Explorer window.
By double-clicking on the ZIP archive, you are effectively opening it and gaining access to the files and folders stored within. This step allows you to preview the contents of the archive and verify that you have located the correct ZIP archive before proceeding with the extraction process.
As you continue with the extraction process, remember to keep the ZIP archive open in File Explorer until you have successfully extracted the desired files and folders.
Step 3: Extracting the Files and Folders
Once you have opened the ZIP archive in File Explorer, the next step in extracting files from a ZIP archive is to select and extract the specific files and folders you want. Here’s how you can do it:
1. To extract specific files and folders from the ZIP archive, click and hold the Ctrl key on your keyboard while selecting each item you want to extract. You can select multiple files and folders by continuing to hold down the Ctrl key and clicking on each item. Alternatively, if you want to extract all the files and folders in the ZIP archive, press Ctrl + A to select everything.
2. After selecting the desired files and folders, right-click on any of the selected items. A context menu will appear, displaying various options for managing the selected files and folders.
3. From the context menu, hover your cursor over the “Extract” or “Extract all” option. This action will display a submenu with options for extracting the selected items from the ZIP archive.
4. Choose the appropriate option from the submenu based on your requirements. If you only want to extract the selected items, select “Extract.” If you want to extract all the files and folders in the ZIP archive, choose “Extract all.” This will open a prompt asking you to specify the destination folder for the extracted files.
5. Select the destination folder where you want to extract the files and folders. You can choose an existing folder by navigating through the folders in the prompt or create a new folder by selecting the “New folder” option and entering a name for the folder.
6. After selecting the destination folder, click the “Extract” button to initiate the extraction process. Depending on the size and number of files being extracted, this process may take a few moments. You will see a progress dialog displaying the extraction progress.
7. Once the extraction process is complete, you will find the extracted files and folders in the selected destination folder. You can now access and utilize these files as needed.
By following these steps, you can successfully extract specific files and folders or all the contents from a ZIP archive. This allows you to access and use the extracted files, whether it is for editing, sharing, or any other purpose you have in mind.
Step 4: Choosing the Destination Folder
After selecting the files and folders that you want to extract from the ZIP archive, the next step is to choose the destination folder where you want to extract them. Here’s how you can do it:
1. With the desired files and folders selected within the ZIP archive, right-click on any of the selected items. A context menu will appear, providing you with various options for managing the selection.
2. From the context menu, hover your cursor over the “Extract” or “Extract all” option. This will display a submenu with additional options related to the extraction process.
3. From the submenu, choose the option that suits your needs. If you only want to extract the selected files and folders, select “Extract.” This will begin the extraction process for the chosen items. If you want to extract all the files and folders in the ZIP archive, choose “Extract all.” This action will extract the entire contents of the ZIP archive.
4. After selecting the appropriate extraction option, a prompt will appear, asking you to choose the destination folder where you want to save the extracted files and folders.
5. Navigate to the desired destination folder by either selecting an existing folder from the prompt or creating a new folder. To create a new folder, click the “New folder” button and enter a name for the folder. This ensures that the extracted files and folders are organized in a location of your choice.
6. Once you have chosen the destination folder for extraction, click the “Extract” or “OK” button to start the extraction process. Depending on the size and number of files being extracted, this process may take a few moments. You may see a progress dialog that shows the extraction progress.
7. After the extraction process is complete, you will find the extracted files and folders in the destination folder you selected. You can now access and use these files for various purposes, such as editing, sharing, or organizing.
By following these steps, you can successfully choose the destination folder where you want to extract the files and folders from the ZIP archive. This allows you to control the location and organization of the extracted files, making it easier for you to work with and manage them.
Additional Tips and Recommendations
When working with ZIP archives in Windows, here are some additional tips and recommendations to enhance your experience and ensure the smooth handling of your files:
- Organize Files Before Zipping: Before creating a ZIP archive, take some time to organize and consolidate your files and folders. By grouping related items together, you can make the extraction process easier and find specific files more efficiently.
- Choose a Descriptive Name: When renaming a ZIP archive, use a descriptive name that reflects the content or purpose of the archived files. This makes it easier to identify the archive and retrieve specific files later on.
- Verify ZIP Archives: It is a good practice to verify the integrity of your ZIP archives after they are created or received. You can do this by opening the archive and checking that all the files and folders are intact and accessible. If any issues are found, consider creating a new ZIP archive or retrieving a backup copy.
- Password Protect Sensitive Archives: If you are working with sensitive or confidential files, consider adding a password to your ZIP archives. This helps prevent unauthorized access, ensuring that your files remain secure during storage or transmission.
- Regularly Backup ZIP Archives: It’s essential to regularly back up your ZIP archives to prevent data loss. Consider storing copies of your archives on external storage devices, cloud storage services, or other backup solutions to safeguard your important files.
- Keep Track of ZIP Archive Locations: Maintain a record of the locations where you store your ZIP archives. This prevents you from accidentally creating duplicate archives or losing track of where specific files are stored.
- Consider Compression Levels: When creating ZIP archives, you may have the option to choose the compression level. Higher compression levels result in smaller archive sizes but may take longer to create. Consider the trade-off between file size and processing time based on your storage and time constraints.
- Use File Compression Software: While Windows provides built-in functionality for creating and extracting ZIP archives, there are third-party file compression software options available that offer additional features and support for various compression formats. Explore these options to find the one that best suits your needs.
By following these tips and recommendations, you can enhance your ZIP archive management, improve file organization, and ensure the security and accessibility of your important files and folders.