
What is a ZIP file?
A ZIP file is a compressed archive file format that is commonly used for organizing and efficiently storing multiple files and folders. It allows you to combine multiple files into a single, compressed package, making it easier to store, send, and access them. The ZIP file format was introduced in 1989 by Phil Katz and rapidly gained popularity for its ability to reduce file size and streamline file sharing.
ZIP files use compression algorithms to significantly reduce the size of the contained files. By compressing the data, ZIP files make it possible to save storage space on your computer or other devices. When you extract files from a ZIP archive, the compressed files are restored to their original size and can be accessed and used as normal.
One of the advantages of ZIP files is their cross-platform compatibility. They can be created, opened, and extracted on various operating systems, including Windows, Mac, and Linux, making them a versatile choice for file compression and archiving.
ZIP files are commonly used in a variety of scenarios. They are particularly helpful when sending multiple files via email or sharing them online because they reduce the overall file size, resulting in faster uploads and downloads. ZIP files are also useful for organizing and bundling files, especially when dealing with large project folders or documents.
It is important to note that ZIP files do not encrypt the contents by default. If you need to secure the files within a ZIP archive, you can add a password to protect them from unauthorized access. This feature makes ZIP files an effective way to securely store and transmit sensitive information.
Benefits of using ZIP files
ZIP files offer several advantages that make them a valuable tool for managing and organizing your digital files. Here are some benefits of using ZIP files:
- Reduced file size: One of the primary benefits of ZIP files is their ability to compress multiple files and reduce their overall size. This is especially helpful when dealing with large files or folders that need to be stored or transferred. By compressing the files, ZIP files free up storage space and make it easier to share files via email or other online platforms.
- Ease of file organization: ZIP files provide a convenient way to organize and bundle related files. You can group files together in a ZIP archive, which helps maintain file and folder structure and simplifies file management. This is particularly useful when working on projects that involve multiple files or when organizing documents for easy storage and retrieval.
- Faster file transfer: When transferring files over the internet, file size can greatly impact the speed of uploading and downloading. ZIP files address this issue by compressing the files, resulting in faster transfer times. This is especially beneficial when sending large attachments via email or sharing files online, as it reduces the time and bandwidth required for the transfer.
- Preservation of file integrity: ZIP files are designed to preserve the integrity of the files stored within them. By compressing the files, ZIP archives maintain the original file structure and prevent data loss or corruption. This ensures that the files extracted from a ZIP archive are identical to the original files, providing a reliable and trustworthy way to store and share files.
- Encryption and password protection: Another advantage of ZIP files is the ability to add encryption and password protection. This feature allows you to secure sensitive files and restrict access to authorized individuals. By encrypting the content within a ZIP archive, you can ensure that your files are kept confidential and safeguarded from unauthorized access.
Overall, ZIP files provide a versatile and efficient solution for organizing, compressing, and encrypting files. Whether you need to share files with others or simply want to streamline your file management, using ZIP files can simplify the process and enhance productivity.
Creating a ZIP file on Windows
Windows provides built-in functionality that allows you to create ZIP files without the need for any third-party software. Here’s how you can create a ZIP file on Windows:
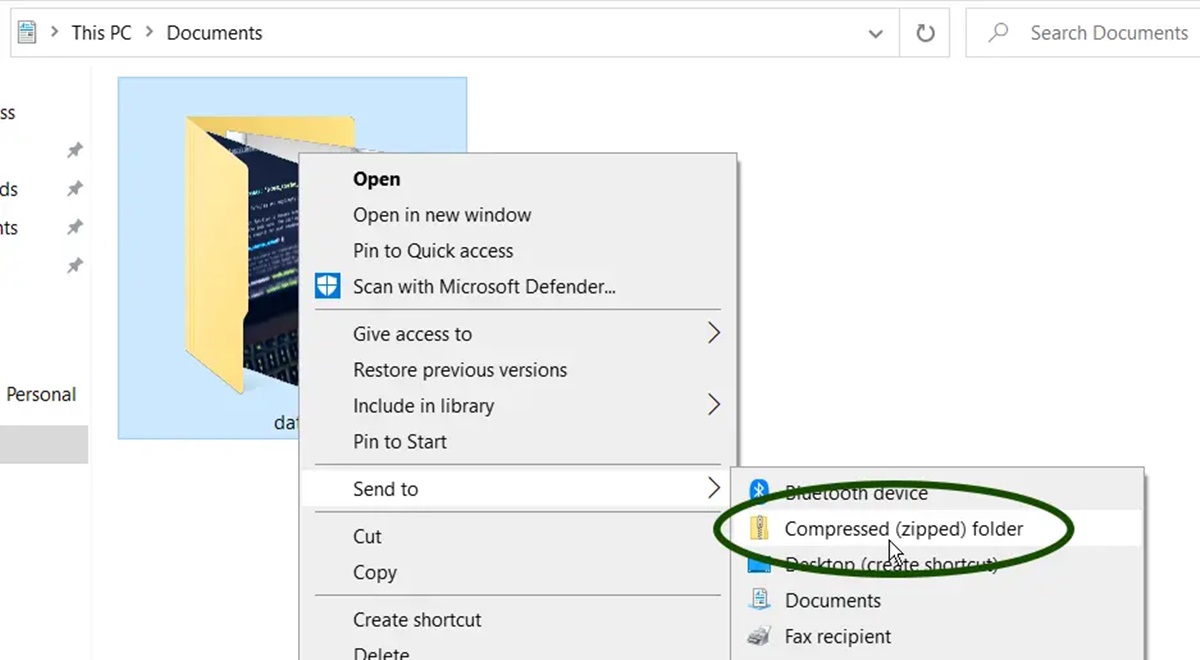
- Locate the files or folders you want to include in the ZIP file. Select them by holding down the Ctrl key and clicking on each file or folder.
- Right-click on one of the selected files or folders and choose the “Send to” option from the context menu.
- In the submenu that appears, select “Compressed (zipped) folder”. Windows will create a new ZIP file with a default name in the same location as the selected files or folders.
- Once the ZIP file is created, you can rename it by right-clicking on it and selecting “Rename” from the context menu.
- To add more files or folders to the existing ZIP file, simply drag and drop them onto the ZIP file icon.
It’s important to note that the built-in ZIP functionality in Windows doesn’t offer advanced options like encryption or splitting files. If you require these features, you may need to use third-party software specifically designed for ZIP file management.
Creating a ZIP file on Windows is a quick and straightforward process that simplifies file compression and organization. It allows you to combine multiple files or folders into a single archive, making it easier to share or store them. Whether you’re sending files via email or organizing your documents, creating a ZIP file on Windows is a useful tool for managing your digital files efficiently.
Creating a ZIP file on Mac
Mac users can easily create ZIP files directly from the Finder without the need for third-party software. Here’s how you can create a ZIP file on Mac:
- Locate the files or folders you want to include in the ZIP file. Select them by holding down the Command key and clicking on each file or folder.
- Right-click on one of the selected files or folders and choose the “Compress” option from the context menu.
- A new ZIP file will be created in the same location as the selected files or folders. The ZIP file will have the same name as the first selected file or folder, followed by the .zip extension.
- If you want to change the name of the ZIP file, simply select it and press the Return key. You can then enter a new name for the file.
- To add more files or folders to the existing ZIP file, simply drag and drop them onto the ZIP file icon.
It’s important to note that the built-in ZIP functionality in Mac doesn’t offer advanced options like encryption or splitting files. If you require these features, you may need to use third-party software specifically designed for ZIP file management.
Creating a ZIP file on Mac is a straightforward process that simplifies file compression and organization. Whether you need to send multiple files via email or bundle related files together, creating a ZIP file on Mac allows you to efficiently manage and store your digital files.
Creating a ZIP file on Linux
Linux systems offer various command-line utilities that allow you to create ZIP files effortlessly. Here’s how you can create a ZIP file on Linux using the terminal:
- Open the terminal on your Linux system.
- Navigate to the directory where the files or folders you want to include in the ZIP file are located. You can use the `cd` command followed by the directory path to move to the desired location.
- Once you are in the correct directory, use the `zip` command followed by the name you want to give to the ZIP file and the files or folders you want to include. For example, to create a ZIP file named “archive.zip” with all files and folders in the current directory, you can use the command:
zip archive.zip *. The asterisk (*) is a wildcard character that represents all files and folders in the current directory. - Press Enter, and the ZIP file will be created in the current directory with the specified name.
- To add more files or folders to the existing ZIP file, you can use the `zip` command again with the appropriate options. For example, to add a file named “newfile.txt” to the existing ZIP file “archive.zip”, you can use the command:
zip archive.zip newfile.txt.
It’s important to note that Linux provides several additional options and flags with the `zip` command, allowing you to customize the ZIP file creation process. You can refer to the `zip` command’s manual page (`man zip`) for more details and advanced usage.
Creating a ZIP file on Linux using the terminal provides a flexible and efficient way to compress and organize files. Whether you’re working with directories, individual files, or a combination of both, using the Linux command line to create ZIP files gives you fine-grained control over the process.
Adding files to a ZIP archive
Once you have created a ZIP archive, you may need to add additional files or folders to it. Adding files to an existing ZIP archive is a simple process that can be done on various operating systems. Here’s how you can add files to a ZIP archive:
- Locate the ZIP archive to which you want to add files.
- Double-click on the ZIP archive to open it. This will display the contents of the archive.
- Open a file explorer window and navigate to the location of the files you want to add to the ZIP archive.
- Select the files you want to add by holding down the Ctrl key (Windows) or the Command key (Mac) and clicking on each file.
- Drag and drop the selected files from the file explorer window into the open ZIP archive window. Alternatively, you can right-click on the selected files and choose “Copy” from the menu, then right-click inside the ZIP archive window and choose “Paste”.
- The selected files will be added to the ZIP archive, and you will see them listed among the contents of the archive.
It’s worth noting that if you’re working with a large number of files or folders, you can also select multiple files/folders at once and add them to the ZIP archive in a single operation.
Adding files to a ZIP archive allows you to consolidate and organize related files into a single compressed package. Whether you’re archiving project files or bundling documents for easier sharing, adding files to a ZIP archive is a convenient way to manage and store your digital files.
Removing files from a ZIP archive
At times, you may need to remove specific files or folders from a ZIP archive. Whether you want to reduce the file size or remove unnecessary files, the process of removing files from a ZIP archive is straightforward. Here’s how you can do it:
- Locate the ZIP archive from which you want to remove files.
- Open a file explorer window and navigate to the location where the ZIP archive is saved.
- Double-click on the ZIP archive to open it, revealing the contents.
- Select the files or folders you want to remove by holding down the Ctrl key (Windows) or the Command key (Mac) and clicking on each file or folder.
- Once the desired files or folders are selected, either right-click on them and choose “Delete” from the menu, or press the Delete or Backspace key on your keyboard.
- Confirm the deletion when prompted to remove the selected files or folders from the ZIP archive.
- The selected files or folders will then be permanently removed from the ZIP archive.
It is essential to note that removing files from a ZIP archive is irreversible. Therefore, it is advisable to double-check the files you are removing to ensure you don’t accidentally delete important data.
Removing unnecessary files from a ZIP archive is beneficial in situations where you want to reduce the archive’s size or declutter the contents. By removing unwanted files, you can optimize the storage space and focus on the important files within the ZIP archive.
Extracting files from a ZIP archive
When you receive or encounter a ZIP archive, you’ll often need to extract the files and access the content within. Extracting files from a ZIP archive is a simple process that can be done on various operating systems. Here’s how you can extract files from a ZIP archive:
- Locate the ZIP archive you want to extract files from.
- Double-click on the ZIP archive to open it. Alternatively, you can right-click on the ZIP archive and select an extraction option from the context menu.
- Browse the files and folders within the ZIP archive to locate the specific files you want to extract.
- Select the files you want to extract by holding down the Ctrl key (Windows) or the Command key (Mac) and clicking on each file. If you want to extract all files, you can press Ctrl+A (Windows) or Command+A (Mac) to select them all.
- Once you have selected the desired files, either drag and drop them to a specific folder or right-click on them and choose an “Extract” or “Extract Here” option.
- Depending on your extraction option, the files will be extracted from the ZIP archive and placed into the chosen folder.
It’s important to note that some ZIP software may provide additional options during the extraction process, such as choosing a location for extraction or preserving the folder structure within the ZIP archive.
Extracting files from a ZIP archive allows you to access and use the content within. Whether you’re retrieving specific documents or extracting a collection of files, this process enables you to retrieve and work with the files contained in the ZIP archive.
Password protecting a ZIP file
One of the key features of ZIP files is the ability to add a password to protect the contents from unauthorized access. Password protecting a ZIP file adds an additional layer of security, ensuring that only individuals with the correct password can open and extract its contents. Here’s how you can password protect a ZIP file:
- Locate the ZIP file that you want to password protect.
- Right-click on the ZIP file and select an option such as “Add a password” or “Encrypt” from the context menu. Depending on the software you are using, the wording may vary.
- Enter the desired password in the provided field. Make sure to choose a strong, unique password that is not easily guessable.
- Confirm the password by retyping it in the confirmation field, if required by the software.
- Save the changes, and the ZIP file will be password protected with the specified password.
It’s important to remember the password you set for the ZIP file since it cannot be recovered if you forget it. So make sure to save the password in a secure location or consider using a password manager to keep track of your passwords.
Password protecting a ZIP file adds an extra level of privacy and security to your files. It helps ensure that only authorized individuals can access the contents, making it an effective way to protect sensitive or confidential information during file storage or transmission.
Splitting a large ZIP file
Sometimes, you may encounter large ZIP files that are difficult to handle due to their size. In such cases, splitting the ZIP file into smaller parts can be helpful. Splitting a large ZIP file allows for easier storage, transfer, and management. Here’s how you can split a large ZIP file:
- Identify the large ZIP file that you want to split.
- Ensure that you have sufficient storage space available for the resulting split files. Each split file will be a smaller, self-contained ZIP archive.
- Choose a compression software or utility that supports the splitting feature. There are various software options available, both free and paid, that can split large ZIP files.
- Open the compression software and locate the option to split a file.
- Select the large ZIP file you want to split and specify the maximum size for each split file. You can choose a specific file size or specify the number of files you want the ZIP file to be split into.
- Initiate the splitting process and wait for the software to complete the task.
- Once the splitting is finished, you will have multiple smaller ZIP files that collectively contain the contents of the original large ZIP file.
It’s important to keep track of all the split files and ensure that they are kept together. If any part of the split files is missing or corrupted, the original ZIP file cannot be fully restored.
Splitting a large ZIP file provides a practical solution for managing oversized archives. It allows for easier storage on limited disk space, faster transfers via email or other platforms, and more efficient handling of the files within the ZIP archive.
Combining multiple ZIP files
There may be situations where you have multiple ZIP files that you want to combine into a single, larger ZIP file. Combining multiple ZIP files simplifies file management and organization by consolidating related files into one archive. Here’s how you can combine multiple ZIP files:
- Gather all the ZIP files that you want to combine into a single archive.
- Create a new folder on your computer and copy all the ZIP files into that folder.
- Open the compression software or utility that supports merging or combining ZIP files.
- Choose the option to create a new ZIP file or add files to an existing ZIP file.
- Navigate to the folder where you copied the ZIP files and select all the files you want to combine.
- Specify the destination folder or provide the name for the new ZIP file.
- Initiate the combining process and wait for the software to complete the task.
- Once the combining process is finished, verify that the new ZIP file contains all the files from the previously separate ZIP files.
It’s crucial to ensure that there are no files with the same names in the ZIP files you are combining. If there are duplicate file names, conflicts may arise, resulting in overwritten or missing files.
Combining multiple ZIP files provides a convenient way to consolidate related files and folders into a single archive. It simplifies file management, making it easier to store, transfer, and organize your data effectively.
Renaming a ZIP file
If you want to change the name of a ZIP file to something more descriptive or meaningful, you can easily do so. Renaming a ZIP file allows you to personalize the file name or make it easier to identify the contents. Here’s how you can rename a ZIP file:
- Locate the ZIP file that you want to rename.
- Right-click on the ZIP file and select the “Rename” option from the context menu.
- Alternatively, you can select the ZIP file and press the F2 key on your keyboard.
- Enter the new name for the ZIP file.
- Make sure to choose a name that is descriptive and meaningful, reflecting the contents of the ZIP file.
- Press the Enter key on your keyboard to save the new name.
It’s important to note that when you rename a ZIP file, the extension “.zip” should not be changed. The ZIP file extension is necessary for the file to be recognized as a ZIP archive.
Renaming a ZIP file allows you to have more control over the file’s name and helps improve organization and identification of your files. Whether you want to give it a more descriptive name or make it easier to locate in a folder, renaming a ZIP file is a simple and effective solution.
Checking the integrity of a ZIP file
Ensuring the integrity of a ZIP file is important to confirm that the file has not been corrupted or altered during storage or transmission. By checking the integrity of a ZIP file, you can verify that it is in a valid and usable state. Here are a few ways to check the integrity of a ZIP file:
- Use compression software: Most compression software and utilities offer built-in functionality to verify the integrity of ZIP files. Simply open the ZIP file using the software and look for an option to check the file’s integrity. The software will analyze the ZIP file and notify you if any issues or errors are detected.
- Command-line tools: If you prefer using the command-line interface, you can use tools like “unzip” or “7-Zip” to check the integrity of ZIP files. Open a terminal or command prompt, navigate to the directory containing the ZIP file, and execute the appropriate command to test the integrity. For example, using “unzip”, you can run “unzip -t file.zip” to test the ZIP file’s integrity.
- Checksums and hashes: Another way to check the integrity of a ZIP file is by comparing checksums or hashes. This involves generating a unique string of characters from the ZIP file and comparing it to the original checksum or hash provided by the source. If the generated checksum matches the original, the ZIP file’s integrity is intact.
It’s important to note that checking the integrity of a ZIP file does not guarantee that the individual files within the ZIP are error-free. It only ensures that the ZIP file structure is intact and no tampering or corruption has occurred.
Regularly checking the integrity of ZIP files safeguards against data loss or corruption. It provides confidence that the files within the ZIP can be safely extracted and used without encountering any errors or issues.
Decompressing a ZIP file without software
If you don’t have compression software installed or prefer not to use it, you can still decompress or extract the contents of a ZIP file using the built-in functionality of your operating system. Here’s how you can decompress a ZIP file without software:
- Locate the ZIP file that you want to decompress.
- Create a new folder on your computer or choose an existing folder where you want to extract the contents of the ZIP file.
- Right-click on the ZIP file and select the option to “Extract” or “Extract All” from the context menu.
- Specify the destination folder where you want the extracted files to be saved. Alternatively, you can choose the default location suggested by your operating system.
- Click on the “Extract” button to initiate the extraction process.
After completing the extraction process, the contents of the ZIP file will be extracted and saved in the specified folder or the default location determined by your operating system.
It’s important to note that the built-in decompression functionality of your operating system may have limitations compared to dedicated compression software. Advanced features like password protection or handling of certain compression formats may not be supported. In such cases, it’s recommended to use specialized compression software for more comprehensive functionality.
Decompressing a ZIP file without software provides a basic method for extracting files from a ZIP archive. This allows you to access and utilize the contents of the ZIP file without the need for additional software or utilities.
Common errors and troubleshooting tips
While working with ZIP files, you may encounter various errors or issues that can hinder your file management or extraction process. Here are some common errors and troubleshooting tips to help you overcome them:
- Corrupted ZIP file: If you receive an error indicating a corrupted ZIP file, it may be due to a transfer error or incomplete download. Try downloading the ZIP file again, or ask the sender to resend it if possible.
- Invalid password: If you’re unable to open a password-protected ZIP file, ensure that you have entered the correct password. Double-check the spelling, capitalization, and any special characters. If you’ve forgotten the password, unfortunately, there’s no way to recover it, and the files within the ZIP file may be inaccessible.
- File extraction failures: If you encounter errors while extracting files from a ZIP archive, it could indicate file corruption or inconsistencies. Try using a different extraction software or utility to see if the issue persists. You can also try extracting the files on another computer to determine if the problem is specific to your system.
- Unsupported compression format: If you receive an error stating that the compression format is unsupported, it could be due to using an outdated or incompatible compression algorithm. Ensure that you are using a compatible compression software or utility that supports the format of the ZIP file.
- Insufficient disk space: If you encounter an error indicating insufficient disk space during extraction, check if you have enough space in the destination folder or partition. Free up some disk space or choose a different location with sufficient storage capacity to complete the extraction process.
- Long file name issues: ZIP files have limitations on file name length and certain characters. If you encounter errors related to long file names or special characters, try renaming the problematic files within the ZIP archive to shorter and simpler names before extracting them.
It’s important to note that if you consistently encounter errors or face challenges with ZIP files, it may be helpful to seek assistance from technical support or consult online forums and communities for further guidance.
By understanding and following these troubleshooting tips, you can overcome common errors and enhance your experience when working with ZIP files.