
Why Use ZIP Files for Email Attachments?
When it comes to sending multiple files through email, using ZIP files can be an incredibly useful and efficient method. ZIP files allow you to compress multiple files into a single, smaller file, making it easier and quicker to share a large number of documents, images, or other types of files.
There are several reasons why using ZIP files for email attachments is beneficial:
- File Size Reduction: ZIP files utilize compression algorithms to reduce the size of the files stored within them. This means that the overall file size of the attachments you send will be smaller, saving you valuable bandwidth and reducing upload and download times.
- Organization and Structure: Instead of cluttering your email with numerous individual attachments, using a ZIP file allows you to organize and structure your files neatly within a single package. This makes it easier for the recipient to locate and manage the files.
- Easier File Transfer: Large files or folders with multiple files can be challenging to send via email due to limitations on attachment sizes imposed by email providers. By compressing them into a ZIP file, you can bypass these restrictions and ensure that your recipient receives all the necessary files in one package.
- File Security: ZIP files provide a layer of security by password protecting the contents. This can be particularly useful when sending sensitive or confidential information via email, ensuring that only the intended recipient can access the files.
- Preservation of File Integrity: ZIP files help maintain the integrity of your files during the email transfer process. By compressing the files, you reduce the risk of corruption, ensuring that the recipient receives the files exactly as intended.
Overall, using ZIP files for email attachments is a practical and efficient solution for sending multiple files. Not only does it reduce the file size and enhance organization, but it also provides added security and ensures that the files remain intact during transmission. So, the next time you need to send multiple files via email, consider compressing them into a ZIP file for a seamless and hassle-free experience.
Step 1: Download and Install a ZIP Software
To create ZIP files for email attachments, you’ll need to download and install a ZIP software on your computer. There are various options available, both free and paid, so you can choose one that suits your needs and preferences.
Here’s how you can download and install a ZIP software:
- Research and Choose a ZIP Software: Start by researching different ZIP software options. Popular choices include WinRAR, 7-Zip, and WinZip. Look for software that is compatible with your operating system and offers the features you require.
- Visit the Software Website: Once you’ve selected a ZIP software, visit its official website. Look for a “Download” or “Get Started” button to initiate the download process.
- Download the Software: Click on the designated download button and save the installation file to your computer. Ensure that you’re downloading the correct version for your operating system (e.g., Windows, macOS, or Linux).
- Run the Installation File: Locate the downloaded file and double-click on it to run the installation wizard. Follow the on-screen prompts to proceed with the installation process.
- Accept the License Agreement: When prompted, carefully read the license agreement and terms of use. If you agree, select the “I accept” or similar option to proceed.
- Choose Installation Options: Depending on the ZIP software, you may have various installation options to select. Choose the desired options, such as file associations or additional features, and click “Next” or “Install” to proceed.
- Wait for Installation: The software will now be installed on your computer. Depending on the size of the software and the speed of your computer, this process may take a few moments.
- Launch the ZIP Software: Once the installation is complete, you can launch the ZIP software from your desktop or start menu. Familiarize yourself with the software’s interface and features.
By following these steps, you can successfully download and install a ZIP software on your computer. Once installed, you’ll be ready to create and manage ZIP files for email attachments. In the next steps, we’ll explore how to compress your files into a ZIP archive.
Step 2: Select the Files You Want to Compress
After installing a ZIP software on your computer, the next step to create ZIP files for email attachments is to select the files you want to compress. Before proceeding, ensure that the files you want to include in the ZIP archive are located in a folder or easily accessible on your computer.
Follow these steps to select the files:
- Create a New Folder (Optional): If your files are scattered across different locations, consider creating a new folder to gather them in one place. This step is optional but can help streamline the selection process.
- Locate the Files: Open the folder containing the files you want to include in the ZIP archive. Use your computer’s file explorer or Finder to navigate to the desired location.
- Select Multiple Files: To select multiple files at once, you can hold down the Ctrl (Windows) or Command (Mac) key on your keyboard while clicking on each file. Alternatively, you can click and drag to select a range of files.
- Select All Files: If you want to include all files within a specific folder, you can simply press Ctrl + A (Windows) or Command + A (Mac) to select all files in that folder.
- Include Subfolders (Optional): If your selected folder contains subfolders, you may have the option to include them in the ZIP file as well. Check the settings in your ZIP software to ensure that subfolders are included if desired.
- Verify Selection: Double-check that you have selected all the necessary files for your ZIP archive. It’s essential to ensure that you haven’t missed any important files before proceeding to the next step.
By following these steps, you can easily select the files you want to compress into a ZIP file. Once you have verified your selection, you are ready to proceed to the next step, which involves compressing the files into a ZIP archive.
Step 3: Right-click and Choose “Add to Archive”
Once you have selected the files you want to compress into a ZIP file, the next step is to right-click on the selected files and choose the “Add to Archive” option. This action will initiate the compression process using the ZIP software you have installed on your computer.
Here’s how you can proceed:
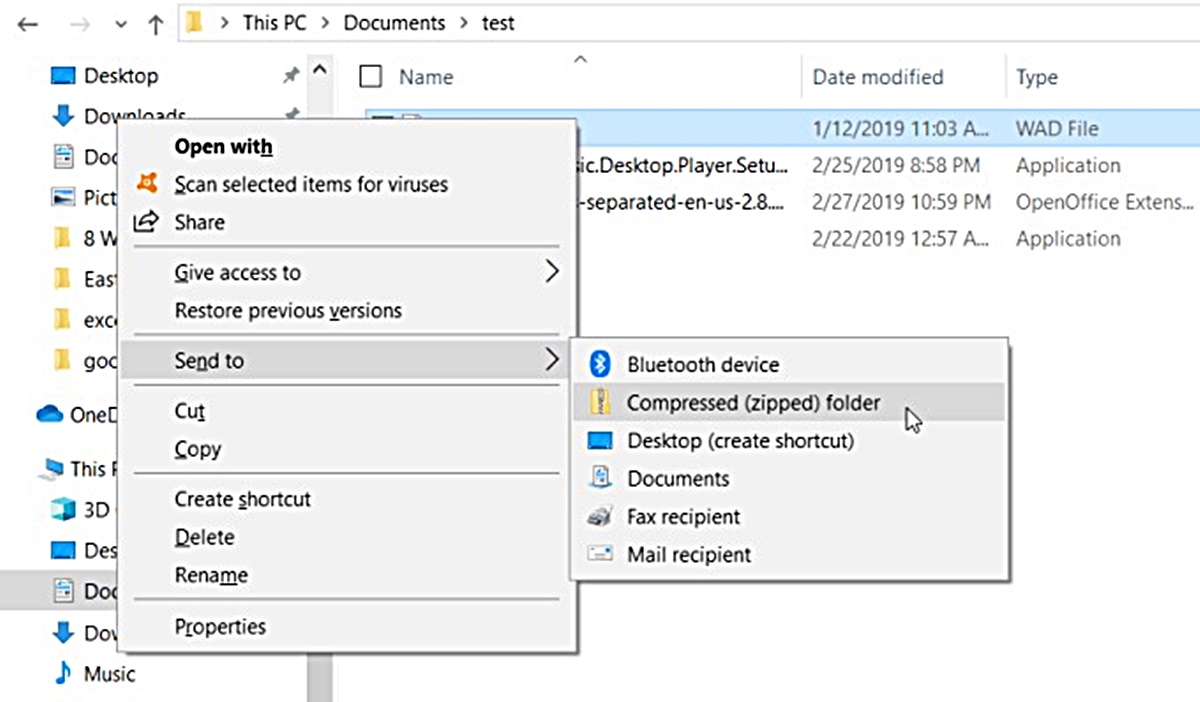
- Right-click on the Selected Files: Position your cursor over the selected files, then right-click. This will open a context menu with various options.
- Select “Add to Archive” or Similar: From the context menu, look for an option that says “Add to Archive,” “Compress to ZIP,” or something similar. The exact wording may vary depending on the ZIP software you have installed.
- Click on “Add to Archive” Option: Once you locate the appropriate option, click on it to proceed. This action will open a new window or dialog box specific to your ZIP software.
- Configure Compression Settings (Optional): In the ZIP software window, you may have the option to configure compression settings. These settings include the name of the ZIP file, compression level, encryption options, and more. Adjust these settings according to your preferences, or leave them at their default values.
- Verify File Selection: Once you have configured the compression settings (if applicable), verify that all the selected files are listed in the software window. Make sure that no important files have been unintentionally omitted.
- Initiate Compression: When you’re satisfied with the file selection and compression settings, look for a button or option to start the compression process. It may be labeled “OK,” “Create,” “Compress,” or similar. Click on this button to begin compressing the files into a ZIP archive.
- Wait for Compression to Complete: The ZIP software will now compress the selected files into a single ZIP archive. The time required for the compression process may vary depending on the size and number of files being compressed.
- Confirmation and Location: Once the compression process is complete, you will typically receive a confirmation message or a notification. The ZIP archive will be saved to a specified location on your computer. Take note of the destination folder for future reference.
By following these steps, you can easily compress your selected files into a ZIP archive using the right-click context menu and the “Add to Archive” option provided by your ZIP software. In the next step, we’ll explore how to configure the compression settings to customize the ZIP file further.
Step 4: Configure ZIP Compression Settings
After selecting the files and initiating the compression process, the next step is to configure the ZIP compression settings. These settings allow you to customize the ZIP file according to your requirements, such as choosing the compression level, encryption options, and more.
Here’s how you can configure the compression settings:
- Access Compression Settings: Once you have launched the ZIP software and selected the files to compress, you will typically be presented with a window or dialog box specific to the software. Look for a section or tab within this window labeled “Compression Settings,” “Options,” or something similar.
- Choose Compression Level: In the compression settings, you will find an option to select the compression level for your ZIP file. The available levels may include “Store” (no compression), “Fastest,” “Normal,” or “Best” (maximum compression). Choose the level that strikes a balance between file size reduction and the time taken to compress and decompress the files.
- Enable Encryption (Optional): If you want to protect the contents of the ZIP file with a password, look for an “Encryption” or “Password” option in the compression settings. Enable encryption and set a strong, unique password that you can share with the intended recipient separately.
- Include File Information (Optional): Some ZIP software may provide additional options to include file information in the ZIP archive, such as file paths, timestamps, or comments. If you find these options useful, consider enabling them to enhance the organization and understanding of the archived files.
- Set ZIP File Name and Location: Ensure that you have specified a name for the ZIP file and selected the destination folder in the compression settings. Choose a descriptive name that reflects the contents of the archive, and select a location on your computer where you can easily locate the ZIP file.
- Review and Verify Settings: Before proceeding with the compression, carefully review all the configured settings in the compression settings window. Double-check the compression level, encryption status, file information options, and the destination folder to ensure that everything is set as desired.
- Save or Apply Settings: When you’re satisfied with the compression settings, look for a button or option to save or apply the settings. It may be labeled “OK,” “Apply,” “Create,” or similar. Click on this button to confirm the settings and proceed with the compression process.
By following these steps, you can configure the ZIP compression settings according to your preferences. Take your time to choose the appropriate compression level, enable encryption if needed, include file information for better organization, and specify the ZIP file name and location. Once you have reviewed and applied the settings, you are ready to create the ZIP file.
Step 5: Choose the Destination Folder for Your ZIP File
After configuring the compression settings, the next step is to choose the destination folder where you want to save your newly created ZIP file. This folder is where the ZIP file will be stored on your computer once the compression process is complete.
Here’s how you can choose the destination folder:
- Navigate to the “Save” or “Destination” Field: When you are prompted to choose the destination folder for your ZIP file, you will typically see a field labeled “Save” or “Destination” in the ZIP software window. This field may be located near the compression settings or at the bottom of the window.
- Click on the “Browse” or “Choose” Button: Next to the destination field, there is usually a button labeled “Browse” or “Choose.” Click on this button to open a file explorer or folder selection dialog box.
- Select or Create a Folder: In the file explorer or folder selection dialog box, navigate to the desired location where you want to save the ZIP file. You can choose an existing folder by double-clicking on it, or you can create a new folder by clicking on the “New Folder” or similar button.
- Choose the Folder: Once you have selected or created the folder, it should appear in the destination field in the ZIP software window. Take a moment to verify that the selected folder is correct and matches your intended destination.
- Confirm and Save: Finally, click on the “Save” or “OK” button in the file explorer or folder selection dialog box to confirm the selected destination folder. This action will close the dialog box and return you to the ZIP software window.
By following these steps, you can choose the destination folder for your ZIP file. It’s important to select a location that you can easily access and remember. Once you have confirmed the destination folder, you are ready to proceed with saving your ZIP file in the next step.
Step 6: Rename and Save Your ZIP File
After choosing the destination folder for your ZIP file, the next step is to rename the file and save it in the selected location. Renaming the ZIP file allows you to give it a more descriptive or meaningful name that reflects its contents or purpose.
Here’s how you can rename and save your ZIP file:
- Locate the “File Name” Field: In the ZIP software window, you will typically find a field labeled “File Name” or “Save As” where you can enter the desired name for your ZIP file. This field may be located near the destination folder selection or in a separate section dedicated to saving the file.
- Replace the Default Name: By default, the ZIP software may suggest a generic name for the file based on the contents or the compression settings. Select the existing name in the “File Name” field and replace it with a name that is clear and descriptive.
- Choose a Descriptive Name: When naming your ZIP file, consider using a name that reflects the contents or purpose of the archived files. For example, if you are sending a collection of project documents, you could name the file “ProjectDocuments.zip.”
- Avoid Special Characters and Spaces: It’s generally recommended to avoid using special characters or spaces in the file name to ensure compatibility with different operating systems. Stick to alphanumeric characters and use hyphens or underscores if necessary.
- Click “Save” or “OK”: Once you have entered the desired name for your ZIP file, click on the “Save” or “OK” button in the ZIP software window. This action will save the file with the new name in the selected destination folder.
- Confirmation Message: Depending on the ZIP software you are using, you may receive a confirmation message indicating that your ZIP file has been saved successfully. Take note of any additional details provided in the message.
By following these steps, you can easily rename and save your ZIP file with a descriptive name in the chosen destination folder. It’s important to choose a name that accurately represents the contents of the file for easy identification later on. With the file now saved, you are almost ready to attach it to your email in the next step.
Step 7: Attach the ZIP File to Your Email
With your ZIP file saved and ready, the next step is to attach the file to your email. Attaching the ZIP file ensures that the recipient can easily download and access the compressed files you have created.
Here’s how you can attach the ZIP file to your email:
- Open your Email Client: Launch your email client or open the email service provider’s website where you want to compose your email. Sign in to your email account if necessary.
- Create a New Email: Click on the “Compose” or “New Email” button to start composing a new email message. This button is usually located somewhere on the email client’s dashboard or toolbar.
- Enter the Recipient’s Email Address: In the appropriate field (“To” or “Recipient”), enter the email address of the person or people you want to send the email to. Separate multiple email addresses with commas if needed.
- Add a Descriptive Subject Line: Enter a concise and descriptive subject line for your email that clearly reflects the purpose or content of the message. This will help the recipient understand the nature of the email.
- Compose the Email Body: In the email body, you can include a brief message or any additional information you want to convey to the recipient. It’s recommended to provide context or instructions regarding the attached ZIP file.
- Click on the “Attach” or Paperclip Icon: Look for an “Attach” button or a paperclip icon in your email client’s toolbar. Click on this button to initiate the file attachment process.
- Locate and Select the ZIP File: In the file attachment dialog box, navigate to the destination folder where your ZIP file is saved. Select the ZIP file by clicking on it, then click on the “Open” or similar button to attach the file to your email.
- Confirm the Attachment: Once the ZIP file is attached, you will typically see the file name displayed below or beside the email composition area. Take a moment to verify that the correct file is attached.
- Send the Email: When you have finished composing your email, double-check the recipient’s email address, subject line, and email body for any errors or omissions. Finally, click on the “Send” or “Send Email” button to send the email with the attached ZIP file.
By following these steps, you can easily attach your ZIP file to your email, ensuring that the recipient receives the compressed files. Remember to provide any necessary instructions or context in the email body to help the recipient understand the purpose of the attached ZIP file. Congratulations! You have successfully attached the ZIP file to your email and are ready to send it in the next step.
Step 8: Complete Your Email and Send
After attaching the ZIP file to your email, the final step is to complete your email message and send it to the intended recipient. Completing your email involves reviewing the content, adding any additional details, and ensuring all necessary information is included before hitting the send button.
Here’s how you can complete your email and send it:
- Review Email Content: Take a moment to review the entire email, including the recipient’s email address, subject line, email body, and any attachments. It’s important to double-check for any errors, grammatical mistakes, or missing information.
- Add any Additional Details: If there are any additional details or instructions you need to provide regarding the attached ZIP file or any other aspect of the email, make sure to include them in the appropriate place within the email body.
- Check for Clarity and Professionalism: Ensure that your email is clear, concise, and professional in tone. Avoid ambiguous or confusing language and make sure your message is easy to understand.
- Check for Attachments: Verify that the ZIP file is still attached and correctly displayed in the email. Check its file name and size to ensure it matches your intentions.
- Proofread: Take a few moments to proofread your email once again, paying attention to spelling, grammar, and punctuation. Correct any mistakes you notice to ensure a polished final email.
- Click on “Send” or “Send Email”: When you are confident that your email is complete and error-free, click on the “Send” or “Send Email” button to dispatch your message to the recipient(s).
- Confirmation Message: Depending on your email client or service, you may receive a confirmation message or see a notification indicating that your email has been sent successfully. Take note of any additional details or tracking information provided.
- Keep a Copy for Reference (Optional): If needed, consider keeping a copy of the sent email for your records. This can be useful for reference or documentation purposes.
By following these steps, you can ensure that your email is complete, accurate, and ready to be sent. Taking the time to review the email content, clarify any instructions, and double-check for errors or missing information helps to maintain professionalism and ensure a successful email transmission. Congratulations! You have now completed your email and sent it with the attached ZIP file.