
Compressing Files and Folders on a Mac
Compressing files and folders can be a useful technique to save disk space and make sending files easier and faster. If you’re using a Mac, you have several options available to compress your files and folders. In this section, we’ll explore the built-in compression tool as well as third-party apps that can help you reduce file sizes.
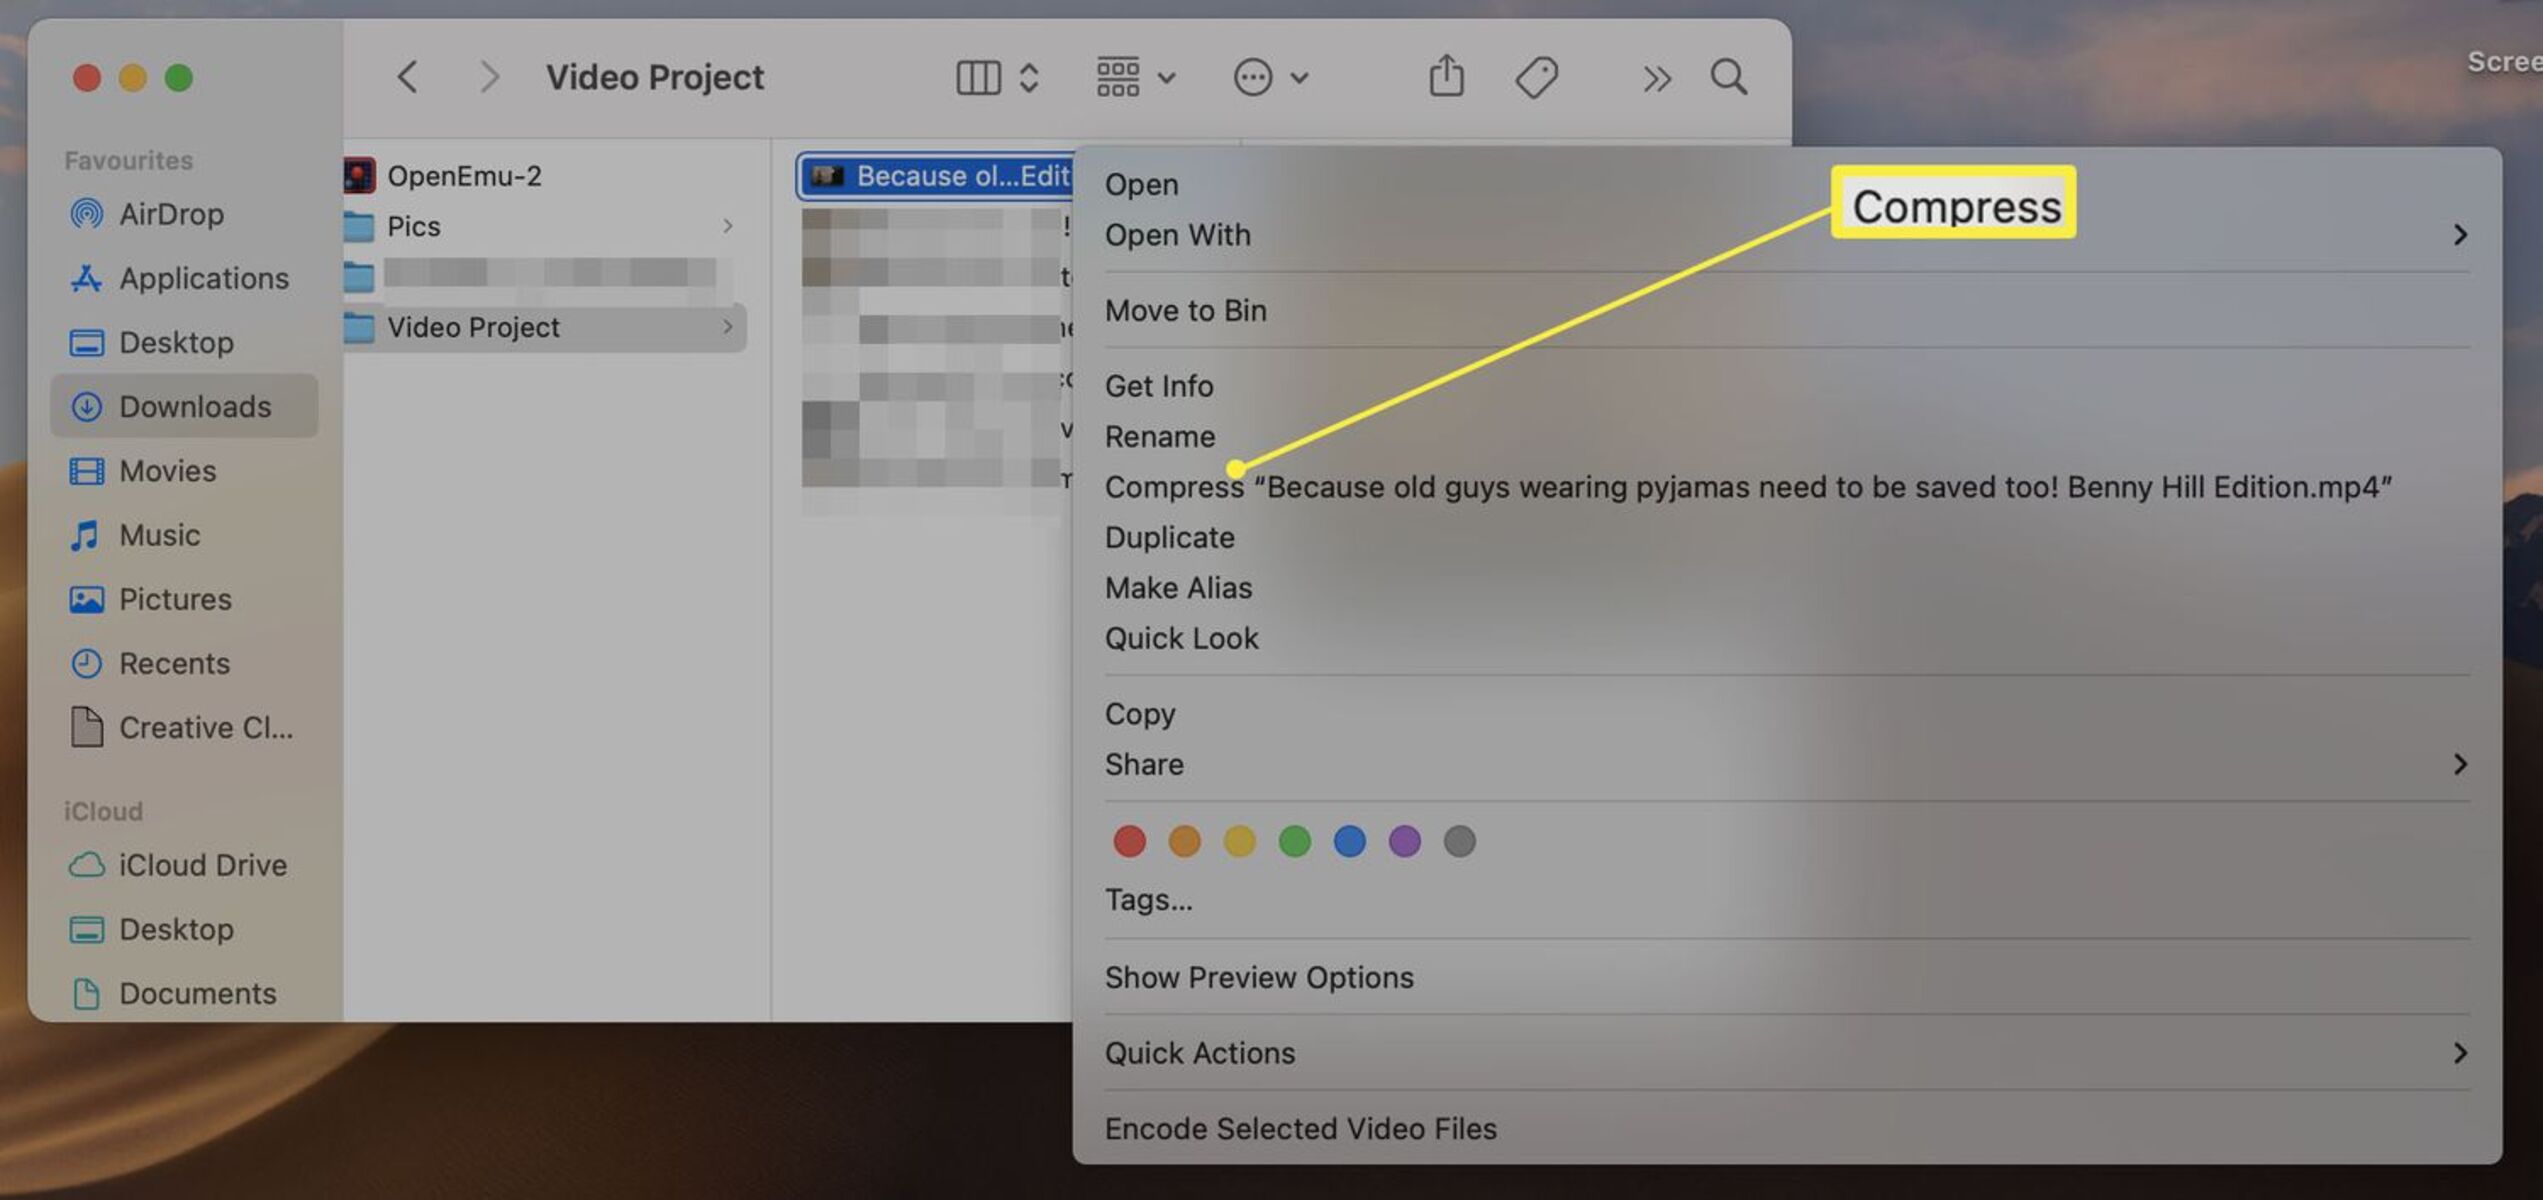
First, let’s take a look at how to use the built-in compression tool on a Mac. Apple’s macOS includes a handy utility called Archive Utility, which allows you to compress files and folders with just a few clicks. To compress a single file, simply right-click on it, select “Compress [file name],” and macOS will create a compressed file in ZIP format. This compressed file will have the same name as the original file but with the .zip extension.
If you want to compress multiple files or an entire folder, select all the items you want to compress, right-click, and choose “Compress [number] Items.” Archive Utility will bundle all the selected files and folders into a single zip file. This makes it convenient to transfer or store multiple files as a single compressed archive.
It’s also important to understand different compression formats. While ZIP is the most common format used on Macs, macOS also supports other formats like GZIP and TAR. You can choose the compression format in the Archive Utility preferences, accessible through the “Archive Utility” option in your Applications > Utilities folder.
If you need more advanced compression options or want to explore alternative compression formats, there are third-party apps available for Mac. Applications like WinZip, StuffIt, and BetterZip offer additional features such as encryption, password protection, and support for various compression formats beyond ZIP.
When trying to reduce file sizes without compression, there are a few tips you can follow. Firstly, consider removing any unnecessary data from the file or folder. This might include deleting duplicate files, removing unused styles or formatting, or compressing images further using specialized software.
Using the Built-in Compression Tool
If you’re a Mac user, you’re in luck because macOS comes with a built-in compression tool called Archive Utility. This utility makes it incredibly easy to compress files and folders with just a few simple steps.
To compress a single file using the built-in compression tool, start by locating the file you want to compress. Once you’ve found it, simply right-click on the file and select “Compress [file name]” from the context menu. macOS will then create a compressed file with the same name as the original file, but with the .zip extension.
If you need to compress multiple files or an entire folder, the built-in compression tool has got you covered as well. Just select all the items you want to compress, right-click, and choose “Compress [number] Items”. Archive Utility will then bundle all the selected files and folders into a single zip file.
The beauty of the built-in compression tool is its simplicity and convenience. With just a few clicks, you can significantly reduce the size of your files or folders, making them easier to store, share, and transfer.
It’s worth noting that the default compression format used by Archive Utility is ZIP. However, if you want to use a different compression format like GZIP or TAR, you can customize these options in the Archive Utility preferences. Simply navigate to your Applications > Utilities folder, find the Archive Utility app, and access its preferences to select your desired compression format.
Using the built-in compression tool on a Mac gives you a quick and efficient way to compress your files and folders without the need for additional software. Whether you’re looking to free up disk space, send files via email, or create backups, the built-in compression tool has you covered.
However, it’s worth mentioning that while the built-in compression tool is reliable and easy to use, it may not offer advanced features like encryption or support for alternative compression formats. If you require additional functionalities, there are numerous third-party compression apps available for macOS that you can explore.
How to Compress a Single File on a Mac
Compressing a single file on a Mac is a straightforward process using the built-in compression tool. Follow these simple steps to compress your file:
- Locate the file you want to compress on your Mac.
- Once you’ve found the file, right-click on it to open the context menu.
- In the context menu, select “Compress [file name]”.
- Archive Utility, the built-in compression tool on macOS, will then create a compressed file with the same name as the original file, but with the .zip extension.
That’s it! Your file is now compressed and ready to be used. The compressed file will have a smaller size, making it easier to store or send via email.
It’s important to note that the default compression format used by Archive Utility is ZIP. However, if you prefer to use a different compression format, such as GZIP or TAR, you can customize these options in the Archive Utility preferences. To access the preferences, go to your Applications > Utilities folder, find the Archive Utility app, and open its preferences to select your desired compression format.
Compressing a single file on a Mac is a quick and efficient way to reduce its size without losing any important data. Whether you’re looking to save disk space or make file sharing more convenient, compressing a single file using the built-in compression tool is a handy feature available at your fingertips on macOS.
How to Compress Multiple Files or Folders on a Mac
If you have multiple files or an entire folder that you want to compress on your Mac, the built-in compression tool makes it easy to bundle them into a single compressed file. Here’s how you can compress multiple files or folders:
- First, locate the files or folder you want to compress on your Mac.
- Select all the items you want to compress. You can do this by holding down the Command key and clicking on each file or folder, or by using the Shift key to select a range of items.
- Once you have selected all the items, right-click on any one of them to open the context menu.
- In the context menu, choose “Compress [number] Items”.
- The built-in compression tool called Archive Utility will then create a single zip file containing all the selected files or folders.
With this method, you can easily compress multiple files or folders into a single archive, making it more convenient to store or transfer them. The compressed file will have the same name as the first file or folder you selected, but with the .zip extension.
It’s worth noting that the built-in compression tool on macOS uses ZIP as the default compression format. However, if you wish to use a different compression format like GZIP or TAR, you can customize these options in the Archive Utility preferences. Just navigate to your Applications > Utilities folder, find the Archive Utility app, and open its preferences to select your preferred compression format.
Compressing multiple files or folders on a Mac using the built-in compression tool is an efficient way to reduce their size and organize them into a single archive. Whether you need to share multiple files via email or save disk space, this method simplifies the process and ensures your files are neatly bundled and ready for use.
Understanding Different Compression Formats
When it comes to compressing files and folders on a Mac, it’s essential to have a basic understanding of different compression formats. While the most commonly used format is ZIP, macOS supports other formats like GZIP and TAR. Let’s explore these formats and their uses:
ZIP: ZIP is the default compression format used by the built-in compression tool on macOS. It is widely supported and compatible with various operating systems, making it a popular choice for compressing files. ZIP compression reduces the size of files without sacrificing their quality or integrity, making it ideal for general-purpose compression.
GZIP: GZIP is another popular compression format, commonly used for compressing single files. It offers higher compression ratios compared to ZIP, resulting in smaller file sizes. GZIP compression is often used for web server file compression or when space-saving is a priority.
TAR: TAR, short for Tape Archive, is not a compression format itself, but rather an archiving format that bundles multiple files or directories together into a single file. TAR files are commonly compressed using other compression algorithms, such as GZIP or BZIP2, to reduce their size further.
Understanding these different compression formats can help you choose the most suitable option for your specific needs. For everyday compression tasks, ZIP is often the go-to choice due to its widespread compatibility and ease of use. However, if you require higher compression ratios or have specific requirements, exploring alternative formats like GZIP or TAR can be beneficial.
To select your preferred compression format using the built-in compression tool on macOS, you can access the Archive Utility preferences. Simply navigate to your Applications > Utilities folder, find the Archive Utility app, and customize the compression format settings to suit your needs.
Having a grasp of different compression formats allows you to make informed decisions and optimize your file compression process based on your unique requirements. Whether you’re archiving files, transferring data, or saving disk space, understanding the strengths and uses of these formats ensures you can choose the right one for the job.
Compressing Files with Third-Party Apps
While the built-in compression tool on macOS is convenient and easy to use, there are also third-party apps available that provide additional features and functionalities when it comes to compressing files. Here’s a look at some popular third-party apps you can consider:
WinZip: WinZip is a well-known compression software that offers a wide range of features. Along with basic compression capabilities, WinZip provides options for encrypting compressed files, managing and organizing archives, and integrating with cloud storage services for seamless backup and sharing.
StuffIt: StuffIt is another popular compression tool for macOS that supports a variety of formats. In addition to compressing files into formats like ZIP, GZIP, and TAR, StuffIt offers advanced features like compression profiles for customizing settings based on file type, strong encryption for securing archived files, and in-depth file management options.
BetterZip: BetterZip is a versatile compression app that allows you to compress files and folders using various formats, including ZIP, GZIP, BZIP2, and more. It includes features like password protection, split archives for conveniently sharing large files, and the ability to preview and extract specific files from an archive without decompressing everything.
These third-party apps can enhance your compression experience, providing you with additional functionalities and customization options. Whether you need stronger encryption, integration with cloud services, or more control over your compression process, these apps offer a range of features beyond what the built-in tool can provide.
When choosing a third-party compression app, consider your specific needs, such as the compression formats you require, the level of encryption or security you desire, and any additional features that would be beneficial to you. You can explore trial versions or read user reviews to help you make an informed decision.
With the availability of these third-party apps, macOS users have a wide selection of compression tools at their disposal. These apps can greatly expand your options and provide a more tailored compression experience based on your preferences and requirements.
Tips for Reducing File Size without Compression
Reducing file size without compression can be a useful approach when you want to save space or optimize file transfer without actually compressing the files. Here are some tips to help you reduce file size without using compression:
- Delete unnecessary data: One of the most effective ways to reduce file size is by removing any unnecessary data. This might include deleting duplicate files, removing unused styles or formatting, or deleting unnecessary metadata from documents.
- Compress images: Images often take up a significant amount of space in files. You can reduce their size by using image compression techniques or specialized software. This can include reducing image resolution, compressing the files using lossy or lossless compression algorithms, or converting images to more efficient file formats like JPEG or WebP.
- Convert file formats: Some file formats have higher compression capabilities or are more efficient in terms of file size. Converting files to more compact formats can help reduce file size. For example, converting video files to a more compressed format like MP4 can significantly decrease their size.
- Remove unnecessary layers or elements: If you’re working with files that have multiple layers or elements, consider removing those that are not essential. For example, in image editing software, you can flatten layers to reduce file size. Similarly, in video editing, removing unnecessary audio tracks or effects can help reduce the overall file size.
- Use file compression alternatives: Depending on the type of files you’re working with, there may be alternative file compression techniques available specific to that type. For example, PDF files can be reduced in size by using optimization tools that remove unnecessary elements and streamline the file structure.
By following these tips, you can significantly reduce file size without relying on traditional compression techniques. This can be especially helpful when you want to conserve disk space or optimize the transfer of files without the need to decompress them at the receiving end.
However, it’s important to note that these methods may not achieve the same level of file size reduction as traditional compression. If maximum compression is required, using compression tools or formats like ZIP or GZIP may still be the best option.
Understanding these alternative techniques allows you to choose the most appropriate method for reducing file size based on your specific needs and requirements. By implementing these tips, you can optimize file sizes while preserving the integrity and quality of your files.
Decompressing Files and Folders on a Mac
Once you have compressed files or folders on your Mac, you may need to decompress them at some point. Decompression is the process of restoring the compressed files back to their original format. Thankfully, on macOS, decompressing files and folders is a simple task. Here’s how to do it:
- Locate the compressed file or folder you want to decompress on your Mac.
- Once you’ve found it, double-click on the compressed file.
- The built-in Archive Utility tool will automatically launch and begin extracting the contents of the compressed file to a new folder in the same location.
- Wait for the extraction process to complete.
That’s it! The compressed file or folder will be decompressed, and you’ll have access to the original files in their uncompressed form.
It’s important to note that the decompression process may vary depending on the compression format used. The built-in Archive Utility on macOS is capable of handling various formats such as ZIP, GZIP, and TAR, so it should work seamlessly for most compressed files you encounter.
If you’re dealing with a less common compression format or a file that requires a specific decompression tool, you may need to use a third-party app that supports that format. In such cases, ensure that you have the appropriate software installed on your Mac to decompress the file properly.
Decompressing files and folders on a Mac is a necessary step to access the contents of compressed archives. With the built-in Archive Utility, the process is simple and straightforward, allowing you to restore your files back to their original state in just a few clicks.
Remember to delete the compressed file or folder once you’ve successfully decompressed it, especially if you no longer need the compressed version. This helps to free up disk space and ensures that you’re working with the most up-to-date and accessible files.
Troubleshooting Compression Issues on macOS
While compressing files and folders on macOS is typically a smooth process, you may encounter occasional issues or errors. Here are some troubleshooting tips to help you resolve common compression issues:
- Ensure sufficient disk space: Before compressing files, verify that you have enough disk space available on your Mac. Insufficient space can cause compression to fail or result in incomplete or corrupted archives.
- Check for file permissions: If you encounter errors while compressing or decompressing files, ensure that you have the necessary permissions to access and modify the files. This includes checking the file permissions and the permissions of the enclosing folders.
- Check for file corruption: If you’re experiencing issues with specific files, check if they are damaged or corrupted. Attempt to open the files individually to ensure they are not causing the compression issues.
- Try different compression formats: If you encounter errors with a particular compression format, try using another format. This can help determine if the issue is specific to the format being used or if it’s a more general problem with the compression process.
- Restart your Mac: Sometimes, a simple system restart can resolve temporary issues with the compression tool or other underlying components of macOS. Before attempting any complex troubleshooting steps, try restarting your Mac and see if the problem persists.
- Update macOS and compression software: Ensure that you have the latest macOS updates installed, as well as any updates for the software you are using to compress or decompress files. Outdated software can sometimes cause compatibility issues or bugs that can affect the compression process.
- Use third-party compression tools: If you continue to experience problems, consider using third-party compression tools instead of the built-in macOS utility. These tools may offer additional features and more robust error handling to address any issues you may be facing.
If none of these troubleshooting tips resolve your compression issues, you may need to consult online forums or seek assistance from the software’s support team for more specific guidance. Providing detailed information about the error messages or specific problems you encounter will help in diagnosing and resolving the issue more effectively.
Remember, while compression can be a useful technique, it’s important to regularly back up your important files. This way, even if you encounter issues during compression, your valuable data remains safe and accessible.