
Why Clearing the Cache is Important for Fire TV Stick Performance
Clearing the cache on your Fire TV Stick is important for maintaining optimal performance and ensuring smooth streaming experiences. The cache is a temporary storage area where apps and websites store data that they frequently access. While the cache can speed up the loading time of apps and websites, it can also accumulate unnecessary data over time, affecting the performance of your Fire TV Stick.
Here are a few reasons why clearing the cache is important:
1. Improved Speed: As you use different apps and stream content on your Fire TV Stick, the cache can become filled with temporary files and data. Over time, these files can slow down your device and cause delays in app loading times. By clearing the cache, you remove these accumulated files and free up storage space, resulting in improved speed and performance.
2. Reduced Buffering: Buffering is often a frustrating experience when streaming videos on the Fire TV Stick. Clearing the cache can help reduce buffering issues by removing stored data that may be causing conflicts or slowing down the streaming process. This can result in smoother playback and uninterrupted streaming sessions.
3. Fixing Glitches and Crashes: If you frequently experience glitches, freezes, or crashes while using certain apps on your Fire TV Stick, it may be due to a corrupted cache. Clearing the cache can help resolve these issues by eliminating any corrupt or outdated data that may be causing the app to malfunction.
4. Optimized Storage: The cache can take up a significant amount of storage space on your Fire TV Stick. By regularly clearing the cache, you can prevent the storage from getting cluttered and ensure that your device has enough space to run smoothly. This is particularly important if you have limited storage capacity on your Fire TV Stick.
Clearing the cache on your Fire TV Stick is a simple process that can greatly benefit the performance of your device. By implementing this routine maintenance task, you can enjoy a seamless streaming experience, faster loading times, and minimize frustrating glitches or crashes. In the following sections, we will guide you through the step-by-step process of clearing the cache on your Fire TV Stick.
Step 1: Accessing the Settings Menu
In order to clear the cache on your Fire TV Stick, you will first need to access the Settings menu. Here’s how you can do it:
1. Start by navigating to the home screen of your Fire TV Stick. This is the main screen that appears when you turn on your device.
2. Use the directional buttons on your Fire TV Stick remote to move the cursor to the top menu. Here you will find several options such as Home, Movies, TV Shows, Apps, and Settings.
3. Move the cursor to the right until you highlight the “Settings” option, which looks like a gear icon. Once selected, press the “OK” button on your remote to access the Settings menu.
4. Once you enter the Settings menu, you will see a list of different options. Use the directional buttons to navigate and highlight the desired option.
By following these simple steps, you can easily access the Settings menu on your Fire TV Stick. In the next section, we will guide you through the process of navigating to the Applications menu, where you can clear the cache for specific apps on your device.
Step 2: Navigating to the Applications Menu
After accessing the Settings menu on your Fire TV Stick, the next step is to navigate to the Applications menu. This is where you can find the option to clear the cache for specific apps. Here’s how you can do it:
1. Once you are in the Settings menu, use the directional buttons on your remote to scroll down and highlight the “Applications” option. The Applications menu contains various settings related to the apps installed on your Fire TV Stick.
2. Scroll to the right until you reach the “Applications” option and press the “OK” button on your remote to enter the Applications menu.
3. In the Applications menu, you will find a list of different options such as Appstore, Manage Installed Applications, and Appstore Settings. Use the directional buttons to highlight the “Manage Installed Applications” option and press the “OK” button to access it.
4. Once you enter the “Manage Installed Applications” screen, you will see a list of all the apps installed on your Fire TV Stick. Scroll through the list to find the app for which you want to clear the cache.
By following these steps, you can easily navigate to the Applications menu on your Fire TV Stick. In the next section, we will guide you through the process of finding the specific app for which you want to clear the cache.
Step 3: Finding the App for Which You Want to Clear the Cache
Once you have accessed the “Manage Installed Applications” screen within the Applications menu on your Fire TV Stick, the next step is to locate the specific app for which you want to clear the cache. Follow these instructions to find the desired app:
1. Using the directional buttons on your Fire TV Stick remote, scroll through the list of installed applications until you find the app you want to clear the cache for.
2. As you navigate through the list, pay attention to the names and icons of the apps to identify the one you need. You can also use the search function if available to quickly locate the desired app.
3. Once you have found the app you want to clear the cache for, select it by highlighting it and pressing the “OK” button on your remote.
4. After selecting the app, you will be taken to its specific settings page, where you can manage various options and preferences for that particular app.
By following these steps, you can easily find the app for which you want to clear the cache on your Fire TV Stick. In the next section, we will guide you through the process of clearing the cache for the selected app.
Step 4: Clearing the Cache for the Selected App
Once you have located the specific app for which you want to clear the cache on your Fire TV Stick, you can proceed with the cache clearing process. Follow the instructions below:
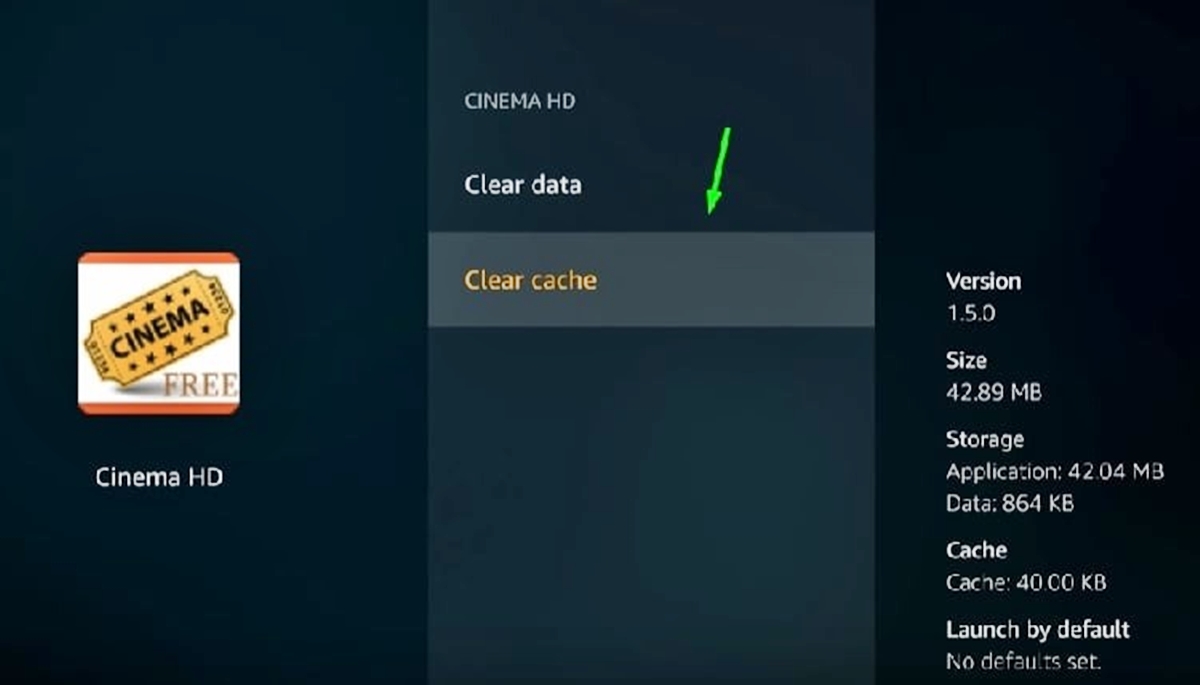
1. On the settings page for the selected app, scroll down to find the “Clear cache” option. This option is usually located in the Storage or General section of the app’s settings.
2. Once you have found the “Clear cache” option, highlight it and press the “OK” button on your remote to select it.
3. A confirmation message will appear, asking if you want to clear the cache for the selected app. Select “Clear” or “OK” to proceed with the cache clearing process.
4. Depending on the size of the app’s cache, the process may take a few seconds or a couple of minutes. Once the cache is cleared, you will receive a notification confirming the successful completion of the process.
5. Repeat this step for any other apps for which you want to clear the cache.
By following these steps, you can easily clear the cache for the selected app on your Fire TV Stick. In the next section, we will guide you through the process of confirming the cache clearing and offer some optional steps to repeat the process for other apps.
Step 5: Confirming the Cache Clearing
After you have cleared the cache for the selected app on your Fire TV Stick, it is important to confirm the cache clearing to ensure that the process was successful. Follow these instructions to confirm the cache clearing:
1. Once you have cleared the cache for an app, you will be redirected back to the settings page for that app.
2. Scroll through the settings page and look for any indication that the cache has been cleared. This may include a decrease in the total cache size or a notification stating that the cache has been successfully cleared.
3. If you cannot find a specific confirmation message, you can exit the settings page and relaunch the app. This will allow you to assess if the cache clearing has positively impacted the app’s performance. If you notice improved speed or reduced buffering, it is likely that the cache clearing was successful.
4. If you encounter any issues or if the app’s performance does not improve after clearing the cache, you may consider repeating the cache clearing process for the app or exploring other troubleshooting steps.
Remember, clearing the cache for an app may temporarily impact its performance as it needs to rebuild the cache with fresh data. However, in most cases, this temporary decrease in performance is outweighed by the long-term benefits of a cleared cache.
By following these steps, you can confirm the cache clearing for the selected app on your Fire TV Stick. In the next section, we will discuss optional steps to repeat the cache clearing process for other apps if desired.
Step 6: Repeating the Process for Other Apps (Optional)
If you have multiple apps installed on your Fire TV Stick and want to optimize their performance by clearing their caches, you can repeat the cache clearing process for each app. Follow these optional steps to clear the cache for other apps:
1. After confirming the cache clearing for the first app, navigate back to the “Manage Installed Applications” screen within the Applications menu.
2. Scroll through the list of installed apps and select the next app for which you want to clear the cache by highlighting it and pressing the “OK” button on your remote.
3. Follow the same steps outlined in the previous sections, namely “Step 4: Clearing the Cache for the Selected App,” to clear the cache for the newly selected app.
4. Repeat this process for each app you wish to clear the cache for, ensuring that you select and clear the cache for one app at a time.
By repeating the cache clearing process for other apps, you can optimize the overall performance of your Fire TV Stick. Pay attention to any changes in performance, such as improved speed and reduced buffering, after clearing the cache for each app.
It’s worth noting that while clearing the cache can improve performance, it is not a universal solution for all app issues. If you continue to experience problems with certain apps after clearing their caches, you may need to explore additional troubleshooting steps or consider contacting the app developer for support.
By following these optional steps, you can repeat the cache clearing process for other apps on your Fire TV Stick if desired. In the next section, we will discuss how restarting the Fire TV Stick can further enhance its performance.
Step 7: Restarting the Fire TV Stick
Restarting the Fire TV Stick can help further optimize its performance and resolve any lingering issues. Here’s how you can restart your Fire TV Stick:
1. Navigate to the home screen of your Fire TV Stick by pressing the home button on your remote. This will ensure that you are at the main screen of your device.
2. From the home screen, go to the settings menu by using the directional buttons on your remote. Scroll to the right to highlight the “Settings” option, which looks like a gear icon. Press the “OK” button on your remote to access the Settings menu.
3. Within the Settings menu, scroll down and select the “Device & Software” option.
4. In the “Device & Software” menu, scroll down and select the “Restart” option. A confirmation message will appear, asking if you want to restart your Fire TV Stick. Select “Restart” to proceed.
5. After selecting “Restart,” your Fire TV Stick will begin the restart process. Allow your device a few moments to fully power down and start up again.
6. Once your Fire TV Stick has restarted, you will be directed back to the home screen. From here, you can resume using your device and enjoy the optimized performance after clearing the cache and restarting.
Restarting your Fire TV Stick periodically is a good practice to keep your device functioning smoothly. It helps clear any temporary glitches and ensures that the system starts fresh, boosting performance and resolving any lingering issues.
By following these steps, you can easily restart your Fire TV Stick to further enhance its performance. In the next section, we will recap the key points and offer final thoughts on clearing the cache on your Fire TV Stick.
Final Thoughts
Clearing the cache on your Fire TV Stick is a simple yet effective way to improve its performance and ensure a smooth streaming experience. By following the steps outlined in this guide, you can easily navigate the settings menu, find specific apps, clear their caches, and restart your device for enhanced performance.
Regularly clearing the cache on your Fire TV Stick can result in improved speed, reduced buffering, and the resolution of glitches and crashes. It also helps optimize storage space, ensuring your device runs smoothly and efficiently.
Remember, clearing the cache is not a one-time fix. As you continue to use your Fire TV Stick and install new apps, their caches will gradually accumulate again. It is recommended to clear the cache periodically or whenever you encounter performance issues with specific apps.
Additionally, restarting your Fire TV Stick after clearing the cache can help refresh the system and further enhance performance. This simple step can resolve any lingering issues and ensure that your device starts on a clean slate.
By implementing these practices, you can maintain a high-performing Fire TV Stick and enjoy seamless streaming experiences with your favorite apps and content.
We hope this guide has been helpful in guiding you through the process of clearing the cache on your Fire TV Stick. If you have any further questions or concerns regarding your device, consult the official support resources provided by Amazon or contact their customer support for assistance.
Thank you for choosing the Fire TV Stick, and happy streaming!