
How to Check Storage Usage on iPhone
It’s essential to keep track of your iPhone’s storage usage to ensure you have enough space for new files, apps, and media. Fortunately, checking your iPhone’s storage usage is a straightforward process. Here’s how you can do it:
- Open the “Settings” app on your iPhone. It’s the gear-shaped icon located on your home screen.
- Scroll down and tap on “General.”
- Select “iPhone Storage.”
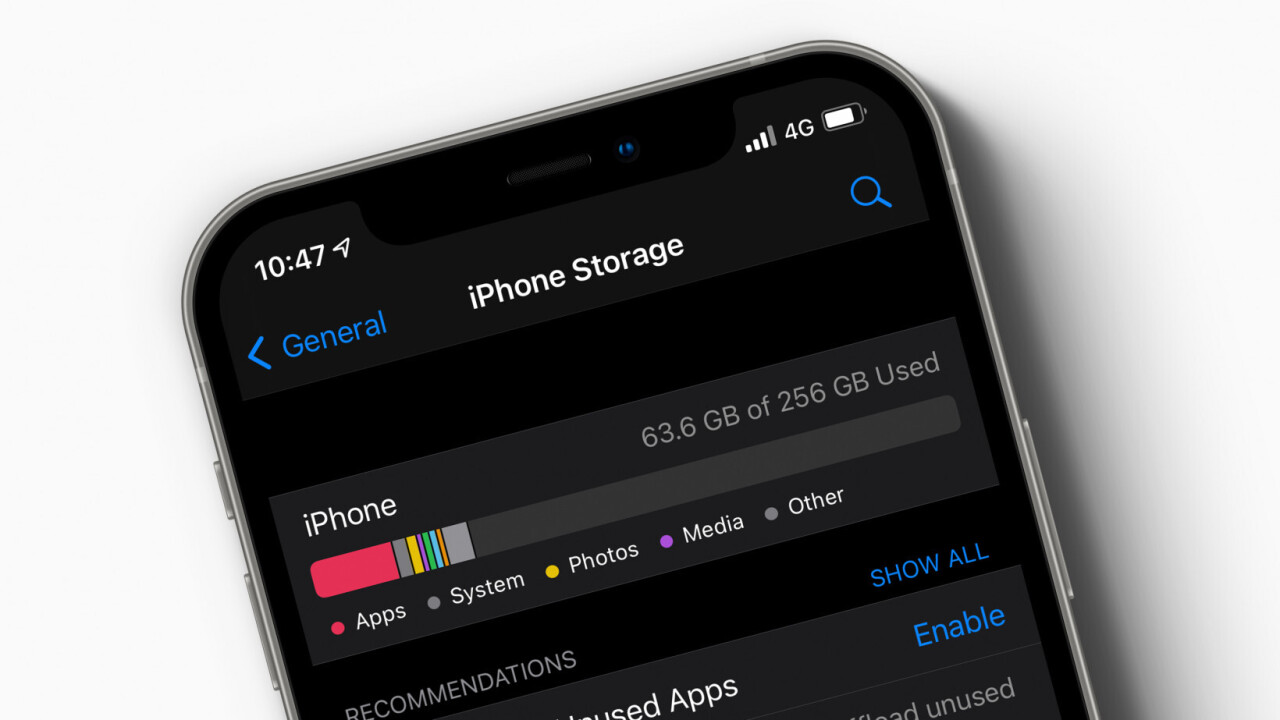
Once you’re in the iPhone Storage settings, you’ll see a breakdown of your storage usage. The graph at the top gives you an overview of how your storage is being allocated among different categories like Apps, Photos, Media, System, and Others.
Beneath the graph, you’ll find a list of apps installed on your device, sorted by the amount of storage they occupy. This will give you a clear idea of which apps are taking up the most space.
If you tap on any app, you’ll see a more detailed view, including the app size, documents and data, and the option to offload the app. Tapping “Offload App” will remove the app but keep its documents and data, freeing up space while still preserving your information.
By regularly checking your storage usage, you can identify the apps, photos, videos, or other media that are consuming the most space on your iPhone. Once you have a clear understanding of your storage usage, you can proceed to clear unnecessary files and optimize your device’s performance.
How to Clear Storage on iPhone
As you use your iPhone, it is common for the storage to accumulate unnecessary files and data that can take up valuable space. Clearing your iPhone’s storage is a simple and effective way to reclaim that space and optimize your device’s performance. Here are some methods you can use to clear storage on your iPhone:
- Clearing App Cache: Many apps store cache data, which can take up significant storage space over time. To clear app cache, go to “Settings” > “General” > “iPhone Storage” and tap on the app you want to clear cache for. Then, select “Offload App” to remove the app but keep its documents and data, or “Delete App” to completely remove the app and all its data.
- Clearing Safari Cache: Safari stores website data, cookies, and cache, which can also occupy a large amount of storage. To clear Safari cache, go to “Settings” > “Safari” > “Clear History and Website Data.”
- Clearing Messages Attachments: Messages with attachments such as photos, videos, and audio files can quickly fill up your storage. To clear these attachments, open the Messages app, find a conversation with attachments, swipe left on it, and tap “Delete.”
- Clearing iMessage Attachments: iMessage also stores attachments. To clear iMessage attachments, go to “Settings” > “Messages” > “Keep Messages” and select a shorter time period to automatically remove older attachments.
- Clearing WhatsApp Media: WhatsApp also stores media files, including photos, videos, and voice messages. To clear WhatsApp media, open the app, go to “Settings” > “Storage and Data” > “Manage Storage,” and select the conversations you want to clear media from. Then, tap “Clear” to remove the selected media files.
- Clearing Other Media: Apart from app-specific media, there might be other media files stored on your iPhone. You can manually delete them by going to the “Photos” app or using a file management app to locate and remove unwanted media.
- Offloading Unused Apps: If you have apps that you no longer use regularly, you can offload them to free up storage space without losing any documents or data associated with them. To offload apps, go to “Settings” > “General” > “iPhone Storage” and tap on the app you want to offload. Then, select “Offload App.”
- Managing iCloud Photo Library: If you use iCloud Photo Library, you can optimize your storage by enabling the “Optimize iPhone Storage” option. This will store smaller versions of photos on your device and keep the originals in iCloud, reducing the space used by your photos.
- Using Google Photos to Clear Storage: Another option is to use Google Photos to back up your photos and videos to the cloud and then delete them from your device. This can free up a significant amount of storage while still allowing you to access your media from the Google Photos app.
- Using Third-Party Apps: There are several third-party apps available that can help you identify and remove unnecessary files, duplicates, and other space-consuming data on your iPhone. These apps often provide additional features and customization options for managing your storage effectively.
By utilizing these methods, you can clear the unnecessary clutter from your iPhone’s storage and ensure you have ample space for new files, apps, and media. Regularly clearing your storage will help keep your iPhone running smoothly and efficiently.
Clearing App Cache on iPhone
App cache is temporary data stored by apps on your iPhone to improve performance and provide a smoother user experience. However, over time, this cache can accumulate and take up a significant amount of storage space. Clearing app cache can help free up space on your iPhone and potentially resolve performance issues. Here’s how you can clear app cache on your iPhone:
- Open the “Settings” app on your iPhone.
- Scroll down and tap on “General.”
- Select “iPhone Storage.”
- Scroll down to the “Recommendations” section and look for the apps listed under “Offload Unused Apps.”
- Tap on an app to get more details about its storage usage.
- You will see the app size and an option called “Offload App.” Tapping on this option will remove the app but keep its documents and data, freeing up storage space.
Keep in mind that if you reinstall the app in the future, your data will be restored. Offloading apps is a great way to clear cache and regain storage space without losing important information.
If you prefer to clear app cache without offloading the entire app, some apps offer the option to clear cache within their settings. Here’s how you can clear cache for specific apps:
- Open the “Settings” app on your iPhone.
- Scroll down and find the app you want to clear cache for.
- Select the app and look for the option related to storage or cache.
- Tap on the option to clear the app cache.
It’s important to note that not all apps provide the ability to clear cache within the app settings. In such cases, offloading the app or reinstalling it will be the most effective way to clear cache associated with that app.
Regularly clearing app cache can help improve the performance of your iPhone and free up valuable storage space. However, it’s worth mentioning that clearing app cache does not delete any personal data or documents stored within the app. It only removes temporary files and data that are no longer needed.
By following these steps, you can effectively clear app cache on your iPhone and enjoy a smoother, more efficient device.
Clearing Safari Cache on iPhone
Safari, the default web browser on your iPhone, stores temporary files, cookies, and website data to improve browsing speed and provide a personalized experience. However, over time, this cache can accumulate and take up valuable storage space on your device. Clearing Safari cache periodically can help free up space and ensure a smooth browsing experience. Here’s how you can clear Safari cache on your iPhone:
- Open the “Settings” app on your iPhone.
- Scroll down and tap on “Safari.”
- Under the “Privacy & Security” section, tap on “Clear History and Website Data.”
- A confirmation pop-up will appear. Tap “Clear History and Data” to proceed.
By following these steps, Safari cache, along with browsing history, cookies, and other website data, will be cleared from your iPhone.
It’s important to note that clearing Safari cache will log you out of websites, remove stored website data, and delete autofill information. You may need to sign in again to websites and re-enter passwords or other previously saved information.
If you want to clear specific website data without completely clearing Safari cache, you can do so by following these steps:
- Open the “Settings” app on your iPhone.
- Scroll down and tap on “Safari.”
- Under the “Privacy & Security” section, tap on “Advanced.”
- Select “Website Data.”
- You’ll see a list of websites that have stored data on your iPhone. Tap on “Edit” in the top right corner.
- Select the websites you want to remove data for, or tap “Remove All Website Data” to delete all stored website data.
- Tap “Done” to confirm.
This method allows you to selectively clear website data while leaving other Safari settings and cache intact.
Clearing Safari cache on your iPhone can help improve performance, free up storage space, and ensure a more reliable browsing experience. By periodically clearing cache and website data in Safari, you can optimize your device’s performance and keep your storage in check.
Clearing Messages Attachments on iPhone
Messages on your iPhone can quickly accumulate attachments such as photos, videos, audio files, and other media. These attachments take up valuable storage space, especially if you have been using the Messages app for a while. Clearing messages attachments periodically can help free up space and keep your device running smoothly. Here’s how you can clear messages attachments on your iPhone:
- Open the Messages app on your iPhone.
- Find a conversation that contains attachments you want to clear.
- Swipe left on the conversation to reveal the options.
- Tap on “More.”
- Select the attachments you want to remove by tapping on the checkboxes next to them.
- Tap on the Trash Can icon in the bottom left corner.
- Confirm the deletion by tapping on “Delete Messages.”
By following these steps, the selected messages and their attachments will be permanently deleted from your iPhone.
If you want to clear attachments from multiple conversations at once, you can use the “Manage Storage” feature in the Messages settings. Here’s how:
- Open the “Settings” app on your iPhone.
- Scroll down and tap on “Messages.”
- Select “Keep Messages.”
- Choose a shorter time period like 30 days or 1 year to automatically remove older message attachments.
Enabling this option will automatically clear message attachments that are older than the specified time period, helping you manage storage more efficiently.
It’s important to note that clearing message attachments will only remove them from your iPhone. The attachments will still be available in the conversations of other participants if they have not deleted them as well.
If you want to save specific attachments before clearing them from your iPhone, you can save them to your Photos app or any other appropriate app. Simply tap and hold on the attachment in the Messages app and select the “Save” or “Save Image” option.
By regularly clearing message attachments, you can free up storage space on your iPhone, declutter your Messages app, and ensure smooth performance. It’s a great way to keep your device organized and optimize its storage usage.
Clearing iMessage Attachments on iPhone
iMessage, the built-in messaging service on your iPhone, allows you to send and receive multimedia attachments such as photos, videos, and audio files. Over time, these iMessage attachments can accumulate and take up valuable storage space on your device. Clearing iMessage attachments is a simple and effective way to free up space and optimize your iPhone’s performance. Here’s how you can clear iMessage attachments on your iPhone:
- Open the “Settings” app on your iPhone.
- Scroll down and tap on “Messages.”
- Select “Keep Messages.”
- Choose a shorter time period, such as 30 days or 1 year, to automatically remove iMessage attachments older than the specified time.
By enabling this option, your iPhone will automatically clear iMessage attachments that are older than the chosen time period, helping you manage storage more efficiently.
Alternatively, if you want to manually clear specific iMessage attachments, you can follow these steps:
- Open the “Messages” app on your iPhone.
- Find the conversation that contains the iMessage attachments you want to clear.
- Tap and hold on the specific attachment you want to remove.
- Select the “More” option to enter the selection mode.
- Select multiple attachments by tapping on the checkboxes next to them.
- Tap on the trash can icon to delete the selected iMessage attachments.
- Confirm the deletion by tapping on “Delete Message.”
By following these steps, you can manually clear iMessage attachments and free up storage space on your iPhone.
Remember that clearing iMessage attachments will only remove them from your device. If the recipient still has the conversations and attachments on their device, they will remain unaffected by your actions.
If you want to save specific iMessage attachments before clearing them from your iPhone, you can do so by tapping and holding on the attachment and selecting the “Save” or “Save Image” option.
Regularly clearing iMessage attachments helps keep your device organized, optimizes storage space, and ensures a smooth user experience. By managing your iMessage attachments, you can keep your iPhone running efficiently and have ample space for important files and media.
Clearing WhatsApp Media on iPhone
WhatsApp is a popular messaging app that allows users to exchange messages, photos, videos, and other media files. As you use WhatsApp, these media files can accumulate and take up a significant amount of storage space on your iPhone. Clearing WhatsApp media is a great way to reclaim storage space and keep your device running smoothly. Here’s how you can clear WhatsApp media on your iPhone:
- Open the WhatsApp app on your iPhone.
- Tap on the “Settings” tab at the bottom right corner.
- Choose “Storage and Data.”
- Select “Manage Storage.”
- You will see a list of your WhatsApp conversations, sorted by the amount of storage they occupy.
- Tap on a conversation to see detailed information about the media files shared within it.
- From the conversation detail screen, you can choose to delete specific media files.
- Tap on “Clear” to remove selected media files or tap “Clear All” to delete all media files in that conversation.
- Confirm the deletion by tapping “OK.”
By following these steps, you can selectively remove media files from your WhatsApp conversations, freeing up storage space on your iPhone.
Additionally, you can set WhatsApp to automatically delete media files after they have been saved to your iPhone’s Photos app. To do this, follow these steps:
- Open the WhatsApp app on your iPhone.
- Tap on the “Settings” tab at the bottom right corner.
- Choose “Chats.”
- Toggle on the “Save to Camera Roll” option.
Enabling this option ensures that once media files are saved to your device’s Photos app, they will be deleted from the WhatsApp storage, further optimizing your storage space.
While clearing WhatsApp media can help free up storage space, it’s important to note that these deleted media files will be permanently removed from your device. If you wish to keep certain media files, it’s advisable to back them up to another storage location before clearing WhatsApp media.
By regularly clearing WhatsApp media on your iPhone, you can keep your device storage in check and maintain optimal performance.
Clearing Other Media on iPhone
In addition to app-specific media and messaging attachments, there may be other types of media files stored on your iPhone that take up valuable storage space. Clearing these miscellaneous media files can help free up storage and ensure optimal performance on your device. Here are some methods to clear other media on your iPhone:
- Photos App: Open the Photos app on your iPhone and navigate to the “Albums” tab. Look for albums such as “Screenshots,” “Recently Deleted,” or “Hidden.” These albums often contain media files that you may no longer need. You can select individual photos or videos and tap the “Delete” button to remove them permanently.
- File Management Apps: Use file management apps like “Files” or third-party apps like “Documents by Readdle” to locate and remove unwanted media files. These apps allow you to navigate through different folders and delete files that are no longer needed.
- Downloads: Clearing the “Downloads” folder on your iPhone can also help free up storage. Open the Files app or any other relevant download app, such as a cloud storage app or a document viewer, and navigate to the “Downloads” folder. Select the files you want to remove and delete them from your device.
- Unused Apps: Review the apps installed on your iPhone and identify those that you no longer use regularly. Uninstalling these unused apps can help free up significant storage space. Simply long-press on the app icon on your home screen, tap the “X” that appears, and confirm the deletion.
- Podcasts and Videos: If you regularly download podcasts or videos for offline usage, these files can occupy a considerable amount of storage. Open the Podcasts or Videos app, go to the Downloads section, and remove any downloaded files that you no longer need.
Clearing other media files on your iPhone can help optimize storage and improve overall performance. Remember to review the files thoroughly before deleting them, ensuring that you don’t remove any important or irreplaceable media.
Regularly clearing unnecessary media files not only frees up storage space but also ensures that your iPhone functions efficiently, allowing you to enjoy a smoother user experience.
Offloading Unused Apps on iPhone
Over time, you may accumulate numerous apps on your iPhone that you no longer use regularly. These unused apps can take up a significant amount of storage space. Offloading these apps is an effective way to free up storage while still preserving the app’s data and settings for future use. Here’s how you can offload unused apps on your iPhone:
- Open the “Settings” app on your iPhone.
- Scroll down and tap on “General.”
- Select “iPhone Storage.”
- You’ll see a list of apps sorted by the amount of storage they occupy.
- Scroll through the list and find the app(s) you want to offload.
- Tap on the app to open its storage details.
- You’ll see an option called “Offload App.” Tap on it.
- A confirmation message will appear, stating that the app will be offloaded but its documents and data will be preserved.
- Tap “Offload App” again to confirm.
By offloading unused apps, you remove the app itself from your device, freeing up storage space. However, the app’s documents and data will be retained, allowing you to reinstall the app later with all of its previous settings and data intact.
If you decide to reinstall an offloaded app, simply search for it in the App Store, and it will download and install like any other app. Offloaded apps will appear with a cloud download icon, indicating that they are ready for installation.
To disable automatic offloading of unused apps, you can follow these steps:
- Open the “Settings” app on your iPhone.
- Scroll down and tap on “App Store.”
- Under the “App Downloads” section, toggle off the “Offload Unused Apps” option.
By disabling this feature, your iPhone will no longer automatically offload unused apps, and you’ll have to manually offload them if desired.
Offloading unused apps is an effective way to free up storage space without losing important data. By regularly offloading apps you no longer use, you can keep your iPhone storage optimized, improve device performance, and have more space for the apps and media you truly need.
Managing iCloud Photo Library on iPhone
iCloud Photo Library offers a convenient way to store and access your photos and videos across all your Apple devices. However, if you have limited iCloud storage or want to optimize your iPhone’s storage space, managing your iCloud Photo Library is essential. Here are some tips for effectively managing iCloud Photo Library on your iPhone:
1. Enable Optimize iPhone Storage: Open the “Settings” app on your iPhone, tap your name at the top, then select “iCloud” > “Photos.” Enable the “Optimize iPhone Storage” option. This option automatically manages the storage of photos and videos on your device, replacing full-resolution media files with smaller versions to optimize storage space.
2. Remove Unwanted Photos and Videos: Open the “Photos” app on your iPhone and navigate to the specific album where you want to delete photos or videos. Tap “Select” to enter selection mode, then choose the media files you want to remove. Tap the trash can icon to delete them. These deleted items will be moved to the “Recently Deleted” album, where they’re permanently deleted after 30 days or sooner if you choose to delete them immediately from that album.
3. Optimize iCloud Photo Library Settings: Open the “Settings” app on your iPhone, tap your name at the top, then select “iCloud” > “Photos.” From here, you can adjust settings like enabling “Upload to My Photo Stream” (for sharing recent photos across devices) and “Download and Keep Originals” (to keep full-resolution copies of your photos and videos on your device).
4. Review and Delete Duplicate Photos: Use third-party apps like “Remo Duplicate Photos Remover” or “Photo Cleaner” to scan your Photos library for duplicate images. These apps can help identify and delete exact or similar duplicates, saving storage space.
5. Use “Manage Storage” in iCloud Settings: To get an overview of your iCloud storage usage and manage your iCloud backups, open the “Settings” app, tap your name, then select “iCloud” > “Manage Storage.” You can view which apps and photos/videos are using the most storage, delete unnecessary backups, and optimize your iCloud storage as needed.
6. Consider Purchasing Additional iCloud Storage: If you frequently capture and store a large number of photos and videos, you may want to upgrade your iCloud storage plan. Open the “Settings” app, tap your name, then select “iCloud” > “Manage Storage” > “Change Storage Plan” to explore and select a suitable plan.
By implementing these strategies, you can effectively manage your iCloud Photo Library on your iPhone. You’ll be able to optimize storage space, keep your photo and video collection organized, and ensure a seamless experience across all your Apple devices.
Using Google Photos to Clear Storage on iPhone
Google Photos is a popular app that provides a cloud-based solution for managing and storing your photos and videos. If you’re running out of storage space on your iPhone, using Google Photos can be an excellent way to clear up space while still keeping your precious memories accessible. Here’s how you can use Google Photos to clear storage on your iPhone:
- Download and Install Google Photos: Open the App Store on your iPhone and search for “Google Photos.” Download and install the app on your device.
- Create or Sign in to Your Google Account: Open Google Photos and sign in with your Google account. If you don’t have one, follow the prompts to create a new account.
- Allow Google Photos to Access Your Photos: When prompted, grant Google Photos permission to access your iPhone’s photos and videos. This will enable the app to automatically backup and sync your media files.
- Backup and Sync Your Photos: Once you’ve granted access, Google Photos will begin uploading your photos and videos to the cloud. This process may take some time, depending on the number and size of your media files. Ensure that you have a stable internet connection and keep the app open until the backup is complete.
- Free Up Space on Your iPhone: After your photos and videos are securely backed up to Google Photos, you can free up space on your iPhone by removing the originals. Open the Google Photos app and tap on the “Free up space” option. This will prompt Google Photos to delete the photos and videos that have been successfully backed up from your iPhone’s storage.
- Access Your Media Anytime: Once your media files are backed up and cleared from your iPhone’s storage, you can view and access them anytime using the Google Photos app. The app offers powerful search options, smart organization features, and the ability to create albums and share memories.
- Optional: Adjust Google Photos Settings: If you want to customize the backup and sync settings or manage the quality of uploaded photos, you can do so by opening the Google Photos app, tapping on your profile picture, and selecting “Settings.” From here, you can explore various options, such as choosing between high quality or original quality uploads, managing cellular data usage, and more.
Using Google Photos to clear storage on your iPhone offers a seamless way to backup and access your photos and videos while freeing up valuable space on your device. By following these steps and incorporating Google Photos into your workflow, you can enjoy a clutter-free iPhone and ensure that your memories are safely stored in the cloud.
Using Third-Party Apps to Clear Storage on iPhone
In addition to built-in iOS features, there are several third-party apps available that offer advanced tools and functionalities to help you efficiently clear storage space on your iPhone. These apps can help you identify and remove unnecessary files, clean up duplicates, and manage your device’s storage effectively. Here’s how you can use third-party apps to clear storage on your iPhone:
1. Files App Managers: File management apps like “Documents by Readdle,” “FileBrowser,” or “FileMaster” provide comprehensive file management capabilities. These apps allow you to navigate through your device’s folders, identify large or unnecessary files, and delete them to free up space.
2. Duplicate File Removers: Duplicate files can take up a significant amount of storage on your iPhone. Apps like “Gemini Photos” and “Remo Duplicate Photos Remover” scan your device’s photo library and other selected folders to identify and remove duplicate media files, saving storage space.
3. Temporary Files Cleaners: Apps like “Cleaner Master,” “PhoneClean,” or “Cache Cleaner” specifically target temporary files, junk files, cache, and app leftovers that may accumulate and occupy storage space on your iPhone. These apps allow you to perform a thorough cleanup of these unwanted files to reclaim storage.
4. Photo Compression Apps: If you have a lot of high-resolution photos occupying substantial storage, apps like “Photo Compress & Resize” or “Image Size” can help you compress photos without compromising on quality. These apps can significantly reduce the file size of your photos, freeing up additional storage space.
5. Note and Document Organizers: Apps like “Evernote,” “Microsoft OneNote,” or “Google Keep” let you organize your notes and documents digitally. By utilizing these apps, you can store important information and documents securely in the cloud, removing the need to store them locally on your iPhone.
6. Cloud Storage Services: Utilizing cloud storage services such as Dropbox, Google Drive, or OneDrive allows you to offload files and media from your iPhone to the cloud. By storing your files in the cloud, you can access them anytime without using up storage space on your device.
When using third-party apps to clear storage, ensure that you choose reputable apps from trusted developers. Read user reviews, check the app’s ratings, and be cautious of any potential privacy or security issues. It’s important to grant necessary permissions to these apps but also review their access periodically to maintain control over your data.
By utilizing third-party apps specifically designed for storage management, you can efficiently clear space on your iPhone, optimize device performance, and ensure a clutter-free experience.