
Removing Dust
Dust buildup is one of the most common issues that can affect the performance of your PC. Over time, dust can accumulate on the internal components, clog the fans, and hinder the airflow, leading to overheating and potential hardware damage. Regularly removing dust from your PC is essential for maintaining its optimal functionality.
To remove dust from your PC, follow these steps:
- Turn off your PC and unplug it from the power source.
- Open the case of your computer. Most desktop PCs have a side panel that can be removed by loosening the screws or sliding a latch.
- Use a can of compressed air or a soft brush to carefully remove the dust from the internal components. Pay special attention to the fans, heatsinks, and vents, as these areas tend to accumulate dust the most.
- Hold the can of compressed air upright and use short bursts to blow the dust away. Avoid tilting the can or spraying the air continuously, as this can cause the moisture buildup.
- If you’re using a brush, gently sweep away the dust from the components. Be cautious not to apply too much pressure, as this can damage delicate parts.
- Once you’ve removed the dust, take a moment to ensure all the components are secure and properly connected. Check for any loose cables or connectors and reattach them if necessary.
- Close the case of your PC and plug it back into the power source.
By regularly removing dust from your PC, you can prevent overheating, extend the lifespan of your hardware, and maintain optimal performance. Aim to clean your PC every three to six months or more frequently if you notice a significant buildup of dust.
Cleaning the Exterior Surfaces
Cleaning the exterior surfaces of your PC not only enhances its appearance but also helps to prevent dust and dirt from entering the internal components. Additionally, keeping the exterior clean can improve the overall experience of using your computer. Follow these steps to effectively clean the exterior surfaces:
- Turn off your PC and unplug it from the power source.
- Use a soft, lint-free cloth slightly dampened with water or a mild cleaning solution specifically designed for electronics.
- Gently wipe the surfaces of your PC, including the case, monitor, keyboard, mouse, and peripherals, to remove any dirt or smudges. Be careful not to apply excessive pressure or use abrasive materials that could damage the surfaces.
- For stubborn stains or sticky residue, dampen the cloth with a small amount of isopropyl alcohol and gently wipe the affected areas.
- Ensure that all surfaces are completely dry before reconnecting the power source and turning on the PC.
When cleaning the keyboard, you can use compressed air to remove crumbs and debris from between the keys. Alternatively, you can gently remove the keys and clean them individually. Refer to your keyboard’s user manual for specific instructions on how to safely remove the keys.
For the monitor, use a microfiber cloth to avoid scratching the screen. If necessary, dampen the cloth with water or a screen cleaning solution and wipe the screen gently in a circular motion. Avoid spraying liquids directly onto the screen.
Remember, regular cleaning of the exterior surfaces not only keeps your PC looking clean and professional but also helps to prevent dirt and dust from affecting its performance. Aim to clean the exterior surfaces of your PC at least once a month or whenever visible dirt or smudges are present.
Cleaning the Keyboard
Regularly cleaning your keyboard is essential not only for hygiene purposes but also for maintaining its functionality. Over time, dust, crumbs, and debris can accumulate between the keys, leading to sticky keys or unresponsiveness. Follow these steps to effectively clean your keyboard:
- Turn off your computer and unplug the keyboard from the USB port.
- Hold the keyboard upside down and gently tap on it to dislodge any loose debris. You can also use compressed air to blow away the dust and particles.
- If there are any sticky or stubborn stains, use a damp cloth with a mild cleaning solution or isopropyl alcohol to carefully wipe the affected keys. Avoid using excessive moisture to prevent damage to the keyboard.
- For a deeper clean, you can remove the keys individually using a keycap puller if available or by gently prying them up with a small tool, such as a flathead screwdriver. Take care not to use excessive force or damage the keys.
- Once the keys are removed, clean them separately by soaking them in warm soapy water or a cleaning solution specifically designed for keyboards. Use a soft brush or cloth to remove any dirt or residue.
- Rinse the keys with clean water and ensure they are completely dry before reattaching them to the keyboard.
- With the keys removed, use compressed air or a small vacuum cleaner to clean the empty spaces between the keys and remove any remaining debris.
- Once the keys are dry and the keyboard is free from dirt and dust, reconnect it to your computer.
Regularly cleaning your keyboard not only helps to maintain its performance but also extends its lifespan. Aim to clean your keyboard at least once every few months or more frequently if you notice any issues with its functionality. By keeping your keyboard clean, you can ensure a pleasant and efficient typing experience.
Cleaning the Mouse
Over time, the mouse can accumulate dirt, oils, and debris, which can affect its performance and responsiveness. Regularly cleaning your mouse not only helps to maintain its functionality but also ensures smooth cursor movements. Follow these steps to effectively clean your mouse:
- Turn off your computer and unplug the mouse from the USB port.
- If your mouse has a removable ball or trackball, twist the retaining ring counterclockwise and remove the ball. Clean the ball by wiping it with a damp cloth and dry it thoroughly before reinserting it.
- If your mouse has an optical or laser sensor, use a microfiber cloth or cotton swab lightly dampened with water to gently clean the sensor and the surrounding area. Avoid using excessive moisture or harsh chemicals to prevent damage.
- For the exterior surfaces of the mouse, use a soft cloth slightly dampened with water or a mild cleaning solution. Gently wipe the surfaces to remove any dirt or smudges.
- Pay special attention to the crevices and buttons, using a toothpick or cotton swab to remove any dirt or debris that may be trapped in these areas.
- Ensure that all components are completely dry before reconnecting the mouse to the USB port.
Note: If you have a wireless mouse, remove the batteries before cleaning and make sure the mouse is switched off.
Regularly cleaning your mouse will help to maintain its smooth operation and extend its lifespan. Aim to clean your mouse every few months or more frequently if you notice any issues with its performance or responsiveness. By keeping your mouse clean, you can enjoy a comfortable and precise navigation experience.
Cleaning the Monitor
A clean monitor not only improves visibility and clarity but also ensures a pleasant viewing experience. Over time, dust, fingerprints, and smudges can accumulate on the screen, diminishing its brightness and clarity. Follow these steps to effectively clean your monitor:
- Turn off your computer and unplug the monitor from the power source.
- Use a microfiber cloth to gently remove any loose dust or particles from the surface of the screen. Avoid using paper towels or rough materials that could scratch the screen.
- If there are fingerprints or smudges on the screen, dampen the microfiber cloth with water or a screen cleaning solution specifically designed for monitors.
- Gently wipe the screen using a circular motion, applying light pressure. Avoid using excessive moisture or pressing too hard, as this can damage the screen.
- If necessary, use a second microfiber cloth to dry the screen or let it air dry for a few minutes before reconnecting the monitor to the power source.
Note: Never spray cleaning solutions directly onto the screen, as they can seep into the monitor and cause damage. Instead, apply the cleaning solution to the cloth and then clean the screen.
If you have a touchscreen monitor, refer to the manufacturer’s instructions for cleaning, as some touchscreen displays may require specific cleaning methods or solutions.
Regularly cleaning your monitor will help to maintain its visual quality and extend its lifespan. Aim to clean your monitor every two to three weeks or as needed, especially if you notice visible smudges or dust buildup. By keeping your monitor clean, you can enjoy a clear and vibrant display.
Cleaning the CPU
Cleaning the CPU (Central Processing Unit) is crucial for ensuring proper heat dissipation and preventing overheating. Over time, the CPU cooling system can accumulate dust, which can impede airflow and cause the CPU to run at higher temperatures. Follow these steps to effectively clean your CPU:
- Turn off your computer and unplug it from the power source.
- Open the case of your computer. Most desktop PCs have a side panel that can be removed by loosening the screws or sliding a latch.
- Identify the CPU fan and heat sink. The heat sink is usually a metallic component with fins and is located on top of the CPU.
- Use a can of compressed air to blow away the dust from the heat sink and the CPU fan. Hold the can upright and use short bursts to avoid moisture buildup.
- Pay particular attention to the areas where the fan blades meet the heat sink, as dust tends to accumulate in those areas. Use a toothpick or a small brush to gently remove any stubborn dust.
- If the CPU fan is removable, disconnect it from its power source and carefully clean it using a soft brush or compressed air.
- Inspect the thermal paste between the CPU and the heat sink. If it appears dry or cracked, you may need to reapply thermal paste. Refer to your CPU’s manual or consult a professional for guidance on applying thermal paste.
- Once you’ve cleaned the CPU and the surrounding components, ensure they are properly reconnected and secured.
- Close the case of your computer and plug it back into the power source.
Regularly cleaning the CPU helps to maintain optimal performance and prevents the risk of overheating. Aim to clean your CPU every six to twelve months or more frequently if you notice that the system temperatures are higher than usual. By keeping your CPU clean, you can prolong the life of your computer and ensure its stability and reliability.
Cleaning the Fans and Vents
The fans and vents in your computer play a critical role in maintaining proper airflow and preventing overheating. Over time, these components can accumulate dust and debris, which can impede airflow and cause the system to run hotter. Follow these steps to effectively clean the fans and vents:
- Turn off your computer and unplug it from the power source.
- Open the case of your computer. Most desktop PCs have a side panel that can be removed by loosening the screws or sliding a latch.
- Locate the fans and vents in your computer. There are usually multiple fans, including the CPU fan, case fans, and GPU (Graphics Processing Unit) fans.
- Use a can of compressed air to blow away the dust and debris from the fans and vents. Hold the can upright and use short bursts to avoid moisture buildup.
- Pay special attention to the fan blades, as they tend to accumulate dust. Use a toothpick or a small brush to gently remove any stubborn debris from the blades.
- Blow air into the vents to remove any dust or debris that may have accumulated inside.
- If the fans are removable, disconnect them from their power source and clean them using a soft brush or compressed air.
- Inspect the fan filters, if your computer has them. Clean or replace them if necessary to ensure proper airflow.
- Once you’ve cleaned the fans and vents, ensure they are properly reconnected and secured.
- Close the case of your computer and plug it back into the power source.
Regularly cleaning the fans and vents helps to maintain optimal airflow and prevent overheating. Aim to clean them every three to six months or more frequently if you notice that the system temperatures are higher than usual or if there is a significant amount of dust buildup. By keeping the fans and vents clean, you can ensure the longevity and reliability of your computer system.
Cleaning the Power Supply
While cleaning the power supply might not be a task performed as frequently as other components, it is still important to ensure its proper functioning. Dust and debris can accumulate inside the power supply over time, potentially hindering its performance and increasing the risk of overheating. Follow these steps to safely clean the power supply:
- Turn off your computer and unplug it from the power source.
- Open the case of your computer. Most desktop PCs have a side panel that can be removed by loosening the screws or sliding a latch.
- Locate the power supply unit (PSU), typically positioned at the back of the computer case.
- Use a can of compressed air to blow away any loose dust and debris from the power supply. Hold the can upright and use short bursts to prevent moisture buildup.
- Pay attention to the fan inside the power supply. It may accumulate dust over time, which can affect its performance. Use a soft brush or compressed air to carefully clean the fan blades.
- Inspect the external vents of the power supply for any buildup of dust or obstructions. Use a can of compressed air or a soft brush to clean these areas gently.
- Ensure that there are no loose wires or cables obstructing the airflow inside the power supply. Secure any loose connections to prevent them from interfering with the power supply’s performance.
- Once you’ve cleaned the power supply, ensure that it is properly reinstalled and secured within the case.
- Close the case of your computer and plug it back into the power source.
It is important to exercise caution when cleaning the power supply, as it contains electrical components. If you are unsure or uncomfortable with cleaning the power supply, it is best to seek professional assistance.
Cleaning the power supply periodically helps to maintain its functionality and prevent dust buildup. Aim to clean the power supply every six to twelve months or more frequently if your computer is located in a particularly dusty environment. By keeping the power supply clean, you can enhance its performance and ensure the reliability of your computer system.
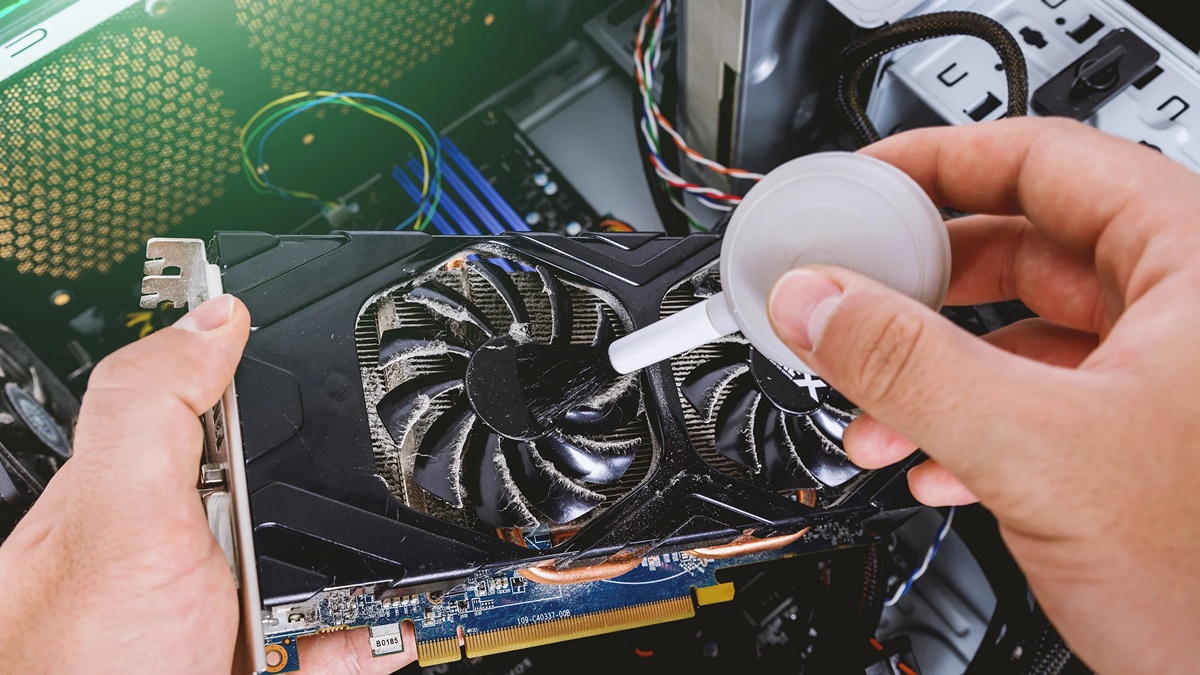
Cleaning the RAM and Graphics Cards
Cleaning the RAM (Random Access Memory) and graphics cards is an important maintenance task to ensure optimal performance and stability. Over time, dust and debris can accumulate on these components, which can lead to overheating and potentially affect their functionality. Follow these steps to effectively clean the RAM and graphics cards:
- Turn off your computer and unplug it from the power source.
- Open the case of your computer. Most desktop PCs have a side panel that can be removed by loosening the screws or sliding a latch.
- Identify the RAM modules and graphics cards in your computer.
- Carefully remove the RAM modules by unlocking the latches on each side and gently pulling them out of their slots.
- Use a soft, lint-free cloth or an eraser to clean the gold contacts on the RAM modules. Gently rub the contacts in a straight motion, being careful not to apply excessive pressure.
- Inspect the graphics card for any visible dust or debris. Use a can of compressed air or a soft brush to carefully remove any dust from the card’s surface and components.
- Reinsert the clean RAM modules back into their slots, ensuring they are properly seated and locked into place.
- Close the case of your computer and plug it back into the power source.
It’s important to handle RAM modules and graphics cards with care. Avoid touching the gold contacts with your fingers, as oils and residue from your hands can potentially affect their performance. When using compressed air, hold the can upright and use short bursts to prevent moisture buildup.
Regularly cleaning the RAM and graphics cards helps to maintain their performance and prevent dust-related issues. Aim to clean them every six to twelve months or more frequently if you notice any signs of dust accumulation or if your computer is located in a dusty environment. By keeping these components clean, you can ensure smooth operation and enhance the overall performance of your computer system.
Cleaning the Hard Drive
Cleaning the hard drive helps to optimize storage space, enhance system performance, and ensure the smooth operation of your computer. Over time, unnecessary files, temporary data, and other clutter can accumulate on your hard drive, taking up valuable space and potentially slowing down your system. Follow these steps to effectively clean your hard drive:
- Back up your important files and data to an external storage device, cloud storage, or another location to ensure they are safe.
- Open “File Explorer” or “My Computer” and locate the hard drive you want to clean.
- Right-click on the drive and select “Properties”.
- In the “General” tab, click on “Disk Cleanup” to initiate the cleanup process.
- Wait for the scanning process to complete. The tool will analyze your hard drive and identify files that can be safely deleted.
- Review the list of files that are safe to delete, such as temporary files, log files, and recycle bin contents.
- Select the files you want to delete and click “OK”.
- Confirm the deletion by clicking “Delete Files”.
- Allow the cleanup tool to complete the process. This may take several minutes, depending on the size and condition of your hard drive.
- Once the cleanup is finished, close the “Disk Cleanup” tool.
In addition to using the built-in Disk Cleanup tool, you can also manually delete unnecessary files and folders from your hard drive. This includes removing old or unused applications, deleting downloaded files that are no longer needed, and organizing your files into folders for better management.
Regularly cleaning your hard drive helps to free up space, improve system performance, and ensure the efficient operation of your computer. Aim to clean your hard drive every few months or whenever you notice a significant decrease in available storage space. By keeping your hard drive clean, you can optimize your computer’s performance and make the most out of your storage capacity.
Cleaning the Cables and Connections
Properly cleaning and maintaining the cables and connections in your computer setup is essential for optimal performance and reliability. Over time, dust, dirt, and other debris can accumulate on cables and connectors, potentially causing connectivity issues and signal degradation. Follow these steps to effectively clean the cables and connections:
- Turn off your computer and unplug it from the power source.
- Inspect the cables and connectors for signs of dirt, dust, or corrosion.
- For cables with detachable connectors, gently disconnect them from their respective devices.
- Use a can of compressed air and a soft cloth to remove any loose dust or debris on the cables and connectors.
- If the cables are dirty, dampen a cloth with water or a mild cleaning solution and wipe the cables gently, taking care not to damage the connectors.
- For connectors with significant dirt or corrosion, use a small brush or a cotton swab dipped in isopropyl alcohol to clean them. Gently scrub the connectors and then dry them thoroughly.
- Ensure that all cables are reconnected securely and properly to their respective devices.
- Check for any loose or damaged cables and replace them if necessary.
- Once you’ve cleaned and checked all the cables and connections, turn on your computer and check for proper functionality.
Regularly cleaning the cables and connections helps to prevent signal loss, enhance data transfer speeds, and maintain a reliable connection between devices. Aim to clean your cables and connections every few months or whenever you notice visible dirt or signs of deterioration. By keeping your cables and connections clean, you can ensure a dependable and efficient computer setup.
Cleaning the Peripherals
Cleaning the peripherals, such as your mouse, keyboard, and other external devices, is essential to maintain their functionality and hygiene. These peripherals are often prone to buildup of dirt, dust, and even bacteria. Follow these steps to effectively clean your peripherals:
- Turn off your computer and unplug the peripherals from the USB ports.
- Use a can of compressed air to blow away any loose dust or debris from the surfaces and crevices of the peripherals. Hold the can upright and use short bursts to prevent moisture buildup.
- For keyboards, tilt it upside down and gently tap on it to dislodge any loose debris. You can also use compressed air to blow away the dust and particles between the keys.
- For mice, wipe the exterior surfaces with a soft, lint-free cloth lightly dampened with a mild cleaning solution or isopropyl alcohol. Pay attention to areas where your hand comes into contact with the mouse, as these areas tend to accumulate oils and dirt.
- Clean other peripherals, such as headphones, speakers, and webcams, with a soft cloth slightly dampened with water or a suitable cleaning solution. Avoid using excessive moisture or abrasive materials that could damage the peripherals.
- If your peripherals have removable parts, such as ear cushions on headphones, clean them separately according to the manufacturer’s instructions.
- Ensure that all peripherals are completely dry before reconnecting them to the USB ports.
It’s important to note that different peripherals may require specific cleaning methods, so refer to the manufacturer’s instructions for detailed guidance.
Regularly cleaning your peripherals helps to prevent the buildup of dirt, maintain their functionality, and promote good hygiene. Aim to clean them every few months or whenever you notice visible dirt or a decrease in performance. By keeping your peripherals clean, you can enjoy a pleasant and reliable experience with your computer setup.
Cleaning the Software and Files
Regularly cleaning the software and files on your computer is essential to optimize performance, improve storage space, and ensure a smooth computing experience. Over time, unnecessary files, unused programs, and system clutter can accumulate, affecting the speed and efficiency of your computer. Follow these steps to effectively clean your software and files:
- Perform a thorough scan for malware and viruses using a reliable antivirus software. Remove any detected threats to keep your system secure.
- Uninstall unnecessary programs and applications from your computer. Go to the “Control Panel” (Windows) or “Applications” (macOS) and use the built-in uninstaller or a third-party software uninstaller to remove programs that you no longer need.
- Organize your files and folders by deleting any unnecessary or duplicate files. Sort your files into specific folders to streamline your file management.
- Empty the recycle bin or trash to permanently remove deleted files and free up storage space. Be sure to review the contents before emptying, as the action is irreversible.
- Run disk cleanup tools provided by your operating system to remove temporary files, system logs, and other unnecessary data. On Windows, you can use the “Disk Cleanup” utility, while macOS offers the “Optimize Storage” feature.
- Regularly update your software, including the operating system and applications, to benefit from bug fixes, security patches, and performance improvements. Keep your software up to date to ensure smooth operation.
Additionally, consider using tools such as disk defragmenters (Windows) or disk utility (macOS) to optimize disk performance by rearranging fragmented data on your hard drive.
By cleaning the software and files on your computer, you can improve system performance, free up valuable storage space, and enhance overall efficiency. Aim to perform these cleaning tasks periodically, such as once every few months, to maintain a clean and optimized computer system.
Cleaning the Registry
The Windows Registry is a crucial component of the operating system that stores important settings and configurations for your computer and software. Over time, the registry can accumulate invalid, obsolete, or redundant entries that can slow down your system and cause errors. Cleaning the registry can help optimize your computer’s performance and resolve issues. However, it is important to exercise caution when cleaning the registry, as improper modifications can lead to system instability. Follow these steps to clean the registry safely:
- Backup your registry before making any changes. This allows you to revert to a previous state if any issues arise. To create a backup, open the Registry Editor by pressing “Win + R” and typing “regedit”. Then, select “File” and choose “Export” to save a backup of the registry.
- Open the Registry Editor by pressing “Win + R” and typing “regedit”.
- Navigate to the section of the registry you want to clean. Be cautious when modifying the registry and ensure that you are in the correct section.
- Review the entries in the selected section and identify any invalid, obsolete, or redundant entries that can be safely removed.
- Right-click on the entry you want to delete and select “Delete”. Confirm the deletion if prompted.
- Repeat the process for other unwanted entries in the selected section of the registry.
- Exit the Registry Editor once you have finished cleaning the desired sections.
It is crucial to exercise extreme caution when modifying the registry, as deleting or modifying the wrong entries can cause serious system issues. If you are uncertain or uncomfortable with cleaning the registry manually, it is recommended to use reputable registry cleaning software that can automatically scan and remove unnecessary entries.
Cleaning the registry periodically can help optimize your computer’s performance and resolve registry-related issues. However, it is important to note that cleaning the registry alone may not result in significant performance improvements for modern systems. In most cases, the impact on system performance is minimal, and any potential gains are often outweighed by the risks of making unintended modifications.
Before making any changes to the registry, always take precautionary measures, like creating a backup and ensuring you are editing the correct sections. If you are unsure about cleaning the registry, it is best to seek guidance from a knowledgeable professional.
Updating Your Operating System and Programs
Regularly updating your operating system and programs is crucial for maintaining the security, stability, and performance of your computer. Developers release updates to address bugs, fix security vulnerabilities, and introduce new features. Follow these steps to ensure your operating system and programs are up to date:
- Enable automatic updates for your operating system. Most operating systems have an option to automatically download and install updates.
- Check for updates manually if automatic updates are not enabled. On Windows, go to “Settings” and select “Update & Security”. On macOS, click on the Apple menu and choose “System Preferences” followed by “Software Update”.
- Install the available updates for your operating system. This may require restarting your computer.
- Regularly check for updates for your software programs, including web browsers, office suites, antivirus programs, and other commonly used applications. Most programs have an option to check for updates within the program itself or through the settings menu.
- Download and install the updates for your programs. In some cases, you may need to manually visit the software developer’s website to download the latest version.
- Consider enabling automatic updates for your programs whenever possible to ensure you are always running the latest versions.
By regularly updating your operating system and programs, you can benefit from improved security, stability, and performance. Updates often include important security patches that protect your computer from emerging threats. They also address software bugs and introduce new features or enhancements, improving your overall experience.
Remember, it is important to download updates from official sources and be cautious of fake update notifications or phishing attempts. Verify the authenticity of the update sources before proceeding with the installation.
Make updating your operating system and programs a regular practice to keep your computer secure and running smoothly. Set reminders to check for updates at least once a month, if not more frequently for critical security updates. By staying up to date, you can enjoy improved functionality, better compatibility, and a safer computing environment.
Running Disk Cleanup and Disk Defragmenter
Running disk cleanup and disk defragmenter utilities are important maintenance tasks that can help improve disk performance, optimize storage space, and enhance overall system efficiency. These utilities are built-in features of most operating systems and offer valuable benefits. Follow these steps to run disk cleanup and disk defragmenter:
Disk Cleanup:
- Open the “Disk Cleanup” utility on your computer. On Windows, you can access it by clicking the Start button and typing “Disk Cleanup” in the search bar. On macOS, you can use the built-in “Optimize Storage” feature.
- Select the drive you want to clean. Typically, it is the C: drive where the operating system is installed.
- The utility will analyze your disk and present you with a list of files that can be safely deleted. These include temporary files, system logs, recycle bin content, and other unnecessary data.
- Review the list of files and select the ones you want to delete. Be sure to double-check the selections to avoid deleting any important files.
- Click “OK” or “Clean up system files” to begin the cleanup process. Depending on the amount of data to be cleaned, it may take several minutes to complete.
Disk Defragmenter:
- Open the “Disk Defragmenter” utility on your computer. On Windows, you can access it by clicking the Start button, typing “Disk Defragmenter” in the search bar, and selecting the appropriate result.
- Select the drive you want to defragment. It is recommended to defragment the drive where the operating system is installed (typically, the C: drive).
- Click “Analyze” to see if the drive needs defragmentation. The utility will evaluate the fragmentation level of your drive.
- If the drive needs defragmentation, click “Defragment” to start the process. This process may take some time, depending on the size and fragmentation level of the drive.
- Once the defragmentation is complete, close the utility. It is a good practice to schedule regular automatic defragmentation for your drives.
Disk cleanup and defragmentation help optimize your hard drive by removing unnecessary files and rearranging fragmented data. Regular maintenance of your disk can improve system responsiveness, shorten loading times, and increase overall efficiency.
It is important to note that solid-state drives (SSDs) do not require defragmentation, as the data is stored differently on these drives. However, disk cleanup is still beneficial for freeing up storage space and removing unneeded files.
Make disk cleanup and defragmentation part of your regular system maintenance routine, performing them every few months or as needed. By keeping your disk clean and organized, you can ensure optimal performance and extend the lifespan of your storage.
Uninstalling Unnecessary Programs
Uninstalling unnecessary programs from your computer is an essential task that can help optimize system resources, free up storage space, and improve overall performance. Over time, you may accumulate various applications and software that are no longer needed or used. Removing these programs not only declutters your computer but also reduces the strain on system resources. Follow these steps to effectively uninstall unnecessary programs:
- Open the “Control Panel” on your computer. On Windows, you can access it by clicking the Start button and searching for “Control Panel”. On macOS, you can find it in the Apple menu.
- In the Control Panel, locate the “Programs” or “Programs and Features” option and click on it.
- A list of installed programs will appear. Review the list and identify the programs that you no longer use or need.
- Select the program you want to uninstall and click on the “Uninstall” or “Remove” button.
- Follow the uninstallation wizard’s prompts to complete the removal process. In some cases, you may be asked to confirm the action or provide additional information.
- Repeat the process for each unnecessary program that you want to remove.
- After uninstalling all the identified programs, restart your computer to ensure that any related files or settings are fully removed.
It’s important to exercise caution when uninstalling programs, especially if you are unsure about the purpose or functionality of a particular application. If you’re uncertain, it’s recommended to research the program or consult with an expert before proceeding with the uninstallation.
Regularly reviewing and removing unnecessary programs from your computer helps declutter your system and improve its performance. Aim to perform this task every few months or whenever you notice a decrease in available storage space or system speed. By keeping your computer free of unnecessary programs, you can ensure a more efficient and streamlined computing experience.
Scanning for Malware and Viruses
Scanning your computer for malware and viruses is crucial for maintaining a secure and safe computing environment. Malicious software and viruses can compromise your privacy, steal sensitive information, and cause various system issues. Regularly scanning your computer helps to detect and remove any potential threats. Follow these steps to effectively scan for malware and viruses:
- Install a reputable antivirus software if you haven’t already. There are several options available, both free and paid, that offer robust protection against malware and viruses.
- Ensure that your antivirus software is up to date. Update it with the latest virus definitions to detect the newest threats.
- Run a full system scan using your antivirus software. This comprehensive scan will examine all files and folders on your computer for any potential threats.
- If any threats are detected, follow the prompts provided by the antivirus software to quarantine or remove the infected files. Take caution to ensure that any false positives do not result in the removal of important system files.
- In addition to antivirus software, consider using anti-malware programs to provide an extra layer of protection. These programs can detect and remove different types of malware that may go undetected by traditional antivirus software.
- Scan any external storage devices, such as USB drives or external hard drives, before accessing the files on them. These devices can also be carriers of malware.
- Keep your antivirus and anti-malware software up to date to stay protected against emerging threats. Set them to automatically update or perform regular manual updates.
- Exercise caution when downloading or opening files from unknown or untrusted sources. Be vigilant while browsing the internet and avoid clicking on suspicious links or downloading files from unverified websites.
Regularly scanning your computer for malware and viruses helps to safeguard your personal information, prevent system disruptions, and maintain the integrity of your computer. Aim to perform these scans at least once a week, or more frequently if you often access the internet or download files. By keeping your computer protected, you can enjoy a safer and more secure computing experience.
Backing Up Your PC
Backing up your PC is a crucial practice to ensure the safety and availability of your important files and data. Accidental data loss, hardware failure, malware attacks, or system crashes can occur at any time, resulting in the loss of your valuable information. By regularly backing up your files, you can protect yourself from such scenarios and quickly recover your data. Follow these steps to effectively back up your PC:
- Choose a backup method that suits your needs. There are several options available, such as external hard drives, cloud storage services, or network-attached storage (NAS) devices.
- Create a backup schedule suited to your needs. It can be daily, weekly, or monthly, depending on the frequency of changes to your files and the importance of the data.
- Identify the files and folders you want to back up. Focus on critical files, such as documents, photos, videos, and other irreplaceable content.
- Utilize backup software or features provided by your operating system to automate the backup process. This allows for scheduled backups and incremental backups that only capture changes since the last backup.
- If using an external hard drive, connect it to your PC and follow the software instructions to set up the backup. Ensure that you keep the external hard drive in a safe location when not in use.
- If using cloud storage services, sign up for a reliable service, install the necessary software or apps, and follow the instructions to configure the backup. Take into consideration the storage limits and security measures offered by the service.
- Regularly monitor and verify your backup process to ensure it is working correctly. Test the restore function periodically to confirm that your files are accessible and intact.
- Keep multiple copies of your backups, especially for critical data. Having duplicates ensures redundancy and offers additional protection against hardware failures or backup corruption.
Backing up your PC is an ongoing process. It is important to consistently follow your backup schedule and adapt it as your data storage needs change. Remember to also update your backups after making significant changes to your files or adding new data.
With a proper backup strategy in place, you can have peace of mind knowing that your important files and data are safeguarded. In the event of a computer failure or data loss, you can quickly restore your files and resume your work without significant disruptions.
Maintaining Regular Cleaning and Maintenance
Maintaining regular cleaning and maintenance for your computer is essential for its optimal performance, longevity, and reliability. By following a consistent maintenance routine, you can prevent issues caused by dust accumulation, software clutter, and outdated components. Here are some key aspects to consider for effective computer maintenance:
- Keep your computer in a clean and dust-free environment. Dust can accumulate on internal components, leading to overheating and potential hardware damage. Regularly dusting your computer with compressed air and cleaning the exterior surfaces helps prevent these issues.
- Update your operating system and software regularly. Installing the latest updates and patches ensures that your computer remains secure and benefits from bug fixes and performance enhancements.
- Scan for malware and viruses frequently. Running regular scans with reputable antivirus and anti-malware software helps detect and remove any potential threats to your computer and data.
- Manage your storage space effectively. Regularly delete unnecessary files, uninstall unused programs, and organize your files into appropriate folders. This helps improve system performance and frees up valuable storage space.
- Maintain a healthy hard drive. Use disk cleanup and disk defragmenter utilities to remove temporary files, system clutter, and optimize disk performance. Regularly backing up your files also ensures that your data is protected in case of system failure.
- Check your computer’s hardware regularly. Monitor your system’s temperature, examine fans and vents for dust buildup, and ensure that all cables and connections are secure.
- Practice safe computing habits. Be cautious when browsing the internet, downloading files, and opening email attachments. Exercise caution to avoid malware infections and potential security risks.
- Consider professional help if needed. If you are unsure about performing certain maintenance tasks or encounter persistent issues, seek assistance from a qualified computer technician.
Regularly maintaining your computer helps prolong its lifespan, enhance performance, and prevent potential issues. It is recommended to establish a maintenance schedule, such as performing certain tasks monthly, quarterly, or annually, depending on the specific needs of your computer and usage.
Remember, prevention is better than cure. By incorporating regular cleaning and maintenance into your computer routine, you can ensure a smooth and reliable computing experience while minimizing potential disruptions and system failures.