
What is Twitch Bitrate?
Twitch bitrate refers to the amount of data that is transmitted per second during a live stream on the Twitch platform. It is a crucial factor that directly impacts the quality of your stream and the viewing experience for your audience.
Bitrate is measured in kilobits per second (Kbps) or megabits per second (Mbps). The higher the bitrate, the higher the video quality, but it also requires a faster and more stable internet connection to handle the increased data transmission.
When you stream on Twitch, your video and audio are encoded and compressed before being sent to the Twitch servers. The bitrate setting determines the amount of data allocated for each second of the stream. Twitch then adjusts the stream quality delivered to viewers based on their internet connection and device capabilities.
Choosing the right Twitch bitrate is crucial for creating an enjoyable viewing experience for your audience while ensuring a smooth and uninterrupted stream. It involves considering factors such as your internet connection, stream quality, and the desired video resolution.
Keep in mind that Twitch has its recommended bitrate ranges, which you should aim to stay within for optimal performance and compatibility with the platform. These recommendations ensure that your stream strikes a balance between quality and accessibility, allowing viewers with different internet speeds to enjoy your content.
Now that we have a basic understanding of what Twitch bitrate is, let’s delve into why it is so important for Twitch streaming.
Why is Bitrate Important for Twitch Streaming?
Bitrate plays a crucial role in determining the quality of your Twitch stream and the viewing experience for your audience. Here are a few key reasons why bitrate is important for Twitch streaming:
1. Video Quality: The bitrate directly affects the quality of the video that your viewers see. A higher bitrate allows for a higher level of detail and clarity in the stream, resulting in a more immersive experience. On the other hand, a lower bitrate can lead to pixelation, blurriness, and a loss of visual fidelity.
2. Bandwidth and Compatibility: Streaming at a suitable bitrate ensures that your stream can be easily accessed and viewed by a wider audience. If your bitrate is too high, viewers with slower internet connections may experience buffering or lags. Similarly, if your bitrate is too low, viewers with faster connections may not be able to fully enjoy the optimal quality of your stream.
3. Audience Retention: High bitrate streams are more likely to capture and retain the attention of viewers. A smooth, high-quality stream can enhance viewer engagement and encourage them to stick around for longer periods, increasing the chances of building a loyal and dedicated audience.
4. Professionalism and Brand Image: Delivering a high-quality stream showcases your professionalism as a streamer and can positively impact your brand image. It reflects your commitment to providing the best possible experience for your audience and can help you stand out among other streamers.
5. Differentiation and Competitiveness: With the increasing popularity of Twitch, standing out from the crowd is essential. Streaming at a higher bitrate can give you a competitive edge by delivering a superior visual experience compared to those with lower-quality streams. This can help attract new viewers and keep them coming back for more.
6. Partnership Requirements: If you aspire to become a Twitch Partner, maintaining a consistent and high-quality stream is crucial. Twitch has specific guidelines and requirements for partner eligibility, and streaming at a recommended bitrate is often one of them. So, paying attention to your bitrate can bring you one step closer to achieving your partnership goals.
As you can see, bitrate is a fundamental aspect of Twitch streaming that directly impacts the quality of your stream, audience satisfaction, and your overall success as a streamer. In the next section, we will explore the factors you should consider when choosing the right Twitch bitrate for your stream.
Factors to Consider when Choosing Twitch Bitrate
Choosing the right Twitch bitrate involves considering several factors to ensure a smooth and high-quality streaming experience. Here are some key factors to keep in mind:
1. Internet Connection and Upload Speed: Your internet connection is a crucial determinant of the bitrate you can reliably stream at. You should have a stable and fast internet connection with sufficient upload speed to handle the chosen bitrate without interruptions or buffering. Twitch recommends an upload speed of at least 5 Mbps for 720p streams and 6 Mbps for 1080p streams.
2. Stream Quality and Video Resolution: The desired quality of your stream plays a significant role in determining the appropriate bitrate. Higher resolutions and frame rates generally require higher bitrates to maintain good video quality. Consider the capabilities of your equipment, the requirements of the content you’re streaming, and the preferences of your audience.
3. Twitch Bitrate Recommendations: Twitch provides recommended bitrate ranges based on the video resolution. For example, the recommendation for 720p 30fps streams is between 2,500 and 4,000 Kbps, while for 1080p 60fps streams, it is between 4,500 and 6,000 Kbps. Staying within these recommendations ensures compatibility with the platform and provides a balance between quality and accessibility.
4. Viewer Preferences and Accessibility: Consider the internet speeds of your target audience. If a significant portion of your viewers have limited bandwidth, streaming at a lower bitrate can enhance the accessibility of your stream and prevent buffering or lag issues. However, if your target audience has faster internet connections, you may consider streaming at a higher bitrate to provide a visually impressive experience.
5. Platform Constraints: Remember that Twitch has certain limitations and restrictions on bitrate. For example, non-partnered streamers are generally limited to a maximum bitrate of 6,000 Kbps, while Twitch Partners may have higher limits. It’s important to be aware of these constraints and adjust your bitrate accordingly.
6. Test and Experiment: It’s always a good practice to test different bitrates and monitor the results. Pay attention to the quality of your stream, viewer feedback, and any issues that arise. By experimenting with different bitrates and making adjustments based on the outcomes, you can find the sweet spot that provides the best balance between quality and performance for your specific setup and content.
Considering these factors will help you make an informed decision when choosing the Twitch bitrate that is suitable for your stream. In the next section, we will explore how you can test your Twitch bitrate to ensure optimal performance.
Internet Connection and Upload Speed
One of the key factors to consider when choosing a Twitch bitrate is your internet connection and upload speed. A stable and fast internet connection is essential for streaming at a consistent and high-quality bitrate. Here’s what you need to know about internet connection and upload speed:
1. Upload Speed: The upload speed is the rate at which data can be transmitted from your device to the internet. It is generally much lower than the download speed, as internet service providers prioritize download speed for most consumers. Streaming requires a significant amount of upload speed to transmit the video and audio data of your stream to Twitch servers.
2. Recommended Upload Speed: Twitch recommends a minimum upload speed of 3 Mbps for streaming at 720p 30fps, and a minimum upload speed of 6 Mbps for streaming at 1080p 60fps. These recommendations ensure a stable and reliable stream without buffering or interruptions for both you as the streamer and your viewers.
3. ISP Plan Considerations: Check with your internet service provider (ISP) to ensure that your current plan offers a sufficient upload speed for streaming on Twitch. Some ISPs may have plans with higher upload speeds specifically tailored for content creators and streamers. Upgrading to a plan with a faster upload speed can significantly improve your streaming experience.
4. Wired Connection vs. Wi-Fi: When streaming on Twitch, it is highly recommended to use a wired internet connection rather than relying on Wi-Fi. A wired connection provides more stability and consistency, which is crucial for maintaining a smooth and uninterrupted stream. If you have the option, connect your streaming device directly to your modem or router with an Ethernet cable.
5. Network Congestion: Network congestion can occur during peak usage hours, causing fluctuations in upload speed and affecting the stability of your stream. Be mindful of the time when you are streaming and consider scheduling your streams during off-peak hours to minimize the impact of network congestion.
6. Use Speed Tests: Use online speed test tools to check your current upload speed. This will give you an idea of whether your current internet connection is sufficient for streaming at the desired bitrate. Conduct multiple tests at different times of the day to get a more accurate representation of your actual upload speed.
By ensuring that your internet connection provides a reliable and fast upload speed, you can stream on Twitch at a suitable bitrate without compromising the quality and consistency of your stream. In the next section, we will discuss the importance of stream quality and video resolution when choosing a Twitch bitrate.
Stream Quality and Video Resolution
The stream quality and video resolution have a significant impact on the choice of Twitch bitrate. These factors determine the level of detail and clarity in your stream, as well as the viewing experience for your audience. Here’s what you need to consider when it comes to stream quality and video resolution:
1. Video Resolution: The video resolution refers to the number of pixels displayed on the screen and is typically denoted by the width and height of the video in pixels. Higher resolutions offer more visual detail, but they also require higher bitrates for optimal quality. Common video resolutions include 720p (1280×720 pixels), 1080p (1920×1080 pixels), and even higher resolutions, such as 1440p or 4K, for more advanced setups.
2. Frame Rate: The frame rate represents the number of frames displayed per second in the video. The standard for most Twitch streams is 30 frames per second (fps), but some streamers prefer a smoother experience at 60 fps. Higher frame rates require higher bitrates to maintain quality and smoothness in fast-paced content, such as action games or sports streams.
3. Encoding Efficiency: Different encoding technologies and software have varying degrees of efficiency when it comes to compressing video data. More efficient encoding allows you to achieve comparable quality at lower bitrates. Experiment with different encoding settings to find the optimal balance between bitrate and stream quality for your specific setup and requirements.
4. Viewing Platform: Consider the platforms on which your viewers will be watching your stream. Some platforms, such as mobile devices or older computers, may not support higher resolutions or higher bitrates. It’s important to strike a balance between providing a high-quality stream and ensuring compatibility and accessibility for a wider range of viewers.
5. Hardware and Software Capabilities: Your streaming hardware and software must support the desired video resolution and frame rate. High-resolution streams at higher frame rates generally require more powerful hardware and efficient software encoding to handle the increased data processing and transmission effectively. Ensure that your setup can handle the chosen resolution and frame rate without sacrificing performance.
6. Viewer Preferences: Lastly, consider the preferences of your target audience. Some viewers may prioritize a higher resolution for a more visually immersive experience, while others may prioritize a smoother 60 fps stream. Monitor viewer feedback and adapt your stream quality accordingly to cater to the preferences and expectations of your audience.
By taking into account these factors and making informed decisions, you can choose the appropriate Twitch bitrate that aligns with the desired stream quality and video resolution. In the next section, we will explore the Twitch bitrate recommendations provided by the platform.
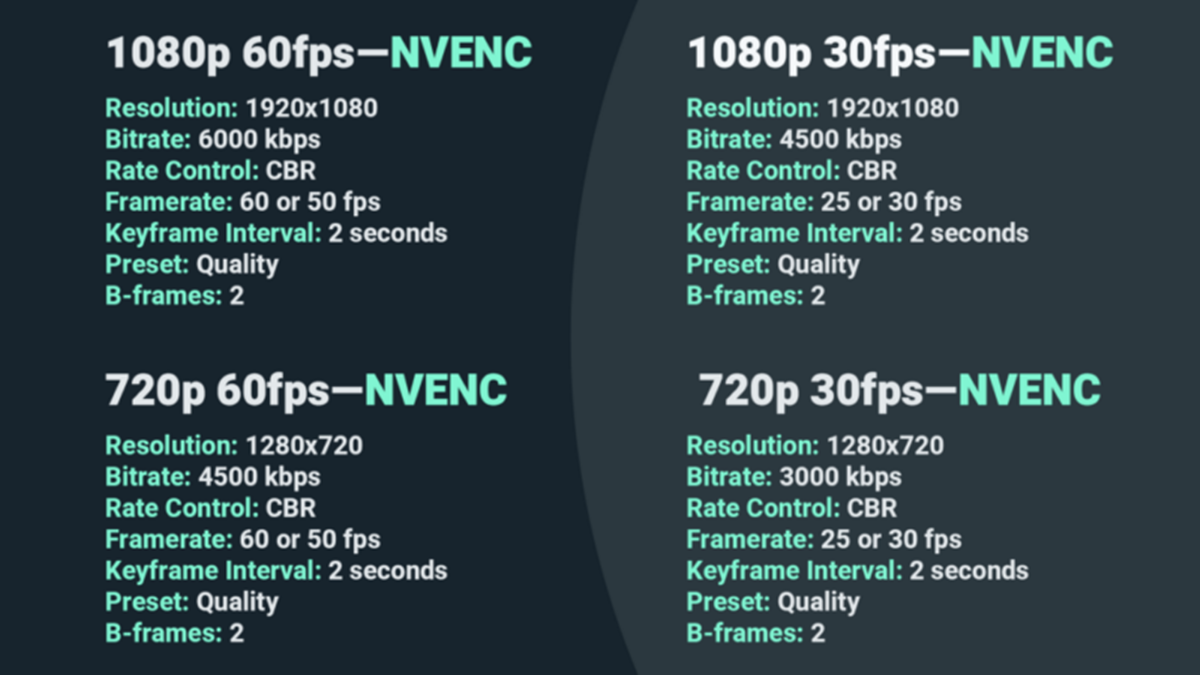
Twitch Bitrate Recommendations
When it comes to choosing the right Twitch bitrate, it’s helpful to refer to the recommendations provided by the platform. These bitrate ranges are designed to ensure optimal performance and quality for your streams. Here are the Twitch bitrate recommendations based on video resolution:
1. 720p 30fps: For a 720p stream at 30 frames per second, Twitch recommends a bitrate between 2,500 and 4,000 kilobits per second (Kbps). This range offers a good balance between video quality and accessibility, allowing viewers with varied internet speeds to enjoy the stream without buffering or lag issues.
2. 720p 60fps: If you prefer to stream at 60 frames per second for a smoother experience, Twitch recommends a higher bitrate between 3,500 and 5,000 Kbps. This higher bitrate is required to maintain the visual quality and smoothness in streams with more fast-paced content.
3. 1080p 30fps: For a 1080p stream at 30 frames per second, Twitch suggests a bitrate range of 4,000 to 6,000 Kbps. This higher bitrate is necessary to accommodate the increased amount of visual detail in the stream and deliver a high-quality viewing experience.
4. 1080p 60fps: If you aim for a 1080p stream at 60 frames per second, Twitch recommends a bitrate range of 4,500 to 6,000 Kbps. The higher frame rate requires a higher data rate to maintain smoothness during fast motion and ensure minimal loss in visual quality.
Note: These are general recommendations, and you may need to make adjustments based on your specific setup, internet connection, and audience preferences. Factors such as the complexity of your content, encoding efficiency, and hardware capabilities can also influence the required bitrate.
Adhering to the recommended bitrate ranges helps ensure compatibility with the Twitch platform and provides a stream quality that is suitable for most viewers. However, it’s worth mentioning that these recommendations are not set in stone, and you may need to experiment and fine-tune your bitrate based on your stream’s unique requirements.
Now that you have an understanding of the Twitch bitrate recommendations, let’s discuss how you can test your Twitch bitrate to ensure optimal performance in the next section.
How to Test your Twitch Bitrate
Testing your Twitch bitrate is essential to ensure that you are streaming at the optimal settings for your setup and internet connection. Here’s a step-by-step guide on how to test your Twitch bitrate:
1. Use Twitch Inspector: Twitch provides a helpful tool called Twitch Inspector that allows you to analyze your stream’s performance. Go to the Twitch Inspector website (inspector.twitch.tv) and select the stream you want to test. The tool provides real-time data on your bitrate, frame rate, stability, and other key metrics.
2. Monitor Twitch Dashboard: Another way to test your bitrate is by monitoring the Twitch Dashboard while you’re streaming. Access your dashboard on the Twitch website and observe the stream statistics that are displayed, including bitrate, resolution, and stream health. Keep an eye on any fluctuations or inconsistencies in the reported values.
3. Use OBS or Streamlabs OBS: If you’re using broadcasting software like OBS (Open Broadcaster Software) or Streamlabs OBS, you can review the settings and monitor the stream statistics within the software itself. Look for the bitrate information displayed in the software’s interface or settings, and compare it with the recommended bitrate for your chosen video resolution and frame rate.
4. Check Viewer Feedback: Take into account the feedback you receive from your viewers. If they report buffering or lag issues, it might be an indication that your bitrate is too high for their internet connection. Conversely, if viewers mention pixelation or blurriness, it may indicate that your bitrate is too low for the desired video quality.
5. Conduct Bitrate Tests: Perform specific bitrate tests to find the optimal setting for your stream. Lower your bitrate gradually while streaming and observe the impact on the video quality and stream stability. Raise the bitrate again and compare the results. Find the threshold where the video quality starts to degrade, and then adjust it slightly below that level for a buffer of stability.
6. Monitor Stream VODs: Reviewing your past stream VODs (Video On Demand) can provide valuable insights into the bitrate and video quality. Analyze recorded streams to identify any issues or areas of improvement. Pay attention to moments with fast motion or complex scenes, as they may reveal any potential bitrate-related problems.
7. Seek Expertise: If you’re still unsure about your bitrate settings or encounter persistent issues, consider seeking help from experienced streamers or online communities. They can provide guidance and assist in troubleshooting any bitrate-related problems you may be experiencing.
By regularly testing your Twitch bitrate and making necessary adjustments, you can ensure that your stream is optimized for the best quality and viewing experience. Remember to take into account the recommended bitrate ranges and the capabilities of your internet connection and hardware. In the next section, we will discuss how to adjust the bitrate for different games or content.
Adjusting Bitrate for Different Games or Content
When streaming on Twitch, different games or content may have varying requirements for the ideal bitrate. Some games with fast-paced action or high visual detail may benefit from higher bitrates to preserve quality, while others may require lower bitrates to ensure a stable stream. Here’s how you can adjust your bitrate for different games or content:
1. Evaluate the Complexity: Consider the complexity of the game or content you are streaming. Games with intricate graphics, fast movement, or frequent scene changes may require higher bitrates to maintain visual clarity. On the other hand, games with simpler graphics or slower pace may be suitable for lower bitrates without compromising the viewing experience.
2. Test Different Bitrates: Experiment and test various bitrates while streaming different games or content. Start with the recommended bitrate for the chosen video resolution and frame rate, and gradually increase or decrease it based on the specific requirements of each game or content. Monitor the stream quality and stability to find the optimal bitrate that balances visual quality and performance.
3. Monitor Stream Performance: Keep an eye on critical stream performance indicators, such as dropped frames, buffering, or pixelation, during different games or content. If you notice any issues, it may indicate that your bitrate is either too high or too low for the specific game or content. Adjust the bitrate accordingly to address these issues.
4. Consider Different Platforms: Certain platforms may have limitations on the maximum supported bitrate. For example, if you plan to stream simultaneously on Twitch and other platforms like YouTube or Facebook, ensure that your bitrate settings are compatible with the platform’s guidelines. You may need to adjust the bitrate to meet the requirements of each platform.
5. Take Audience Preferences into Account: Pay attention to viewer feedback and preferences for different games or content. Engage with your audience and ask for their opinions regarding the stream quality. Some viewers may prioritize a higher bitrate for visually demanding games, while others may focus more on a stable stream without buffering. Strive to find a balance that satisfies the majority of your audience’s expectations.
6. Save Different Bitrate Profiles: Broadcasting software, such as OBS or Streamlabs OBS, often allows you to save different bitrate profiles. This feature enables you to switch between profiles easily when streaming various games or content. Create and save profiles for different games or genres to have preset bitrate settings that you can quickly apply when needed.
By adjusting your bitrate to suit the specific requirements of different games or content, you can optimize your stream quality and deliver a better viewing experience for your audience. It may require some experimentation and fine-tuning, but finding the right balance is crucial to maintaining the overall quality of your Twitch channel.
In the next section, we will discuss best practices for maintaining a stable bitrate during your Twitch streams.
Best Practices for Maintaining a Stable Bitrate
A stable bitrate is essential for providing a smooth and high-quality streaming experience on Twitch. Here are some best practices to help you maintain a stable bitrate:
1. Optimize Your Internet Connection: Ensure that you have a stable and fast internet connection with sufficient upload speed. Use a wired connection if possible, as it provides better stability and consistency compared to Wi-Fi.
2. Close Unnecessary Background Applications: Close any unnecessary applications or processes running in the background on your streaming device. These applications can consume bandwidth and system resources, potentially affecting your bitrate and stream stability.
3. Limit Network Usage: Minimize other network-intensive activities on your streaming device or network while you’re streaming. For example, avoid downloading large files or streaming videos on other devices connected to the same network, as it can impact your available bandwidth.
4. Monitor CPU Usage: Keep an eye on your CPU usage during streams, as high CPU usage can lead to dropped frames and bitrate instability. Optimize your settings and adjust encoding preferences to reduce CPU load and ensure smooth stream performance.
5. Use Hardware Acceleration: If your streaming software supports it, enable hardware acceleration for encoding. This offloads some of the encoding workload from your CPU to your GPU, reducing the strain on your system and helping maintain a stable bitrate.
6. Test Different Bitrates: Experiment with different bitrate settings during your testing phase. Find the balance between video quality and stability that works best for your setup and internet connection. Adjust the bitrate gradually until you achieve the optimal performance.
7. Regularly Monitor Stream Statistics: Keep an eye on your stream statistics during live broadcasts. Utilize tools like Twitch Inspector or the stream statistics within your broadcasting software to monitor key indicators such as bitrate, dropped frames, and stream health.
8. Test Stream Health Outside of Peak Hours: To ensure accurate results, perform bitrate tests and monitor stream health during off-peak hours when network congestion is less likely to occur. This will help you assess the stability of your bitrate without external factors affecting the results.
9. Consider Bitrate Buffering: Leave a small buffer in your bitrate settings, setting it slightly below the maximum stable bitrate that you can consistently maintain. This buffer allows for minor variations in network conditions without significantly affecting the stream quality.
10. Regularly Update Your Streaming Software: Keep your streaming software up to date with the latest updates and patches. Developers often release optimizations and bug fixes that can improve the stability and performance of your streams.
Implementing these best practices will help you achieve a stable bitrate during your Twitch streams, leading to a better viewing experience for your audience. Remember to regularly monitor and fine-tune your settings to ensure optimal performance and quality.
In the next section, we will address some common bitrate issues and provide troubleshooting tips to resolve them.
Troubleshooting Common Bitrate Issues
While streaming on Twitch, you may encounter common bitrate issues. Understanding these issues and knowing how to troubleshoot them can help you maintain a stable and high-quality stream. Here are some common bitrate issues and troubleshooting tips:
1. Buffering or Lag: If your viewers experience buffering or lag while watching your stream, it may indicate that your bitrate is too high for their internet connection. Lower your bitrate to a more suitable level based on the average internet speeds of your viewers. Test different bitrates and monitor viewer feedback to find the optimal setting.
2. Pixelation or Blurriness: If your stream appears pixelated or blurry, it may indicate that your bitrate is too low to maintain the desired video quality. Increase your bitrate gradually and monitor the impact on stream quality. Find the balance between bitrate and visual clarity to achieve the best visual experience for your audience.
3. Dropped Frames: Dropped frames occur when your stream cannot keep up with the selected bitrate, resulting in a loss of frames in the broadcast. This can be caused by various factors, such as a weak internet connection, high CPU usage, or encoding settings that are too demanding. Close unnecessary applications, reduce the resolution or frame rate, or lower the bitrate to remedy dropped frames.
4. Inconsistent Bitrate: Inconsistencies in bitrate can result in a fluctuating stream quality or intermittent buffering. Ensure that you have a stable internet connection with sufficient upload speed. Check for any issues with your network or hardware that may cause variations in your bitrate. Utilize bitrate buffering by setting your bitrate slightly below the maximum stable bitrate to accommodate minor fluctuations.
5. Encoding Artifacts: Encoding artifacts are visual distortions that occur due to compression during the encoding process. To reduce encoding artifacts, consider using more efficient encoding settings or software, or increase the bitrate to allow for better compression. Experiment with different encoding presets and settings to find the optimal balance between bitrate and visual quality.
6. Network Congestion: Network congestion can occur during peak usage hours, causing variations in your available bandwidth and affecting the stability of your stream. Consider scheduling your streams during off-peak hours to minimize the impact of network congestion. Additionally, check with your internet service provider to ensure that your plan can handle the demands of streaming during peak times.
7. Insufficient Hardware Resources: If you experience bitrate issues despite having a stable internet connection, it’s possible that your hardware is struggling to handle the encoding and transmission process. Ensure that your CPU, GPU, and other components meet the requirements for streaming at the desired bitrate. Upgrading your hardware or optimizing your software settings may be necessary to resolve these issues.
By troubleshooting these common bitrate issues, you can enhance the stability and quality of your Twitch streams. Remember to take into account the specific factors that may be contributing to the issue and apply the appropriate troubleshooting steps. Regular monitoring, testing, and fine-tuning will help you maintain a consistent and enjoyable streaming experience.
In the final section, we will provide a summary of the key points discussed throughout the article.