
Choosing the Right Equipment
When it comes to streaming Nintendo Switch gameplay on Twitch, having the right equipment is crucial. Here are some key components you’ll need to set up your streaming setup:
1. Nintendo Switch Console: Of course, you’ll need a Nintendo Switch console to play games and capture gameplay footage. Make sure your console is updated to the latest firmware to ensure compatibility with the streaming software and capture card.
2. Capture Card: A capture card is essential for capturing and recording gameplay footage from your Nintendo Switch. There are a variety of capture cards available on the market, such as the Elgato HD60 S or Avermedia Live Gamer Portable 2 Plus. Choose one that suits your budget and streaming needs.
3. Computer: You’ll need a computer with decent specs to handle streaming and encoding the video output from your capture card. Make sure your computer meets the minimum requirements for streaming software and has enough processing power and RAM.
4. Streaming Software: There are several streaming software options available, such as OBS Studio, Streamlabs OBS, or XSplit. Choose one that you’re comfortable with and offers the features you need for streaming on Twitch.
5. Microphone and Webcam: While not mandatory, having a good quality microphone and webcam can greatly enhance your streaming experience. Consider investing in a USB microphone like the Blue Yeti or a webcam like the Logitech C920 for better audio and video quality.
6. Internet Connection: A stable and reliable internet connection is vital for streaming on Twitch. Make sure you have a high-speed internet plan with sufficient upload speed to handle the streaming requirements. Consider connecting your computer and Nintendo Switch to the router via Ethernet for a more stable connection.
Remember, the quality of your equipment can greatly impact the overall streaming experience. While you don’t need the most expensive gear to start streaming, having reliable and capable equipment will ensure a smoother and more professional stream.
Setting Up Your Nintendo Switch for Streaming
Before you start streaming your Nintendo Switch gameplay on Twitch, you’ll need to set up your console properly. Follow these steps to prepare your Nintendo Switch for streaming:
1. Update Your Nintendo Switch: Ensure that your Nintendo Switch is running the latest firmware by going to System Settings > System > System Update. Keeping your console up to date will ensure compatibility with the capture card and streaming software.
2. Enable the HDMI Output: Connect your Nintendo Switch dock to your TV or monitor using the HDMI cable. On your Nintendo Switch, go to System Settings > TV Output and enable “Enable HDMI-Connected TV Device.” This will allow the capture card to receive the gameplay footage.
3. Enable Airplane Mode: To minimize interruptions and notifications during your stream, activate Airplane Mode on your Nintendo Switch. You can do this by swiping down from the top-right corner of the home screen and toggling the Airplane Mode icon.
4. Adjust Audio and Display Settings: To ensure optimal audio and visual quality for your stream, navigate to System Settings > System > Audio Output and select the appropriate options. Additionally, adjust the display settings under System Settings > TV Output to match your streaming setup.
5. Manage Storage: Clear up some space on your Nintendo Switch’s internal storage or expand it with a microSD card. This will ensure you have enough room for capturing and storing your gameplay recordings.
6. Configure Capture Settings: Some capture cards require specific settings on the Nintendo Switch. Consult the documentation provided with your capture card to determine if any additional configurations are necessary.
By following these steps, you’ll have your Nintendo Switch ready to stream your gameplay to Twitch. Having the right settings and configurations in place will ensure a smooth streaming experience and allow you to focus on engaging with your viewers.
Connecting Your Switch to the Capture Card
Once you’ve set up your Nintendo Switch, the next step is to connect it to the capture card. Here’s how you can do it:
1. Power off your Nintendo Switch: Before connecting any cables, make sure your Nintendo Switch is turned off to avoid any damage to the console or the capture card.
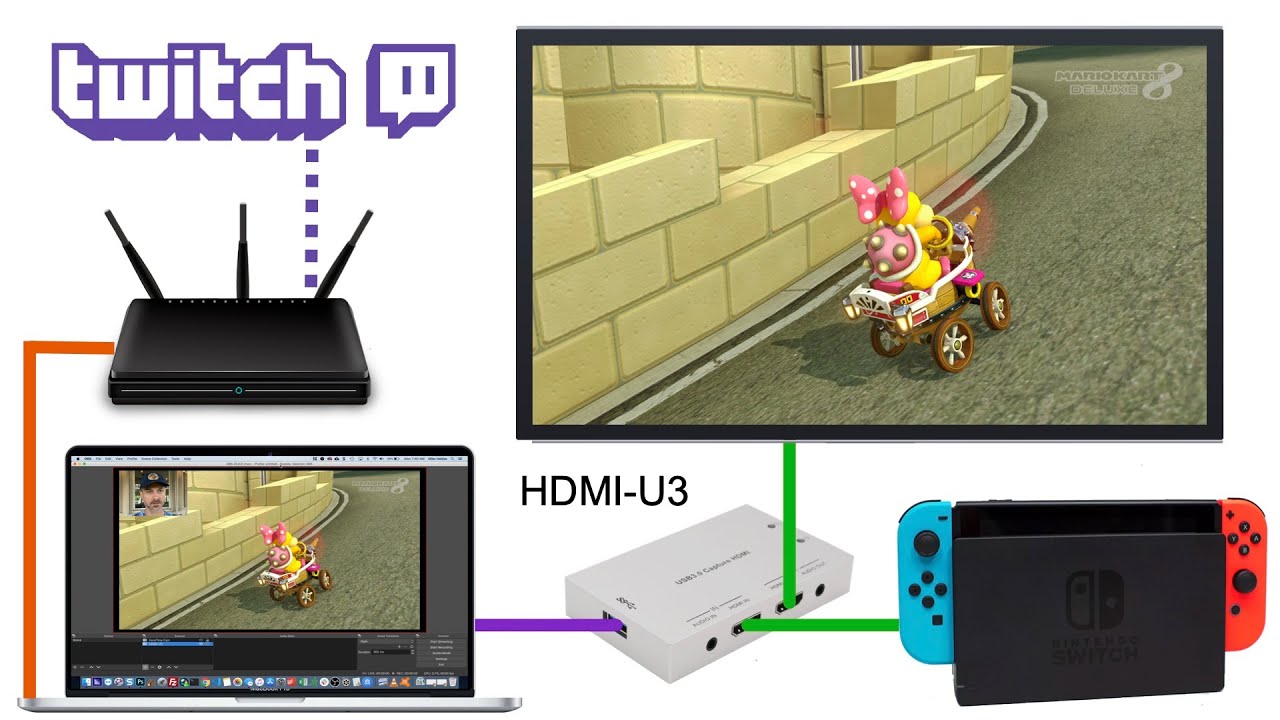
2. Connect the HDMI cable: Take the HDMI cable that came with your Nintendo Switch and connect one end to the HDMI output port on the Nintendo Switch dock. Connect the other end to the HDMI input port on the capture card.
3. Connect the capture card to your computer: Use the USB cable provided with the capture card to connect it to an available USB port on your computer. This will allow your computer to receive the captured gameplay footage.
4. Power on your Nintendo Switch and the capture card: Turn on your Nintendo Switch and allow it to display on the connected display through the capture card. Make sure the capture card is also powered on.
5. Configure the capture card settings: Depending on the capture card you’re using, you may need to install the appropriate software or drivers on your computer. Follow the instructions provided with your capture card to properly set up and configure the capture card software.
6. Test the connection: Open the capture card software on your computer and verify that the Nintendo Switch gameplay is being displayed correctly. You should see the gameplay footage on your computer screen or within the capture card software.
By successfully connecting your Nintendo Switch to the capture card, you’re now ready to capture and record gameplay footage for streaming. Ensure that the connection is secure and test it before streaming to avoid any technical issues during your stream. The capture card will act as a bridge between your Nintendo Switch and your computer, allowing you to capture and transmit the gameplay footage smoothly.
Configuring the Capture Card Software
After connecting your Nintendo Switch to the capture card, the next step is to configure the capture card software on your computer. The specific steps may vary depending on the brand and model of your capture card. Here are some general guidelines to help you get started:
1. Install the capture card software: If you haven’t already done so, download and install the software provided by the capture card manufacturer. Follow the instructions provided to complete the installation process.
2. Open the capture card software: Launch the capture card software on your computer. It should detect the connected capture card automatically.
3. Configure the input settings: Within the capture card software, locate the input settings and ensure that the correct input source is selected. In this case, choose the input source connected to your Nintendo Switch.
4. Adjust the audio settings: Navigate to the audio settings within the capture card software. Ensure that the audio input is set to capture the gameplay audio from your Nintendo Switch. You may need to enable audio capturing or adjust the volume levels as needed.
5. Set the capture resolution and frame rate: Configure the capture resolution and frame rate settings to match your streaming preferences. It’s recommended to choose a resolution and frame rate that is supported by both your capture card and streaming software.
6. Verify the preview display: Preview the gameplay footage within the capture card software to ensure that it is displaying correctly. Adjust any settings, such as brightness or contrast, if necessary.
7. Test the recording functionality: Initiate a test recording within the capture card software to confirm that the gameplay footage is being captured properly. Review the recorded footage to ensure there are no issues or distortions.
By configuring the capture card software correctly, you’ll be able to capture and record high-quality gameplay footage from your Nintendo Switch. Take the time to explore the various settings and options available within the software to maximize the performance of your capture card and ensure a seamless streaming experience.
Setting Up Twitch Account and Stream Key
Before you can start streaming your Nintendo Switch gameplay on Twitch, you’ll need to set up a Twitch account and obtain a stream key. Here’s how to get started:
1. Create a Twitch account: Visit the Twitch website at twitch.tv and click on the “Sign Up” button. Follow the prompts to create your account by entering your desired username, password, and other required information.
2. Verify your email: After signing up, Twitch will send a verification email to the email address you provided during registration. Open the email and click on the verification link to complete the account setup process.
3. Enable two-factor authentication (2FA): Twitch strongly recommends enabling 2FA for added security. Go to your account settings and navigate to the Security and Privacy section. Follow the instructions to set up 2FA using either an authenticator app or SMS verification.
4. Obtain your stream key: From your Twitch dashboard, click on your profile icon and select “Creator Dashboard”. In the sidebar, navigate to the “Stream Manager” section. Under the “Stream Settings” tab, you’ll find your unique stream key. Click on the “Copy” button to save it to your clipboard.
5. Secure your stream key: Treat your stream key as sensitive information and ensure that it is kept private. Sharing your stream key can allow unauthorized individuals to stream on your Twitch channel. Be cautious when pasting your stream key and avoid accidentally sharing it while streaming.
6. Configure your streaming software: Open your preferred streaming software, such as OBS Studio or Streamlabs OBS. Navigate to the settings or preferences section and locate the “Stream” or “Broadcast” settings. Paste your Twitch stream key into the appropriate field.
7. Save and apply the settings: Make sure to save the changes to your streaming software settings after pasting the stream key. This ensures that your streaming software is correctly linked to your Twitch account.
By setting up a Twitch account and obtaining your stream key, you’ll be ready to go live and start streaming your Nintendo Switch gameplay to the Twitch community. Remember to regularly review your Twitch account settings and consider customizing your channel to add your unique branding elements to enhance your streaming experience.
Choosing Streaming Software
Choosing the right streaming software is crucial for a seamless streaming experience when showcasing your Nintendo Switch gameplay on Twitch. Here are some popular streaming software options to consider:
1. OBS Studio: OBS Studio (Open Broadcaster Software) is a free and open-source streaming software that offers powerful features and customization options. It supports platforms like Twitch and provides a user-friendly interface for configuring scenes, overlays, and audio settings.
2. Streamlabs OBS: Streamlabs OBS is a popular choice among streamers due to its integration with Streamlabs, a suite of tools that enhance the streaming experience. It offers customizable themes, alert notifications, and simplified scene setup to help you create a professional-looking stream.
3. XSplit: XSplit is a feature-rich streaming software that offers a free version, as well as premium options with additional features. It provides an intuitive interface, supports multiple platforms, and offers advanced features like scene transitions, live annotations, and video editing capabilities.
4. Wirecast: Wirecast is a professional-grade streaming software suitable for more advanced streaming setups. It offers a wide range of features such as multi-camera support, advanced audio mixing, and virtual sets. Wirecast allows for high-quality streaming and is used by broadcasters and professional streamers.
5. Lightstream Studio: Lightstream Studio is a cloud-based streaming software that simplifies the streaming setup process. It provides easy-to-use controls for adding overlays, alerts, and transitions without the need for additional hardware or software installations.
When choosing streaming software, consider factors such as your computer’s specifications, the features you require, and your level of technical expertise. Take the time to explore the features and functionalities of each software option, as well as user reviews and tutorials, to determine which one best suits your streaming needs.
Configuring Streaming Software
Once you’ve chosen your streaming software, it’s important to properly configure it to ensure a smooth streaming experience for your Nintendo Switch gameplay on Twitch. Here are the essential steps to follow:
1. Connect your capture card: Ensure that your capture card is properly connected to your computer and recognized by the streaming software. This may involve selecting the appropriate video and audio input sources within the software settings.
2. Set your streaming output: In your streaming software settings, specify your desired streaming output settings. This includes choosing the streaming platform (e.g., Twitch), selecting the appropriate server location, and setting the desired bitrate, resolution, and frame rate for your stream. It’s important to choose settings that align with your internet connection and the capabilities of your computer.
3. Configure audio settings: Adjust the audio settings in your streaming software to ensure that the game audio and your microphone audio are balanced and clear. You may need to select your microphone as the designated audio input and adjust the audio levels to avoid any distortion or background noise.
4. Create scenes and sources: Use the scene editor in your streaming software to set up different scenes and add various sources to your stream. Sources can include your Nintendo Switch gameplay capture, webcam feed, overlays, alerts, and other elements you want to include in your stream. Arrange and resize the sources to create visually appealing and engaging layouts.
5. Set up overlays and alerts: Customize your stream with overlays, which can include your logo, chat box, recent followers, and donation notifications. Configure alerts to notify you and your viewers of new followers, subscribers, or other interactions. Many streaming software options provide built-in tools or allow you to import custom overlays and alerts.
6. Test your stream: Before going live, it’s essential to test your stream to ensure that everything is working correctly. Use the preview feature in your streaming software to check the stream quality, audio levels, and the display of your overlays. Consider having a friend or another device ready to view your stream and provide feedback during the testing phase.
Configuring your streaming software takes time and experimentation to achieve the desired results. Understand the different settings and options available in your chosen software, and don’t hesitate to consult online tutorials, forums, or support resources for specific guidance based on your streaming software of choice. Regularly review and fine-tune your settings to optimize your streaming quality and create an engaging experience for your Twitch audience.
Testing and Troubleshooting
Before you go live with your Nintendo Switch gameplay stream on Twitch, it’s important to thoroughly test your setup and troubleshoot any potential issues. Here are some key steps to ensure a smooth streaming experience:
1. Test your internet connection: Conduct a speed test to ensure that your internet connection meets the recommended upload speed for streaming on Twitch. A stable and sufficient connection is essential for a high-quality stream.
2. Test your hardware: Verify that all your hardware components, including the Nintendo Switch, capture card, and microphone, are working properly. Test the audio and video quality to ensure there are no distortions or technical glitches.
3. Test your streaming software settings: Go through all the settings in your streaming software, double-checking the streaming platform, bitrate, resolution, and any overlays or alerts. Verify that the stream key is correctly entered and that the software is properly configured to capture and stream your Nintendo Switch gameplay.
4. Conduct a test stream: Initiate a test stream on Twitch using the “Stream Preview” or “Start Streaming” feature in your streaming software. Monitor the stream quality, audio levels, and the display of your overlays. Ask a friend or viewer to provide feedback on the stream’s performance and any potential issues they notice.
5. Monitor stream health and statistics: Keep an eye on the stream health and statistics provided by your streaming software or Twitch dashboard. Look for any dropped frames, high latency, or other indications of performance issues. Make adjustments to your settings or internet connection as needed.
6. Troubleshoot potential issues: If you encounter any issues during testing, identify the root cause and troubleshoot accordingly. Check for any software updates, ensure all drivers are up to date, and troubleshoot any hardware or connectivity problems. Refer to online resources, forums, or support channels for specific troubleshooting steps related to your equipment and software.
Testing and troubleshooting are essential steps to ensure a successful streaming experience. By thoroughly testing your setup and addressing any issues before going live, you can minimize the risk of technical difficulties during your stream and provide a more enjoyable experience for your viewers.
Best Practices for Streaming Nintendo Switch Gameplay
Streaming Nintendo Switch gameplay on Twitch offers a unique opportunity to engage with viewers and share your gaming experiences. To enhance your streaming experience and create a compelling stream, consider these best practices:
1. Interact with your audience: Engage with your viewers by responding to their comments and questions. Creating an interactive atmosphere helps to build a sense of community and encourages viewers to stay engaged with your stream.
2. Add a personal touch: Inject your personality into your stream by sharing stories, jokes, and anecdotes. Showcase your enthusiasm and passion for gaming to create a unique and enjoyable experience for your audience.
3. Keep a consistent schedule: Establish a regular streaming schedule to attract and retain viewers. Consistency helps viewers know when to expect your stream and allows you to build a dedicated audience.
4. Set up engaging overlays: Customize your overlays to provide relevant information and add professional polish to your stream. Include elements such as your webcam, chat box, and recent followers to enhance viewer interaction.
5. Use a high-quality microphone: Invest in a good quality microphone to ensure clear and crisp audio. A high-quality microphone helps viewers hear your voice and commentary without distractions or background noise.
6. Engage with chat: Monitor and actively participate in the chat during your stream. Respond to questions, address comments, and acknowledge new followers and subscribers. This interaction helps to create a sense of community and build rapport with your viewers.
7. Showcase a variety of games: While focusing on Nintendo Switch gameplay, explore different games within the console’s library to provide variety and cater to a broader audience. This diversity helps to attract new viewers and keeps existing viewers engaged.
8. Be mindful of your streaming environment: Set up a clean and well-organized streaming space to create a professional impression. Consider the lighting, background, and noise levels to enhance the visual quality of your stream.
9. Promote your stream: Utilize social media platforms and online communities to promote your stream and attract new viewers. Engage with gaming communities relevant to your content and collaborate with other streamers to expand your reach.
10. Continuously improve: Seek feedback from your viewers and analyze your stream analytics to identify areas for improvement. Review your past broadcasts to see what works well and what can be enhanced to provide a better streaming experience.
By applying these best practices, you can create an engaging and successful Nintendo Switch gameplay stream on Twitch. Remember, streaming is a journey of continuous improvement, so continue to refine your techniques, engage with your audience, and adapt to new trends to ensure an enjoyable and thriving streaming experience.