
Why change your Mac’s DNS settings?
When it comes to browsing the internet on your Mac, you may not give much thought to the Domain Name System (DNS). However, the DNS plays a crucial role in connecting your Mac to websites by translating domain names into IP addresses. By default, your Mac uses the DNS settings provided by your internet service provider (ISP). While these settings generally work fine, there are several reasons why you might consider changing your Mac’s DNS settings.
Improved Speed and Performance: By changing your DNS settings, you can potentially improve the speed and performance of your internet connection. Some DNS servers are optimized for faster response times, reducing the time it takes for your browser to load websites. This can be especially beneficial if you frequently visit media-rich websites or stream online videos.
Bypassing DNS-based Restrictions: Some ISPs or networks may block certain websites or impose restrictions on accessing specific content. By changing your DNS settings, you can circumvent these restrictions and access blocked websites. This is particularly useful if you’re traveling or residing in a country with strict internet censorship.
Enhanced Security: DNS plays a vital role in protecting your Mac from malicious websites and phishing attempts. By using a DNS service that offers enhanced security features such as malware blocking and phishing protection, you reduce the risk of falling victim to cyber threats. This added layer of security can give you peace of mind while browsing the web.
Customized Content Filtering: If you have children using your Mac or want to control the type of content that can be accessed, changing your DNS settings allows you to set up content filtering. Some DNS services offer parental control options, allowing you to block websites with explicit content or restrict access to certain categories. This can help provide a safer browsing experience for your family.
Privacy and Data Protection: By default, your ISP’s DNS servers may track your internet activity, potentially compromising your privacy. Changing your DNS settings to a service that prioritizes privacy can help protect your browsing data. Some DNS providers offer advanced privacy features, such as encrypted DNS queries, to ensure your online activities remain confidential.
Flexibility and Customization: Changing your DNS settings gives you the flexibility to choose the DNS provider that best fits your needs. You can opt for a DNS service that offers additional features like ad-blocking or DNS-level filtering. This customization allows you to tailor your browsing experience according to your preferences.
Method 1: Changing DNS settings through System Preferences
Changing the DNS settings on your Mac through System Preferences is a straightforward process. Follow these steps to modify the DNS settings:
- Click on the Apple menu in the top-left corner of your screen and select “System Preferences.”
- In the System Preferences window, click on the “Network” icon.
- Select your active network connection from the list on the left-hand side of the Network window. It could be Wi-Fi, Ethernet, or any other interface you are currently using.
- Click on the “Advanced” button in the bottom-right corner of the Network window.
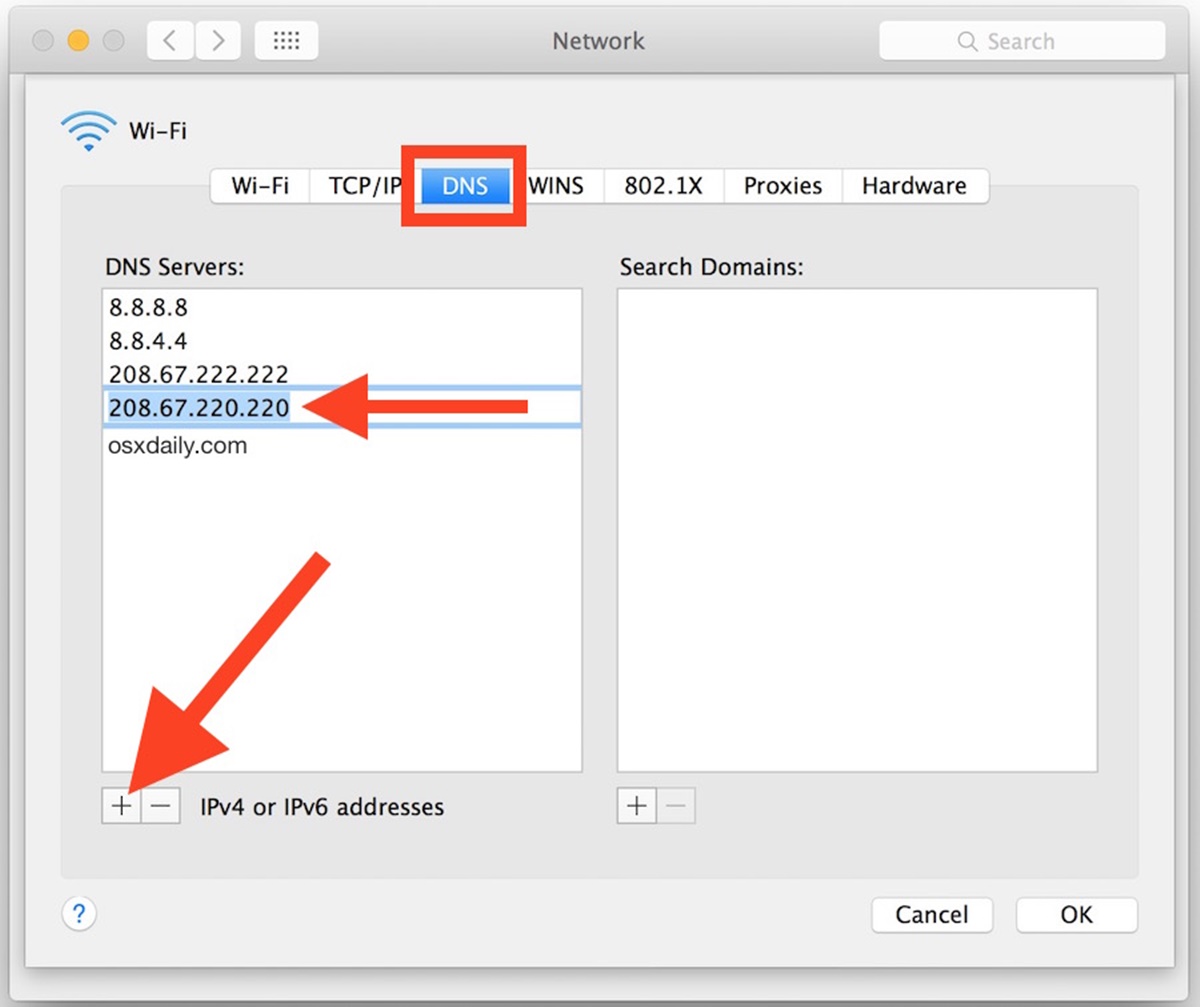
- In the Advanced window, select the “DNS” tab.
- Click on the “+” button at the bottom-left corner to add a new DNS server.
- Type in the IP address of the DNS server you want to use. You can add multiple DNS servers by clicking the “+” button again.
- Once you’re done adding the DNS servers, click on “OK” to save the changes.
- Click “Apply” in the Network window to apply the new DNS settings.
Note that you can change the order of DNS servers by dragging and dropping them in the DNS servers list. By default, macOS will use the DNS servers in the order they are listed, but it will move to the next server if the previous one is unresponsive.
After making these changes, your Mac will start using the new DNS servers you specified. It may take a few moments for the changes to take effect. You can verify the new DNS settings by visiting a website and checking if it loads correctly.
If you want to revert to the default DNS settings provided by your ISP, you can remove the custom DNS servers from the DNS tab in the Network preferences or click on the “Reset” button to restore the original settings.
Method 2: Changing DNS settings through Network Preferences
If you prefer a more direct approach, you can also change the DNS settings on your Mac through the Network preferences. Here’s how:
- Click on the Apple menu in the top-left corner of your screen and select “System Preferences.”
- In the System Preferences window, click on the “Network” icon.
- Select your active network connection from the list on the left-hand side of the Network window. It could be Wi-Fi, Ethernet, or any other interface you are currently using.
- Click on the “Advanced” button in the bottom-right corner of the Network window.
- In the Advanced window, navigate to the “TCP/IP” tab.
- In the “Configure IPv4” or “Configure IPv6” dropdown menu, select “Manually.”
- In the “DNS Servers” section, enter the IP address of the DNS server you wish to use. You can add multiple DNS servers by separating them with commas.
- Click on “OK” to save the changes.
- Click “Apply” in the Network window to apply the new DNS settings.
Once you’ve completed these steps, your Mac will start using the new DNS server(s) you specified. It may take a few moments for the changes to take effect. You can test the new DNS settings by visiting a website and checking if it loads as expected.
If you wish to revert back to the default DNS settings provided by your ISP, you can select “Using DHCP” in the “Configure IPv4” or “Configure IPv6” dropdown menu. This will assign DNS settings automatically.
By changing the DNS settings through the Network preferences, you have direct control over which DNS servers your Mac uses. This method is particularly useful if you want to quickly switch between different DNS servers or if you have specific DNS server preferences for different networks.
Method 3: Changing DNS settings through Terminal
If you prefer a command-line approach, you can change the DNS settings on your Mac using the Terminal. Here’s how:
- Open the Terminal application on your Mac. You can find it in the Utilities folder within the Applications folder, or you can use Spotlight search to find it.
- Type the following command and press Enter:
- You will be prompted to enter your administrator password. Type it in and press Enter. Note that when entering your password, you won’t see the characters being typed.
- Once you’ve entered the password correctly, the DNS servers for the specified interface will be updated.
- You can verify the changes by typing the following command and pressing Enter:
bash
sudo networksetup -setdnsservers Wi-Fi [DNS server IP address]
Replace `[DNS server IP address]` with the IP address of the DNS server you want to use. If you are using a different network interface, replace `Wi-Fi` with the appropriate interface name (e.g., Ethernet).
bash
networksetup -getdnsservers Wi-Fi
Replace `Wi-Fi` with the name of your network interface.
After executing these steps, your Mac will start using the new DNS server you specified. Keep in mind that it may take a few moments for the changes to take effect. To confirm the new DNS settings, you can visit a website and check if it loads as expected.
If you want to revert back to the default DNS settings provided by your ISP, you can use the following command:
bash
sudo networksetup -setdnsservers Wi-Fi Empty
Replace `Wi-Fi` with the appropriate interface name if you are using a different network interface.
Changing DNS settings through the Terminal gives you more fine-grained control over your Mac’s network configuration. It is especially useful for advanced users who are comfortable with the command line interface and want to automate DNS configuration or quickly switch between different DNS servers.
How to find the best DNS servers for your Mac
Choosing the right DNS servers for your Mac can have a significant impact on your browsing experience. Here are a few methods to help you find the best DNS servers:
1. ISP-recommended DNS servers: Many internet service providers (ISPs) provide a list of recommended DNS servers that are optimized for their network. Check your ISP’s website or contact their customer support to find out if they offer any specific DNS server recommendations.
2. Public DNS servers: Several companies offer free public DNS servers that are known for their speed, reliability, and security. Some popular options include Google Public DNS (8.8.8.8, 8.8.4.4), Cloudflare DNS (1.1.1.1, 1.0.0.1), and OpenDNS (208.67.222.222, 208.67.220.220). These DNS servers are widely used and trusted by millions of users worldwide.
3. DNS benchmarking tools: DNS benchmarking tools can help you identify the fastest and most reliable DNS servers for your specific location. These tools test the response times of various DNS servers and provide you with a ranked list of servers based on their performance. Some popular DNS benchmarking tools include DNS Benchmark, GRC’s DNS Benchmark, and Namebench.
4. DNSSec-protected servers: If you prioritize security, consider using DNS servers that support Domain Name System Security Extensions (DNSSEC). DNSSEC adds an extra layer of protection against DNS attacks by ensuring the authenticity and integrity of DNS responses. Cloudflare DNS (1.1.1.1), Quad9 (9.9.9.9), and CleanBrowsing (185.228.168.9) are examples of DNSSEC-supporting servers.
5. Local DNS servers: If you have a server or network device running on your local network, you can set up your own DNS server to handle DNS resolution requests. This can provide faster response times and additional control over DNS settings, especially in local network environments.
When testing different DNS servers, consider factors such as server location, reliability, speed, security features, and any additional services they offer, such as content filtering or parental controls. It’s also worth noting that the performance of DNS servers can vary based on your geographical location and network conditions. Therefore, it may be beneficial to test multiple DNS servers and select the ones that provide the best overall performance for your specific setup.
Remember to periodically evaluate your DNS servers and consider changing them if you experience any issues with speed, reliability, or security. By finding the best DNS servers for your Mac, you can optimize your browsing experience and enjoy a faster, more secure internet connection.
Troubleshooting: Common issues when changing DNS settings
While changing DNS settings on your Mac can bring numerous benefits, there are certain common issues that you may encounter during the process. Here are a few troubleshooting steps to resolve these issues:
1. Incorrect DNS server addresses: Double-check that you have entered the correct DNS server addresses. These addresses are typically provided by your DNS service provider or can be obtained from public DNS server lists. Incorrectly entered addresses can cause connectivity problems and hinder your ability to access websites.
2. DNS cache clearing: After changing DNS settings, your Mac may still use the old DNS cache, leading to inconsistent results. To clear the DNS cache, open Terminal and enter the following command:
bash
sudo killall -HUP mDNSResponder
This will flush the DNS cache and force your Mac to use the updated DNS settings.
3. Router DNS settings: If you are using a router to connect to the internet, it may have its own DNS settings that override your Mac’s DNS settings. Access your router’s settings page and confirm that the DNS settings are configured correctly or set to obtain DNS automatically.
4. Firewall or antivirus software: In certain cases, firewall or antivirus software may interfere with DNS resolution. Temporarily disable any such software and check if the issue persists. If disabling the software resolves the problem, consider adjusting the settings or seeking alternatives to ensure that DNS requests are not blocked.
5. Network configuration conflicts: Conflicts between network configurations such as VPN settings or proxy servers can disrupt DNS resolution. Temporarily disable any VPN connections or proxy settings to see if it resolves the issue. If it does, adjust the settings to allow proper DNS resolution or consult with your network administrator.
6. Restarting your Mac and network equipment: Sometimes, network issues can be resolved by simply restarting your Mac and network equipment, including your router and modem. This can help refresh network connections and clear any temporary glitches that may be hindering DNS resolution.
If you have exhausted these troubleshooting options and are still experiencing difficulty with your DNS settings, consider reaching out to your ISP or DNS service provider for further assistance. They may be able to provide additional insights or offer specific troubleshooting steps based on their services.
Remember, occasional issues with DNS settings can occur due to various factors. By following these troubleshooting steps, you can quickly resolve most common issues and enjoy a seamless internet browsing experience on your Mac.