
Accessing the Settings Menu
Changing the vibration settings on your iPhone allows you to customize your device’s notification alerts and haptic feedback. To begin, you’ll need to access the Settings menu. Follow these simple steps:
- Unlock your iPhone by entering your passcode or using Face ID or Touch ID.
- Locate the Settings app on your home screen, which is represented by a gear icon, and tap on it to open the Settings menu.
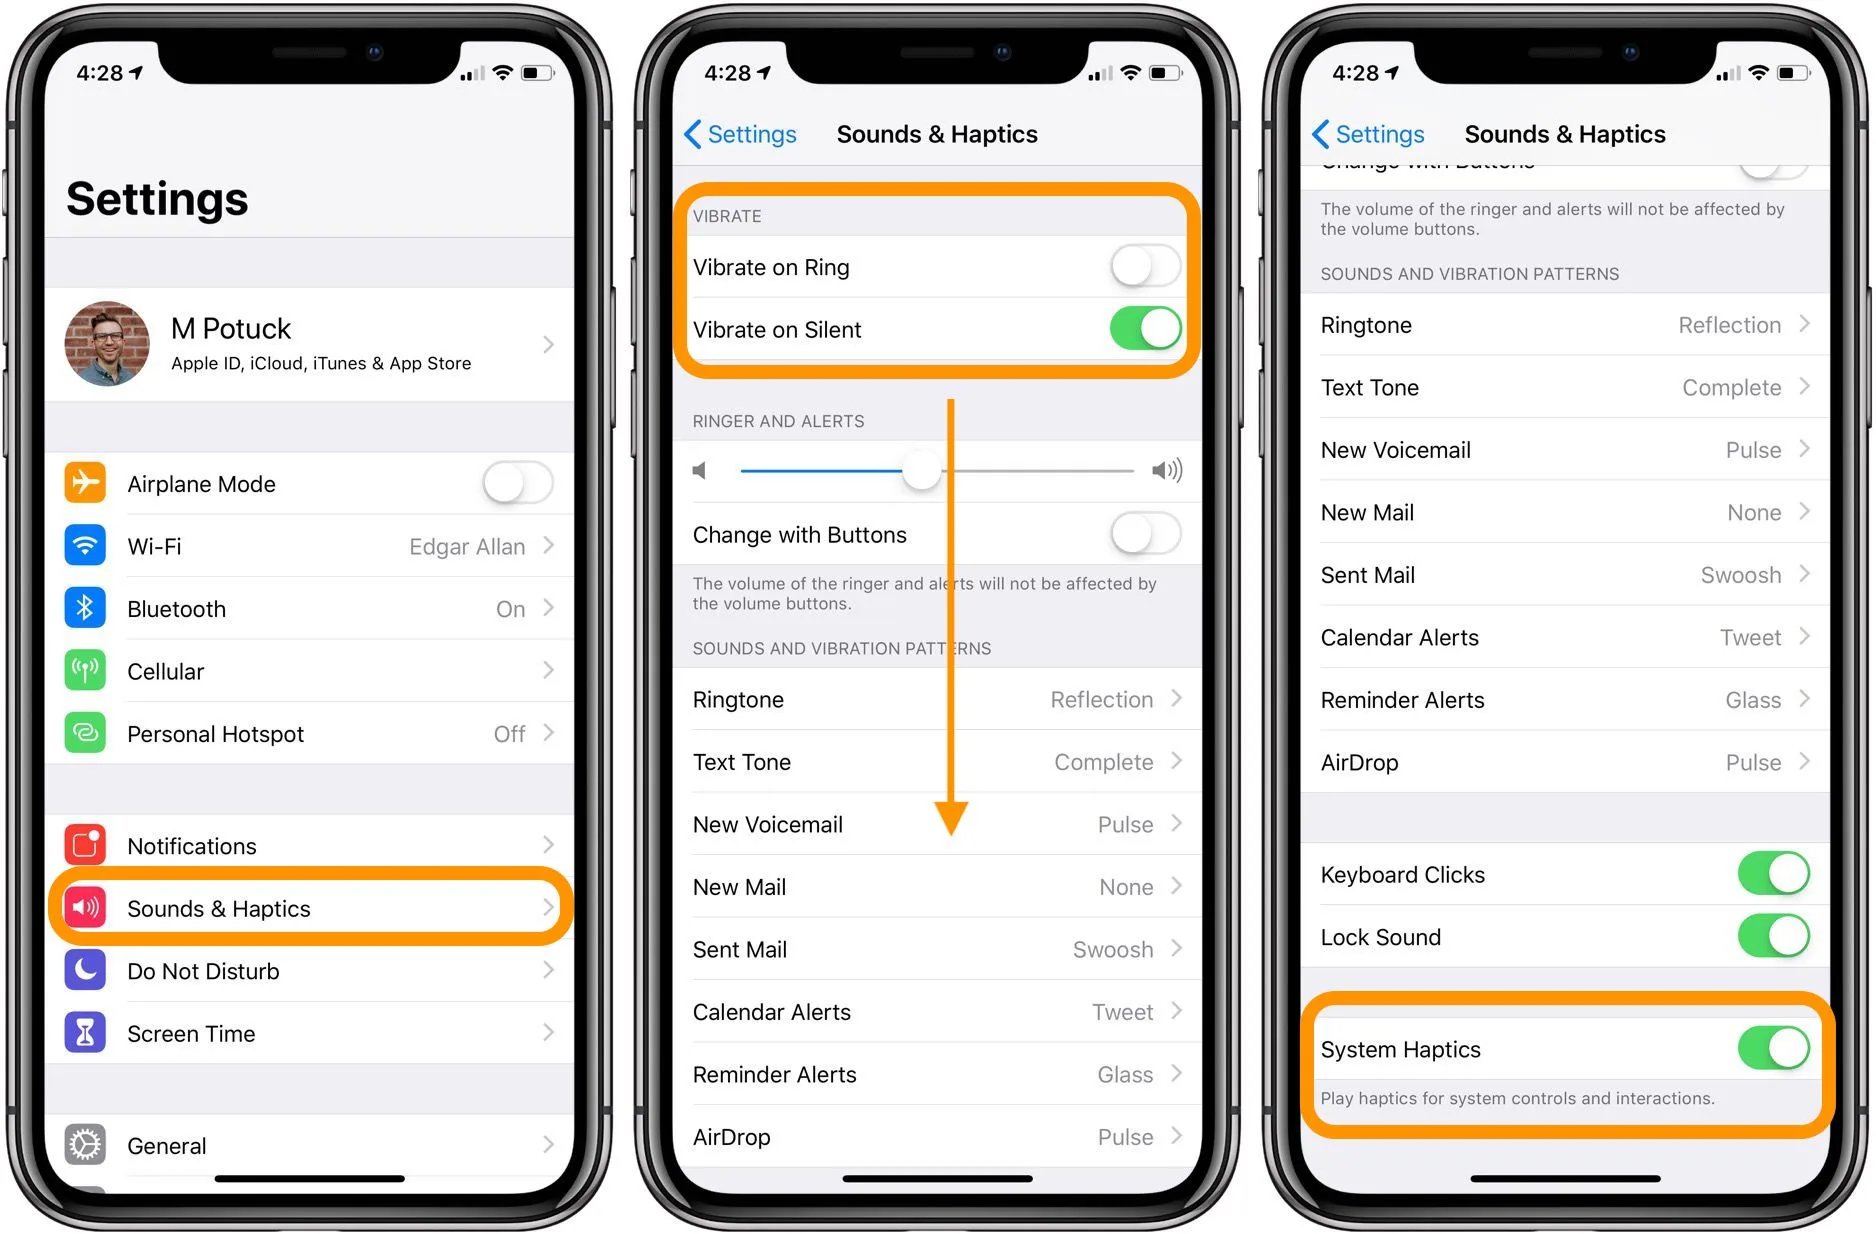
- Scroll down and look for the option that says “Sounds & Haptics.” This is usually below the “Do Not Disturb” and “Screen Time” options.
- Tap on “Sounds & Haptics” to access the sound and vibration settings for your iPhone.
Once you’re in the “Sounds & Haptics” section, you’ll have a range of options to customize the vibration settings on your iPhone. From here, you can change the vibration pattern, create custom vibration patterns, adjust the vibration intensity, enable vibration alerts for specific notifications, and more.
Accessing the Settings menu is the first step towards personalizing your iPhone’s vibration settings and ensuring that the notifications you receive are tailored to your preferences. Let’s continue exploring the various options available to further customize your device’s vibration experience.
Navigating to the Sounds & Haptics Option
Once you’ve accessed the Settings menu on your iPhone, the next step is to locate and select the “Sounds & Haptics” option. This section allows you to control the sound and vibration settings for your device. Follow these steps to navigate to the Sounds & Haptics option:
- Ensure you’re in the Settings menu of your iPhone, as mentioned in the previous section.
- Scroll down until you find the “Sounds & Haptics” option. It is usually located below the “Do Not Disturb” and “Screen Time” options.
- Tap on “Sounds & Haptics” to access the various settings related to sound and vibration on your iPhone.
Once you’re in the Sounds & Haptics section, you’ll see different options to customize your device’s vibration settings. These options include changing the vibration pattern, creating custom vibrations, adjusting the vibration intensity, and enabling vibration alerts for specific notifications.
By navigating to the Sounds & Haptics option, you gain control over how your iPhone notifies you through vibrations. This allows you to personalize your device’s vibration experience according to your preferences. Let’s move on to the next section to learn how to change the vibration pattern on your iPhone.
Changing the Vibration Pattern
Changing the vibration pattern on your iPhone can add a unique touch to your device’s notification alerts. By default, iPhones come with a range of pre-set vibration patterns to choose from. To change the vibration pattern, follow these steps:
- Access the Sounds & Haptics option in the Settings menu, as described in the previous sections.
- Scroll down to the “Sounds and Vibration Patterns” section and tap on “Vibration.” You’ll find a list of pre-set vibration patterns.
- Select the desired vibration pattern from the list by tapping on it.
When you tap on a vibration pattern, your iPhone will automatically play a preview of the selected pattern, allowing you to listen and feel the vibrations before applying the change. This helps you choose the vibration pattern that suits your preferences.
If you can’t find a vibration pattern that matches your liking, you can create a custom vibration pattern, which will be covered in the next section.
By changing the vibration pattern on your iPhone, you can personalize the way your device alerts you. Whether you prefer a subtle or more noticeable vibration, selecting the perfect pattern ensures that you can easily identify different notifications just by the feel of your iPhone’s vibrations.
Creating a Custom Vibration Pattern
If the pre-set vibration patterns on your iPhone don’t meet your preferences, you have the option to create a custom vibration pattern. This allows you to have a unique and personalized vibration for different notifications. Here’s how you can create a custom vibration pattern:
- Navigate to the Sounds & Haptics section in the Settings menu, as explained earlier.
- Scroll down and select “Vibration” under the “Sounds and Vibration Patterns” section.
- At the bottom of the screen, tap on “Create New Vibration.”
- You’ll see an empty grid displayed on the screen, representing the vibrations. Tap on the grid to create your custom pattern by tapping or holding your finger on the screen in various patterns and rhythms.
- Once you’ve created your desired vibration pattern, tap on “Save” to save it with a custom name.
Now, whenever you receive a notification, you can assign your custom vibration pattern to differentiate it from the default ones. This allows you to easily recognize specific notifications based on the unique vibration pattern you’ve created.
Creating a custom vibration pattern enables you to add a personal touch to your iPhone’s notification experience. It’s a handy feature for individuals looking to customize their device and make it uniquely theirs.
Adjusting Vibration Intensity
Along with changing the vibration pattern, you also have the option to adjust the intensity of the vibrations on your iPhone. Whether you prefer a subtle vibration or a more robust one, adjusting the vibration intensity allows you to tailor the notifications to your liking. Here’s how you can adjust the vibration intensity:
- Go to the Sounds & Haptics section in the Settings menu, as mentioned earlier.
- Scroll down to find the “Vibration Intensity” option.
- Tap on “Vibration Intensity” to access the various intensity levels available.
- Move the slider towards “Light” or “Strong” to adjust the vibration intensity according to your preference.
As you move the slider towards the “Light” end, the vibration intensity decreases, resulting in a more subtle and gentle vibration. On the other hand, moving the slider towards the “Strong” end increases the intensity, providing a more pronounced and noticeable vibration.
By adjusting the vibration intensity, you can ensure that your iPhone’s notifications are personalized to your sensory preferences. Whether you prefer a strong vibration to ensure you never miss an alert or a lighter vibration to be discreet in certain situations, the ability to control the intensity gives you flexibility in setting your device’s notification behavior.
Enabling and Customizing Vibration Alerts for Different Notifications
Customizing vibration alerts for different notifications allows you to easily identify incoming calls, text messages, emails, and more, without needing to look at your iPhone’s screen. By enabling and customizing vibration alerts, you can create a personalized experience. Here’s how you can do it:
- Open the Settings menu and go to the Sounds & Haptics section, as previously mentioned.
- Scroll down to find the “Sounds and Vibration Patterns” section and select “Ringtone.”
- Under the “Vibration” tab, tap on “Vibration” to access the pre-set vibration options.
- Scroll down to the “Custom” section and tap on “Create New Vibration” if you want to create a custom vibration for a specific notification.
- Select the desired notification from the list, such as text message, mail, or calendar alerts.
- Choose the vibration pattern that you want to assign to that specific notification.
- Tap on “Save” to save the customized vibration alert.
By customizing vibration alerts for different notifications, you can easily distinguish between incoming calls, messages, and other alerts without needing to check your device visually. This can be particularly helpful when your iPhone is in silent mode or when you’re in a situation where checking your phone may not be feasible.
Take advantage of this feature to create a unique and personalized vibration experience for each type of notification you receive. This way, you can quickly identify what type of notification you’re receiving solely based on the vibrations of your iPhone.
Turning Off Vibration for Specific Features
While vibrations can be helpful for alerting you to notifications, there may be times when you prefer to silence certain features and disable vibration altogether. Fortunately, your iPhone allows you to easily turn off vibrations for specific features. Here’s how you can do it:
- Open the Settings app on your iPhone and navigate to the Sounds & Haptics section.
- Scroll down and look for the specific feature or app for which you want to disable vibration.
- Tap on the feature or app to access its settings.
- Look for an option that mentions vibrations or haptics.
- Toggle off the vibration option for that specific feature or app.
By turning off vibrations for specific features or apps, you can have more control over when your iPhone vibrates. For example, if you don’t want your device to vibrate every time you receive an email or social media notification, you can disable vibrations for those specific apps. This allows you to have a more focused and customized notification experience.
Remember that turning off vibrations for certain features doesn’t disable vibrations for all notifications or alerts on your iPhone. You may still receive vibrations for other apps or calls, depending on your device’s settings. This way, you can fine-tune your iPhone’s vibration behavior to suit your preferences and needs.
Using the Ring/Silent Switch to Control Vibration
One of the simplest ways to control the vibration settings on your iPhone is by utilizing the Ring/Silent switch. Located on the side of your device, this switch allows you to quickly toggle between sound and silent mode, thereby affecting the vibration behavior as well. Here’s how you can use the Ring/Silent switch to control vibration:
- Locate the Ring/Silent switch on the side of your iPhone. It is usually located above the volume buttons.
- When the switch is in the up position, it indicates that your iPhone is in sound mode. This means your device will produce sound for incoming calls and notifications, and it will also vibrate when receiving alerts.
- When the switch is in the down position, it indicates that your iPhone is in silent mode. This means your device will not produce any sound for incoming calls and notifications, but it will still vibrate if the vibration settings are enabled.
By utilizing the Ring/Silent switch, you have the flexibility to quickly switch between sound and silent mode, which also affects vibration settings. This can be useful in various scenarios, such as when you’re in a meeting or a quiet environment and want to avoid any audible alerts while still receiving vibration notifications.
It’s important to note that the Ring/Silent switch only controls the vibration behavior when your iPhone is in silent mode. If your iPhone is set to sound mode, the vibration settings you’ve customized in the Settings menu will apply.
Make use of the Ring/Silent switch to easily control the vibration behavior of your iPhone and adapt it to different situations and environments.