
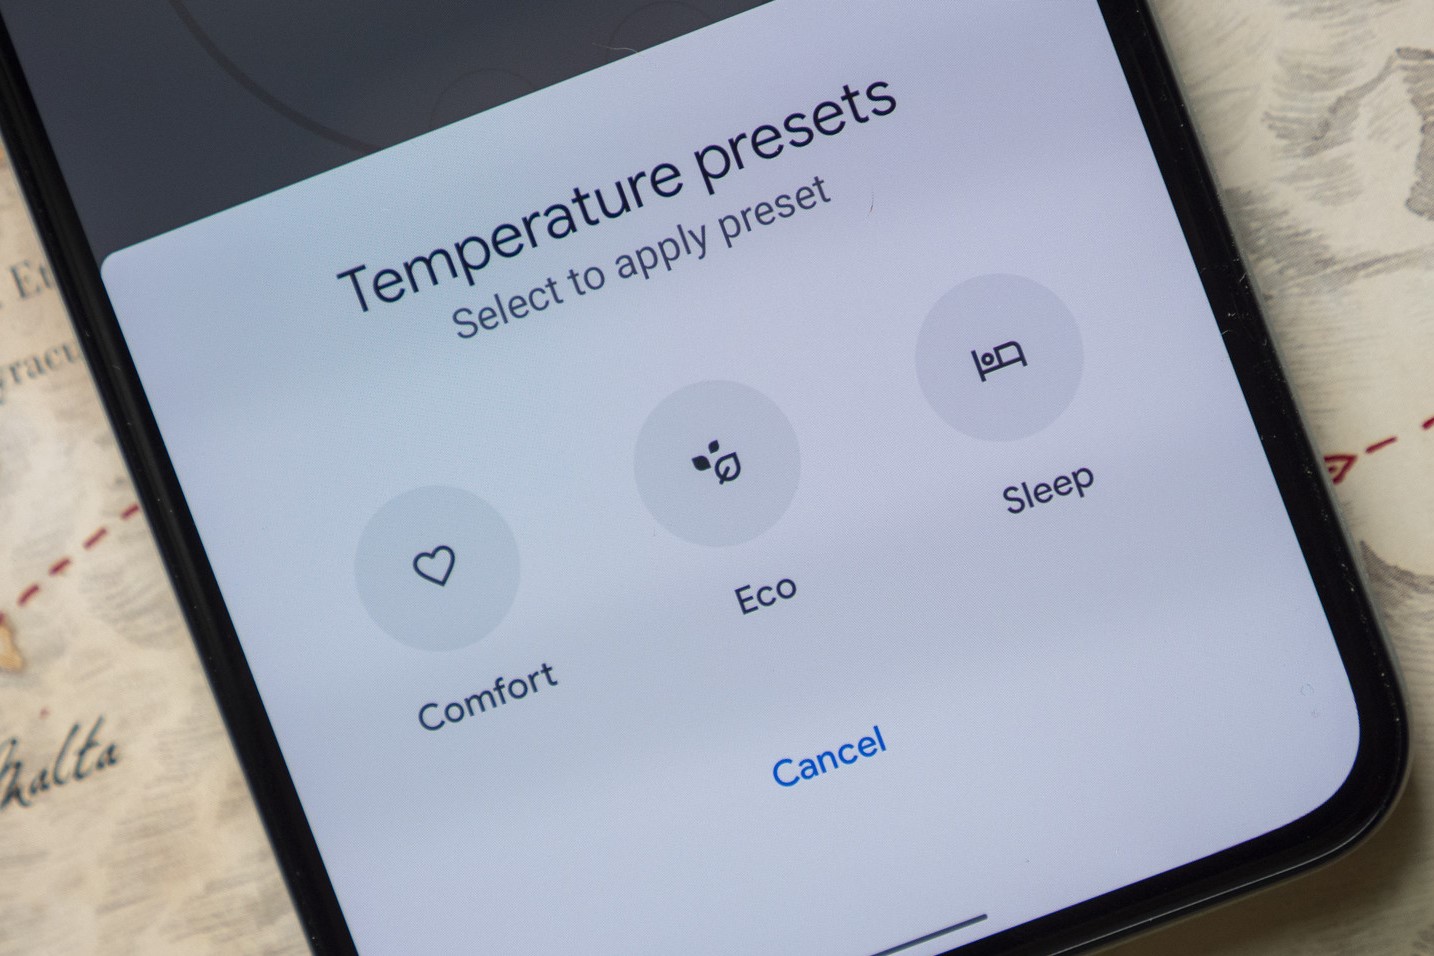
Understanding Nest Thermostat Presets
When it comes to managing the temperature in your home, the Nest Thermostat provides you with a powerful tool called presets. These presets allow you to set specific temperature ranges for different times of the day, creating a customized heating and cooling schedule that fits your lifestyle.
Presets on the Nest Thermostat can be thought of as predefined temperature settings that can be easily accessed and adjusted with just a few taps on the device or through the Nest app on your smartphone. They provide a convenient way to automate and personalize your home’s climate control.
By understanding and utilizing the Nest Thermostat presets effectively, you can ensure optimal comfort and energy efficiency in your home. Whether you want to keep the temperature cooler during the nights or have a specific temperature range for when you’re away from home, presets allow you to achieve your desired settings with ease.
It’s important to note that the Nest Thermostat comes with default presets, including “Home” and “Away”. The “Home” preset is the default setting and is activated when someone is present in the home. The “Away” preset is activated when the home is empty, typically adjusting the temperature to a more energy-efficient level.
However, Nest Thermostat presets are not limited to just these default options. You can customize and create your own presets to suit your specific needs. This flexibility allows you to have different temperature ranges for different times of the day or different days of the week.
Overall, understanding the concept of presets on the Nest Thermostat opens up a world of possibilities for managing your home’s climate control. By harnessing the power of presets, you can create a comfortable and energy-efficient environment tailored to your preferences.
Nest Thermostat Presets Explained
Nest Thermostat presets are preconfigured temperature settings that allow you to easily control the climate in your home. These presets enable you to set specific temperature ranges for different times of the day, creating a customized schedule to suit your lifestyle.
By utilizing presets, you can enjoy the convenience of having your desired temperature automatically set at specific times. For example, you can have the thermostat set to a comfortable temperature in the morning when you wake up, adjust to a slightly cooler setting during the day when you’re at work, and then warm up again in the evening when you return home.
When it comes to preset options, the Nest Thermostat comes with default presets like “Home” and “Away”. The “Home” preset activates when someone is present in the house, maintaining a comfortable temperature. The “Away” preset, on the other hand, is triggered when the system detects that the house is empty and adjusts the temperature to save energy.
Additionally, the Nest Thermostat gives you the flexibility to create your own presets. This feature allows you to customize temperature ranges for specific times of the day or even different days of the week. For example, you might want a cooler temperature at night while you sleep or prefer a warmer setting on the weekends when you’re at home for longer periods.
Presets also work seamlessly with other features of the Nest Thermostat, such as the Home and Away Assist. This feature uses sensors and your smartphone’s location to determine if you’re home or away. By combining the presets with Home and Away Assist, you can ensure that your thermostat adjusts the temperature based on whether you’re in the house or not, saving energy when you’re away.
Overall, Nest Thermostat presets provide you with a user-friendly approach to managing your home’s temperature. By utilizing these presets, you can easily customize and automate your home’s climate control, ensuring comfort and energy efficiency throughout the day.
Accessing and Adjusting Presets on Your Nest Thermostat
Accessing and adjusting presets on your Nest Thermostat is quick and straightforward, allowing you to easily control and customize your home’s temperature settings. Whether you want to change the temperature for a specific preset or create a new one, the Nest Thermostat offers intuitive options to meet your needs.
To access the presets on your Nest Thermostat, start by pressing the thermostat’s display to wake it up. You will then see the current temperature displayed as well as the active preset. By turning the thermostat’s outer ring, you can scroll through the available presets. Once you reach the desired preset, simply press the thermostat’s display to select it.
Once you have selected a preset, you can easily adjust the temperature range associated with it. To do this, rotate the outer ring again until you see the temperature range displayed. From there, simply turn the ring to set the desired temperature range. This allows you to fine-tune the settings to align with your comfort preferences.
If you want to create a new preset on your Nest Thermostat, you can do so through the Nest app on your smartphone. Open the app and navigate to the thermostat settings. From there, you can select “Add a Schedule” or a similar option, depending on the app version. Follow the prompts to set the desired temperature ranges and schedule for the new preset. Once saved, the new preset will be accessible on your Nest Thermostat.
Furthermore, if you need to delete or rename a preset on your Nest Thermostat, it can also be done through the Nest app. Open the app, go to the thermostat settings, and find the presets section. From there, you can select the preset you want to delete or rename and choose the corresponding option. This gives you the flexibility to manage and organize your presets according to your preferences.
By accessing and adjusting presets on your Nest Thermostat, you can effortlessly customize and control your home’s temperature settings. Whether you want to change an existing preset or create a new one, the intuitive interface of the Nest Thermostat ensures a seamless user experience for managing your home’s climate control.
Changing the Temperature Range for a Preset
Modifying the temperature range for a preset on your Nest Thermostat is a simple process that allows you to customize and fine-tune your home’s comfort. Whether you want to make the temperature warmer or cooler for a specific preset, the Nest Thermostat offers intuitive options to adjust the settings according to your preferences.
To change the temperature range for a preset, start by accessing the preset on your Nest Thermostat. Press the thermostat’s display to wake it up, and then rotate the outer ring to scroll through the available presets. Once you have selected the desired preset, press the display to access the temperature range associated with it.
Once you are in the temperature range settings, you can make adjustments by rotating the outer ring. Turning the ring clockwise will increase the temperature, while turning it counterclockwise will decrease the temperature. This allows you to set the temperature range within the desired range of comfort.
For example, if you want a warmer temperature during the morning preset, rotate the ring clockwise to increase the temperature within the preset’s range. Similarly, if you want a cooler temperature during the night preset, rotate the ring counterclockwise to decrease the temperature accordingly.
As you adjust the temperature range for a preset, the Nest Thermostat displays the new range on its screen, giving you real-time feedback. This allows you to make precise changes and ensure that the temperature falls within your desired comfort level.
By changing the temperature range for a preset on your Nest Thermostat, you have full control over customizing your home’s climate according to your preferences. Whether you want to create a cozy environment during the winter months or maintain a cool temperature in the summer, the Nest Thermostat’s easy-to-use interface makes it effortless to modify the temperature settings for each preset.
Creating New Presets on Your Nest Thermostat
Creating new presets on your Nest Thermostat allows you to tailor the temperature settings to your specific needs and routines. Whether you want different temperature ranges for different times of the day or days of the week, the Nest Thermostat offers a straightforward process to create and customize new presets.
To create a new preset, you can use the Nest app on your smartphone. Open the app and navigate to the thermostat settings. Look for an option like “Add a Schedule” or something similar. Selecting this option will prompt you to set the desired temperature ranges and schedule for the new preset.
Start by giving your new preset a name that reflects the temperature settings you intend to apply. For example, you might want to create a preset called “Morning” for a specific temperature range when you wake up. Then, set the desired temperature range for this time period, taking into account your personal comfort preferences.
After setting the temperature range for the initial schedule, you can proceed to customize the preset further. This includes selecting the days of the week you want this preset to be active, the time range when it should apply, and any other specific settings you desire.
Once you have defined all the parameters for the new preset, save the changes. The Nest Thermostat will now recognize and display the new preset in its available options.
Keep in mind that creating new presets allows you to have different temperature settings for various times of the day or days of the week. This flexibility ensures that your home is always comfortable according to your unique schedule and preferences.
Furthermore, the ability to create new presets can also be useful if your routine changes over time. For example, if you start waking up earlier or coming home later, you can easily adjust the presets to align with your updated schedule.
By creating new presets on your Nest Thermostat, you can have complete control over customizing and fine-tuning the temperature settings in your home. This ensures that your home remains comfortable and energy-efficient while accommodating your specific needs and lifestyle.
Deleting or Renaming Presets on Your Nest Thermostat
Managing and organizing presets on your Nest Thermostat includes the ability to delete or rename existing presets. If you no longer need a particular preset, or if you want to give it a different name to better reflect its purpose, the Nest Thermostat offers a straightforward process to make these adjustments.
To delete or rename presets on your Nest Thermostat, you can use the Nest app on your smartphone. Open the app and navigate to the thermostat settings. Look for the section that lists the presets and select the one you want to modify.
If you wish to delete a preset, choose the corresponding option in the app. Confirm the deletion when prompted, and the preset will be removed from your Nest Thermostat. Deleting presets that are no longer needed helps keep your thermostat’s settings organized and clutter-free.
If you prefer to rename a preset, select the rename option in the app. Enter the new name for the preset and save the changes. The Nest Thermostat will now display the updated name for the preset when you access it.
This capability to delete or rename presets is particularly beneficial when your routine changes or if you want to make adjustments to better suit your needs. Whether you decide to merge multiple presets into one or create new presets altogether, the flexibility to modify and organize your presets enhances the efficiency and customization of your Nest Thermostat.
By taking advantage of the option to delete or rename presets, you can ensure that your Nest Thermostat reflects your current preferences and routines. Rather than being confined to preset options that no longer fit your lifestyle, you can fully customize and customize your thermostat’s settings to align with your ever-evolving needs.
Overall, the ability to delete or rename presets on your Nest Thermostat gives you the freedom to manage and organize your temperature settings effectively. Whether you need to clean up unused presets or revise them to better suit your requirements, this feature allows you to maintain a streamlined and personalized climate control experience in your home.
Adjusting the Schedule for Presets
The Nest Thermostat offers the flexibility to adjust the schedule for presets, allowing you to customize the temperature settings according to your daily routines and preferences. Whether you want to change the timeframes during which a preset is active or create a unique schedule for a specific preset, the Nest Thermostat makes it easy to tailor the climate control of your home.
To adjust the schedule for presets on your Nest Thermostat, you can use the Nest app on your smartphone. Open the app and navigate to the thermostat settings. Look for options like “Edit Schedule” or “Modify Preset Schedule” to access the schedule settings.
Once you have accessed the schedule settings, you can make modifications to the timeframes during which a preset is active. This includes adjusting the start and end times, as well as the days of the week on which the preset should apply. For example, you can set a preset to activate only on weekdays or to have different timeframes on weekends.
If you want to add additional timeframes for a preset, such as having different temperature ranges in the morning and the evening, you can do so by creating multiple segments within the preset’s schedule. This allows you to have more precise control over the temperature settings throughout the day.
Furthermore, if you need to change the active days of the week or remove specific days for a preset, you can easily do so in the schedule settings. This flexibility ensures that the presets on your Nest Thermostat can adapt to your changing schedule and accommodate any variations in your routine.
By adjusting the schedule for presets, you can ensure that your home remains comfortable and energy-efficient according to your unique needs. Whether you want warmer temperatures in the morning or cooler temperatures at night, the Nest Thermostat allows you to customize the schedule for each preset, providing enhanced control over your home’s climate control.
It’s important to note that adjustments made to the schedule for presets on the Nest app will reflect on your Nest Thermostat automatically. This seamless synchronization ensures that your desired temperature settings are in effect at the specified times.
Using the Home and Away Feature with Presets
The Nest Thermostat offers a powerful feature known as Home and Away Assist, which can be used in conjunction with presets to maximize energy efficiency and ensure optimal comfort in your home. By detecting when you are at home or away, this feature automatically adjusts the temperature settings based on your preset preferences.
When the Home and Away Assist feature is enabled, the Nest Thermostat uses various sensors and algorithms to determine if you are present in the house or if it is empty. It takes into account factors such as motion, location data from your smartphone, and the presence of other Nest devices in your home.
When the system detects that you are away, it will activate the “Away” preset, which typically sets the temperature to a more energy-efficient level. This helps to conserve energy and reduce unnecessary heating or cooling while you are not at home.
Conversely, when the Home and Away Assist feature detects that you are back home, it switches to the “Home” preset, which adjusts the temperature to a comfortable range according to your preferences. This ensures that your home is cozy and welcoming when you return.
The integration of Home and Away Assist with presets on the Nest Thermostat provides a seamless and automated approach to climate control. It eliminates the need for manual adjustments every time you leave or enter your home, allowing you to enjoy consistent comfort and energy savings without needing to worry about thermostat settings.
In addition to the automatic switching between presets, you can also choose to manually override the Home and Away settings. This can be done through the Nest app on your smartphone or directly on the Nest Thermostat itself. By manually adjusting the Home and Away settings, you have full control over the temperature settings regardless of your presence or absence.
Using the Home and Away feature with presets on your Nest Thermostat offers a convenient and efficient way to manage your home’s climate control. By leveraging the power of detection algorithms and customizable presets, you can enjoy optimal comfort and energy savings without the hassle of constant manual adjustments.
It is worth noting that the accuracy of the Home and Away Assist feature depends on various factors, such as the reliability of your smartphone’s location services and the placement of your Nest Thermostat and other Nest devices. Regularly checking and adjusting the sensitivity settings of the Home and Away Assist feature will help ensure its effectiveness in accurately detecting your presence.
Troubleshooting Nest Thermostat Presets
While Nest Thermostat presets are designed to provide a seamless and user-friendly experience, there may be instances where you encounter issues or need to troubleshoot certain issues related to presets. Here are some common troubleshooting steps you can follow to resolve any problems you may encounter:
1. Verify preset settings: Double-check the temperature ranges and schedule for each preset to ensure they are set correctly. Make sure the presets are active and enabled according to your desired preferences.
2. Check for software updates: Ensure that your Nest Thermostat and the Nest app on your smartphone are running the latest software versions. Keeping your devices up to date can help resolve any software-related issues and ensure compatibility with the presets feature.
3. Restart your Nest Thermostat: Try restarting your thermostat by going to the device settings or by turning off the power to your thermostat for a few seconds and then turning it back on. This can sometimes resolve minor software glitches that may be affecting the presets.
4. Reset and reconfigure presets: If you continue to experience issues with presets, you can try resetting them. This involves deleting the existing presets and recreating them from scratch. Remember to note down the desired temperature ranges and schedule before resetting.
5. Check sensor placement: Ensure that the sensors in your Nest Thermostat are correctly placed and not obstructed. Blocked or improperly positioned sensors can affect the accuracy of temperature readings and potentially impact the functionality of presets.
6. Troubleshoot connectivity: If you have issues with presets not syncing or updating, check your internet connectivity and ensure that your thermostat is connected to your home’s Wi-Fi network. A stable connection is essential for the proper functioning of presets.
7. Contact customer support: If the troubleshooting steps above do not resolve the issues with presets, reach out to the Nest customer support team for assistance. They can provide further guidance and help diagnose any potential hardware or software problems that may be affecting the presets.
It’s important to remember that troubleshooting measures may vary depending on your specific circumstances and the nature of the issue you encounter. Refer to the official Nest Thermostat documentation and support resources for detailed troubleshooting instructions tailored to your device.
By following these troubleshooting steps and seeking assistance when needed, you can ensure that your Nest Thermostat presets function smoothly, allowing you to enjoy personalized and automated climate control in your home.