
Why Backing Up the Windows Registry is Important
Backing up the Windows Registry is a crucial task that every computer user should prioritize. The Windows Registry is a centralized database that stores important configuration settings and options for the Windows operating system and installed applications. It contains information about hardware devices, software preferences, user settings, and much more.
Accidental changes to the Registry, such as incorrect modifications or deletions of key entries, can have drastic consequences for the stability and performance of your computer. In some cases, a single wrong edit can render your system unbootable or cause applications to malfunction. This is why having a backup of the Registry is essential – it allows you to restore the Registry to its previous state and undo any unwanted changes.
Another reason why backing up the Registry is important is in the event of a system crash or hardware failure. If your computer experiences a catastrophic failure or becomes unbootable, having a recent backup of the Registry enables you to restore your system to a functional state without losing important settings or configurations.
Moreover, regular Registry backups can be a lifesaver when it comes to troubleshooting issues or resolving conflicts caused by software installations or updates. If you encounter problems after installing a new application or updating an existing one, you can easily revert to a previous backup and eliminate any potential conflicts that may have arisen.
Additionally, if you plan on making advanced system tweaks or experimenting with Registry modifications, having a backup is crucial. It provides a safety net, allowing you to experiment freely without the fear of irreversibly damaging your system. If something goes awry, you can simply restore the backup and start over.
Overall, backing up the Windows Registry is a proactive measure that ensures the stability, performance, and security of your computer system. It provides peace of mind knowing that you have a safeguard in place to protect against accidental changes, system crashes, and troubleshooting headaches. Now that we understand the importance of Registry backups, let’s explore different methods of creating these backups.
Method 1: Using the Registry Editor
The Registry Editor is a built-in Windows tool that allows users to view and modify the contents of the Windows Registry. It can also be used to create backups of specific Registry keys or the entire Registry. Here’s how you can use the Registry Editor to back up the Windows Registry:
Step 1: Open the Registry Editor
To open the Registry Editor, press the Windows key + R to open the Run dialog box. Type “regedit” (without quotes) and press Enter. This will launch the Registry Editor.
Step 2: Select the Registry Key to Backup
In the Registry Editor, navigate to the key that you want to back up. You can expand the folders on the left pane to browse through the different branches of the Registry. Select the key you want to back up.
Step 3: Export the Registry Key
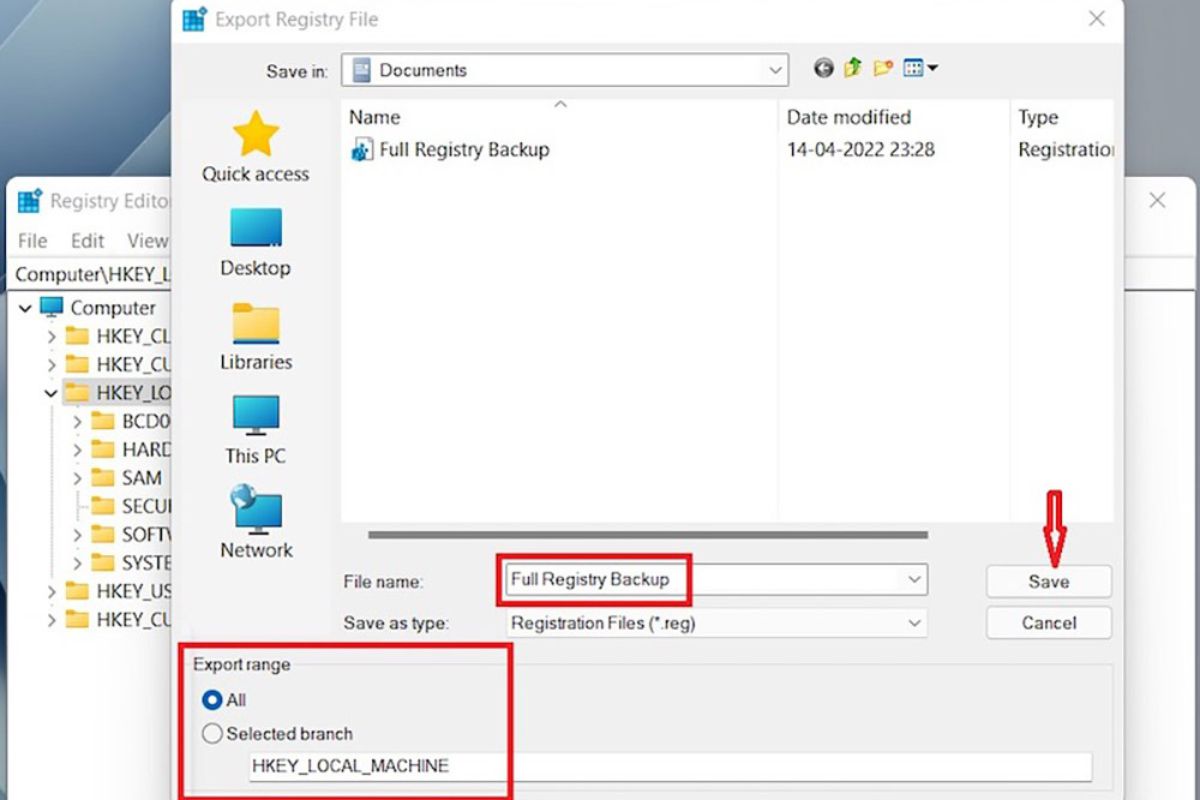
With the desired key selected, click on “File” in the top menu and then choose “Export.” In the “Export Registry File” dialog box, choose the location where you want to save the backup and provide a name for the backup file. Ensure that the “Selected branch” option is selected under the “Export range” section, and then click “Save” to create the backup.
It’s important to note that exporting individual keys in the Registry Editor will only create backups of those specific keys. If you need to back up the entire Registry, you will need to export the top-level key, which is typically named “Computer” or “HKEY_LOCAL_MACHINE”.
By using the Registry Editor, you can create backups of important Registry keys, ensuring that you have a restore point in case of any unforeseen issues or changes. It’s a reliable method, especially for advanced users who have a good understanding of the Registry structure. However, for those who prefer a more automated approach, there are alternative methods available, which we will explore in the subsequent sections.
Step 1: Open the Registry Editor
To begin the process of backing up the Windows Registry using the Registry Editor, you need to open the application. The Registry Editor is a powerful tool that provides access to the Windows Registry and allows you to view, modify, and backup its contents.
Here’s how you can open the Registry Editor:
Method 1: Using the Run Dialog Box
Press the Windows key + R on your keyboard to open the Run dialog box. In the Open field, type “regedit” (without the quotes) and hit Enter. This will launch the Registry Editor.
Method 2: Using the Start Menu Search
Click on the Start button or press the Windows key, and type “Registry Editor” in the search bar. The Registry Editor should appear as a result. Click on it to open the application.
Method 3: Using Command Prompt
If you prefer using the Command Prompt to open applications, you can open it by pressing the Windows key + R, typing “cmd” (without the quotes), and hitting Enter. In the Command Prompt window, type “regedit” and press Enter. The Registry Editor will open.
Once you have successfully opened the Registry Editor, you will see a window with a tree-like structure on the left side. This structure represents the different Registry hives and keys. You can navigate through the Registry by expanding the folders and subfolders.
It’s important to note that the Registry Editor is a powerful tool that should be used with caution. Making incorrect changes or deleting the wrong entries can cause serious issues with your system. Before making any modifications or backing up the Registry, it’s advisable to create a system restore point or backup your data.
Now that you have opened the Registry Editor, you are ready to proceed to the next step of the backup process. We will guide you through selecting the Registry key to backup in the next section.
Step 2: Select the Registry Key to Backup
After opening the Registry Editor, the next step in backing up the Windows Registry is to select the specific Registry key that you want to back up. The Registry is organized into a hierarchical structure, with keys and subkeys representing various settings, configurations, and options.
Follow these steps to select the Registry key that you wish to back up:
1. Navigate through the Registry
In the Registry Editor window, you will see a tree-like structure on the left side, which represents the Registry hives and keys. Expand the folders and subfolders to navigate to the desired key. The keys are organized into sections such as HKEY_CLASSES_ROOT, HKEY_CURRENT_USER, HKEY_LOCAL_MACHINE, HKEY_USERS, and HKEY_CURRENT_CONFIG.
2. Select the key to backup
Click on the key that you want to back up. This will highlight the key in the Registry Editor, making it the active key for backup.
If you want to back up an entire section of the Registry, such as HKEY_LOCAL_MACHINE or HKEY_CURRENT_USER, simply select the top-level key of that section.
It’s essential to be cautious when selecting the Registry key for backup. Choosing the wrong key can result in the backup not including all the desired settings and configurations, or it may include unnecessary entries that can lead to complications during the restore process.
Before proceeding to the next step, ensure that you have selected the correct key that contains the specific settings you want to back up. Double-checking this step will help ensure a reliable and accurate backup of your Registry.
Now that you have selected the Registry key to back up, you are ready to proceed to the next step: exporting the Registry key to create the backup. This process will be covered in detail in the following section.
Step 3: Export the Registry Key
Once you have selected the Registry key that you want to back up, the next step is to export it using the Registry Editor. Exporting a Registry key creates a backup file that contains all the values, subkeys, and settings associated with that key.
Follow these steps to export the Registry key:
1. Right-click the selected key
In the Registry Editor window, right-click on the selected key that you want to back up. This will open a context menu with various options.
2. Choose “Export”
In the context menu, click on the “Export” option. This will open the “Export Registry File” dialog box.
3. Specify the file name and location
In the “Export Registry File” dialog box, choose the location where you want to save the backup file. It’s recommended to save the backup to a location on your computer where it is easily accessible and can be easily identified.
Provide a name for the backup file. It’s advisable to use a descriptive name that reflects the specific key or settings being backed up.
4. Select the export range
In the “Export Registry File” dialog box, ensure that the selected key is displayed in the “Export range” section. This ensures that only the selected key and its subkeys will be included in the backup file. It’s essential to review this option carefully to ensure that you don’t inadvertently include or exclude any unintended Registry entries.
5. Click “Save”
Once you have specified the file name, location, and export range, click on the “Save” button to create the backup of the selected Registry key.
The Registry Editor will create a backup file with a .reg extension at the specified location. This backup file contains all the information necessary to restore the selected Registry key if needed.
It is crucial to keep the backup file in a secure location that is separate from your system’s main drive. This ensures that you can easily access the backup file even if your computer encounters issues or needs a fresh installation of the operating system.
By following these steps and exporting the selected Registry key, you have successfully created a backup of the Windows Registry using the Registry Editor. This backup can now be used to restore the Registry in case of any issues or changes that may impact system stability or application functionality.
Method 2: Using System Restore
System Restore is a built-in feature in the Windows operating system that allows you to revert your computer’s state to a previous point in time. It creates restore points, which are snapshots of your system’s settings, configurations, and files. Using System Restore, you can restore the Windows Registry and other system files to a known working state. Here’s how to use System Restore to back up the Windows Registry:
Step 1: Open System Restore
To open System Restore, press the Windows key + R on your keyboard to open the Run dialog box. Type “rstrui” (without quotes) and press Enter. This will launch the System Restore window.
Step 2: Create a Restore Point
In the System Restore window, click on the “Create a restore point” option and click “Next.” This will open the System Protection tab in the System Properties window.
On the System Protection tab, click on the “Create” button. You will be prompted to provide a description for the restore point. Enter a descriptive name that will help you identify this specific backup. Click “Create” to create the restore point. This will include a backup of the Windows Registry along with other system files.
It’s important to note that the availability and functionality of System Restore may vary depending on your version of Windows. Some editions or configurations may have System Restore disabled or have different options for creating and using restore points. Ensure that System Restore is enabled on your system and consult your operating system documentation for specific instructions.
System Restore provides an effective way to back up the Windows Registry and other system files. It allows you to revert your system back to a previous state without affecting personal files or data. It’s important to regularly create restore points, especially before making significant changes to your system, such as installing new applications or modifying critical settings.
Though System Restore is a valuable tool, it’s worth mentioning that it has its limitations. It may not be able to undo certain types of changes or resolve problems caused by malware infections or hardware failures. In these cases, having additional methods for backing up the Windows Registry, such as using the Registry Editor or third-party software, can provide a more comprehensive backup solution.
Now that you know how to use System Restore to create a backup of the Windows Registry, you can proceed to explore other methods for registry backup, which will be covered in the following sections.
Step 1: Open System Restore
To begin the process of using System Restore to back up the Windows Registry, you first need to open the System Restore utility. System Restore is a built-in feature in the Windows operating system that allows you to restore your computer’s settings to a previous point in time.
Here’s how you can open the System Restore utility:
Method 1: Using the Run Dialog Box
Press the Windows key + R on your keyboard to open the Run dialog box. In the Open field, type “rstrui” (without the quotes) and hit Enter. This will launch the System Restore utility.
Method 2: Using Control Panel
Click on the Start button or press the Windows key, and type “Control Panel” in the search bar. Open the Control Panel from the search results. In the Control Panel window, navigate to “System and Security” and click on “System.” On the left side, click on “System Protection,” and then click on the “System Restore” button. This will open the System Restore utility.
Method 3: Using the Start Menu Search
Click on the Start button or press the Windows key and directly type “System Restore” in the search bar. The System Restore utility should appear as a result. Click on it to open the application.
Once you have successfully opened the System Restore utility, you will see a window with options to create a restore point, restore your computer to a previous state, or undo a previous restoration.
Note that System Restore should be enabled on your computer for this method to work. It is generally enabled by default, but it’s advisable to check if it’s enabled and create restore points regularly to ensure you have recent backups of your system.
Now that you have opened the System Restore utility, you are ready to proceed to the next step: creating a restore point to back up the Windows Registry. We will guide you through this process in the following section.
Step 2: Create a Restore Point
After opening the System Restore utility, the next step in using System Restore to back up the Windows Registry is to create a restore point. A restore point is a snapshot of your computer’s settings, configurations, and system files at a specific point in time. By creating a restore point, you ensure that you have a reference point to revert your system back to if needed.
Follow these steps to create a restore point:
1. Open the Create a Restore Point option
In the System Restore utility window, click on the “Create a restore point” option and click “Next.” This will open the System Protection tab in the System Properties window.
2. Create the restore point
On the System Protection tab, click on the “Create” button. A new window will appear, prompting you to provide a name for the restore point. Enter a descriptive name that will help you identify this specific backup.
It’s recommended to use a name that reflects the date and purpose of the restore point. For example, you can include the current date and a brief description such as “Registry backup before software installation.” This will help you easily identify the restore point when needed.
3. Click “Create” to create the restore point
After entering a descriptive name for the restore point, click on the “Create” button to initiate the creation process. The system will begin capturing a snapshot of your system’s settings, configurations, and system files.
The time required to create the restore point may vary depending on the speed of your computer and the amount of data being processed. It’s important to be patient and allow the process to complete without interruption.
Once the restore point creation process is complete, you will receive a confirmation message. The restore point is now created and can be used to restore your system to its state at the time of the backup.
It’s important to regularly create restore points, especially before making significant changes to your system, such as installing new software or modifying critical settings. This ensures that you have recent backups to revert to in case of any issues or unforeseen consequences.
Now that you have created a restore point using System Restore, you have successfully backed up the Windows Registry. Should the need arise to restore your system to its previous state, you can rely on this restore point to roll back any changes made to the Registry.
Method 3: Using Third-Party Software
In addition to the built-in options provided by Windows, there are various third-party software solutions available that offer more advanced and automated methods for backing up the Windows Registry. These tools provide additional features, such as scheduled backups, incremental backups, and more. Here’s how you can use third-party software to back up the Windows Registry:
Step 1: Choose a Trustworthy Registry Backup Software
Research and select a reputable third-party software tool specifically designed for backing up the Windows Registry. Look for software that has positive user reviews, good ratings, and a track record of reliability and performance. Ensure that the software is compatible with your version of Windows.
Step 2: Install and Run the Software
Download the chosen registry backup software from the official website or a trusted software repository. Follow the installation instructions to install the software on your computer. Once installed, launch the software.
Step 3: Backup the Registry
Using the software’s interface, locate the backup or backup creation option. The exact steps may vary depending on the software you have chosen, but generally, it will involve selecting the desired Registry keys or configurations you want to back up and specifying the location where the backup file should be saved.
Some software tools may offer additional options, such as scheduling automated backups, setting incremental backups, or integrating with cloud storage services. Explore the software’s features to utilize any functionality that suits your needs.
It’s important to carefully follow the instructions provided by the third-party software to ensure a successful backup of the Windows Registry. Pay attention to any prompts or warnings during the backup process to avoid any data loss or system instability.
Regularly using third-party software for backing up the Windows Registry can provide an efficient and streamlined process. These tools often offer advanced features and options that can save time and effort in creating and managing Registry backups.
Remember to keep the backup files created by third-party software in a safe location that is separate from your system’s main drive. This will ensure that you can easily access the backup files even if your computer encounters issues or requires a fresh installation of the operating system.
Now that you are familiar with using third-party software to back up the Windows Registry, you can explore different software options available to find the one that best suits your needs and preferences.
Step 1: Choose a Trustworthy Registry Backup Software
When it comes to backing up the Windows Registry using third-party software, the first and most important step is to choose a trustworthy and reliable backup software. With a plethora of options available, it’s crucial to select a software tool that not only meets your requirements but also ensures the safety and integrity of your Registry backups.
Here are some factors to consider when choosing a trustworthy Registry backup software:
Research and Read Reviews
Take the time to research different software options and read reviews from reputable sources. Look for software that has received positive feedback, good ratings, and recommendations from users who have used it for Registry backups. Online forums, technology websites, and software review platforms can provide valuable insights and opinions.
Check Compatibility
Make sure that the software you choose is compatible with your version of Windows. Check the software’s system requirements to ensure it will work smoothly on your operating system. Compatibility issues can lead to errors or malfunctions during backup processes, so it’s crucial to verify compatibility before proceeding.
Consider Reputation and Reliability
Choose a software tool from a reputable and well-established developer. Companies with a longstanding presence in the market tend to have more experience, a solid track record, and a commitment to providing reliable backup solutions. By selecting software from trusted developers, you can have confidence in the quality and performance of the product.
Evaluate Features and Functionality
Consider the features and functionality offered by the backup software. Look for features such as selective key backup, automated scheduled backups, incremental backups, and the ability to restore individual keys or the entire Registry. Assess whether the software provides the level of functionality and customization you require for your Registry backup needs.
Trial Versions and Customer Support
Many backup software tools offer trial versions that allow you to test their functionality and user experience before committing to a purchase. Take advantage of these trial versions to get a hands-on feel for the software and ensure it meets your expectations. Additionally, ensure that the software’s developer offers reliable customer support channels in case you encounter any issues or have questions during the backup process.
By following these guidelines and carefully selecting a trustworthy Registry backup software, you can have peace of mind knowing that your Registry backups are secure, reliable, and readily available whenever you need them. Take the time to compare and evaluate different software options to find the one that best fits your requirements and preferences.
Step 2: Install and Run the Software
Once you have selected a trustworthy Registry backup software, the next step is to install the software on your computer and run it. Installing and running the software will give you access to its features and allow you to initiate the Registry backup process. Here’s how to install and run the software:
1. Download the software
Visit the official website of the software developer or a trusted software repository to download the installation file for the backup software. Ensure that you are downloading the correct version that is compatible with your operating system.
2. Run the installation file
Locate the downloaded installation file on your computer and double-click on it to run the installer. Follow the on-screen instructions provided by the software’s setup wizard to proceed with the installation process.
3. Review and accept the License Agreement
During the installation process, you may be presented with a License Agreement or Terms of Service. Read through these documents carefully and ensure that you understand all the terms and conditions. If you agree to the terms, select the checkbox or click the “Agree” button to proceed.
4. Choose the installation location and options
At some point during the installation process, you may be prompted to choose the installation location and select any additional options or features offered by the software. Review the available options and make your selections based on your preferences and requirements. Click “Next” or “Install” to proceed.
5. Wait for the installation to complete
Once you have made your selections, the software will begin installing onto your computer. Wait for the installation process to complete, which may take a few moments depending on the software and the performance of your computer.
6. Launch the software
After the installation is complete, you may have the option to launch the software immediately. If not, you can locate the installed software either in your Start Menu, on your desktop, or in the installation directory. Double-click on the software’s icon to run it.
7. Explore the software interface
Once the software is launched, take a few moments to explore its interface and familiarize yourself with the available features and options. Pay attention to any tutorials or guides provided by the software to maximize your understanding of its functionality.
Now that you have successfully installed and launched the backup software, you’re ready to proceed to the next step: backing up the Windows Registry. The software’s interface should provide clear instructions and options for initiating the backup process. Follow the software’s guidelines and proceed with confidence knowing that your Registry backup is in progress.
Step 3: Backup the Registry
With the Registry backup software installed and launched, you are now ready to proceed with backing up the Windows Registry. The software’s interface will provide intuitive options and features to facilitate the backup process. Follow these steps to backup the Registry:
1. Select the desired Registry keys
Using the software’s interface, locate the option to select the specific Registry keys or configurations you want to back up. You may be able to choose individual keys or entire Registry sections, depending on the software’s capabilities. Consider selecting keys that are critical for your system’s stability or contain personal configurations you want to ensure safekeeping.
2. Specify the backup location
Choose the location where you want the Registry backup files to be saved. Ideally, select a location that is separate from your system’s main drive to ensure they are protected in the event of a system failure or data loss. Storage devices such as external hard drives, network drives, or cloud storage services can be suitable options for storing your backup files.
3. Configure additional backup settings (if available)
Explore any additional settings or options provided by the backup software. This may include scheduling automated backups, setting incremental backups, encrypting the backup files for added security, or integrating with cloud storage services for seamless backup management. Adjust these settings according to your preferences and requirements.
4. Initiate the backup process
Once you have selected the desired Registry keys, specified the backup location, and configured any additional settings, it’s time to initiate the backup process. Locate the backup or start button provided by the software and click on it to begin the backup. The software will now start creating a backup of the selected Registry keys and save them to the specified location.
5. Monitor the backup progress
Depending on the size of the Registry keys and the performance of your computer, the backup process may take some time to complete. Keep an eye on the software’s interface to monitor the progress of the backup. Some software tools provide progress bars, status updates, or notifications to keep you informed about the backup’s status. Ensure that the backup process completes successfully before proceeding.
6. Verify and review the backup files
Once the backup process is complete, navigate to the specified backup location to verify and review the backup files. Check that the backup files are present and ensure they are accessible and intact. Take note of the backup file names, timestamps, and any additional information provided by the software for future reference.
By following these steps, you have successfully backed up the Windows Registry using third-party software. Regularly repeat this process to ensure that your Registry backups are up to date, especially before making significant changes to your system. Having comprehensive and recent Registry backups will give you peace of mind and provide an effective way to restore your Registry if needed.
Method 4: Using Command Prompt
Using Command Prompt, a powerful built-in command-line tool in Windows, provides an alternative method for backing up the Windows Registry. This method allows you to create backups using the “reg export” command. Here’s how you can use Command Prompt to back up the Windows Registry:
Step 1: Open Command Prompt
To open Command Prompt, press the Windows key + R on your keyboard to open the Run dialog box. Type “cmd” (without the quotes) and hit Enter. This will launch the Command Prompt window.
Step 2: Use the “reg export” Command
In the Command Prompt window, type the following command to export a specific Registry key:
reg export [key_path] [file_path]
Replace [key_path] with the path to the Registry key you want to back up. For example, if you want to back up the HKEY_CURRENT_USER\Software key, you would enter:
reg export HKEY_CURRENT_USER\Software C:\Backup\RegistryBackup.reg
Replace [file_path] with the location and name for the backup file. In the example above, the backup file will be saved as “RegistryBackup.reg” in the “C:\Backup” directory.
Step 3: Specify the File Path for the Backup
After entering the command, press Enter to execute it. Command Prompt will export the specified Registry key and save it as a backup file in the location you specified. The backup file will have a .reg extension.
Using Command Prompt to back up the Windows Registry provides a quick and straightforward option for creating backups. Note that this method backs up individual keys rather than the entire Registry. Multiple “reg export” commands can be used to back up different Registry keys.
It’s essential to remember that Command Prompt is a powerful tool, and making incorrect modifications or using incorrect commands can have serious consequences for your system. Be cautious while using Command Prompt and double-check your commands before executing them.
Now that you are familiar with using Command Prompt to back up the Windows Registry, you can proceed to back up the desired Registry keys using this method. Having these backups will prove valuable in case of any unforeseen issues or the need for restoring specific Registry settings.
Step 1: Open Command Prompt
Command Prompt is a powerful command-line tool in Windows that allows you to interact with your computer through text-based commands. To start the process of backing up the Windows Registry using Command Prompt, you need to open the application. Follow these steps to open Command Prompt:
Method 1: Using the Run Dialog Box
Press the Windows key + R on your keyboard to open the Run dialog box. In the Open field, type “cmd” (without the quotes) and hit Enter. This will launch the Command Prompt window.
Method 2: Using the Start Menu Search
Click on the Start button or press the Windows key, and type “cmd” in the search bar. Command Prompt should appear as a result. Click on it to open the application.
Method 3: Using the Power User Menu
Press the Windows key + X on your keyboard to open the Power User Menu. From the list of options, select “Command Prompt” or “Command Prompt (Admin)” to open Command Prompt as a regular user or with administrative privileges, respectively.
Once you have successfully opened Command Prompt, you will see a black window with a blinking cursor. This is where you can enter various commands to interact with your computer’s settings and execute system tasks.
It’s important to note that Command Prompt is a powerful tool, and executing incorrect commands can have serious consequences for your system. Before executing any command, ensure that you understand its purpose and double-check the syntax to avoid any unintended modifications or deletions.
Now that you have opened Command Prompt, you are ready to proceed to the next steps, which involve using the “reg export” command to back up specific Registry keys. Following these steps carefully will allow you to create backups of your Windows Registry using Command Prompt.
Step 2: Use the “reg export” Command
After opening Command Prompt, you can proceed to use the “reg export” command to back up specific Registry keys. The “reg export” command allows you to export the contents of a Registry key and save it as a backup file. Follow these steps to use the “reg export” command:
1. Determine the Registry key to back up
Identify the Registry key that you want to back up. You can determine the key path by navigating through the Registry using the Registry Editor or by referring to documentation or online resources.
2. Open Command Prompt
If you haven’t already opened Command Prompt, follow the previous steps outlined in Step 1 to open the application.
3. Enter the “reg export” command
In the Command Prompt window, type the following command to export the desired Registry key:
reg export [key_path] [file_path]
Replace [key_path] with the path to the Registry key you want to back up. For example, if you want to back up the HKEY_CURRENT_USER\Software key, you would enter:
reg export HKEY_CURRENT_USER\Software C:\Backup\RegistryBackup.reg
Replace [file_path] with the desired location and name for the backup file. In the above example, the backup file will be saved as “RegistryBackup.reg” in the “C:\Backup” directory. Make sure the directory exists, or specify a different location.
4. Execute the command
Press Enter on your keyboard to execute the command. Command Prompt will process the command and generate a backup file of the specified Registry key with the .reg file extension.
5. Verify the backup file
After the command completes, navigate to the location specified in [file_path] to verify the backup file. Check that the file exists and that it contains the data from the selected Registry key.
By following these steps, you can use the “reg export” command in Command Prompt to back up specific Registry keys. It’s important to note that each execution of the command will create a separate backup file, so ensure that you name and store the backup files appropriately for future use.
Remember to exercise caution when working with the Windows Registry and Command Prompt. Incorrect modifications or deletions of Registry keys can have serious implications for your system’s stability and functionality. Always double-check the command syntax and be mindful of the potential impact before executing any command.
Now that you have successfully used the “reg export” command, you have created a backup of a specific Registry key using Command Prompt. Repeat these steps for other Registry keys or explore alternative methods of backing up the Windows Registry for a comprehensive backup strategy.
Step 3: Specify the File Path for the Backup
After using the “reg export” command in Command Prompt to initiate the backup process, the next step is to specify the file path where you want to save the backup file of the Registry key. By specifying the file path, you can ensure that the backup is saved in a location that is easily accessible and organized. Follow these steps to specify the file path for the backup:
1. Determine the desired location
Decide where you want to store the backup file. It’s recommended to choose a location on a separate drive or external storage device to safeguard the backup from any potential issues on your system’s main drive. Additionally, consider using a specific folder designated for Registry backups to keep them organized.
2. Choose a file name
Select a name for the backup file that reflects the contents or purpose of the backup. Using a descriptive and relevant file name will make it easier to identify and locate the backup file in the future. Ensure that the file name includes the .reg file extension, which indicates that it contains Registry data.
3. Specify the complete file path
In Command Prompt, when specifying the file path for the backup, include both the location and the file name in the command. Ensure that you use the correct syntax to represent the file path. For example, if you want to save the backup file as “RegistryBackup.reg” in the “C:\Backup” directory, your specified file path would be:
C:\Backup\RegistryBackup.reg
Make sure to adjust the file path in the command according to your desired location and file name.
4. Press Enter to execute the command
Once you have specified the complete file path, press Enter on your keyboard to execute the command in Command Prompt. The backup file will be saved in the specified location with the provided file name and the .reg file extension.
5. Verify the backup file
After the command completes, navigate to the specified backup location and verify that the backup file exists. Check that the backup file’s name matches the name you specified and that it has the .reg extension. Opening the file using a text editor will allow you to confirm that it contains the backup of the intended Registry key.
By following these steps and specifying the file path for the backup in Command Prompt, you have successfully determined where the backup file of the Registry key will be saved. Remember to choose a secure and easily accessible location while providing a descriptive name for better organization and future reference.
Now that you have specified the file path for the backup, ensure that the backup is stored in a safe location and consider creating additional backups of other Registry keys or exploring alternative methods for a comprehensive backup strategy.
Tips for a Successful Registry Backup
When it comes to backing up the Windows Registry, it’s important to follow certain tips and best practices to ensure a successful and reliable backup. These tips will help you safeguard your Registry data and make it easier to restore in case of any issues or changes. Here are some tips to consider:
1. Determine the critical Registry keys:
Identify the Registry keys that are critical for your system’s stability and functionality. These may include keys related to device drivers, system configurations, or software settings. Prioritize backing up these keys to ensure you have the most important data protected.
2. Regularly update your backups:
Make it a habit to update your Registry backups regularly. As you make changes to your system or install new software, create new backups to capture the latest settings and configurations. This will ensure that you have up-to-date backups that reflect the current state of your Registry.
3. Store backups in a secure location:
Choose a secure location to store your Registry backups. Consider using external storage devices, cloud storage services, or other secure backup solutions. This will protect your backups from hardware failures, system crashes, or other unforeseen events that may impact your computer.
4. Test the restore process:
Periodically test the restore process using one of your backup files. This will help ensure that your backups are valid and that you can comfortably restore your Registry when needed. By testing the restore process, you can identify any potential issues or errors before relying on the backup in a real-time scenario.
5. Document important changes:
Keep a record of any significant changes or modifications you make to the Registry. This will provide an additional layer of documentation and help you track the changes you have made over time. Having this documentation can assist in troubleshooting and restore efforts, allowing you to reapply specific changes if necessary.
6. Use multiple backup methods:
Diversify your backup methods by using a combination of built-in tools, third-party software, or Command Prompt. This ensures redundancy and increases the chances of a successful backup. Additionally, different methods may provide specific features or options that better suit your backup requirements.
7. Keep your system up to date:
Regularly update your operating system and installed software to maintain system stability and security. Keeping your system up to date reduces the likelihood of issues that require restoring the Registry from backup. Updates often include bug fixes, patches, and enhancements that can prevent problems that might affect Registry integrity.
8. Exercise caution when making Registry changes:
Be cautious when making changes to the Registry. Incorrect modifications or deletions of Registry keys may have severe consequences for your system. Before making any changes, it’s advisable to back up the specific key or section of the Registry you intend to modify. This way, you can revert to the backup if needed.
By following these tips, you can ensure a successful and reliable backup of your Windows Registry. Taking the time to implement these practices will help protect your Registry data and provide peace of mind knowing that you have a backup plan in place.