
Connect your iPhone to your MacBook
Backing up your iPhone is a crucial step to ensure that your data is safe and can be easily restored if something goes wrong. One of the easiest ways to back up your iPhone is by connecting it to your MacBook. Follow these steps to get started:
First, make sure you have the necessary cables. You’ll need a Lightning cable to connect your iPhone to your MacBook. Plug one end of the cable into the Lightning port on your iPhone and the other end into a USB port on your MacBook.
Next, unlock your iPhone and tap “Trust” when prompted. This will allow your MacBook to access your iPhone’s data. It’s important to establish trust between the two devices to ensure a smooth backup process.
Now, open the Finder app on your MacBook. You can do this by clicking on the Finder icon in the Dock or by using the Spotlight search function. Once the Finder app is open, you’ll see your iPhone listed in the sidebar under the “Locations” section.
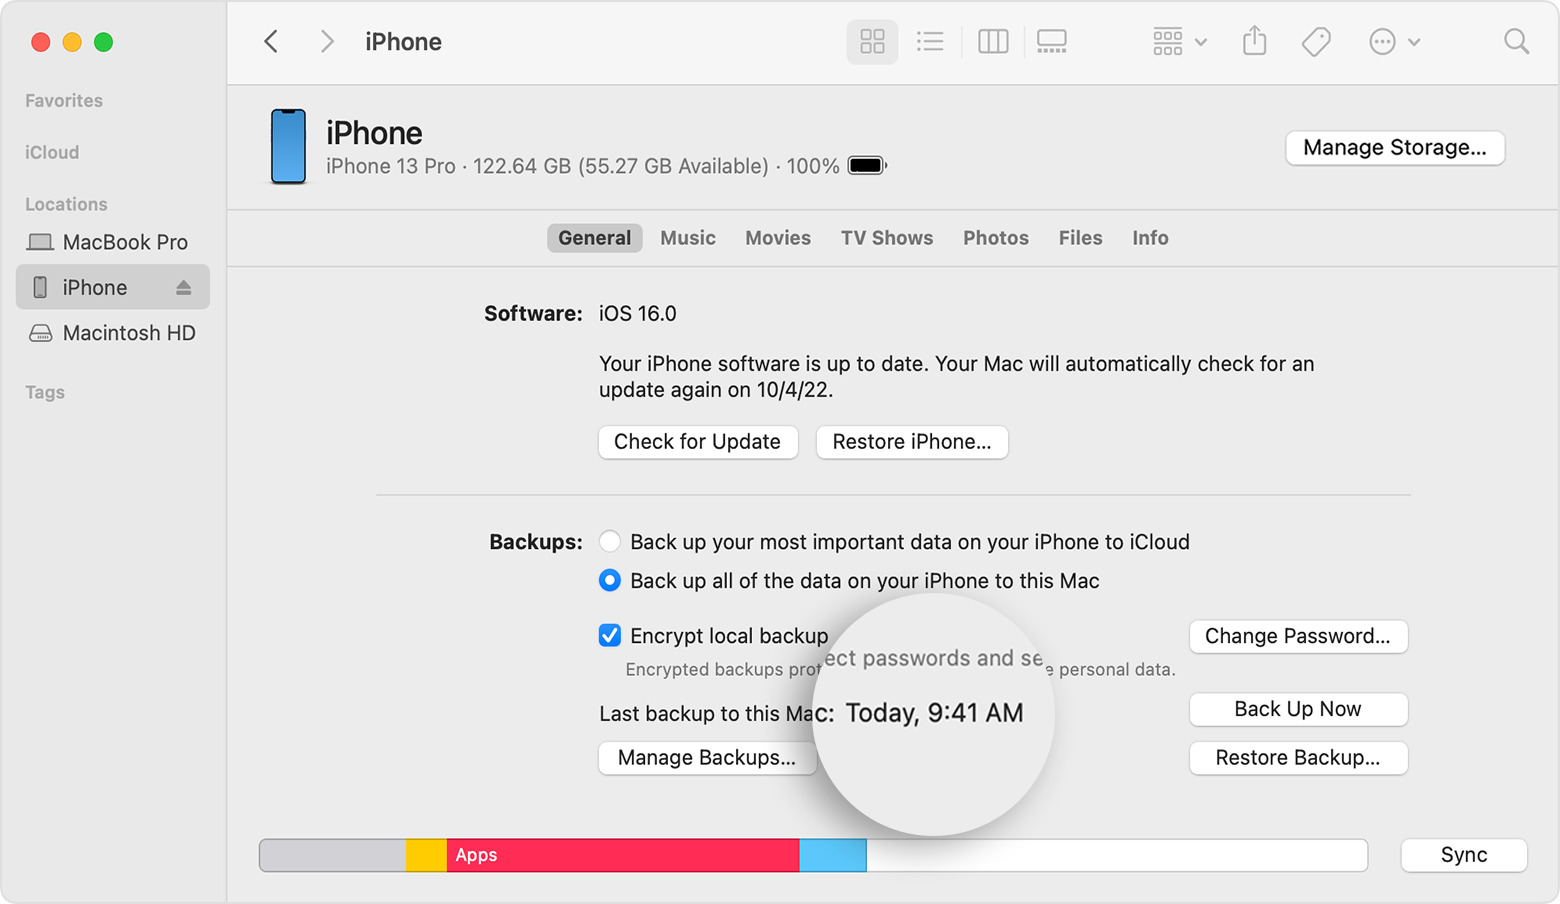
Click on your iPhone’s name from the sidebar. This will open the iPhone’s summary page in the Finder. Here, you’ll find various options and settings related to your iPhone.
With your iPhone selected in the Finder, you’re now ready to initiate the backup process. Look for the “Backup” option and click on it. This will bring up a menu with backup-related settings and options.
Before proceeding, decide on the backup method you want to use. You have two options: backing up to iCloud or backing up to your computer. Choose the method that suits your needs and preferences.
If you choose to back up to iCloud, make sure you’re signed in to your iCloud account on both your iPhone and MacBook. This will ensure that the backup is stored securely in your iCloud account.
If you prefer to back up to your computer, select the option to “Back Up All of the Data on your iPhone to this Mac”. This will create a full backup of your iPhone’s data on your MacBook.
Once you’ve chosen the backup method, review the backup settings to make sure they align with your preferences. You can encrypt the backup for enhanced security and include or exclude certain types of data from the backup.
When you’re satisfied with the backup settings, click on the “Back Up Now” button to start the backup process. Your MacBook will now create a backup of your iPhone’s data and save it to the designated location.
During the backup process, it’s important to keep your iPhone connected to your MacBook and avoid interrupting the connection. You can monitor the progress of the backup in the Finder app.
Once the backup is complete, you’ll receive a confirmation message. At this point, your iPhone’s data is safely backed up and can be restored if needed.
When you’re done with the backup, safely disconnect your iPhone from your MacBook by unplugging the Lightning cable. Your iPhone is now ready for use, and you can rest assured knowing that your data is securely backed up on your MacBook.
Open the Finder app on your MacBook
After connecting your iPhone to your MacBook, the next step in the backup process is to open the Finder app. The Finder app serves as the main interface for managing files and devices on your MacBook. Here’s how you can open the Finder app and proceed with the backup:
To open the Finder app, start by navigating to the Dock, which is usually located at the bottom of your MacBook’s screen. Look for the Finder icon, which resembles a blue and white face. Click on this icon to launch the Finder app. Alternatively, you can also use the Spotlight search function by pressing Command + Space and typing “Finder” in the search bar.
Once the Finder app is open, you will see a sidebar on the left side of the screen. This sidebar contains various sections and items that allow you to navigate through your MacBook’s contents. Look for the “Locations” section in the sidebar, where your connected iPhone should be listed.
If you don’t see your iPhone listed, make sure it is properly connected to your MacBook and that you have established trust between the devices. If you’ve already done this, try restarting your iPhone and MacBook, and then reconnecting them.
Click on your iPhone’s name from the sidebar to access its summary page in the Finder app. This page provides an overview of your iPhone’s details, settings, and options. It serves as a hub for managing your iPhone’s backups, updates, and synchronization.
With your iPhone’s summary page open, you can now proceed with the backup process. Look for the “Backup” option, usually located in the upper section of the page. This option allows you to configure and initiate the backup of your iPhone’s data.
Clicking on the “Backup” option will bring up a menu with various settings and options related to the backup process. Take a moment to review these settings and make any necessary adjustments to ensure that the backup aligns with your preferences.
Within the backup menu, you can choose the backup method you prefer. Depending on your needs, you can opt for a backup to iCloud or a backup to your computer. Consider factors such as storage space, convenience, and security when deciding on the backup method.
Once you have selected the backup method, you can further customize the backup settings. For example, you can choose to encrypt your backup for added security, specify the backup location, or include additional data such as photos, videos, or app data.
After reviewing and adjusting the backup settings, you are now ready to start the backup process. Look for the “Back Up Now” button and click on it to initiate the backup. The backup may take some time, depending on the amount of data on your iPhone, so be patient and let the process complete.
While the backup is in progress, you can monitor its status and progress within the Finder app. Look for a progress bar or percentage indicator that shows the backup’s completion percentage. Avoid interrupting the backup by keeping your iPhone connected to your MacBook throughout the process.
Once the backup is complete, you will receive a confirmation message. At this point, your iPhone’s data is safely backed up, and you can proceed with other tasks or disconnect your iPhone from your MacBook if desired.
Opening the Finder app on your MacBook is a crucial step in the backup process. It allows you to access and manage your iPhone’s backups, ensuring that your data remains safe and recoverable. Remember to open the Finder app every time you want to perform a backup or manage your iPhone’s settings.
Ensure that your MacBook and iPhone are trusted devices
Before you can proceed with backing up your iPhone to your MacBook, it’s essential to establish trust between the two devices. This ensures that data can be transferred securely and that your MacBook can access the necessary information from your iPhone. Follow these steps to ensure that your MacBook and iPhone are trusted devices:
Start by connecting your iPhone to your MacBook using a Lightning cable. Plug one end of the cable into the Lightning port on your iPhone and the other end into a USB port on your MacBook. Make sure both ends are securely connected.
Unlock your iPhone by entering your passcode or using Face ID or Touch ID if enabled. When you connect your iPhone to your MacBook for the first time, a pop-up message should appear on your iPhone’s screen asking for confirmation.
On your iPhone, you will see a message asking if you want to “Trust This Computer”. This step is crucial for establishing trust between your iPhone and MacBook. Tap on the “Trust” button to proceed.
After tapping the “Trust” button, your iPhone will communicate with your MacBook and establish the necessary connection. This ensures that your MacBook can access your iPhone’s data and perform tasks such as backups.
If the “Trust This Computer” message does not appear on your iPhone’s screen, there may be a few reasons for this. First, ensure that you have a stable connection between your iPhone and MacBook. Try disconnecting and reconnecting the Lightning cable to establish a fresh connection.
If the issue persists, check if you have the latest version of the iTunes app installed on your MacBook. Sometimes, updating the iTunes app can help facilitate the trust process between your devices.
If you’ve tried the above steps and are still unable to establish trust, try restarting both your iPhone and MacBook. Sometimes, a simple restart can resolve connection issues and allow the trust prompt to appear.
Establishing trust between your MacBook and iPhone is vital to ensure a secure and smooth backup process. It allows your MacBook to access your iPhone’s data and create a backup without any interruptions or complications.
Once the trust is established, you can proceed with the backup process, confident that your MacBook and iPhone are working together seamlessly. It’s advisable to check the trust status whenever you connect your iPhone to a new MacBook or after performing any software updates on either device.
By ensuring that your MacBook and iPhone are trusted devices, you can proceed with peace of mind knowing that your data is safe and your backup process will be successful.
Click on your iPhone device from the sidebar in Finder
Once you have connected your iPhone to your MacBook, the next step in the backup process is to select your iPhone device from the sidebar in the Finder app. This allows you to access your iPhone’s settings, summary page, and initiate the backup. Here’s how to do it:
Start by opening the Finder app on your MacBook. You can do this by clicking on the Finder icon in the Dock at the bottom of your screen or by searching for Finder using the Spotlight search function.
Once the Finder app is open, you will see a sidebar on the left-hand side of the window. This sidebar displays different sections and devices that are connected to or accessible from your MacBook. Look for the “Locations” section in the sidebar, which should include your connected iPhone.
Your iPhone will be listed under the “Locations” section with its name or a generic label such as “iPhone”. Click on your iPhone’s name or label in the sidebar to select it and open its summary page in the Finder app.
By clicking on your iPhone’s name in the sidebar, you will be taken to the specific page dedicated to managing your iPhone’s settings, backups, and synchronization. This page provides an overview of your iPhone’s details and allows you to perform various tasks related to your device.
On the summary page, you will find information about your iPhone’s storage capacity, software version, and available backups. This page also provides access to settings related to backups, updates, and app management.
With your iPhone selected in the Finder app, you can now proceed with initiating the backup process. Look for the “Backup” option, usually located toward the top of the summary page. Clicking on this option will display a menu with backup-related settings and options.
Before proceeding, decide on the backup method you prefer: iCloud or local backup to your MacBook. Select the appropriate option based on your preferences and available storage. If you choose iCloud backup, make sure you are signed in to your iCloud account on both your iPhone and MacBook.
After choosing the backup method, review the backup settings to ensure they are aligned with your requirements. You can enable or disable backup encryption, specify the backup location if you choose a local backup, or include additional data such as photos or app data in the backup.
Once you’re satisfied with the backup settings, click the “Back Up Now” button to initiate the backup process. Depending on the amount of data on your iPhone and the speed of your connection, the backup may take some time to complete. Monitor the progress bar in the Finder app to track the backup’s status.
Clicking on your iPhone device in the Finder app’s sidebar is a crucial step in the backup process. It allows you to access your iPhone’s settings and initiate the backup. Ensure that you have selected the correct device before proceeding to avoid any unintended data loss or backup failures.
By following these steps and selecting your iPhone device from the sidebar in the Finder app, you can confidently proceed with backing up your iPhone’s data to your MacBook and ensure that your valuable information is safely stored for future use.
Select the “Backup” option
Once you have clicked on your iPhone device in the sidebar of the Finder app, the next step in the backup process is to select the “Backup” option. This option allows you to configure and initiate the backup of your iPhone’s data. Here’s how to proceed:
With your iPhone selected in the Finder app, you will be on the summary page dedicated to managing your iPhone’s settings, backups, and synchronization. Look for the “Backup” option, usually located towards the top section of the summary page.
Click on the “Backup” option to access the backup settings and options menu. This menu provides various settings that you can customize to suit your backup requirements and preferences.
The backup settings and options menu offers choices depending on the backup method you have selected. If you have chosen iCloud backup, the menu may display options to toggle iCloud backup on or off, as well as manage iCloud storage settings.
If you have opted for a local backup to your MacBook, the menu may offer settings related to backing up all data, encrypting the backup, or choosing specific data categories to include or exclude from the backup.
Take a moment to review the available options and ensure that they are configured according to your preferences. You may want to enable encryption for added security or choose specific data categories if you have limited storage space.
Once you have customized the backup settings, you are ready to initiate the backup process. Look for the “Back Up Now” button and click on it to start the backup.
After clicking the “Back Up Now” button, your MacBook will begin creating a backup of your iPhone’s data. The time required to complete the backup will depend on factors such as the amount of data on your iPhone and the speed of your connection.
While the backup is in progress, it’s important to keep your iPhone connected to your MacBook. Avoid disconnecting the device or interrupting the backup process to ensure a successful backup.
Depending on your settings and preferences, the backup process may include transferring photos, videos, app data, and other files from your iPhone to your MacBook. You can monitor the progress of the backup by checking the status bar or percentage indicator in the Finder app.
Once the backup is complete, you may receive a confirmation message indicating that the backup was successful. At this point, your iPhone’s data is safely backed up and can be restored if needed.
Selecting the “Backup” option in the Finder app is a crucial step in the process of backing up your iPhone to your MacBook. By customizing the backup settings and initiating the backup, you can ensure that your valuable data is securely saved and can be easily restored when required.
Choose the backup method
When backing up your iPhone to your MacBook, one important decision you need to make is choosing the backup method. There are two primary options: backing up to iCloud or backing up to your computer. Here’s what you need to know to make an informed choice:
iCloud Backup:
If you choose iCloud backup, your iPhone’s data will be securely stored in your iCloud account. This option offers several advantages:
– Convenience: iCloud backups can be performed wirelessly and automatically when your iPhone is connected to Wi-Fi and charging. This ensures that your data is continuously backed up without requiring you to connect your iPhone to your MacBook.
– Accessibility: With iCloud backup, your data is accessible across multiple devices. If you own other Apple devices using the same Apple ID, you can easily restore your iPhone data to any of these devices.
– Off-site Storage: iCloud backup provides an additional level of security by storing your data off-site. This means that even if your MacBook is lost or damaged, your iPhone’s data remains safe in your iCloud account.
Local Backup:
If you choose to back up to your computer, you can create a local backup on your MacBook. Here are some key points to consider:
– Control: By backing up to your computer, you have more control over your data. You can choose where to store the backup and easily access it whenever you need to restore your iPhone.
– Security: Local backups can be encrypted using a password, providing an extra layer of security for your iPhone’s data. Encrypted backups ensure that your personal information remains protected.
– Storage: The availability of storage space on your MacBook is a crucial factor. Local backups require sufficient disk space to accommodate the backup files, especially if you have a large amount of data on your iPhone.
To choose the backup method, consider your preferences, needs, and circumstances. If you value convenience and want your backups to happen automatically and wirelessly, iCloud backup may be the best option. On the other hand, if you prefer more control over your backups and have ample storage space on your MacBook, local backup may be the preferred choice.
Remember that you can change the backup method in the future if your needs or preferences change. The important thing is to choose the backup method that gives you peace of mind knowing that your iPhone’s data is safely backed up and can be restored when needed.
Check the backup settings
Before initiating the backup process, it’s crucial to review and check the backup settings to ensure that they align with your preferences. By checking the backup settings, you can customize the backup process and include or exclude specific data categories. Here’s how to do it:
After selecting the backup method, such as iCloud or local backup, you will have access to the backup settings menu. This menu allows you to configure various aspects of the backup process and tailor it to your needs.
Take a moment to review the available settings and options. Some common settings you may encounter include:
– Backup Encryption: You can choose to enable backup encryption for added security. Encrypted backups require a password to access the data, ensuring that your personal information remains protected.
– Backup Location: If you are performing a local backup, you may have the option to specify the backup location on your MacBook. Choose a location with sufficient storage capacity to accommodate the backup files.
– Data Categories: Depending on the backup method and your iOS version, you may be able to select specific data categories to include or exclude from the backup. Common categories include photos, videos, contacts, messages, and application data.
To customize the backup settings, simply toggle the options or select the desired settings according to your preferences. Ensure that you have chosen the right encryption option, backup location, and data categories.
Consider your storage capacity, security requirements, and the importance of different types of data when configuring the backup settings. If storage space is limited, you may choose to exclude less critical data categories to optimize the backup size.
It’s important to note that the backup settings you configure will apply to future backups as well. Therefore, make sure to check the settings periodically and update them if your preferences or requirements change.
By reviewing and checking the backup settings, you can ensure that the backup process accurately reflects your preferences and provides the level of security and flexibility you desire. This step ensures that your valuable data is protected and that the backup remains optimized for your needs.
Start the backup process
Once you have reviewed and adjusted the backup settings to your liking, the next step is to start the backup process. Starting the backup process will initiate the transfer of your iPhone’s data to either iCloud or your MacBook, depending on the chosen backup method. Here’s how to get started:
With the backup settings configured, look for the option to start the backup process. This is usually indicated by a button or a prompt such as “Back Up Now” or “Start Backup”. It’s typically located within the backup settings menu or on the summary page of your iPhone’s settings in the Finder app.
Click on the “Back Up Now” button to begin the backup process. The duration of the backup will depend on factors such as the amount of data on your iPhone and the speed of your internet connection. Be patient, as the process may take several minutes to complete.
During the backup process, it’s crucial to keep your iPhone connected to your MacBook. Avoid disconnecting the device or interrupting the process, as this may cause data loss or an incomplete backup.
For iCloud backup, make sure your iPhone is connected to a stable Wi-Fi network and that it’s charging. This ensures that the backup process can take place smoothly and without interruption.
For a local backup to your MacBook, ensure that it has sufficient storage space to accommodate the backup files. If necessary, free up some space by removing unnecessary files or transferring them to an external storage device.
While the backup is in progress, you can monitor its status in the backup settings menu or on the summary page of your iPhone in the Finder app. Look for a progress bar or a percentage indicator that represents the completion of the backup. This allows you to track its progress and estimate the time remaining.
Once the backup process is complete, you will receive a notification or confirmation message indicating its successful completion. At this point, your iPhone’s data is securely stored either in iCloud or on your MacBook, depending on the chosen backup method.
Starting the backup process is a crucial step in ensuring that your iPhone’s data is safely backed up. By initiating the backup, you can have peace of mind knowing that your valuable information is protected and can be easily restored if needed.
Remember to regularly perform backups to keep your data up to date and secure. Whether it’s a regular occurrence or a periodic backup, the backup process helps safeguard your iPhone’s data and ensures that you are prepared for any unforeseen circumstances.
Monitor the progress of the backup
Once you’ve initiated the backup process for your iPhone, it’s important to monitor the progress to ensure that it completes successfully. Monitoring the backup progress allows you to stay informed and ensures that your valuable data is being securely transferred to iCloud or your MacBook. Here’s how to monitor the backup progress:
During the backup process, keep an eye on the backup settings menu or the summary page of your iPhone in the Finder app. Look for a progress bar, percentage indicator, or any visual representation that indicates the status of the backup.
The progress bar or indicator reflects the completion percentage of the backup. This will give you an idea of how much of your iPhone’s data has been transferred so far and how much remains to be backed up. Depending on the size of your data and the speed of your internet connection, the backup process can take some time.
If your backup is taking longer than usual, don’t be alarmed. Factors such as the amount of data being backed up, the speed of your internet connection, and the responsiveness of Apple’s servers can influence the duration of the backup process. It’s normal for larger backups to take more time to complete.
While monitoring the backup progress, it’s important to keep your iPhone connected to your MacBook and ensure a stable connection. Disconnecting the device or interrupting the backup process can lead to an incomplete or failed backup.
If you find that the backup process is taking an unusually long time or stalls at a certain percentage for an extended period, you may try the following troubleshooting steps:
– Check your internet connection: Ensure that you have a stable and reliable internet connection. Slow or intermittent connectivity can impede the backup process.
– Restart your iPhone and MacBook: Sometimes, a simple restart can resolve any temporary glitches that may be impacting the backup process. Try restarting both devices and initiate the backup again.
– Update your software: Make sure that your iPhone and MacBook have the latest software updates installed. Outdated software can sometimes cause conflicts or issues during the backup process.
– Check iCloud storage: If you’re using iCloud backup, ensure that you have enough available storage space in your iCloud account. If your iCloud storage is full, you may need to upgrade your storage plan or free up some space by deleting unnecessary backups or files.
By monitoring the progress of the backup, you can ensure that your valuable data is being safely transferred. It gives you visibility into the process and allows you to take necessary steps or troubleshoot any issues that may arise. Once the backup process reaches 100% completion, you can rest assured knowing that your data is securely stored and can be easily restored if needed.
Disconnect your iPhone from your MacBook safely
After completing the backup process and ensuring the safety of your iPhone’s data, it’s essential to disconnect your iPhone from your MacBook safely. This helps prevent any potential data loss or damage to your devices. Here’s how to disconnect your iPhone safely:
First, verify that the backup process has successfully completed. Check the backup settings menu or summary page in the Finder app to confirm that the backup has reached 100% completion. This ensures that all your iPhone’s data is safely stored and ready for future restoration if needed.
Next, close the Finder app on your MacBook. This ensures that there are no ongoing processes or connections between your iPhone and MacBook that could be disrupted during the disconnection process.
To disconnect your iPhone from your MacBook, gently remove the Lightning cable from both devices. Start by unplugging the end of the cable connected to your iPhone, and then remove it from the USB port on your MacBook. Be careful not to pull or yank the cable, as this could damage the connector or the port.
While disconnecting the cable, ensure that your iPhone’s screen is not active or displaying any prompts asking for your permission or confirmation. It’s important to wait until any ongoing interactions or processes on your iPhone have completed before disconnecting.
Once the cable is disconnected, you can safely store it or use it for other purposes. It’s a good practice to coil the cable neatly and store it in a safe place to prevent any damage or tangling.
After disconnecting your iPhone, you can proceed to use it normally. You have successfully backed up your iPhone’s data to your MacBook, ensuring that your valuable information is secure and retrievable in case of any unforeseen incidents.
Remember, it’s important to regularly perform backups to keep your data up to date and protected. Depending on your needs and preferences, you can choose to perform backups on a regular basis or periodically, based on the frequency of data changes or significant updates.
By following the steps outlined above and disconnecting your iPhone from your MacBook safely, you can ensure a smooth backup process and maintain the integrity of your data and devices.