
Why Archive Emails in Outlook
As an Outlook user, you may find yourself overwhelmed with a growing number of emails cluttering your inbox. Over time, it becomes challenging to locate and manage important emails. This is where email archiving in Outlook comes to the rescue. Archiving emails provides numerous benefits, including:
- Improved Email Management: Archiving helps you declutter your inbox and keep it organized. By removing older or less relevant emails from your main inbox, you can focus on important messages and increase your productivity.
- Reduced Storage Space: Storing a large number of emails in your inbox can consume valuable storage space, causing your Outlook performance to slow down. Archiving emails frees up space by moving older messages to archived folders or an external storage device, ensuring smooth operation.
- Easier Retrieval of Information: When you archive emails, they are not deleted but stored in accessible archive folders. This means that even if you don’t see them in your main inbox, you can easily search and retrieve them when needed, saving valuable time.
- Regulatory Compliance: In certain industries, maintaining email records is crucial for compliance with legal and regulatory requirements. Archiving emails in Outlook ensures that you maintain a secure and tamper-proof record of important communications.
- Protection Against Data Loss: Accidents happen, and sometimes emails can be accidentally deleted, lost, or damaged. By archiving your emails, you create a backup of important messages, providing an additional layer of protection and ensuring that critical information is not lost forever.
By understanding the benefits of email archiving in Outlook, you can take proactive steps to implement a robust archiving system that helps you manage your emails effectively and maintain a clutter-free inbox.
How to Enable Auto-Archiving in Outlook
Outlook provides a convenient feature called auto-archiving that allows you to automatically move older or less important emails to archive folders based on a predefined schedule. To enable auto-archiving, follow these steps:
- Open Microsoft Outlook and go to the “File” tab located at the top left corner of the screen.
- Click on “Options” to open the Outlook Options window.
- In the Options window, navigate to the “Advanced” tab.
- Scroll down to the “AutoArchive” section and click on the “AutoArchive Settings” button.
- A new AutoArchive window will appear. Here, you can choose from various options to customize the auto-archiving settings according to your preferences.
- To enable auto-archiving, check the box that reads “Run AutoArchive every…” and specify the time interval (e.g., every 3 days).
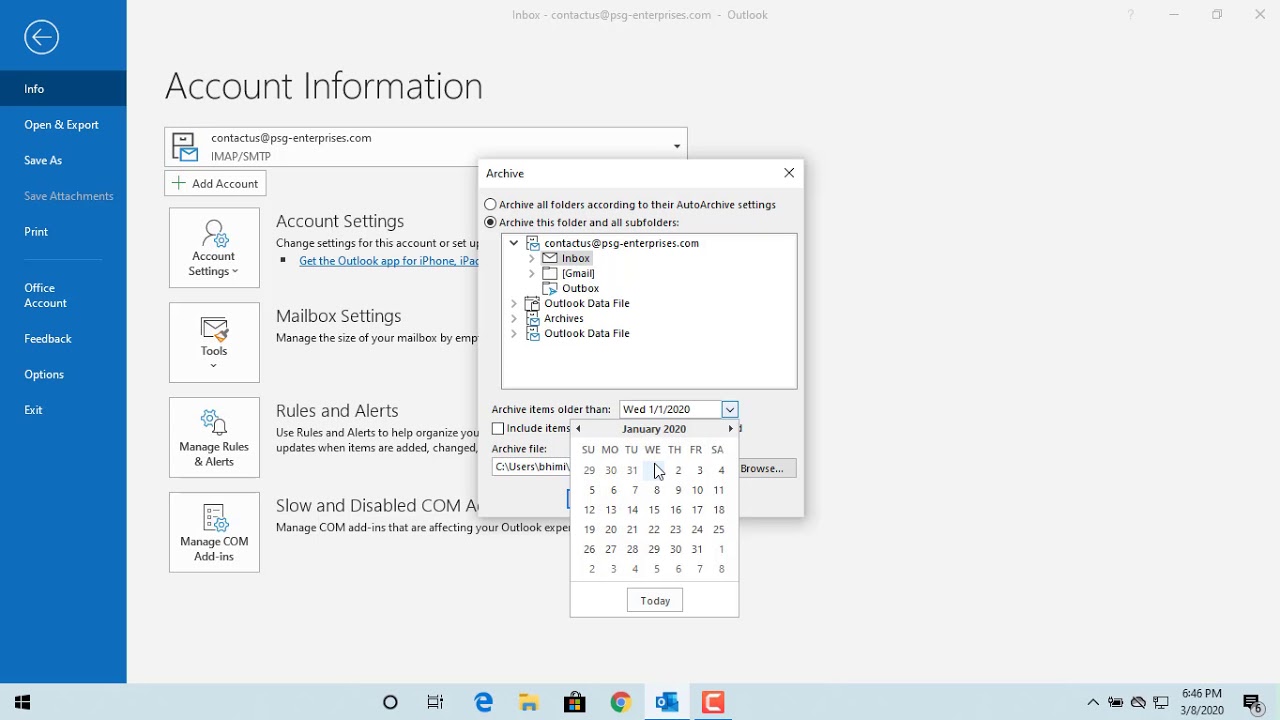
- Select the folders that you want to archive by checking the corresponding boxes.
- Choose the age of items to archive. This allows you to set a specific timeframe for archiving (e.g., items older than 6 months).
- Specify the location where you want to store your archived items by clicking the “Browse” button and selecting a folder or creating a new one.
- Review any additional settings and click “OK” to save the changes.
Once auto-archiving is enabled, Outlook will automatically move the specified emails to the designated archive folders based on your chosen schedule. This helps keep your main inbox organized, reduces clutter, and frees up storage space.
Remember to periodically review and adjust your auto-archiving settings to ensure they align with your requirements and preferences. By implementing auto-archiving in Outlook, you can maintain a well-organized mailbox and easily find important emails when you need them.
Setting Up Archive Folders
When archiving emails in Outlook, it is essential to have well-organized archive folders to store your messages. Follow these steps to set up archive folders:
- Open Microsoft Outlook and go to the “File” tab at the top left corner of the screen.
- Click on “Options” to open the Outlook Options window.
- In the Options window, navigate to the “Advanced” tab.
- Scroll down to the “AutoArchive” section and click on the “AutoArchive Settings” button.
- In the AutoArchive window, click on the “Browse” button next to the “Default Archive File” field.
- Select the desired location where you want to create your archive file. You can choose to store it locally or on an external device.
- Provide a name for your archive file and click “OK” to save the changes.
- Back in the AutoArchive window, ensure the path to the archive file is displayed correctly.
- If you want to create additional archive folders, go back to the main Outlook window.
- Right-click on your mailbox or any existing folder where you want to create an archive subfolder.
- Select “New Folder” from the context menu.
- In the Create New Folder window, enter a name for the archive subfolder and choose the folder type (“Mail and Post Items” is the default).
- Click “OK” to create the archive subfolder.
Repeat the above steps to create as many archive subfolders as you need to effectively categorize and store your archived emails.
Having well-structured archive folders makes it easier to locate and manage your archived emails. You can create archive folders based on different criteria, such as date, sender, project, or any other system that suits your needs. This ensures that you can quickly retrieve specific emails when necessary.
Remember to regularly review and organize your archive folders to maintain a streamlined and efficient email archiving system. Keeping your archive folders tidy will enhance your productivity and help you make the most of Outlook’s email management capabilities.
Manual Archiving
In addition to enabling auto-archiving in Outlook, you can manually archive specific emails or folders based on your preferences. Manual archiving provides flexibility and control over which items to archive. Here’s how you can manually archive in Outlook:
- Open Microsoft Outlook and go to your mailbox or the specific folder you want to manually archive.
- Select the email(s) or folder(s) that you want to archive. You can use Ctrl+Click or Shift+Click to select multiple items.
- In the Outlook toolbar, click on the “File” tab at the top left corner of the screen.
- Click on the “Move” button to display the move options.
- From the available options, select “Archive” to move the selected emails or folders to the archive file.
- If you have multiple archive files, choose the desired archive file where you want to move the selected items.
- Click “OK” to confirm and complete the manual archiving process.
By manually archiving emails or folders, you have full control over what items are moved to the archive file. This allows you to retain important emails while removing the clutter from your main mailbox. Manual archiving can be particularly useful when you want to preserve specific emails for future reference or compliance purposes.
Remember to regularly assess your mailbox and manually archive items that are no longer needed in your main inbox. This will help maintain a manageable and organized email environment.
Keep in mind that manual archiving requires your active involvement, so it’s important to develop a habit of periodically reviewing and archiving emails to keep your Outlook mailbox optimized for productivity and efficiency.
Customizing Auto-Archive Settings
Outlook provides the flexibility to customize your auto-archive settings according to your specific needs and preferences. By customizing these settings, you can tailor the auto-archiving process to suit your email management requirements. Here’s how you can customize your auto-archive settings in Outlook:
- Open Microsoft Outlook and go to the “File” tab located at the top left corner of the screen.
- Click on “Options” to access the Outlook Options window.
- In the Options window, navigate to the “Advanced” tab.
- Scroll down to the “AutoArchive” section and click on the “AutoArchive Settings” button.
- In the AutoArchive window, you will find various options to customize your auto-archive settings.
- Choose the frequency of auto-archiving by selecting the appropriate time interval, such as daily, weekly, or monthly.
- Select the folders that you want to include in the auto-archiving process by checking the corresponding boxes.
- Specify the age of items to archive based on your preference. For example, you can choose to archive items older than a specific number of days, weeks, or months.
- Decide whether to permanently delete expired items or move them to the Deleted Items folder.
- Choose the location where you want to store your archive file by clicking the “Browse” button and selecting the desired folder.
- Review any other available options and settings that you can customize according to your requirements.
- Click “OK” to save the changes and apply your customized auto-archive settings.
Customizing your auto-archive settings allows you to have better control over the archiving process in Outlook. By adjusting the frequency, age, and destination of archived items, you can create a tailored approach that aligns with your email management strategy.
It’s a good practice to periodically review and refine your auto-archive settings to ensure they still meet your needs as your email usage and requirements evolve. Customizing these settings can help you maintain an organized mailbox, optimize storage space, and improve overall productivity.
Managing Archived Emails
Once you have archived your emails in Outlook, it is important to know how to effectively manage and access them when needed. Here are some tips on how to manage your archived emails:
- Search and retrieve: Outlook provides a powerful search function that allows you to easily locate specific archived emails. Use keywords, filters, and sorting options to refine your search and quickly find the messages you are looking for. By entering relevant search terms or using advanced search features, you can save time and retrieve archived emails efficiently.
- Organize by folders: Just like your main mailbox, you can create folders within your archive file to further categorize your archived emails. Create folders based on projects, clients, or any other suitable criteria to keep your archived emails organized and easily accessible.
- Apply labels or tags: Another way to manage your archived emails is by applying labels or tags to categorize them. Outlook allows you to assign categories to emails, making it easier to locate and manage messages within the archive file. Choose specific labels that make sense to you and apply them consistently to ensure efficient email management.
- Set up archive rules: Outlook allows you to create rules to automate the management of your archived emails. You can define rules to automatically move certain types of emails to specific folders within your archive file. This saves time and effort, as Outlook will handle the organization of archived emails based on your predefined rules.
- Regularly review and purge: Over time, your archive file may still accumulate unnecessary emails. Periodically review your archived emails and delete any that are no longer needed. This helps keep your archive file lean and ensures that only relevant and important messages are retained.
By implementing effective management strategies, you can ensure that your archived emails are well-organized and easily accessible when you need them. Organizing, labeling, and using search features can significantly streamline the process of managing and retrieving archived emails in Outlook.
Restoring Archived Emails
There may be instances where you need to access and restore archived emails in Outlook. Whether it’s retrieving important information or reviewing past communications, restoring archived emails can be done effortlessly. Here’s how you can restore archived emails:
- Open Microsoft Outlook and go to the “File” tab located at the top left corner of the screen.
- Click on “Open & Export” to reveal the available options.
- Choose “Open Outlook Data File” to open the Open Outlook Data File dialog box.
- Browse and navigate to the location where your archive file is stored.
- Select the archive file (with .pst extension) and click “OK” to open it.
- You will now see the archive file appear as a separate mailbox in the Outlook folder pane.
- Expand the archive file to view its folders and subfolders.
- Navigate to the specific folder where the archived emails you want to restore are located.
- Select the email(s) that you want to restore to your main mailbox.
- Right-click on the selected email(s) and choose “Move” or “Copy” from the context menu.
- Choose the destination where you want to move or copy the emails. This can be your inbox, a specific folder, or any other desired location.
- Click “OK” to complete the restoration process.
By following these steps, you can easily restore archived emails and bring them back into your main mailbox for easy accessibility. Once restored, the emails will be available alongside your existing messages.
Remember, after restoring the emails, it’s a best practice to re-archive them if they are no longer needed in your main mailbox. This helps maintain an organized and clutter-free email environment.
Restoring archived emails ensures that you have access to important information and previous correspondence whenever you need it. Outlook’s archiving feature provides a seamless way to manage your emails while preserving valuable data for future reference.
Deleting Archived Emails
At times, you may come across archived emails that are no longer needed or have become obsolete. In such cases, it is important to delete these archived emails to free up storage space and maintain an organized email system. Here’s how you can delete archived emails in Outlook:
- Open Microsoft Outlook and navigate to the archive file that contains the emails you want to delete.
- Expand the archive file in the Outlook folder pane to display its folders and subfolders.
- Select the folder or individual emails that you wish to delete.
- Right-click on the selected emails or folder and choose “Delete” from the context menu. Alternatively, you can press the “Delete” or “Del” key on your keyboard.
- A confirmation prompt may appear, asking whether you want to move the deleted items to the Deleted Items folder or permanently delete them. Choose the appropriate option based on your preference.
- Click “OK” to confirm the deletion process.
By following these steps, you can easily delete archived emails and remove them from your archive file. This helps keep your email storage space optimized and ensures that only relevant and necessary emails are retained.
It’s important to exercise caution when deleting archived emails, as this action is permanent and cannot be undone. Take the time to review the emails before deleting them to avoid accidentally deleting important or valuable information.
Regularly reviewing and purging your archived emails ensures that your archive file remains organized and only contains relevant messages. By deleting unnecessary emails, you can enhance your email management system and maintain an efficient workflow.
Tips and Best Practices for Email Archiving in Outlook
Effective email archiving in Outlook can greatly enhance productivity, organization, and data management. To make the most out of the archiving feature, consider the following tips and best practices:
- Establish an archiving strategy: Develop a clear archiving strategy that aligns with your specific needs. Determine which emails to archive, the frequency of archiving, and the duration for which emails will be archived. This strategy will provide a framework for efficient and consistent archiving.
- Set up a folder structure: Create a logical and intuitive folder structure within your archive file. Use meaningful names and hierarchies to categorize archived emails based on projects, clients, or other relevant criteria. A well-organized folder structure makes it easy to locate and retrieve archived emails.
- Regularly review and adjust: Periodically review your emails and adjust your archiving strategy as needed. Delete emails that are no longer required, modify archiving settings, and update your folder structure to accommodate evolving needs.
- Use consistent naming conventions: When creating archive folders or labels, use consistent and descriptive naming conventions. This will ensure that the archived emails are easily identifiable, making it easier to search and retrieve specific messages when needed.
- Utilize search and filtering options: Outlook offers powerful search and filtering features. Take advantage of these tools to locate archived emails quickly. Utilize search parameters such as keywords, senders, recipients, or timeframes to narrow down your search and find specific emails efficiently.
- Consider storage options: If your archive file grows significantly, consider offloading older emails to external storage devices or cloud-based services. This will help optimize storage space and maintain optimal performance within Outlook.
- Stay compliant with legal obligations: In regulated industries, ensure that your email archiving practices comply with legal and regulatory requirements. Be aware of any data retention policies and ensure that important emails are retained for the required period.
- Regularly backup your archive: It is crucial to periodically backup your archive file to ensure data integrity and protection against data loss. Create backups on external storage devices or use cloud-based backup solutions to safeguard your archived emails.
- Keep Outlook performance in mind: Be mindful of the impact that a large number of archived emails can have on Outlook’s performance. Regularly monitor and optimize Outlook’s performance by keeping your archive file organized and removing unnecessary emails.
By following these tips and best practices, you can streamline your email archiving process, enhance productivity, and effectively manage your email communications in Outlook.