
What is Hamachi?
Hamachi is a virtual private network (VPN) application that allows you to create secure connections between multiple devices over the internet. It creates a private network that enables you to access remote computers, share files, and play games as if you were on the same local network.
Developed by LogMeIn, Hamachi provides a reliable and convenient way to connect your devices across different geographical locations. Whether you want to collaborate with coworkers, host a LAN gaming session, or access your home computer remotely, Hamachi simplifies the process without the need for complex network configurations.
Using Hamachi is straightforward. You simply download and install the software on the devices you want to connect, create a network, and invite others to join. Once connected, you can securely share files, chat, and play games with other members of the network.
One of the key features of Hamachi is its secure connection. All data transmitted between devices is encrypted using advanced algorithms, ensuring that your information remains private and protected from eavesdropping.
Furthermore, Hamachi is available for multiple operating systems, including Windows, macOS, and Linux, making it accessible to a wide range of users. It also offers a free version with limited features, as well as a paid subscription for additional functionality and scalability.
Overall, Hamachi is a versatile and reliable VPN solution that enables you to establish secure connections between devices over the internet. Its ease of use, cross-platform compatibility, and robust security features make it an ideal choice for various applications, from online gaming to remote work and collaboration.
Why do you need to allow Hamachi through the firewall?
Firewalls act as a barrier between your device and external networks, monitoring and controlling incoming and outgoing network traffic. While firewalls are essential for network security, they can sometimes block legitimate connections, including those established by Hamachi. Allowing Hamachi through the firewall is necessary to ensure that it functions properly and can establish secure connections.
Here are a few reasons why you need to allow Hamachi through the firewall:
- Enable seamless connectivity: Hamachi relies on network communication protocols to establish connections between devices. By allowing Hamachi through the firewall, you ensure that these protocols can function unhindered, enabling seamless connectivity between devices on the Hamachi network.
- Facilitate file sharing and remote access: Hamachi is commonly used for accessing remote devices and sharing files securely. When the firewall blocks Hamachi, it can prevent the transfer of files or remote access to devices on the network. Allowing Hamachi through the firewall enables these features to work as intended.
- Enable online gaming: Hamachi is popular among gamers for creating virtual LANs and playing multiplayer games over the internet. If the firewall blocks Hamachi, it can prevent gaming sessions or cause connectivity issues. By allowing Hamachi through the firewall, you ensure a smooth gaming experience for all players.
- Ensure secure connections: Hamachi encrypts data transmitted between devices to ensure privacy and security. If the firewall blocks Hamachi, it can interfere with the encryption process or prevent secure connections from being established. Allowing Hamachi through the firewall ensures that your connections remain protected.
Keep in mind that the process of allowing Hamachi through the firewall may differ depending on the operating system and firewall software you are using. However, the general concept remains the same – you need to create an exception or rule in the firewall settings to allow Hamachi to communicate freely.
By allowing Hamachi through the firewall, you can experience the full functionality and benefits of this powerful VPN application. Whether you are collaborating with remote colleagues, accessing files on different devices, or enjoying multiplayer gaming sessions, allowing Hamachi through the firewall is crucial for a seamless and secure experience.
Check if Hamachi is blocked by the firewall
Before you begin allowing Hamachi through the firewall, it’s important to determine whether or not it is currently being blocked. Here are some steps to check if Hamachi is blocked by the firewall:
- Check Windows Firewall: On a Windows PC, open the Control Panel and click on “System and Security” or “Windows Security.” Then, click on “Windows Defender Firewall” or “Windows Firewall.” In the firewall settings, look for any rules blocking Hamachi. If you find any, you will need to create an exception to allow Hamachi through.
- Check Mac Firewall: On a Mac, go to System Preferences and click on “Security & Privacy.” Then, click on the “Firewall” tab and check if Hamachi is listed as an application that is being blocked. If it is, you will need to allow it through the firewall.
- Check third-party firewalls: If you are using a third-party firewall software, such as Norton, McAfee, or ZoneAlarm, you will need to access the settings of that software and check if Hamachi is being blocked. Each firewall software may have different steps, so refer to the documentation or support resources provided by the software manufacturer.
- Test network connectivity: If you suspect that Hamachi is being blocked by the firewall, you can also try testing the network connectivity. Create a network on Hamachi and have someone else join it. If they are unable to join or you cannot establish a connection with them, it could be an indication that Hamachi is blocked by the firewall.
Remember, it’s important to check if Hamachi is blocked by the firewall before making any changes to the firewall settings. This will help ensure that you are addressing the correct issue and can take the appropriate steps to allow Hamachi through the firewall.
Allow Hamachi through Windows Firewall
If you are using Hamachi on a Windows PC and it is being blocked by the Windows Firewall, you can follow these steps to allow Hamachi through the firewall:
- Open Windows Firewall settings: Go to the Control Panel and click on “System and Security” or “Windows Security.” Then, click on “Windows Defender Firewall” or “Windows Firewall.”
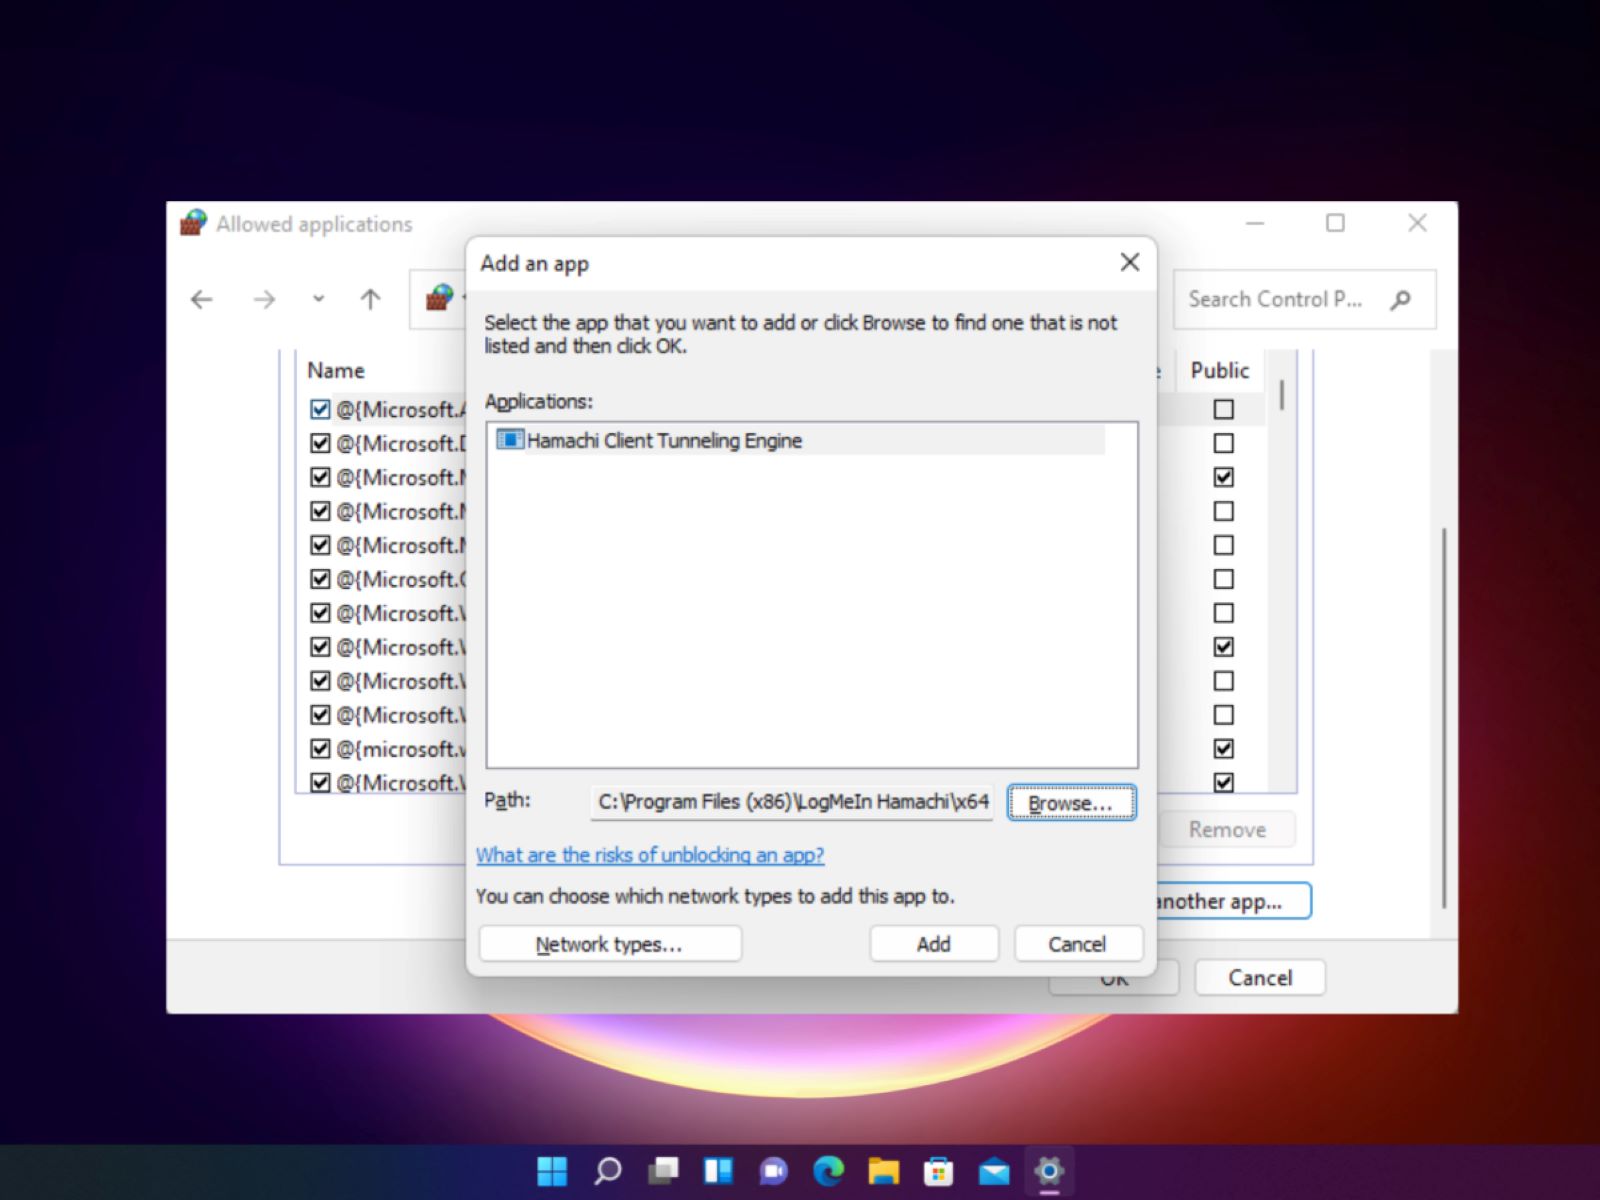
- Click on “Allow an app or feature through Windows Firewall”: On the left-hand side of the screen, you will see a link that says “Allow an app or feature through Windows Firewall.” Click on it to proceed.
- Find Hamachi in the list: In the “Allowed apps” window, click on the “Change settings” button. Scroll down the list of apps and features until you find “Hamachi.” Ensure that both the “Private” and “Public” boxes are checked next to Hamachi.
- Add Hamachi if it’s not listed: If you don’t see Hamachi in the list, you can click on the “Allow another app…” button. In the dialog box that appears, click on the “Browse” button and navigate to the location where Hamachi is installed. Select the Hamachi application file (usually named “hamachi-2-ui.exe” or similar) and click “Open.” Then, make sure that the “Private” and “Public” boxes are checked next to Hamachi.
- Save the changes: Once you have ensured that Hamachi is listed and both the “Private” and “Public” boxes are checked, click on the “OK” button to save the changes and close the Windows Firewall settings.
By following these steps, you have allowed Hamachi through the Windows Firewall. This should prevent the firewall from blocking Hamachi and enable you to establish connections, share files, and use Hamachi without any issues.
Note that if you are using a different firewall software or a third-party antivirus program that includes a firewall, the steps to allow Hamachi may vary. Consult the documentation or support resources provided by the software manufacturer for instructions specific to your firewall software.
Allow Hamachi through Mac Firewall
If you are using Hamachi on a Mac and it is being blocked by the macOS Firewall, you can follow these steps to allow Hamachi through the firewall:
- Open System Preferences: Click on the Apple menu in the top-left corner of the screen and select “System Preferences.”
- Access Firewall settings: In the System Preferences window, click on the “Security & Privacy” icon.
- Unlock the settings: If the settings are locked, click on the lock icon in the bottom-left corner of the window and enter your administrator password when prompted.
- Click on the Firewall tab: In the Security & Privacy window, click on the “Firewall” tab.
- Click on the “Firewall Options” button: Underneath the Firewall options, click on the “Firewall Options” button to open the advanced settings.
- Add Hamachi to the allowed applications: In the “Firewall Options” window, click on the “+” button and navigate to the location where Hamachi is installed. Select the Hamachi application file (usually named “hamachi-2-ui” or similar), and click “Add.”
- Allow incoming connections: Make sure that the checkbox next to Hamachi is checked in the “Block all incoming connections” section. This ensures that incoming connections to Hamachi are allowed.
- Save the changes: Click on the “OK” button to save the changes and close the Firewall Options window.
By following these steps, you have allowed Hamachi through the Mac Firewall. This ensures that the firewall does not block Hamachi and allows you to establish connections, share files, and use Hamachi without any interruptions.
Note that if you are using a different firewall software or a third-party antivirus program that includes a firewall, the steps to allow Hamachi may vary. Refer to the documentation or support resources provided by the software manufacturer for instructions specific to your firewall software.
Allow Hamachi through third-party firewalls
If you are using a third-party firewall software, such as Norton, McAfee, or ZoneAlarm, and Hamachi is being blocked, you can follow these general steps to allow Hamachi through the firewall:
- Open the firewall software: Locate the firewall software on your computer and open the program.
- Access the firewall settings: Look for an option or tab that allows you to configure the firewall settings. This may vary depending on the specific firewall software you are using.
- Find the applications or program permissions: Look for a section or category within the firewall settings that deals with application or program permissions. This is where you can manage which programs are allowed through the firewall.
- Add Hamachi to the allowed list: In the application or program permissions section, click on the option to add a new program or application. Navigate to the location where Hamachi is installed on your computer. Select the Hamachi executable file (usually named “hamachi-2-ui.exe” or similar) and add it to the allowed list.
- Specify network permissions: Depending on the firewall software, you may also need to specify network permissions for Hamachi. Ensure that both inbound and outbound network connections are allowed for Hamachi.
- Save the changes: Once you have added Hamachi to the allowed list and specified the appropriate network permissions, save the changes in the firewall software.
These steps are a general guideline for allowing Hamachi through third-party firewalls. The exact steps may vary depending on the firewall software you are using. Refer to the documentation or support resources provided by the software manufacturer for specific instructions on allowing programs through their firewall.
By allowing Hamachi through third-party firewalls, you ensure that the firewall does not block Hamachi and allows you to establish connections, share files, and use Hamachi without any interruptions.
Troubleshooting common issues
While allowing Hamachi through the firewall should resolve most connectivity issues, there are a few common problems that you may encounter. Here are some troubleshooting steps to help you address these issues:
- Ensure Hamachi is running: Check that Hamachi is running on both your device and the devices you are trying to connect with. If Hamachi is not running or has encountered an error, restart the application and try connecting again.
- Verify network connectivity: Make sure that your device is connected to the internet and has a stable network connection. If your network connection is unstable or experiencing issues, it may affect the performance of Hamachi.
- Check for software conflicts: Sometimes, other software or applications on your device can conflict with Hamachi. Temporarily disable any antivirus, firewall, or VPN software, and check if Hamachi can establish connections. If Hamachi works without conflicts, you may need to adjust the settings of the conflicting software or contact their support for guidance.
- Update Hamachi: Ensure that you are using the latest version of Hamachi. Outdated versions can have compatibility issues, so updating to the latest release may resolve connectivity problems.
- Restart devices and routers: Sometimes, a simple restart of your device or router can resolve connectivity issues. Power off your device and router, wait for a few minutes, and then power them back on.
- Reset network adapters: If you are experiencing persistent connectivity issues, you can try resetting your network adapters. Open the command prompt (CMD) as an administrator and enter the following command:
netsh int ip reset. Restart your device after running the command. - Contact Hamachi support: If you have tried all the troubleshooting steps and are still experiencing issues with Hamachi, it may be beneficial to reach out to Hamachi support for further assistance. They can provide specific guidance based on your situation and help you resolve any persistent problems.
Remember, troubleshooting steps may vary depending on your operating system, network setup, and specific circumstances. It’s always recommended to consult relevant documentation, forums, or support resources for comprehensive troubleshooting specific to your environment.
By following these troubleshooting steps, you can address common connectivity issues and ensure that Hamachi functions properly, allowing you to establish secure connections, share files, and enjoy a seamless Hamachi experience.