
Overview of Smart Inbox in iOS Mail
The Smart Inbox feature in iOS Mail is designed to help users efficiently manage their email by automatically categorizing incoming messages into different folders. This intelligent email organization system allows you to quickly identify and prioritize important emails, ensuring that your inbox remains clutter-free and well-organized.
With the Smart Inbox, iOS Mail automatically creates several default folders, including Primary, Social, and Promotions. The Primary folder contains emails from your most frequently contacted contacts, while the Social folder gathers social media notifications and updates. The Promotions folder, as the name suggests, captures marketing emails and similar promotional materials.
By separating emails into different folders based on their content and sender, the Smart Inbox allows you to focus on the most relevant messages without getting distracted by less important ones. This feature saves you valuable time and increases productivity, as you no longer need to manually sort through your inbox to find specific emails.
In addition to the default folders, iOS Mail also allows you to add or remove additional folders to further customize your Smart Inbox. This flexibility ensures that you can tailor the email organization system to suit your specific needs and preferences.
It’s worth noting that the Smart Inbox feature requires an active internet connection, as it relies on the server to process and categorize incoming emails. Therefore, it’s essential to ensure a stable internet connection for the Smart Inbox to function effectively.
Now that you have an understanding of the Smart Inbox feature in iOS Mail, let’s explore how you can access and manage it to optimize your email organization and productivity.
How to Access the Smart Inbox in iOS Mail
Accessing the Smart Inbox in iOS Mail is a straightforward process. By following a few simple steps, you can take advantage of its benefits and streamline your email management. Here’s how:
1. Launch the iOS Mail app on your iPhone or iPad. This app comes pre-installed on all iOS devices, so you should be able to find it easily.
2. Once you have opened the Mail app, navigate to the mailbox list. You can do this by tapping on the “Mailboxes” button located at the top left corner of the screen. This will take you to a list of your configured email accounts and folders.
3. Look for the “Smart Mailboxes” section, which should be located near the top of the mailbox list. Tap on it to access the Smart Inbox and view the automatically categorized folders.
4. You will now see the default Smart Inbox folders, including Primary, Social, and Promotions. Each folder will display the number of unread messages it contains, making it easy to identify which folders require your attention.
5. To view the emails within a specific folder, simply tap on the folder’s name. This will open a list of the contained emails, allowing you to read, reply to, or delete them as needed.
6. If you have additional Smart Inbox folders that you have created, they will also appear in the Smart Mailboxes section. You can access them by tapping on their respective names.
By following these steps, you can easily access the Smart Inbox in iOS Mail and benefit from its efficient email organization system. Keep in mind that the Smart Inbox feature relies on an active internet connection to function properly. Therefore, ensure that your device is connected to a stable network for optimal performance.
Adding Additional Smart Inbox Folders
The default Smart Inbox folders in iOS Mail provide a convenient way to categorize and manage your emails. However, you may find the need to create additional folders to further customize your email organization. Luckily, iOS Mail allows you to easily add new Smart Inbox folders. Here’s how:
1. Start by opening the iOS Mail app on your iPhone or iPad and navigate to the mailbox list. To do this, tap on the “Mailboxes” button located at the top left corner of the screen.
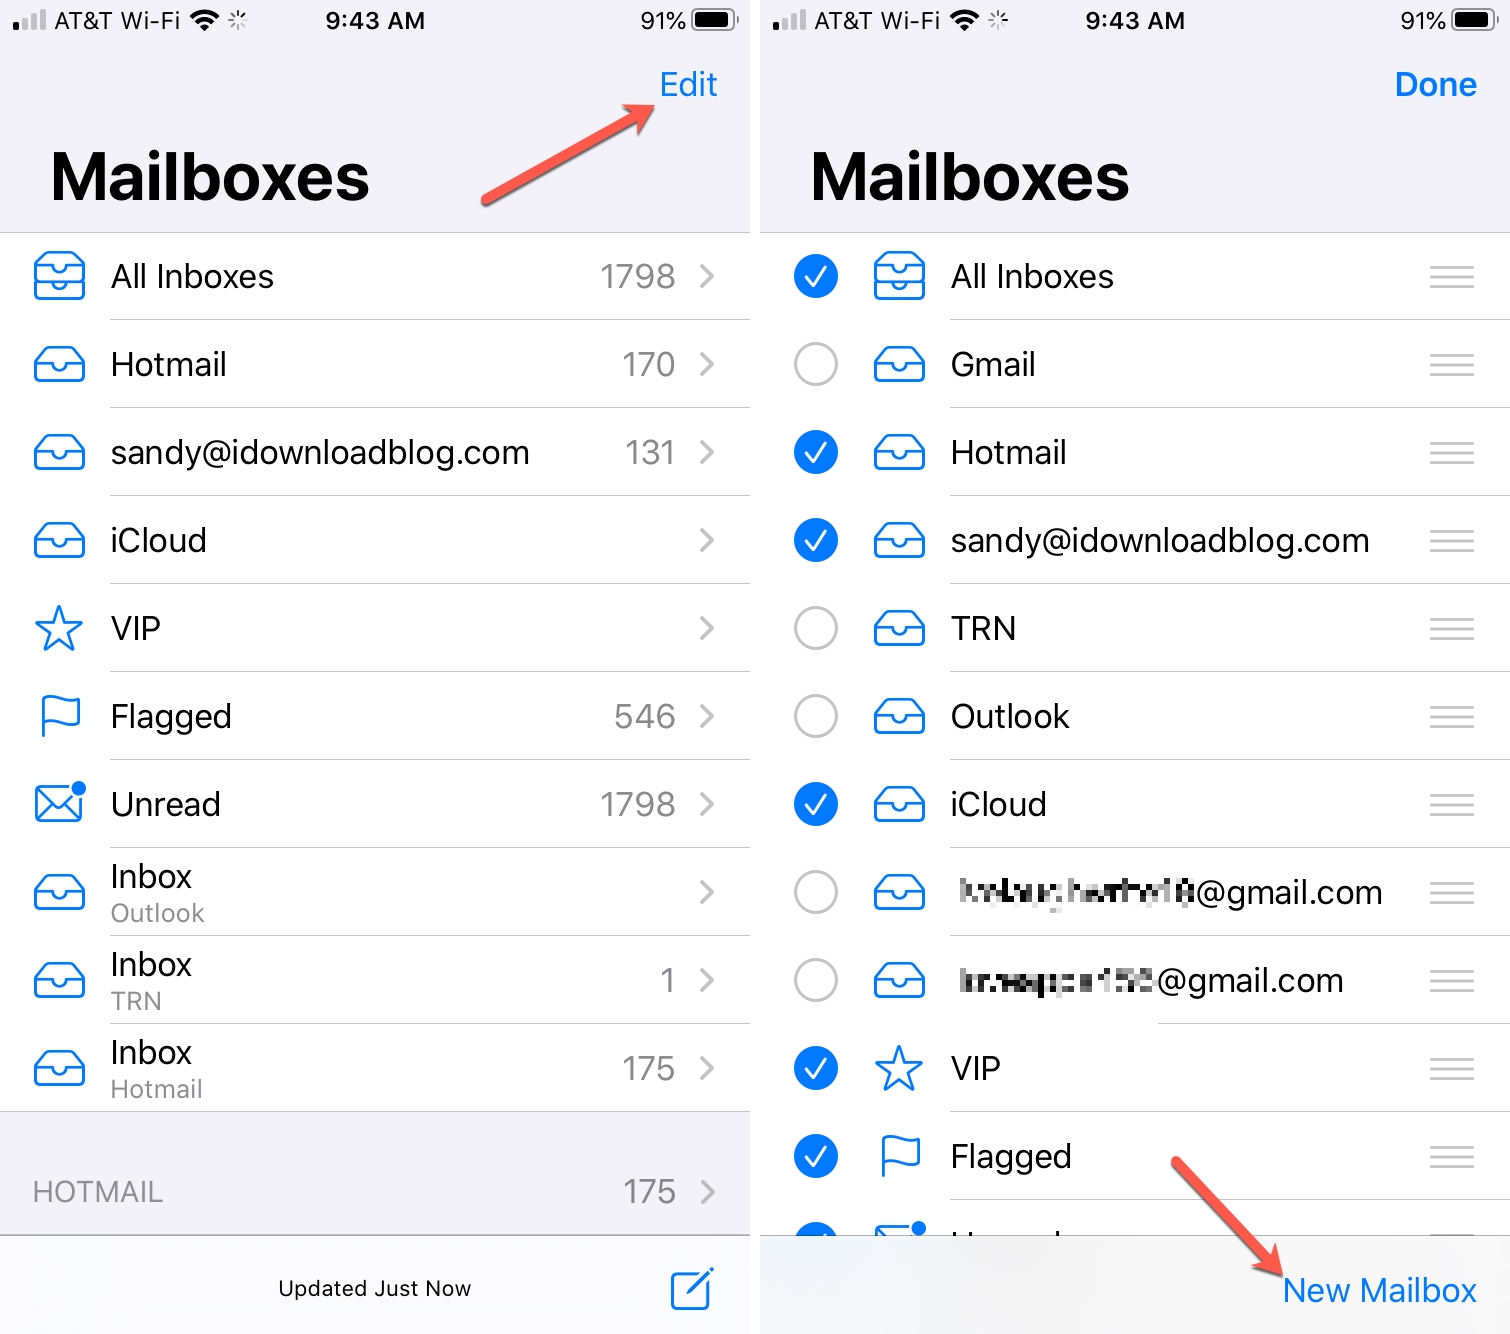
2. In the mailbox list, find the “Smart Mailboxes” section and look for the “Edit” button at the top right corner. Tap on it to enter the editing mode.
3. Once in editing mode, you will see a plus sign (+) at the bottom right corner of the screen. Tap on the plus sign to add a new folder to the Smart Inbox.
4. A list of available folders will be displayed. Scroll through the list to find the folder you want to add to the Smart Inbox. You can choose from pre-existing system folders or select a custom folder if you have created one.
5. Once you have selected the folder you want to add, tap on it to confirm your choice. The folder will now be included in the Smart Inbox and will appear in the Smart Mailboxes section.
6. You can repeat these steps to add multiple folders to the Smart Inbox, based on your preferences and specific email organization needs.
By adding additional Smart Inbox folders, you can further streamline your email management and ensure that emails from specific senders or of particular importance are easily accessible and organized. This customization enables you to prioritize and respond to emails efficiently.
It’s important to note that adding new Smart Inbox folders will not affect the existing default folders. The new folders will complement the default ones, providing you with a comprehensive email organization system.
Now that you know how to add additional Smart Inbox folders, let’s explore the process of removing folders, should you need to rearrange your email organization in the future.
Step 1: Go to the Mailboxes Section
Before you can begin adding or removing Smart Inbox folders in iOS Mail, you need to navigate to the Mailboxes section within the app. This section provides access to all your email accounts and folders. Here’s how to get there:
1. Open the iOS Mail app on your iPhone or iPad by tapping on its icon on the home screen. The app icon is typically a white envelope with a red border.
2. Once the Mail app is open, you will see the list of your email accounts displayed on the main screen. This list includes both your primary email account and any additional email accounts you have added to the app.
3. Look for the “Mailboxes” button located at the top left corner of the screen and tap on it. The button typically features a small blue mailbox icon. Tapping on it will take you to the Mailboxes section.
4. In the Mailboxes section, you will find a list of all your configured email accounts and folders. This includes your primary inbox, sent folder, drafts, junk folder, and any custom folders you have created. You will also see the Smart Mailboxes section, where the Smart Inbox folders are located.
5. To access the Smart Inbox and manage its folders, you will need to tap on the “Smart Mailboxes” section. This will expand and display the default Smart Inbox folders, such as Primary, Social, and Promotions, along with any additional folders you have added.
By following these steps and reaching the Mailboxes section in iOS Mail, you will be ready to proceed with adding or removing Smart Inbox folders to optimize your email organization and productivity.
Step 2: Tap on the Edit Button
Once you have reached the Mailboxes section in iOS Mail, the next step in adding or removing Smart Inbox folders is to tap on the Edit button. This allows you to enter the editing mode and make changes to your mailbox settings. Here’s how to do it:
1. After opening the iOS Mail app and navigating to the Mailboxes section, locate the top right corner of the screen. You will see an Edit button, typically featuring the word “Edit” in bold letters.
2. Tap on the Edit button to enter the editing mode. This action will enable you to make changes to the folders displayed in the Mailboxes section, including the Smart Inbox folders.
3. Once you have tapped on the Edit button, you will notice that each folder in the Mailboxes section now has a small circle or square icon to the left of its name. This icon indicates the selected status of the folder.
4. Tapping on the circle or square icon next to a folder will allow you to select or deselect it. When a folder is selected, it will have a checkmark inside the icon, indicating that it will be included in the Smart Inbox. Conversely, deselecting a folder means it will not be part of the Smart Inbox.
5. You can also rearrange the order of the folders by dragging them up or down. This allows you to customize the arrangement of the folders in the Smart Inbox according to your preference.
6. After you have finished making your desired changes, you can tap on the Done button, typically located in the top right corner of the screen, to exit the editing mode and save your changes.
By tapping on the Edit button in the Mailboxes section, you gain the ability to select, deselect, and rearrange folders, including the Smart Inbox folders. This step provides you with the flexibility to customize the Smart Inbox and tailor it to your specific needs for efficient email organization and management.
Step 3: Tap on the Plus Sign to Add a Folder
After entering the editing mode in the Mailboxes section of iOS Mail, the next step in adding additional Smart Inbox folders is to tap on the plus sign. This allows you to create and add a new folder to the Smart Inbox. Here’s how:
1. Once you are in the editing mode and have selected the Smart Mailboxes section, look for a plus sign (+) symbol at the bottom right corner of the screen.
2. Tap on the plus sign to initiate the process of adding a new folder to the Smart Inbox. Tapping on it will bring up a list of available folders that you can choose from.
3. In the list of available folders, you will see both system folders and any custom folders you have previously created. System folders are pre-defined folders that are part of the iOS Mail app, such as Drafts, Sent, Trash, etc.
4. Scroll through the list of available folders to find the one you want to add to the Smart Inbox. You can also use the search bar at the top of the screen to quickly locate a specific folder by typing its name.
5. Once you have found the folder you want to add, simply tap on its name to select it. This will add the folder to the Smart Inbox and include it in the list of displayed folders.
6. Remember, you can repeat this step to add multiple folders to the Smart Inbox, as needed. This allows you to create a customized email organization system that aligns with your preferences.
By tapping on the plus sign in the editing mode of the Mailboxes section, you can add new folders to the Smart Inbox in iOS Mail. This step empowers you to expand the functionality and versatility of the Smart Inbox, enhancing your email management experience and productivity.
Step 4: Choose a Folder to Add to the Smart Inbox
After tapping on the plus sign to add a new folder to the Smart Inbox in iOS Mail, the next step is to choose the specific folder you want to include in the Smart Inbox. This allows you to customize your email organization and streamline your inbox. Here’s what you need to do:
1. Once you have tapped on the plus sign, a list of available folders will appear on the screen. This list includes both system folders that come pre-installed with iOS Mail and any custom folders you have created.
2. Scroll through the list to browse the available folders. You can also use the search bar at the top of the screen to quickly find a specific folder by typing its name.
3. When you have found the folder you want to add to the Smart Inbox, simply tap on its name to select it. This action will add the folder to the Smart Inbox, and it will be displayed alongside the default Smart Inbox folders.
4. It’s important to choose a folder that aligns with your email organization needs and priorities. For example, you might want to add a folder for emails from a specific project, a particular client, or a specific category of emails that you frequently access.
5. Remember, you can repeat this step to add multiple folders to the Smart Inbox, allowing you to create a personalized email management system that suits your workflow.
By choosing a specific folder to add to the Smart Inbox, you can effectively organize your emails and ensure that important messages are readily accessible. This step enhances the flexibility and customization options of the Smart Inbox in iOS Mail, optimizing your email management experience.
Removing Additional Smart Inbox Folders
In iOS Mail, you have the flexibility to add and remove additional Smart Inbox folders to customize your email organization. If you no longer need a specific folder in your Smart Inbox, you can easily remove it. Here’s how:
Step 1: Go to the Mailboxes section
To begin removing a folder from the Smart Inbox, open the iOS Mail app on your iPhone or iPad. Navigate to the Mailboxes section, which you can access by tapping on the “Mailboxes” button located at the top left corner of the screen. This will bring up a list of your configured email accounts and folders.
Step 2: Tap on the Edit button
Once you are in the Mailboxes section, look for the “Edit” button located at the top right corner of the screen. Tap on it to enter the editing mode, which allows you to make changes to the folders in your mailbox.
Step 3: Tap on the red minus sign next to the folder you want to remove
In the editing mode, you will notice a red minus sign (-) appear next to each folder in the Smart Inbox. Locate the folder you want to remove from the Smart Inbox and tap on the red minus sign next to its name.
Step 4: Confirm the removal of the folder
After tapping on the red minus sign, a confirmation prompt will appear asking if you want to remove the folder from the Smart Inbox. Review the prompt and tap “Remove” or “Delete” to confirm the removal. The folder will no longer be included in the Smart Inbox.
By following these steps, you can easily remove additional Smart Inbox folders that are no longer needed. This allows you to keep your email organization streamlined and focused on the folders that are most relevant to your workflow.
Step 1: Go to the Mailboxes Section
The first step to remove additional Smart Inbox folders in iOS Mail is to navigate to the Mailboxes section within the app. This section provides access to all your email accounts and folders, allowing you to manage and customize your email organization. Here’s how to get there:
1. Open the iOS Mail app on your iPhone or iPad by tapping on its icon on the home screen. The app icon resembles a white envelope with a red border, and it is typically located on one of your device’s home screens.
2. Once the Mail app is open, you will see the main screen displaying a list of your email accounts and folders. These include your primary inbox, sent folder, drafts, spam, and any custom folders you have created.
3. Look for the “Mailboxes” button located at the bottom center of the screen. This button is represented by a small mailbox icon and is used to access the Mailboxes section.
4. Tap on the “Mailboxes” button to enter the Mailboxes section. This will bring up a list of all your configured email accounts and folders.
5. Within the Mailboxes section, you will see the default folders, including the Smart Inbox folders, such as Primary, Social, and Promotions. Additionally, any additional Smart Inbox folders you have created will be displayed here.
6. By accessing the Mailboxes section, you are now ready to proceed with removing additional Smart Inbox folders that are no longer needed, allowing you to refine and customize your email organization.
Remember, it’s important to take care when removing folders as deleting them could permanently delete the associated emails. Ensure that you have backed up any important emails before proceeding with folder removal.
Step 2: Tap on the Edit Button
After you have navigated to the Mailboxes section in iOS Mail, the next step in removing additional Smart Inbox folders is to tap on the Edit button. This will allow you to enter the editing mode and make changes to your mailbox settings. Here’s how to proceed:
1. Once you are in the Mailboxes section, look for the “Edit” button located at the top right corner of the screen. It is typically displayed as the word “Edit” in bold text.
2. Tap on the Edit button to enter the editing mode. This will enable you to modify the folders that are displayed in the Mailboxes section, including the Smart Inbox folders.
3. Upon tapping the Edit button, you will notice that each folder in the Mailboxes section now has a small circle or square icon beside its name. This icon indicates the selected status of the folder.
4. To remove a folder from the Smart Inbox, tap on the circle or square icon next to its name. When the folder is selected, a checkmark will appear inside the icon, indicating that it will be removed from the Smart Inbox.
5. As you tap the icon, the folder will be deselected, and the checkmark will disappear. This action signifies that the folder has been removed from the Smart Inbox and will no longer appear in the list of displayed folders.
6. It’s important to note that removing a folder from the Smart Inbox does not delete the folder or its contents; it simply removes it from the Smart Inbox view. The folder will still be accessible in the regular mailbox view.
With the Edit button, you gain the ability to select and deselect folders, including the Smart Inbox folders, in order to remove them from the Smart Inbox. This step provides you with the flexibility to customize your email organization and optimize your mailbox’s efficiency.
Step 3: Tap on the Red Minus Sign Next to the Folder You Want to Remove
Once you have entered the editing mode in the Mailboxes section of iOS Mail, the next step in removing an additional Smart Inbox folder is to tap on the red minus sign next to the specific folder you want to remove. This action signifies that you no longer wish to include the folder in the Smart Inbox. Here’s how to proceed:
1. Upon entering the editing mode, you will see a red minus sign (-) appear beside each folder in the Mailboxes section.
2. Navigate through the list of folders and locate the one that you want to remove from the Smart Inbox. This could be a custom folder you have created or an already included Smart Inbox folder.
3. Tap on the red minus sign next to the folder’s name. This will initiate the removal process.
4. As you tap on the red minus sign, a confirmation prompt may appear, asking you to confirm the removal of the folder from the Smart Inbox. Read the prompt carefully and take note of any warnings or notifications before proceeding.
5. Depending on the iOS version and configuration, the prompt may display options such as “Remove” or “Delete.” Tap on the appropriate option to confirm the removal.
6. After confirming the removal, the folder will no longer be included in the Smart Inbox. However, it will still be available in the regular mailbox view, allowing you to access its contents if needed.
By tapping on the red minus sign next to the folder you want to remove, you can easily eliminate unnecessary or less-used folders from the Smart Inbox. This step provides you with the flexibility to refine your email organization and streamline your focus on the most relevant folders in the Smart Inbox.
Step 4: Confirm the Removal of the Folder
After tapping on the red minus sign next to the folder you want to remove from the Smart Inbox in iOS Mail, the next step is to confirm the removal. This ensures that you intentionally want to remove the folder from the Smart Inbox. Here’s how to proceed:
1. Once you tap on the red minus sign, a confirmation prompt will appear on the screen. This prompt is designed to double-check your decision and prevent accidental removal of folders.
2. Read the confirmation prompt carefully, as it may provide additional information about the consequences of removing the folder. Pay attention to any warnings or notifications that may be present.
3. Depending on the iOS version and configuration, you may see options such as “Remove” or “Delete” in the confirmation prompt. These options indicate that you are about to remove the selected folder from the Smart Inbox.
4. Take a moment to review your decision before proceeding. Ensure that you have backed up any important emails within the folder, as removing the folder from the Smart Inbox may affect its visibility in the Smart Inbox view.
5. Tap on the appropriate option in the confirmation prompt to confirm the removal. For example, you may tap “Remove” or “Delete” to proceed.
6. After confirming the removal, the selected folder will be removed from the Smart Inbox. However, it will still be available in the regular mailbox view, allowing you to access its contents if needed.
By confirming the removal of the folder, you ensure that the removal is intentional and prevent any accidental deletions. This step adds an extra layer of confirmation to your decision, allowing you to maintain control over your email organization and Smart Inbox folders.
Tips and Tricks for Managing Smart Inbox Folders
Managing Smart Inbox folders in iOS Mail is key to maintaining a well-organized and efficient email system. Here are some tips and tricks to help you make the most out of your Smart Inbox folders:
1. Regularly review and declutter: Take the time to review your Smart Inbox folders periodically and remove any folders that are no longer necessary or relevant. This will help keep your Smart Inbox clean and focused on the folders that truly matter.
2. Customize folder names: Consider renaming your Smart Inbox folders to more accurately reflect their contents. This will make it easier to locate specific folders and understand the purpose of each one at a glance.
3. Prioritize important folders: Rearrange the order of your Smart Inbox folders to reflect the priority of the content within each folder. Place the most critical or frequently accessed folders at the top of the list for quick and easy access.
4. Utilize color-coded labels: If you have enabled the label feature in iOS Mail, you can assign different colors to your Smart Inbox folders. This visual organization method allows you to quickly identify and sort emails based on their respective folders.
5. Take advantage of folder notifications: iOS Mail allows you to enable notifications for specific Smart Inbox folders. By doing so, you can receive real-time alerts for new emails in those folders, ensuring that you never miss important messages.
6. Create subfolders: To further organize your Smart Inbox, consider creating subfolders within existing folders. This hierarchical structure allows for even more granular categorization and enhances your ability to find specific emails.
7. Utilize search functionality: When searching for specific emails within your Smart Inbox, iOS Mail offers powerful search capabilities. Utilize keywords, sender names, or subject lines to quickly locate the emails you need, saving you time and effort.
8. Archive or delete outdated emails: Regularly review and archive or delete emails that are no longer relevant or necessary. Clearing out unnecessary clutter in your Smart Inbox not only improves organization but also enhances email load times and overall performance.
9. Experiment with filters: Explore the filtering options available in iOS Mail to automatically sort incoming emails into relevant Smart Inbox folders based on criteria such as sender, subject, or keywords. This can help streamline email organization and reduce the manual effort required.
10. Stay consistent: Develop a system and stick to it. Consistency in how you manage your Smart Inbox folders will allow you to quickly and efficiently navigate your email and maintain a clutter-free inbox.
By employing these tips and tricks, you can optimize your Smart Inbox folders in iOS Mail and enjoy a streamlined and efficient email management experience.