
Understanding your Mac Drive
Understanding your Mac Drive
Before diving into the process of adding, deleting, or resizing a partition on your Mac drive, it’s essential to have a clear understanding of what a Mac drive is and its importance. Your Mac drive, also known as a hard drive or SSD (Solid State Drive), is the primary storage device on your Mac computer where all your files, applications, and operating system are stored.
Your Mac drive is divided into one or more partitions, which act as separate sections of the drive. Each partition can have its own file system, allowing you to organize your data in a structured manner. For example, you might have a partition dedicated to your operating system, another for your personal files, and yet another for your work-related data.
When you add, delete, or resize a partition on your Mac drive, you are essentially modifying the division of space and allocating it for specific purposes. This can be particularly useful if you want to create separate sections for different types of data or if you need to reclaim space from one partition to allocate it to another.
It’s important to note that adding, deleting, or resizing a partition can have implications for the data stored on your Mac drive. Therefore, it’s crucial to follow the appropriate procedures and back up your important files before proceeding. Additionally, it’s recommended that you have a basic understanding of the tools and methods used to perform these operations, such as Disk Utility or Terminal.
By gaining a clear understanding of how your Mac drive works and the potential consequences of modifying partitions, you can approach the process with confidence and ensure your data remains safe throughout. In the following sections, we will explore the step-by-step methods of adding, deleting, and resizing partitions on your Mac drive using both Disk Utility and Terminal.
Adding a New Partition to Your Mac Drive
Adding a New Partition to Your Mac Drive
If you find yourself needing an additional section on your Mac drive to store specific data or to install a different operating system, you can easily add a new partition. This allows you to keep your existing data intact while creating a separate space for your new files.
To add a new partition, you can use either Disk Utility or Terminal, depending on your preference and familiarity with the tools. Here’s a step-by-step guide on how to add a new partition using Disk Utility:
- Launch Disk Utility. You can find it in the Applications folder under Utilities, or you can use Spotlight to search for it.
- Select your Mac drive from the left-hand sidebar. It is usually named “Macintosh HD” or the specific name given to your drive.
- Click on the “+” button located at the top of the Disk Utility window.
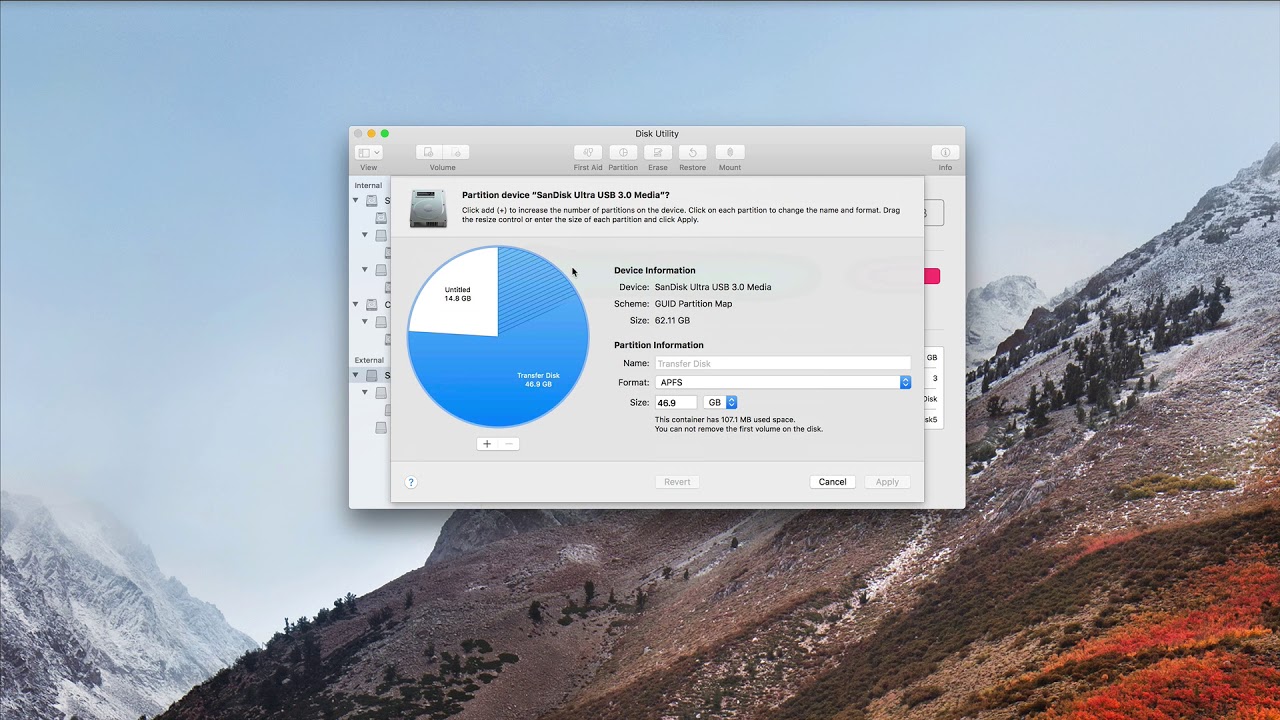
- A new window will appear. Enter a name for your new partition, choose the size you want to allocate for it, and select the file system format (typically either APFS or Mac OS Extended).
- Click “Apply” to create the new partition. Disk Utility will resize your existing partition to create space for the new one.
- Wait for the process to complete, and once done, you will see the new partition listed in the Disk Utility window.
If you prefer using Terminal, you can follow these steps:
- Launch Terminal. You can find it in the Applications folder under Utilities, or you can use Spotlight to search for it.
- Enter the command “diskutil list” to display a list of your connected drives and their current partitions.
- Identify your Mac drive and take note of its disk identifier (diskX).
- Enter the command “diskutil partitionDisk diskX GPT formatName size” where “diskX” is the identifier of your Mac drive, “formatName” is the desired name for the new partition format, and “size” is the size you want to allocate for the new partition (e.g., 100GB).
- Confirm the command by pressing Enter. Terminal will create the new partition on your Mac drive.
- Wait for the process to complete, and once done, you can verify the new partition using the “diskutil list” command again.
By following these steps, you can successfully add a new partition to your Mac drive, giving you the flexibility to organize your data and expand your storage capacity.Deleting a Partition from Your Mac Drive
Deleting a Partition from Your Mac Drive
There may come a time when you no longer need a specific partition on your Mac drive and want to reclaim the space for other purposes. When deleting a partition, it’s important to note that all the data stored within that partition will be permanently erased. Therefore, make sure you have backed up any important files before proceeding.
To delete a partition, you can use Disk Utility or Terminal. Here’s a step-by-step guide on how to delete a partition using Disk Utility:
- Launch Disk Utility from the Applications folder under Utilities or use Spotlight to search for it.
- Select your Mac drive from the left-hand sidebar.
- Click on the “Partition” tab.
- You will see a visual representation of your drive with its partitions. Locate the partition you want to delete and select it.
- Click on the “-” button located at the bottom of the Disk Utility window.
- Confirm the deletion by clicking “Remove.”
- Wait for the process to complete, and the selected partition will be deleted from your Mac drive.
If you prefer using Terminal, you can follow these steps:
- Launch Terminal from the Applications folder under Utilities or use Spotlight to search for it.
- Enter the command “diskutil list” to display a list of your connected drives and their current partitions.
- Identify the partition you want to delete and take note of its disk identifier (diskXsY).
- Enter the command “diskutil eraseVolume formatName diskXsY” where “formatName” is the format of the partition (e.g., APFS), and “diskXsY” is the identifier of the partition to be deleted.
- Confirm the command by pressing Enter. Terminal will erase the selected partition.
By following these steps, you can effectively delete a partition from your Mac drive. Remember to double-check, back up your important data, and proceed with caution to avoid deleting the wrong partition accidentally.
Resizing a Partition on Your Mac Drive
Resizing a Partition on Your Mac Drive
Sometimes, you may find that the allocation of space among the existing partitions on your Mac drive needs adjustment. Resizing a partition allows you to modify the amount of space allocated to a specific partition without deleting any data. This can be particularly useful when you need to increase or decrease the size of a partition to better suit your needs.
To resize a partition, you can use either Disk Utility or Terminal. Here’s a step-by-step guide on how to resize a partition using Disk Utility:
- Launch Disk Utility from the Applications folder under Utilities or use Spotlight to search for it.
- Select your Mac drive from the left-hand sidebar.
- Click on the “Partition” tab.
- You will see a visual representation of your drive with its partitions. Locate the partition you want to resize.
- Click and drag the dividing line between the partitions to increase or decrease the size of the selected partition.
- Adjust the size until you are satisfied with the new allocation of space.
- Click “Apply” to save the changes.
- Wait for the process to complete, and the selected partition will be resized accordingly.
If you prefer using Terminal, you can follow these steps:
- Launch Terminal from the Applications folder under Utilities or use Spotlight to search for it.
- Enter the command “diskutil list” to display a list of your connected drives and their current partitions.
- Identify the partition you want to resize and take note of its disk identifier (diskXsY).
- Enter the command “diskutil resizeVolume diskIdentifier size” where “diskIdentifier” is the identifier of the partition you want to resize (e.g., disk0s3) and “size” is the desired new size of the partition.
- Confirm the command by pressing Enter. Terminal will resize the selected partition.
By following these steps, you can easily resize a partition on your Mac drive, ensuring that your allocated space is optimized for your specific needs. However, it’s important to note that resizing a partition may require reformatting or modifying the existing data on that partition. Therefore, make sure you have a backup of your important files before proceeding and exercise caution to avoid any unintentional data loss.
Preparation before Adding, Deleting, or Resizing a Partition
Preparation before Adding, Deleting, or Resizing a Partition
Before you embark on adding, deleting, or resizing a partition on your Mac drive, it is crucial to take certain preparations. These preparations will help ensure a smooth and successful process while minimizing the risk of data loss. Here are some key steps to consider:
- Backup your data: Before making any changes to your Mac drive, it is vital to back up all your important files and data. This will serve as a safety net in case anything goes wrong during the partitioning process. You can use Time Machine or other backup methods to create a backup of your entire system or specific files.
- Ensure available space: Before adding a new partition or resizing an existing one, make sure you have sufficient free space on your Mac drive. Check the available storage capacity and ensure that you have enough room to accommodate the changes you intend to make.
- Check for errors: Run a disk verification tool, such as Disk Utility, to scan your Mac drive for any errors or issues. Repair any identified problems before proceeding with the partitioning process to minimize the risk of data corruption or complications during the operation.
- Research the process: Take the time to research and understand the specific steps and requirements involved in adding, deleting, or resizing a partition on your Mac drive. Familiarize yourself with the tools you plan to use, such as Disk Utility or Terminal, and ensure you know the potential consequences of each action.
- Identify the right tool: Evaluate whether using Disk Utility or Terminal is the most suitable method for your needs and level of expertise. Disk Utility provides a user-friendly graphical interface, while Terminal offers more advanced control and flexibility. Choose the option that aligns with your comfort level and make sure you have a good understanding of the chosen tool.
- Read official documentation: Consult the official documentation and user guides provided by Apple to gain a comprehensive understanding of the partitioning process. These resources can provide additional insights, tips, and troubleshooting steps to ensure a successful operation.
By following these preparatory steps, you will be better equipped for adding, deleting, or resizing a partition on your Mac drive. These precautions will help minimize the risk of data loss, prevent potential complications, and ensure a smoother overall experience. Remember, taking the time to prepare adequately will ultimately lead to a more successful and stress-free partitioning process.Using Disk Utility to Add, Delete, or Resize a Mac Drive
Using Disk Utility to Add, Delete, or Resize a Mac Drive
Disk Utility is a powerful tool provided by Apple that allows Mac users to manage their storage devices, including adding, deleting, and resizing partitions on their Mac drive. With its user-friendly graphical interface, Disk Utility provides a straightforward way to perform these operations. Here’s a step-by-step guide on how to use Disk Utility to add, delete, or resize a Mac drive partition:
- Launch Disk Utility: Locate Disk Utility by navigating to the Applications folder under Utilities. Alternatively, you can use Spotlight to search for it.
- Select your Mac drive: In the Disk Utility window, you will see a list of available drives and volumes. Select your Mac drive from the left-hand sidebar. It is typically named “Macintosh HD” or the specific name you have given to your drive.
- Adding a new partition: To add a new partition, click on the “+” button located at the top of the Disk Utility window. A new window will appear where you can enter a name for the new partition, choose the desired size, and select the appropriate file system format (such as APFS or Mac OS Extended). Click “Apply” to create the new partition.
- Deleting a partition: To delete a partition, go to the “Partition” tab in Disk Utility. Locate the partition you want to delete from the visual representation of your drive. Select the partition and click on the “-” button at the bottom of the window. Confirm the deletion by clicking “Remove.”
- Resizing a partition: To resize a partition, go to the “Partition” tab in Disk Utility. Adjust the size of the partitions by clicking and dragging the dividing line between them. Expand or shrink the desired partition until you are satisfied with the new allocation of space. Click “Apply” to save the changes.
Once you have performed the desired operation (adding, deleting, or resizing), Disk Utility will automatically adjust the partitions on your Mac drive. It is important to note that these operations may take some time to complete, depending on the size and complexity of your drive. Be patient and allow the process to finish without interruption.
By using Disk Utility, you can easily add, delete, or resize partitions on your Mac drive. Its intuitive interface and straightforward steps make it a popular choice for many Mac users. However, always ensure that you have a backup of your data and follow the necessary precautions to avoid any unintentional data loss or complications during the partitioning process.Using Terminal to Add, Delete, or Resize a Mac Drive
Using Terminal to Add, Delete, or Resize a Mac Drive
For users comfortable with command-line interfaces and seeking more control over adding, deleting, or resizing partitions on their Mac drive, Terminal provides a powerful alternative to Disk Utility. By utilizing various command-line commands, you can perform these operations with precision. Here’s a step-by-step guide on how to use Terminal to add, delete, or resize a Mac drive partition:
- Launch Terminal: Locate Terminal by navigating to the Applications folder under Utilities. Alternatively, you can use Spotlight to search for it.
- Obtain disk information: In Terminal, enter the command “diskutil list” to display a list of connected drives and their current partitions. Identify your Mac drive and make note of its disk identifier (diskX).
- Adding a new partition: To add a new partition, enter the command “diskutil partitionDisk diskX GPT formatName size” where “diskX” is the identifier of your Mac drive, “formatName” is the desired name for the new partition format, and “size” is the size you want to allocate for the new partition (e.g., 100GB).
- Deleting a partition: To delete a partition, enter the command “diskutil eraseVolume formatName diskXsY” where “formatName” is the format of the partition (e.g., APFS) and “diskXsY” is the identifier of the partition to be deleted.
- Resizing a partition: To resize a partition, enter the command “diskutil resizeVolume diskIdentifier size” where “diskIdentifier” is the identifier of the partition you want to resize (e.g., disk0s3) and “size” is the desired new size of the partition.
When executing these commands in Terminal, ensure that you have selected the correct disk identifier and have verified the command before pressing “Enter.” Any mistakes or unintended operations can have irreversible consequences for your data, so exercise caution and double-check your inputs.
Terminal provides a more advanced and granular approach to adding, deleting, or resizing partitions on your Mac drive. However, due to its command-line nature, it requires a higher level of technical understanding and precision. Make sure you have a backup of your data before proceeding with any operations, and it’s advisable to familiarize yourself with the specific commands and their implications by consulting official documentation or reliable resources.
Using Terminal can be a powerful way to manage your Mac drive partitions, but it carries a greater responsibility for ensuring accuracy and caution throughout the process. If you are not comfortable with command-line interfaces, it’s recommended to use Disk Utility, which provides a more user-friendly graphical interface for managing partitions on your Mac drive.Common Issues and Troubleshooting
Common Issues and Troubleshooting
While adding, deleting, or resizing partitions on your Mac drive can generally be a straightforward process, there are some common issues that may arise during the operation. Understanding these issues and how to troubleshoot them can help you overcome any challenges you encounter. Here are some of the most common issues and their potential solutions:
- Incorrect disk selection: One common mistake is accidentally selecting the wrong disk for partitioning. Before proceeding, double-check that you have chosen the correct disk and partition to add, delete, or resize.
- Insufficient space: If you encounter an error stating that there is not enough free space on your Mac drive, check your available storage capacity. Ensure that you have enough space to accommodate the changes you want to make. You may need to delete unnecessary files or free up space by moving data to an external drive.
- Data loss: Although rare, data loss can occur if you accidentally choose the wrong partition or encounter a technical error during the partitioning process. To avoid data loss, always back up your important files before making any changes. In the event of data loss, consult professional data recovery services to attempt the recovery of your lost files.
- Partitioning errors: If you encounter errors or abnormalities during the partitioning process, such as failed operations or the inability to create or delete partitions, try running First Aid in Disk Utility to repair any underlying issues with your Mac drive. If the problem persists, consider seeking assistance from Apple support or an authorized service provider.
- Command errors in Terminal: When using Terminal, syntax errors or incorrect commands can lead to unexpected results or failure to execute the desired partitioning operation. Always ensure that you have entered the commands accurately, including the correct disk identifiers and formatting options.
If you encounter any issues or errors during the partitioning process, it is advisable to pause and reassess the situation. Take the time to troubleshoot and research the specific problem to find the most appropriate solution. Consulting official documentation, online forums, or seeking assistance from experienced users or professionals can help resolve any challenges you may face.
By being aware of common issues and knowing how to troubleshoot them, you can navigate the partitioning process with confidence. Remember to proceed with caution, have backups in place, and seek assistance whenever needed to ensure a smooth and successful partitioning experience on your Mac drive.