
Finding Contacts on Skype
One of the key features of Skype is the ability to connect and communicate with friends, family, colleagues, and people from all over the world. But how do you find and add contacts on Skype? In this guide, we will show you different methods to find and add contacts on Skype, making it easier for you to stay connected.
Here are a few ways to find contacts on Skype:
- Search by Username: If you know the username of the person you want to add, you can simply search for them using the search bar at the top of the Skype window. Enter the username, hit enter, and you will be able to find and add them as a contact.
- Search by Email: If you have someone’s email address, you can use it to search for and add them on Skype. Go to the “Contacts” tab, click on “Add Contacts”, and select the option to add contacts by email.
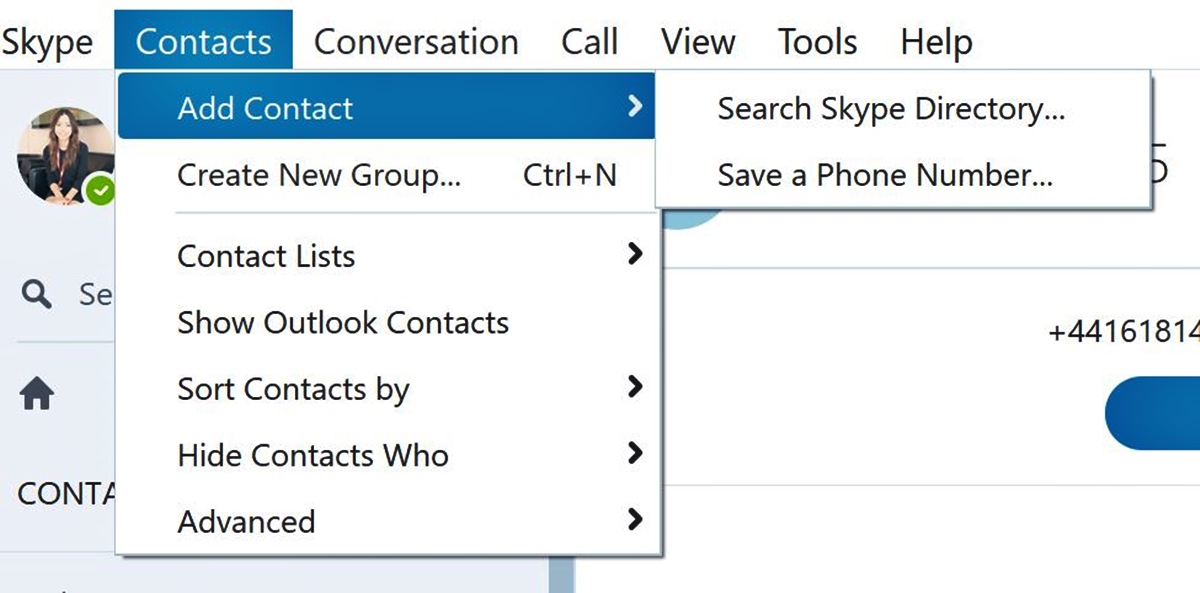
- Skype Directory: The Skype Directory is a database where you can find and connect with people who share common interests or are part of the same community. Simply go to “Contacts” and click on “Add Contacts”. From there, you can search for contacts using keywords or browse through different categories to find people you want to connect with.
- Device Contacts: If you have contacts saved on your device, you can sync them with Skype to add them as contacts. This makes it convenient to connect with people you already have in your phonebook or email contacts list.
Once you have found the contact you want to add, you can send them a contact request. This will enable you to start communicating with them, whether through instant messages, voice calls, or video calls.
Adding and finding contacts on Skype is an easy process that allows you to stay connected with the people who matter to you. So go ahead and start building your Skype contacts list today!
Adding Contacts by Username
Adding contacts on Skype by username is a straightforward process that allows you to connect with people using their unique Skype usernames. Here’s how you can add contacts by username:
- Open Skype: Launch the Skype application on your device and log in to your account.
- Search for the Username: Once logged in, navigate to the search bar at the top of the Skype window.
- Enter the Username: Type the username of the person you want to add as a contact in the search bar. Make sure you enter the correct username to find the right person.
- Search: Press the Enter key or click on the magnifying glass icon to start the search.
- Select the User: Skype will display a list of results that match the username you entered. Click on the name of the person you want to add as a contact.
- Add Contact: On the user’s profile page, click on the “Add contact” button. A contact request will be sent to the person you want to add.
- Wait for Confirmation: The user will receive your contact request and can choose to accept or decline it. If they accept your request, they will be added to your Skype contacts list.
Once the contact has accepted your request, you will be able to start communicating with them through Skype. You can send instant messages, make voice calls, or even initiate video calls to stay connected.
Adding contacts by username is a convenient way to connect with friends, family, and colleagues on Skype. Whether you want to stay in touch with loved ones or collaborate with colleagues, adding contacts by username ensures that you can easily find and connect with the people you need.
Adding Contacts by Email
Another method to add contacts on Skype is by using their email address. Adding contacts by email allows you to connect with people who may not have a Skype username or whose username you might not know. Here’s how you can add contacts on Skype by email:
- Open Skype: Launch the Skype application on your device and log in to your account.
- Access Contacts: Once logged in, go to the “Contacts” tab located at the top left corner of the Skype window.
- Click on “Add Contacts”: In the Contacts tab, click on the “Add Contacts” button. A drop-down menu will appear.
- Select “Add Contacts by Email”: From the drop-down menu, choose the option “Add Contacts by Email”.
- Enter email address: A pop-up window will appear, prompting you to enter the email address of the person you want to add as a contact. Type in the email address and click on “Add”.
- Send Invitation: Skype will send an invitation to the provided email address, notifying the recipient that you would like to add them as a contact on Skype.
The person receiving the invitation will have the option to accept or decline it. If they accept the invitation, they will be added to your Skype contacts list, and you will be able to start communicating with them through Skype’s features.
With the ability to add contacts by email, you can easily connect with a wider network of people on Skype. Whether it’s adding new clients, collaborating with colleagues, or staying in touch with friends and family, adding contacts by email expands your communication possibilities on Skype.
Adding Contacts from the Skype Directory
The Skype Directory is a valuable tool for finding and connecting with people who share common interests or belong to the same community. By using the Skype Directory, you can easily add new contacts to your Skype list. Here’s how you can add contacts from the Skype Directory:
- Open Skype: Launch the Skype application on your device and log in to your account.
- Access the Skype Directory: Once logged in, go to the “Contacts” tab located at the top left corner of the Skype window.
- Click on “Add Contacts”: In the Contacts tab, click on the “Add Contacts” button. A drop-down menu will appear.
- Select “Go to Directory”: From the drop-down menu, choose the option “Go to Directory”. This will open up the Skype Directory.
- Search for Contacts: In the Skype Directory, you can search for contacts using keywords or browse through different categories to find people you want to connect with. You can search by name, location, interests, or other relevant criteria.
- View Profiles: When you find a contact that you’d like to add, click on their profile to view more details. This includes information about their background, interests, and any additional contact details they have chosen to share.
- Add Contact: On the profile page, click on the “Add contact” button. A contact request will be sent to the person you want to add.
- Await Confirmation: The user will receive your contact request and can choose to accept or decline it. If they accept your request, they will be added to your Skype contacts list.
Adding contacts from the Skype Directory is an excellent way to expand your network and connect with like-minded individuals across the globe. It opens up opportunities for professional networking, exploring new hobbies, or simply making new friends.
By utilizing the Skype Directory, you can easily find and add contacts that align with your interests, making your Skype experience more rewarding and engaging.
Adding Contacts from your Device Contacts
Adding contacts from your device contacts list is a convenient way to quickly connect with people you already have saved on your phone or email contacts. Skype allows you to sync your device contacts, making it easy to find and add contacts from your existing list. Here’s how you can add contacts from your device contacts:
- Open Skype: Launch the Skype application on your device and log in to your account.
- Access Contacts: Once logged in, go to the “Contacts” tab located at the top left corner of the Skype window.
- Click on “Add Contacts”: In the Contacts tab, click on the “Add Contacts” button. A drop-down menu will appear.
- Select “Add from Device Contacts”: From the drop-down menu, choose the option “Add from Device Contacts”.
- Enable Contact Sync: Skype will ask for your permission to access your device contacts. Grant the necessary permissions to allow Skype to sync your device contacts with your Skype account.
- Sync Contacts: Once you grant permission, Skype will automatically sync your device contacts. It will compare the contacts in your device with existing Skype accounts and display a list of potential contacts you can add.
- Select Contacts to Add: Review the list of contacts that Skype suggests and select the ones you want to add to your Skype contacts list.
- Add Contacts: Click on the “Add contact” button to send contact requests to the selected contacts. The contacts will then receive your request.
Once the contacts have accepted your request, they will be added to your Skype contacts list. You can now easily communicate with them through Skype, whether it’s through text messages, voice calls, or video calls.
Adding contacts from your device contacts list streamlines the process of expanding your Skype network. It allows you to effortlessly connect with people you already know, making it easier to stay in touch and communicate with your existing contacts.
Sending Contact Requests
Once you have found the contact you want to add on Skype, you will need to send them a contact request. A contact request is a way to express your interest in connecting with someone on Skype. Here’s how you can send contact requests:
- Open Skype: Launch the Skype application on your device and log in to your account.
- Search for the Contact: Use one of the methods discussed earlier to find the person you want to add as a contact on Skype (e.g., username, email, Skype Directory, or device contacts).
- Access the Contact Profile: Click on the name of the person you want to add to open their Skype profile.
- Click on the “Add contact” Button: On the profile page, you will usually find an “Add contact” or “Send contact request” button. Click on it to send the contact request.
- Personalize the Contact Request (Optional): Some people prefer receiving personalized contact requests, so consider adding a brief note introducing yourself or explaining why you want to connect with them.
- Send the Contact Request: Once you are ready, click the “Send” button to send the contact request. The request will be sent to the person’s Skype account.
After sending the contact request, the person will receive a notification informing them of your request. They can then choose to accept or decline the request. If they accept, they will be added to your Skype contacts list, and you can start communicating with them through Skype’s various features.
It’s essential to be respectful when sending contact requests on Skype. Make sure you have a valid reason for wanting to connect with someone and provide any necessary context in your request if required. This will demonstrate genuine interest and increase the likelihood of the person accepting your request.
Sending contact requests on Skype is a simple process that enables you to connect with new people and expand your network. By reaching out to others and initiating contact, you can foster new relationships and broaden your communication possibilities on Skype.
Accepting Contact Requests
When someone sends you a contact request on Skype, it means they are interested in connecting and communicating with you. Accepting contact requests allows you to expand your network and engage with new connections. Here’s how you can accept contact requests on Skype:
- Open Skype: Launch the Skype application on your device and log in to your account.
- Check Pending Requests: You will receive a notification or see a notification badge indicating that you have pending contact requests. Click on the notification or navigate to the “Contacts” tab to access your pending requests.
- Review the Contact Request: In the pending requests section, you will find the contact requests you have received. Take the time to review the information provided by the requester, including their name, profile information, and any personalized message they may have sent.
- Accept or Decline: After reviewing the request, you can choose whether to accept or decline it. If you accept the request, the person will be added to your Skype contacts list, and you can start communicating with them.
- Personalize Your Response (Optional): If you wish to, you can send a brief message to the requester to acknowledge the request or initiate a conversation.
- Start Communicating: Once you have accepted the contact request, it’s time to start communicating with your new contact. You can send text messages, make voice or video calls, or even share files to connect and engage with them.
When accepting contact requests, it’s important to keep in mind your own comfort level and the nature of the request. Only accept requests from people you are genuinely interested in connecting with and engaging in meaningful communication.
Remember that accepting contact requests opens up new possibilities for networking, collaboration, and building relationships on Skype. Embrace the opportunities to connect with others and make the most out of your Skype experience.
Managing your Contacts List
As you use Skype to connect with friends, family, colleagues, and other contacts, your contacts list will continue to grow. Managing your contacts list efficiently ensures that you can easily find and communicate with the right people. Here are some tips for managing your contacts list on Skype:
- Keep it Organized: Create a system for organizing your contacts list. You can categorize contacts into groups based on relationships, such as friends, family, or work contacts. This makes it easier to navigate and find specific contacts when needed.
- Remove Inactive or Unused Contacts: Regularly review your contacts list and remove any contacts that you no longer interact with or have become inactive. This helps declutter your list and keeps it updated with relevant and active contacts.
- Edit Contact Details: Keep contact details up to date by editing the contact information when necessary. If a contact changes their email address, phone number, or any other relevant details, make sure to update their information in your Skype contacts list.
- Utilize Tags or Notes: Use tags or notes to add additional context to specific contacts. You can tag contacts with keywords or add notes with reminders or important information about each contact. This can help you remember important details or easily search for specific contacts.
- Backup Your Contacts: To ensure you don’t lose your contacts in case of any device or application issues, consider backing up your Skype contacts. You can export your contacts as a file and save it in a secure location. This way, you can restore your contacts quickly if needed.
By taking the time to manage your contacts list effectively, you can streamline your communication process and have a more organized experience on Skype. Whether you are connecting with friends, coordinating with colleagues, or collaborating with business partners, an organized contacts list helps you stay connected with ease.
Remember to regularly review and update your contacts list to reflect your current network. This ensures that you have an up-to-date list of contacts that align with your communication needs on Skype.
Organizing Contacts into Groups
As your contacts list on Skype grows, organizing your contacts into groups can help you stay organized and efficiently manage your communication with different sets of people. Grouping contacts allows you to categorize them based on relationships, interests, or any other criteria that make sense to you. Here’s how you can organize your contacts into groups on Skype:
- Create New Groups: In the Skype application, navigate to the “Contacts” tab and locate the “Create New Group” option. Click on it to create a new group.
- Assign Group Name: Give your group a name that accurately represents the contacts you intend to include in it. For example, you might have groups for “Friends,” “Family,” “Work Colleagues,” or “Project Team.”
- Add Contacts to the Group: To add contacts to the group, simply drag and drop the desired contacts into the newly created group. You can also right-click on a contact and select the option to “Move to Group” and choose the appropriate group.
- Customize Group Settings: You can further customize each group by right-clicking on the group name and accessing the group settings. Here, you can change the group’s display picture, set notification preferences, and manage the privacy settings for the group.
- Navigate Contacts by Groups: Once your contacts are organized into groups, you can easily navigate through your contacts list and locate specific individuals by accessing the respective group. This simplifies the process of finding and communicating with contacts in a particular category.
- Make Use of Nested Groups: Skype allows you to create nested groups, which means you can create subgroups within existing groups. This is particularly helpful when you have multiple subcategories within a larger group to further refine your organization.
Organizing contacts into groups provides a structured and efficient approach to managing your Skype contacts list. Whether you want to prioritize specific groups for quick access or maintain clear divisions between personal and professional contacts, grouping your contacts helps streamline your communication on Skype.
Remember to regularly review and update your groups as your network evolves. This way, you can ensure your contacts remain organized and reflect the dynamic nature of your relationships and interests over time.
Blocking and Removing Contacts
While Skype is a platform for connecting with people, there may be instances where you need to block or remove certain contacts from your list. Whether it’s for privacy, security, or personal reasons, knowing how to block and remove contacts is essential. Here’s how you can manage unwanted contacts on Skype:
- Blocking Contacts: To block a contact, locate their name in your Skype contacts list. Right-click on their name and select the option to “Block Contact.” This action prevents the blocked contact from contacting you and seeing your online status. Blocked contacts will not be notified that they have been blocked.
- Unblocking Contacts: If you decide to unblock a contact, go to your blocked contacts list by clicking on your profile picture, selecting “Settings”, and then “Contacts & SMS”. From there, you can view your blocked contacts and choose to unblock specific ones.
- Removing Contacts: To remove a contact from your Skype contacts list, right-click on their name and select the option to “Remove from Contacts.” This action removes the contact from your list, and they will no longer appear in your contacts tab or be able to contact you through Skype.
- Managing Blocked Contacts List: If you want to view and manage your blocked contacts list, you can go to your Skype settings, select “Privacy,” and then “Blocked Contacts.” Here, you can review the contacts you have blocked and choose to unblock or continue blocking them as desired.
Blocking and removing contacts on Skype gives you control over your communication and ensures a comfortable and safe experience. Whether you want to cut ties with someone you no longer wish to interact with or prevent unwanted contact from certain individuals, these features grant you the power to manage your connections on Skype.
Remember to use blocking and removal features responsibly, ensuring they are used only when necessary. It’s important to respect the platform’s community guidelines and treat others with courtesy and empathy.