
Checking for Available User Slots
Before adding a new user to your Nintendo Switch, it’s important to check if there are any available user slots. The Nintendo Switch has a limit on the number of users that can be created, which may vary depending on your system’s configuration and settings. To determine how many user slots are available, follow these steps:
- Turn on your Nintendo Switch and navigate to the Home screen.
- Select the “System Settings” option.
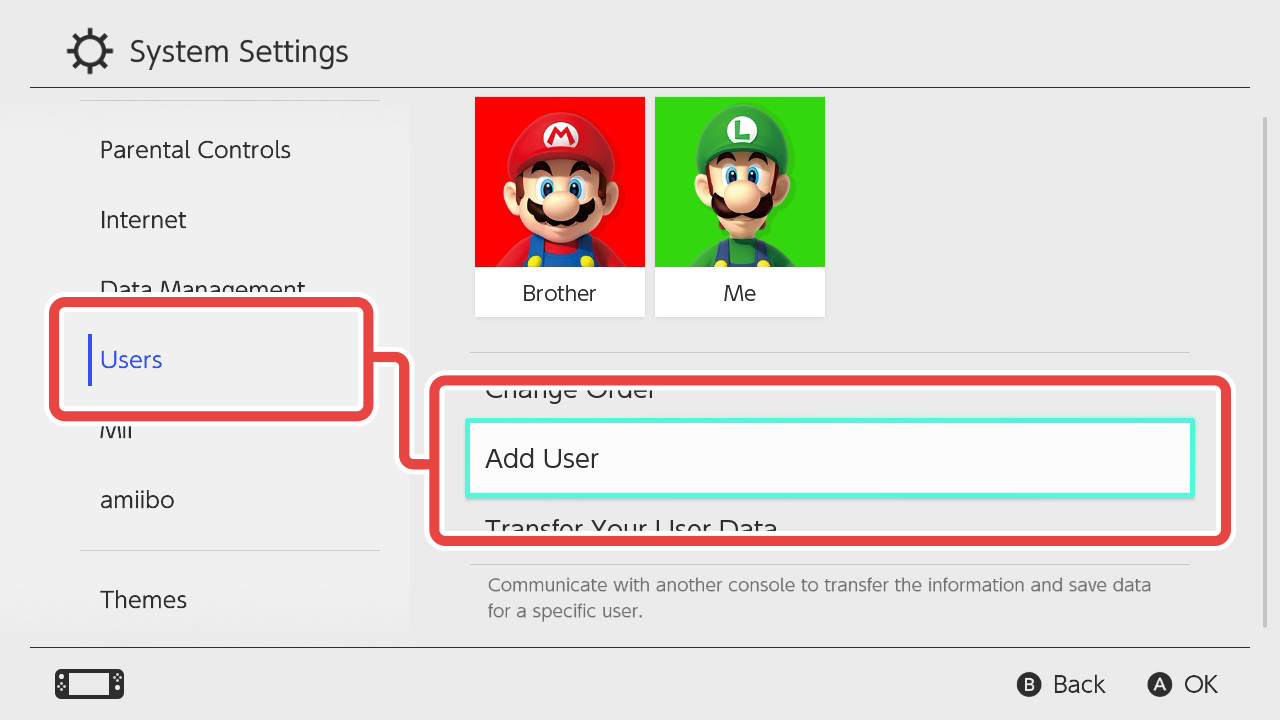
- Scroll down and choose “Users” from the menu.
- On the Users screen, you will see a list of existing users. If there are empty slots available, they will be displayed as blank icons.
If you see empty slots, it means that you can proceed with adding a new user. Keep in mind that each user requires a separate profile and set of save data. It’s also important to note that the number of user slots available may be limited by factors such as parental controls or system restrictions.
If all the user slots are already filled, you may need to delete an existing user to make room for a new one. However, be aware that deleting a user will also delete all associated save data and game progress. Make sure to back up any important data before proceeding with user deletion.
Now that you know how to check for available user slots, let’s explore the options for adding a new user to your Nintendo Switch.
Creating a New User
If you have an available user slot on your Nintendo Switch, you can proceed with creating a new user. The process is quick and straightforward. Here’s how you can do it:
- From the Home screen of your Nintendo Switch, select “System Settings.”
- Scroll down and choose “Users” from the menu.
- On the Users screen, select “Add User.”
- You will be presented with two options: “Create New User” and “Use Existing Nintendo Account.” Select “Create New User” to proceed.
- Enter a nickname for the new user. The nickname will be used to identify the user on the Nintendo Switch.
- Select a profile icon for the new user. You can choose from pre-existing icons or create a custom one.
- Once you’ve entered the nickname and selected a profile icon, select “OK” to confirm and create the new user.
After following these steps, the new user will be successfully created, and you will be redirected to the Users screen, where you can see the newly added user’s profile icon. You can now enjoy gaming and other features on your Nintendo Switch with the newly created user account.
It’s important to note that the new user account will be separate from other existing users on the system. Each user can have their own set of game save data, play preferences, and access to online features.
Now that you know how to create a new user, let’s explore the steps for adding an existing user to your Nintendo Switch.
Adding an Existing User
If you have a friend or family member who already has a user profile on their own Nintendo Switch, you can easily add them to your own system as a user. Follow these steps to add an existing user:
- Access the Home screen of your Nintendo Switch.
- Go to “System Settings.”
- Select “Users” from the menu.
- On the Users screen, choose “Add User.”
- Select “Use Existing Nintendo Account.”
- Enter the friend or family member’s Nintendo Account email address or user ID. If you don’t have this information, you can ask them for it.
- Press the “OK” button to proceed.
- You will be prompted to enter the password associated with the Nintendo Account.
- Once the correct password is entered, select “Sign In.”
- The user profile associated with the Nintendo Account will now be added to your Nintendo Switch.
It’s important to note that adding an existing user will allow them to access their save data, game progress, and purchased content on your Nintendo Switch. Similarly, if you add your user profile to someone else’s system, you’ll be able to access your own data from there. This feature is especially useful when you want to play games with friends or access your game collection on multiple devices.
Now that you know how to add an existing user, let’s explore the steps for adding a user without a Nintendo Account.
Using a Nintendo Account to Add a User
A Nintendo Account is not only essential for accessing online features and making purchases on the eShop, but it is also required to add a user to your Nintendo Switch. If the person you want to add as a user already has a Nintendo Account, follow these steps to add them:
- Access the Home screen of your Nintendo Switch.
- Go to “System Settings.”
- Select “Users” from the menu.
- On the Users screen, choose “Add User.”
- Select “Use Existing Nintendo Account.”
- Enter the friend or family member’s Nintendo Account email address or user ID. If you don’t have this information, you can ask them for it.
- Press the “OK” button to proceed.
- You will be prompted to enter the password associated with the Nintendo Account.
- Once the correct password is entered, select “Sign In.”
- The user profile associated with the Nintendo Account will now be added to your Nintendo Switch.
Using a Nintendo Account to add a user offers several advantages. It allows the added user to access their save data, game progress, and purchased content on your system. It also enables them to participate in online multiplayer, take advantage of cloud saves, and enjoy other online features available on their Nintendo Account.
If the person you want to add as a user does not have a Nintendo Account, no worries! You can still add them as a user without a Nintendo Account. Let’s explore how to do that next.
Adding a User Without a Nintendo Account
If the person you want to add as a user does not have a Nintendo Account, you can still add them to your Nintendo Switch. While they won’t have access to certain online features, they can still enjoy gaming and use the system. Follow these steps to add a user without a Nintendo Account:
- Access the Home screen of your Nintendo Switch.
- Go to “System Settings.”
- Select “Users” from the menu.
- On the Users screen, choose “Add User.”
- Select “Create New User.”
- Enter a nickname for the new user. This nickname will be used to identify the user on the Nintendo Switch.
- Select a profile icon for the new user. You can choose from pre-existing icons or create a custom one.
- Press the “OK” button to proceed.
Once you’ve completed these steps, the new user profile will be successfully created on your Nintendo Switch. They can use this profile to play games and access various system features. However, please note that certain online features, such as online multiplayer and cloud saves, require a Nintendo Account.
If the user wants to access these online features, they can create their own Nintendo Account and link it to their user profile on your Nintendo Switch. This can be done at a later time by going to the System Settings and selecting “Users” from the menu. From there, they can choose their user profile, select “Link Nintendo Account,” and follow the provided instructions to create a new Nintendo Account or link an existing one.
Now that you know how to add a user without a Nintendo Account, let’s explore how to set up user preferences and manage user profiles.
Setting up User Preferences
Once you’ve added a new user to your Nintendo Switch, you can customize their preferences to tailor the gaming experience to their liking. User preferences include language settings, parental controls, notification settings, and more. Here’s how you can set up user preferences:
- From the Home screen of your Nintendo Switch, select “System Settings.”
- Scroll down and choose “Users” from the menu.
- On the Users screen, select the user profile you want to customize.
- Under the user’s profile settings, choose “Change Settings.”
- From here, you can adjust various preferences according to the user’s needs. This may include language settings, region settings, time zone settings, and more.
- If the user is a child, you can set up parental controls to manage their access to games, online features, and screen time. Parental controls allow you to restrict content based on age ratings, set time limits, and monitor play activity.
- You can also customize notification settings for the user, such as enabling or disabling notifications for system updates, game updates, and friend requests.
- Once you’ve adjusted the preferences, select “OK” to save the changes.
Setting up user preferences ensures that each user has their own personalized gaming experience on the Nintendo Switch. This helps maintain individual play styles, language preferences, and age-appropriate content access.
Now that you’ve set up user preferences, let’s explore how to manage user profiles and delete a user when needed.
Managing User Profiles
As the number of users on your Nintendo Switch grows, you may need to manage and organize user profiles to ensure smooth and efficient usage. Managing user profiles involves actions such as editing profiles, transferring data, and customizing settings. Here’s how you can manage user profiles:
- Access the Home screen of your Nintendo Switch.
- Go to “System Settings.”
- Select “Users” from the menu.
- On the Users screen, you will see a list of existing user profiles.
- To edit a user profile, select the profile you want to modify, then choose “Change Settings.” From here, you can make changes to the user’s preferences, including language settings, parental controls, and notification settings.
- If you want to transfer data from one user profile to another, select the profile you wish to transfer data from, then choose “Transfer Your User and Save Data.” Follow the on-screen prompts to complete the transfer process.
- To customize a user’s profile icon, nickname, or Mii character, select the profile you want to customize, choose “Change Icon,” “Edit Name,” or “Edit Mii” respectively.
- If you want to rearrange the order of user profiles on the Home screen, select “Change Order” and drag the profiles into the desired sequence.
Managing user profiles allows you to organize and maintain personalized settings for each user on your Nintendo Switch. Whether it’s fine-tuning preferences, transferring data, or customizing profiles, managing user profiles helps ensure a seamless and enjoyable gaming experience for everyone.
Now that you know how to manage user profiles, let’s explore how to delete a user when necessary.
Deleting a User
If you no longer need a user profile on your Nintendo Switch, you can delete it to free up space and remove any associated save data. It’s important to note that deleting a user profile is irreversible and will permanently delete all save data, play activity, and settings associated with that user. Here’s how you can delete a user:
- Access the Home screen of your Nintendo Switch.
- Go to “System Settings.”
- Select “Users” from the menu.
- On the Users screen, choose the user profile you wish to delete.
- Scroll down and select “Delete User.”
- Confirm the deletion by selecting “Delete” on the confirmation screen.
- Enter the password associated with your Nintendo Account to verify the deletion.
After confirming the deletion, the user profile will be permanently removed from your Nintendo Switch. All associated save data, play activity, and settings will be deleted, so it’s important to back up any necessary data before deleting a user profile. Additionally, any purchased content linked to the deleted user profile will no longer be accessible on the system.
Deleting a user profile is a useful option when you want to declutter your Nintendo Switch or remove profiles that are no longer in use. However, exercise caution when deleting user profiles to avoid unintended data loss.
Now that you know how to delete a user, you have the knowledge to manage user profiles effectively and optimize your Nintendo Switch experience.